Configuring Platform SSO for macOS (Workforce only)
macOS Platform single sign-on (PSSO) integrates a user’s local Mac login session with a Ping Identity IdP, automatically extending authentication to browser-based and native applications so users don’t have to sign on separately to each app.
macOS Platform SSO leverages Apple’s Authentication Services framework as a native OS-level SSO mechanism and requires Apple Silicon hardware. Secure Enclave authentication stores credentials in hardware rather than software. This reduces the risk of credential theft, while enabling phishing-resistant authentication and supporting your organization’s security and compliance requirements.
|
What’s involved
Setting this up requires configuring three components: your MDM system (to push Platform SSO settings to managed Macs), a workforce PingOne environment (to connect PingFederate), and PingFederate itself.
| Step | What you do | Who does it |
|---|---|---|
Review device, software, and enrollment requirements and limitations. |
MDM administrator |
|
Configure the PingFederate side of the Platform SSO connection, including connecting PingOne with PingFederate. |
PingFederate administrator |
|
Push the required MDM configuration profiles to devices. |
MDM administrator |
1. Requirements and important information
Requirements
Confirm the following requirements before you start:
| Requirement | Details |
|---|---|
macOS version |
15.4 Sequoia or later |
Hardware |
Apple Silicon Mac (requires Secure Enclave for key operations). |
PingID desktop app |
PingID desktop app 2.0 or later. Download the latest version here. |
PingOne for Workforce |
PingOne for Workforce license |
PingFederate |
Requires PingFederate 13.1 or later. |
Mac Platform SSO Adapter |
1.0 or later |
MDM solution |
Device enrollment in a mobile device management (MDM) solution. Mac Platform SSO supports the use of any MDM vendor that implements the Apple Platform SSO protocols. |
Limitations and important information
Be aware of the following known limitations and configuration requirements when configuring Platform SSO for macOS:
-
PingFederate Base URL format: The PingFederate Base URL must not include a port number. Verify this in PingFederate under System > Server > Federation Info.
-
Token and user mapping names: The claim names you define in the OIDC policy (for example,
preferred_username,name) must exactly match theTokenToUserMappingvalues in your MDM payload. Any mismatch silently breaks the user mapping. -
Authentication policy order: The Mac Platform SSO adapter must be the first adapter step in your PingFederate authentication policy. Any adapter preceding it (for example, a Reference ID Adapter) prevents Platform SSO from functioning.
-
Associated domains format: Each entry in the
AssociatedDomainsarray must use theauthsrv:prefix followed by the host domain only — nohttps://, no trailing slash, no port. For example:authsrv:pf.example.com. Learn more in MDM payload 2. -
Browser SSO and cookies: When the SSO extension intercepts a browser authorization request, the browser doesn’t send cookies in the request header as it would when calling the server directly. This prevents PingFederate from resuming state using cookie-based values.
2. Configuring a Ping Identity IdP (PingFederate)
Platform SSO requires a Ping Identity IdP to handle several new capabilities: issuing nonces, validating Apple device attestation, storing registration data in a PingOne workforce environment, processing the JSON Web Token (JWT) bearer grants that Platform SSO clients send during login, and configuring an authentication policy to make use of the Platform SSO session. The steps in this section describe how to configure each of these capabilities.
Configuring a PingOne connection
PingFederate uses PingOne to store the device and user registration data that Platform SSO flows create. You must set up the connection between the two products before you configure PingFederate. This generates the credentials you’ll need in the next step.
-
To connect PingFederate to PingOne, follow the steps in Connecting PingFederate to PingOne.
Importing the Apple Enterprise Attestation Root CA
The Platform SSO adapter validates Apple-signed attestation data that devices send during registration. You must therefore import the root certificate issued by Apple Enterprise Attestation Root certificate authority (CA) before configuring the Platform SSO adapter.
-
Go to Apple PKI.
-
Right-click Apple Enterprise Attestation Root CA and select Save Link As.
-
Save the file and confirm it has a
.pemextension. -
In the PingFederate admin console, go to Security > Certificate & Key Management > Trusted CAs.
-
Click Import and select the
.pemfile you downloaded. -
Click Next, then click Save.
Learn more in Manage trusted certificate authorities.
Adding the Platform SSO scope
The urn:apple:platformsso scope identifies requests from the Platform SSO flow. Adding it as an exclusive scope means only the OAuth clients you configure for Platform SSO can use it.
-
In the PingFederate admin console, go to System > OAuth Settings > Scope Management.
-
Select the Exclusive Scopes tab and then click Add Exclusive Scope.
-
Enter the following values:
Field Value Name
urn:apple:platformssoDescription
Apple Platform SSO scopeDynamic
Leave unchecked
-
Click Save.
Learn more in Scopes and scope management.
Adding a data store
PingFederate requires a data store to verify user credentials through the Password Credential Validator (PCV), and to retrieve user attributes (such as username and preferred_username) for the ID token during token contract fulfillment. Mapping these local attributes ensures they are available for selection when configuring the OIDC policy.
You can add any supported enterprise directory. The following steps use a PingOne data store as the example repository.
|
Regardless of where your primary user attributes are stored, PingOne always acts as the system of record for the underlying cryptographic identity data that macOS Platform SSO generates during device and user registration. |
-
In the PingFederate admin console, go to System > Data Stores, and click Add New Data Store.
-
In the Type list, select PingOne Data Store.
-
Create and map the following attributes:
Local Attribute PingOne Attribute first_name/name/givenlast_name/name/familyemail/emailusername/usernamepreferred_username/preferred_username -
In the PingOne Environment field, select the PingOne environment name, and then click Save.
Creating a Password Credential Validator (PCV)
PingFederate requires a Password Credential Validator (PCV) to verify user credentials against the backend directory where your user accounts reside.
You can configure the PCV to connect to any supported enterprise directory. The following steps use a PingOne data store as the example repository.
-
In the PingFederate admin console, go to System > Data Stores > Password Credential Validators, and click Create New Instance.
-
Enter an Instance Name and Instance ID.
-
In the Type field, select PingOne Credential Validator, and click Next.
-
Select the data store you created in the previous step.
-
Click Next, and Save.
Configuring an access token management instance
The access token management (ATM) instance defines how PingFederate structures and signs tokens throughout the Platform SSO flow. The adapter uses this instance to validate access tokens during registration; the identity provider (IdP) connection uses it to issue tokens during login. The client, adapter, and IdP connection must all reference the same ATM instance.
-
In the PingFederate admin console, go to Applications > Access Token Management.
-
Click Create New Instance.
-
In the Type list, select JSON Web Tokens and then click Next.
-
Select the Use Centralized Signing Key checkbox.
-
In the JWS Algorithm list, select RSA using SHA-256.
-
Select Show Advanced Fields, enter the following claim values, and then click Next:
Field Value Client ID Claim Name
client_idScope Claim Name
scopeSpace Delimit Scope Values
Deselect the checkbox.
Issuer Claim Value
Your PingFederate instance URL, for example:
https://pf.example.comAudience Claim Value
The OAuth Client ID as configured in the OAuth client. You’ll create this client in a subsequent step.
-
In the Access Token Attribute Contract tab, use the Extend the Contract field and the Add button to add the
subattribute. -
Click Save.
Learn more in Configuring an access token management instance.
Creating an OpenID Connect policy
The OpenID Connect (OIDC) policy defines the specific user attributes ("claims") that the ID token returns. You’ll need to map the user’s profile data to the following standard claims:
-
preferred_username: The user sign-on ID. -
name: The user’s full name.
|
Although it’s possible to use custom claim names, the strings you define in this section must match the |
-
In the PingFederate admin console, go to Applications > OAuth > OpenID Connect Policy Management, and click Add Policy.
-
Enter a Policy ID and name for the policy.
-
In the Access Token Manager field, select the ATM that you created earlier.
-
Select the checkbox for the following options, and then click Next:
-
Include User Info in ID Token.
-
Return ID Token on Refresh Grant.
-
-
In the Attribute Contract tab, make sure the following attributes are included, and then click Next:
-
sub -
name -
preferred_username
-
-
In the Attribute Scopes tab Scope list:
-
In the OAuth Exclusive Scopes select the
urn:apple:platformssoscope. -
Select the checkbox for the
nameandpreferred_usernameattributes, click Add, and then click Next.
-
-
In the Attribute Sources & User Lookup tab, select Add Attribute Source.
-
In the Attribute Source ID field, enter
user_directory, and in the Attribute Source Description field, enter PingOne Datastore. -
In the Active Data Source list select the PingOne Data Source that you created earlier.
-
In the Configure Data Source Filters:
-
Attribute:
username -
Value:
${sub}
-
-
-
In the Contract Fulfillment tab, select the following options:
Attribute Contract Source Value subAccess tokensubpreferred_usernamePingOne Datastorepreferred_usernamenameExpression#val = #this.get("ds.user_directory.first_name") + " " + #this.get("ds.user_directory.last_name"). NOTE: This expression constructs the user’s full name by concatenating the first_name and last_name attributes from the user_directory source defined in the previous step. -
Click Save.
Configuring an OAuth client for Platform SSO
The OAuth client represents the PingID desktop app in PingFederate. During device registration, it handles the initial OpenID Connect (OIDC) flow and subsequent token refresh. When the user signs on, it processes the JWT bearer grant that the PingID desktop app uses to establish the Platform SSO session.
|
You must create a new OIDC client for use with Platform SSO. |
-
In the PingFederate admin console, go to Applications > OAuth Clients and click + Add Client.
-
Enter an OAuth Client ID and Name.
-
In the Client Authentication field, select None.
-
In the Grant Types section, enable the following grant types:
-
Authorization Code
-
Refresh Token
-
Assertion Grants
-
-
In the OAuth Settings section, do the following:
-
Select Allow Exclusive Scopes and then select the
urn:apple:platformssoscope. -
In the ID Token Signing Algorithm field, select one of the following options:
-
RSA using SHA-256 (
RS256) -
RSA using SHA-384 (
RS384) -
RSA using SHA-512 (
RS512) -
RSASSA-PSS using SHA-256 (
PS256) -
RSASSA-PSS using SHA-384 (
PS384) -
RSASSA-PSS using SHA-512 (
PS512) -
ECDSA using P256 Curve and SHA-256 (
ES256) -
ECDSA using P384 Curve and SHA-384 (
ES384) -
ECDSA using P521 Curve and SHA-512 (
ES512)
-
-
In the OpenID Connect Policy field, select the OpenID Connect policy you created in the previous section.
-
In the Redirect URIs field, enter
pingid-desktop://callback. -
In Advanced Settings, select Require Proof Key For Code Exchange (PKCE).
-
-
In the Token Manager, Grant, Session Settings section, enter the following information. The details here must match the ATM you configured earlier.
-
Default Access Token Manager: Select the ATM you configured earlier.
The client must support a full OIDC flow and issue both an access token and an ID token. The access token’s
subclaim must match the ID token’spreferred_usernameclaim. -
-
Save the changes.
Learn more in Configuring OAuth clients.
Configuring the Mac Platform SSO adapter
The Platform SSO adapter handles device and user registration, as well as nonce issuance and validation. It serves the registration endpoints that the PingID desktop app calls, validates attestation data from devices, and stores registration information in PingOne. It also validates the Mac’s Platform SSO session, using it to sign in to native and web apps.
-
In the PingFederate admin console, go to Authentication > IdP Adapters.
-
Click Create New Instance.
-
On the Type tab:
-
Enter an Instance Name and Instance ID of your choice.
-
In the Type list, select Mac Platform SSO Adapter, and click Next.
-
-
On the IdP Adapter tab:
-
(Optional) In the Scopes area, click Add a new row to 'Required Bearer Access Token Scopes' to enter any additional scopes that must be included in the access token during registration.
-
All the scopes listed in the scopes area must be present in the access token presented during registration. If any scopes are missing, the registration request will fail.
-
The
urn:apple:platformssoscope is always required by the adapter, even if not specified here.
-
-
Select the PingOne environment you connected to PingFederate.
-
Select the Apple Enterprise Attestation Root CA you imported earlier.
-
In the Access Token Manager list, select the ATM instance you configured.
-
In the Client ID of the PingID desktop app field, enter the client ID.
-
If you’re using Automated Device Enrollment (ADE), select Show Advanced Fields and in the Password Credential Validator (PCV) field, select the PCV you want to use during the Mac’s setup process.
-
-
(Optional) To enable device enrollment without a user needing to enter a username and password, generate and enter a Device Registration Token:
-
The registration token enables device registration with the IdP without requiring the user to enter their IdP credentials.
-
Save the token that’s generated in PingFederate, as it only appears once.
-
To generate a token, on the Actions tab, click Generate Device Registration Token.
-
Copy the generated Result Value.
-
Click Previous and on the IdP Adapter tab click Advanced Fields and enter the registration token into the Device Registration Token field.
-
Save the registration token as you’ll need to enter it in the
registrationTokenfield as part of the Extensible SSO payload in the MDM. Learn more in configuring MDM profiles.
-
-
On the Extended Contract tab, click Next.
-
On the Adapter Attributes tab, select the Pseudonym checkbox next to Username, then click Next.
-
On the Adapter Contract Mapping tab, click Next.
-
On the Summary tab, note the Register Device Endpoint, Register User Endpoint, and Nonce User Endpoint values. You’ll need these when configuring the PingID desktop app.
These endpoints are used by the PingID desktop app to communicate with PingFederate. Make sure the Base URL provided in your MDM configuration matches the base URL defined here (learn more in configuring macOS MDM profiles). The PingID desktop app automatically discovers the full paths based on the Base URL.
-
Click Save.
Learn more in Managing IdP adapters.
Configuring the Mac Platform SSO JWT Bearer Grant Processor
During Platform SSO login, the PingID desktop app sends a signed JWT to PingFederate’s token endpoint using the JWT bearer grant type. The Mac Platform SSO JWT Bearer Grant Processor validates that JWT, confirming the user and device are registered and the signatures are correct.
-
In the PingFederate admin console, go to Authentication > OAuth > JWT Bearer Grant Processors.
-
Click Create New Instance and enter an Instance Name and Instance ID.
-
In the Type list, select Mac Platform SSO JWT Bearer Grant Processor.
-
Select the Platform SSO adapter you configured earlier, and then click Save.
Learn more in JWT bearer grant processors.
Configuring an IdP connection for Platform SSO
The IdP connection ties JWT bearer grant processing to PingFederate’s token endpoint. When the PingID desktop app sends a Platform SSO login request, PingFederate uses this connection to process the JWT, retrieve the user’s registered keys from PingOne, and issue the ID token and refresh token that macOS stores in the Secure Enclave.
-
In the PingFederate admin console, go to Authentication > IdP Connections.
-
Click Create Connection.
-
In the Type list, select JWT Bearer Grant Processor.
-
Select the JWT Bearer Grant Processor instance you configured earlier, and click Next.
-
In the General Info tab, enter the Partner’s Entity ID (Connection ID) and Connection Name.
The connection’s Partner’s Entity ID (Connection ID) must match the client ID of the OAuth client you configured for Platform SSO.
Learn more in Identifying the partners.
-
In the JWT Bearer Grant Processor Attribute Mapping tab, select Configure JWT Bearer Grant Processor Attribute Mapping.
-
In the Attribute Contract tab, use the Extend the Contract field and the Add button to add relevant attributes.
-
In the Access Token Manager Mapping tab, click Create New Access Token Manager Mapping and select the ATM that you created earlier.
The IdP connection must reference the same ATM instance as the OAuth client for Platform SSO, and the Platform SSO adapter you configured earlier.
-
-
Click Save.
Learn more in Managing IdP connections.
Configuring an OAuth client set authentication selector
Create an OAuth client set authentication selector. The selector identifies requests from the PingID desktop app by matching its Client ID in the authentication policy.
-
In the PingFederate admin console, go to Authentication > Policies > Selectors, and click Create New Instance.
-
Enter an Instance Name and Instance ID, and in the Type field, select OAuth Client Set Authentication Selector, and then click Next.
-
In the Authentication Selector tab, click Add a new row to 'Clients'.
-
In the Client ID field, select the OAuth client you created earlier, click Update and then click Save.
Adding the Mac Platform SSO adapter to an authentication policy
|
The Mac Platform SSO must be the first adapter step in your PingFederate authentication policy. If another adapter (for example, a Reference ID Adapter) precedes it, Platform SSO won’t function. |
Adding the Platform SSO adapter to an authentication policy is the final Platform SSO-specific step.
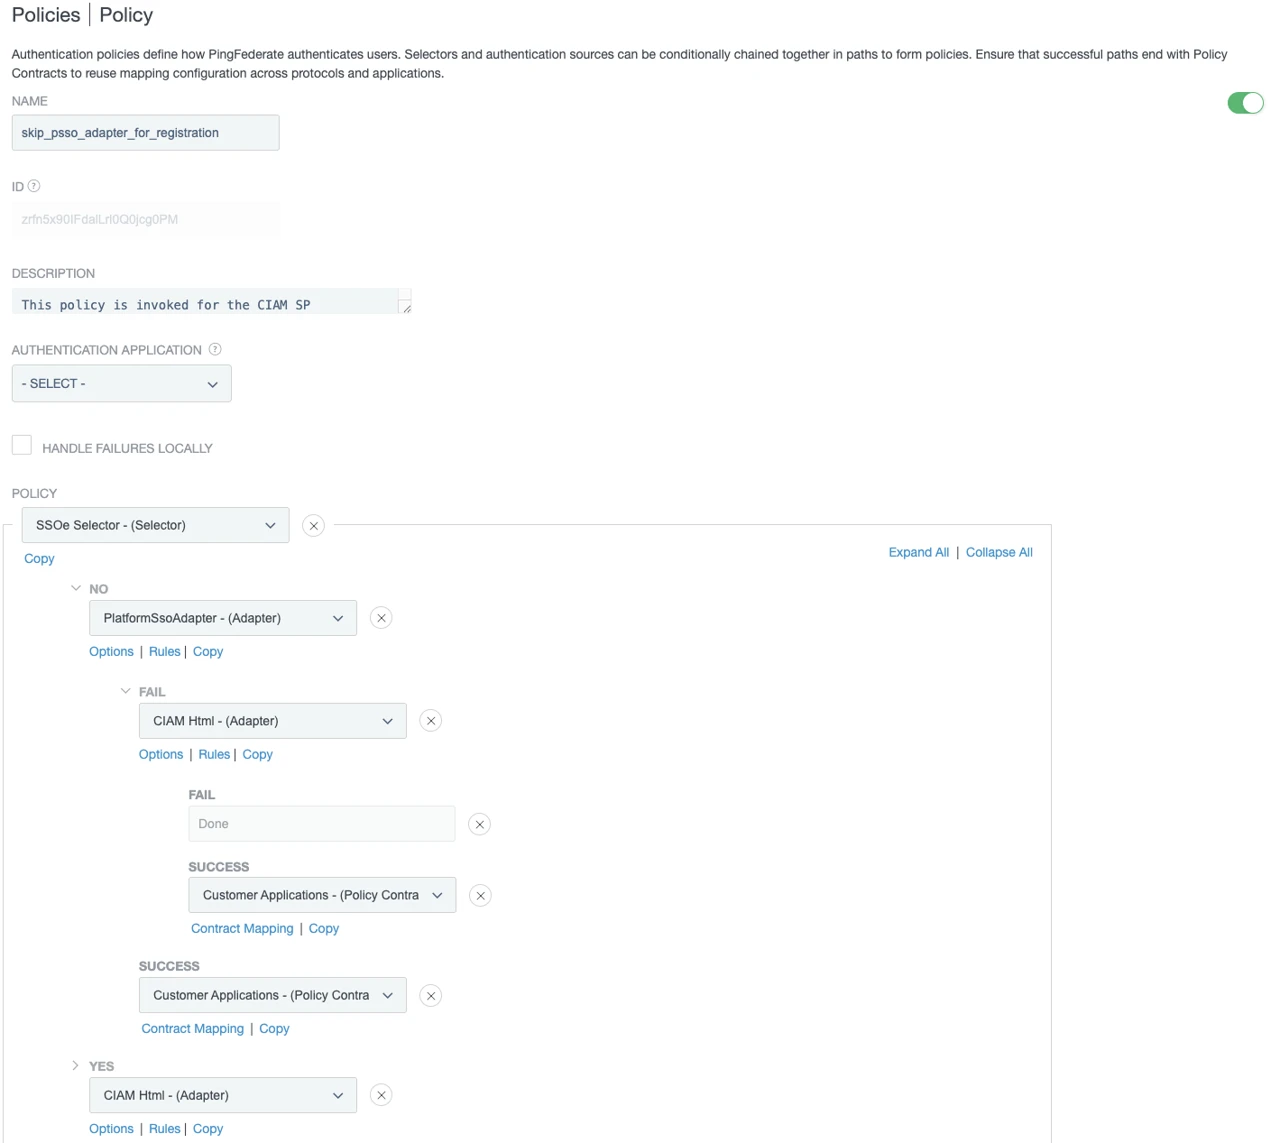
The following example shows the policy using the OAuth client set selector to distinguish between the initial device setup traffic and regular SSO traffic. Requests coming directly from the PingID desktop app (which only occurs during initial registration or key repair) bypass the Platform SSO adapter and flow straight to an interactive sign-on form. Standard application traffic is routed to the Platform SSO adapter first, with a fallback to the login form if a valid platform session does not exist.
-
In the PingFederate admin console, go to Authentication > Policies > Policies.
-
Make sure the IdP Authentication Policies checkbox is selected.
-
Click Add Policy, or select the policy you want to edit.
-
Enter a Name and Description for the policy.
-
In the Policy list, select Selectors and choose the OAuth Client Set Authentication selector you configured in the previous section.
-
In the Policy tree Yes branch:
-
Select IdP Adapters and select the standard interactive login form adapter (for example, CIAM Html) to force form-based credential entry.
-
In the adapter’s Success path select Policy Contracts and select the target policy contract, and configure the Fail path to Done.
-
-
Configure the No branch:
-
Select IdP Adapters and then select your Mac Platform SSO Adapter instance.
-
In the Platform SSO adapter’s Success path, select Policy Contracts and select the target policy contract.
-
In the Platform SSO adapter’s Fail path select IdP Adapters, and choose the interactive login form adapter to act as the password fallback mechanism.
-
In the fallback form adapter’s Success path, select Policy Contracts and select your target policy contract.
-
Configure the fallback form adapter’s Fail path to Done.
-
-
Complete the contract fulfillment mappings for all designated success paths, and then click Save.
Next steps in PingFederate
For your users to access their apps using Platform SSO, complete the following tasks in PingFederate:
-
Configure a policy contract grant mapping: To enable PingFederate to issue OAuth tokens, connect the authentication policy contract to the Access Token Management (ATM) instance.
Learn more in Managing authentication policy contract grant mapping.
-
Configure a default access token mapping: Map attributes from the policy contract into the access token so PingFederate can populate tokens at issuance.
Learn more in Configuring access token mapping.
-
Configure an SP connection for Platform SSO apps: To provide PSSO-based access, each app must have an SP connection in PingFederate that references the same policy contract you configured in the authentication policy.
Learn more in SP connection management.
3. Configuring macOS MDM profiles
You deploy macOS Platform SSO by installing the PingID desktop app and pushing a configuration profile to your Mac devices. The configuration relies on two Apple MDM payloads working together:
-
Extensible SSO payload: registers the PingID desktop app’s Platform SSO extension with macOS and provides it with the OIDC values it needs to connect to the Ping Identity IdP.
-
Associated Domains payload: authorizes macOS to route authentication requests to the SSO extension.
|
Payload 1: Extensible SSO (com.apple.extensiblesso)
This payload registers the Platform SSO extension with macOS, enables Secure Enclave authentication, and passes the Ping Identity IdP configuration to the PingID desktop app.
Core extension settings
| Key | Data type | Value | Description |
|---|---|---|---|
|
|
|
Specifies the payload type for the SSO extension. |
|
|
|
The bundle identifier of the Platform SSO extension. Must match exactly. |
|
|
|
The Apple Developer Team ID that signed the extension. An incorrect value prevents the extension from loading. |
|
|
|
The authentication method. Set to |
|
|
Array of URLs |
The authentication endpoints macOS routes to the SSO extension. Enter your IdP base URL, for example: |
|
|
Enter the value from the Ping Identity IdP |
(Optional) Use this token as part of the device registration with the IdP, without requiring the user to enter their IdP credentials. In PingFederate, generate the registration token as part of the Platform SSO adapter configuration. |
|
|
String |
The display name shown to users during authentication (usually the organization name). Enter a user-friendly name. |
|
Boolean |
|
Set to |
|
Boolean |
|
Enables shared device key architecture required for device attestation verification. Must be set to |
|
|
Must be set to |
This attribute represents the SSO account username when using Platform SSO. The attribute value is defined in the OIDC ID Token and sent as part of the registration flow. |
|
|
Must be set to |
This attribute represents the user account full name in the account registration flow. The attribute value is defined in the OIDC ID Token and sent as part of the registration flow. |
|
Boolean |
Must be set to |
An attestation, which provides a strong assurance that the Mac is a genuine Apple device. The attestation includes device identifiers (UDID and serial number). |
ExtensionData settings
Apple uses the ExtensionData dictionary to pass your OIDC connection values and optional app targeting configuration directly to the PingID desktop app.
| Key | Data type | Value | Description |
|---|---|---|---|
|
|
String |
The OIDC client identifier configured in the Ping Identity IdP. |
|
|
URL |
The base URL for all Platform SSO endpoints. For example: |
|
|
String |
The audience value used in token requests, as configured in the Ping Identity IdP. For example: |
|
|
UUID |
A unique identifier for this Platform SSO configuration. In PingFederate, this is the UUID provided on the configured Mac Platform SSO adapter instance. |
|
Boolean |
|
Set to |
|
|
Array of bundle identifiers |
Applications allowed to use Platform SSO. For example: |
|
|
Array of bundle identifiers |
Applications blocked from using Platform SSO. For example: |
(Optional) Automated Device Enrollment (ADE)
Activate and enforce Platform SSO during unattended Automated Device Enrollment (ADE) to run the Platform SSO registration flow as part of the initial device enrollment phase.
| Key | Data type | Value | Description |
|---|---|---|---|
|
Boolean |
|
Forces the Platform SSO registration sequence to execute after initial MDM device enrollment, but before the user signs in for the first time. |
|
Boolean |
|
Controls whether Platform SSO is allowed to create the first local macOS account during ADE by using the user attributes retrieved from the IdP. This attribute forces the insertion of the user’s full name and account name, as defined in the |
<dict>
    <key>AuthenticationMethod</key>
    <string>UserSecureEnclaveKey</string>
    <key>ExtensionIdentifier</key>
    <string>com.pingidentity.pingid.desktop.pingssoe</string>
    <key>PayloadType</key>
    <string>com.apple.extensiblesso</string>
    <key>TeamIdentifier</key>
    <string>6U3RF4C84N</string>
    <key>RegistrationToken</key>
    <string>YOUR_REGISTRATION_TOKEN</string>
    <key>URLs</key>
    <array>
        <string>https://platformsso.pingidentity.com</string>
    </array>
    <key>ExtensionData</key>
    <dict>
        <key>AppPolicy</key>
        <dict>
            <key>AllowManagedAppsOnly</key>
            <false/>
            <key>AppAllowList</key>
            <array>
                <string>com.apple.Safari</string>
                <string>com.example.browser</string>
            </array>
            <key>AppBlockList</key>
            <array>
                <string>com.example.unsupportedapp</string>
            </array>
        </dict>
        <key>PSSOConfiguration</key>
        <dict>
            <key>Audience</key>
            <string>https://platformsso.pingidentity.com</string>
            <key>BaseURL</key>
            <string>https://platformsso.pingidentity.com</string>
            <key>ClientID</key>
            <string>pingid_platform_sso</string>
            <key>InstanceID</key>
            <string>RQc_rSMhuXxxxxxxxxxxxxxxxxxxxxx</string>
        </dict>
    </dict>
    <key>PlatformSSO</key>
    <dict>
        <key>AccountDisplayName</key>
        <string>Ping Identity</string>
        <key>AllowDeviceIdentifiersInAttestation</key>
        <true/>
        <key>AuthenticationMethod</key>
        <string>UserSecureEnclaveKey</string>
        <key>EnableCreateFirstUserDuringSetup</key>
        <true/>
        <key>EnableRegistrationDuringSetup</key>
        <true/>
        <key>UseSharedDeviceKeys</key>
        <true/>
        <key>TokenToUserMapping</key>
        <dict>
            <key>AccountName</key>
            <string>preferred_username</string>
            <key>FullName</key>
            <string>name</string>
        </dict>
    </dict>
</dict>
Payload 2: Associated Domains (com.apple.developer.associated-domains)
This payload authorizes macOS to route authentication traffic to the PingID desktop app’s SSO extension. Without it, Safari and the system login window ignore the extension entirely.
| Key | Data type | Value | Description |
|---|---|---|---|
|
|
|
Specifies the associated domains payload type. |
|
|
|
The application identifier for PingID desktop app. This value is fixed, should be entered as shown, and must match exactly. |
|
|
Array of domains |
The Fully Qualified Domain Name (FQDN) of the identity provider that triggers the SSO extension for authentication. Enter each domain using the Don’t include |
<dict>
  <key>PayloadType</key>
  <string>com.apple.developer.associated-domains</string>
  <key>Configuration</key>
  <array>
    <dict>
      <key>ApplicationIdentifier</key>
      <string>6U3RF4C84N.com.pingidentity.pingid.desktop</string>
      <key>AssociatedDomains</key>
      <array>
        <string>authsrv:platformsso.pingone.com</string>
      </array>
    </dict>
  </array>
</dict>
Verifying the deployment
To verify deployment is complete, confirm each of the following after you push the MDM profiles to your devices.
Device and user registration
-
The PingID desktop app registers the device successfully.
-
The device and user registration flow completes successfully.
-
(ADE flow only) Local account creation completes successfully.
-
Platform SSO registration completes successfully: In Settings > Users & Groups > User > Platform Single Sign-on section, check that both Registration and Tokens show a green icon.
SSO behavior
-
Native app SSO authentication completes successfully: apps that use the SSO extension obtain tokens without prompting the user to sign on again.
-
Safari SSO authentication completes successfully: browser-initiated authorization flows authenticate through the extension rather than presenting the user with a sign on form.