Using the PingID Device Trust agent
The PingID Device Trust predictor checks if a device is trusted by validating the trust created during the installation of the PingID Device Trust agent.
Learn more about the PingID Device Trust risk predictor in PingID device trust.
Before you begin
To include the PingID Device Trust risk predictor in a risk policy, your users must have:
-
A PingOne Workforce environment.
-
Install the PingID Device Trust agent on all of your users computers.
Basic steps
To use the PingID Device Trust risk predictor in risk evaluations, perform the following steps:
-
In a PingOne Workforce environment:
-
Create a worker application.
For maximum security, assign the worker application a custom PingOne role that contains only the 'Accessing Device' permissions.
Learn more about creating custom roles in Administrator Roles.
-
Add the PingID Device Trust risk predictor to one of your risk policies.
-
-
Using PingFederate (minimum version 11.3) or PingOne DaVinci, create a flow that uses the risk policy with the PingID Device Trust predictor, and follow the additional configuration steps required.
-
Ensure that the PingID Device Trust agent is installed on your users' computers.
Designing flows with PingID Device Trust predictor in PingFederate
Before designing the flow:
-
Download and install version 1.0.5 or later of the PingOne Protect Integration Kit.
-
Restart PingFederate.
Designing the flow:
-
In your HTML Form Adapter:
-
Go to Manage CAPTCHA and Risk Providers.
The steps in this section refer to the provider. Alternatively, enable and configure the PingID Device Trust agent in the configuration of the PingOne Protect Adapter.
-
Select the existing PingOne Protect provider, or create a new one.
-
In the Instance Configuration, click Show Advanced Fields and then select Collect PingID Device Trust attributes.
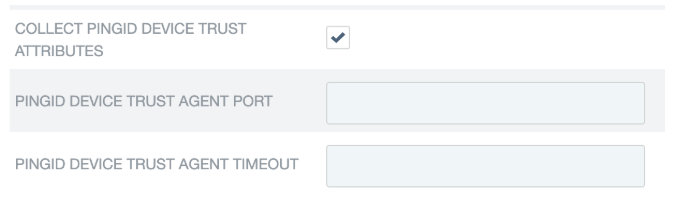
-
If you don’t want the agent to use the default port (9400), use the PingID Device Trust agent port field to specify the port to use.
-
If you don’t want to use the default agent timeout (1000 ms), use the PingID Device Trust agent timeout field to specify the timeout to use.
-
Save.
-
-
Design your flow, using the possible risk evaluation responses for policies with the PingID Device Trust predictor.
-
Consider the risk level calculated for the trust predictor and the detailed data in the response under
details.device.agent. If the risk level calculated for the trust predictor is HIGH, thedetails.device.agentobject isn’t included in the response. Learn more about the agent-related fields included in the response in the Details data model table in the API documentation.
Designing flows with PingID Device Trust predictor in DaVinci
Carry out the following steps so that the risk evaluation in your flow receives the data from the trust agent:
-
In your flow with risk evaluation, locate the HTTP connector where you added the skrisk component to the flow (as described in PingOne Protect Connector) and open the Update Component window for the skrisk component.
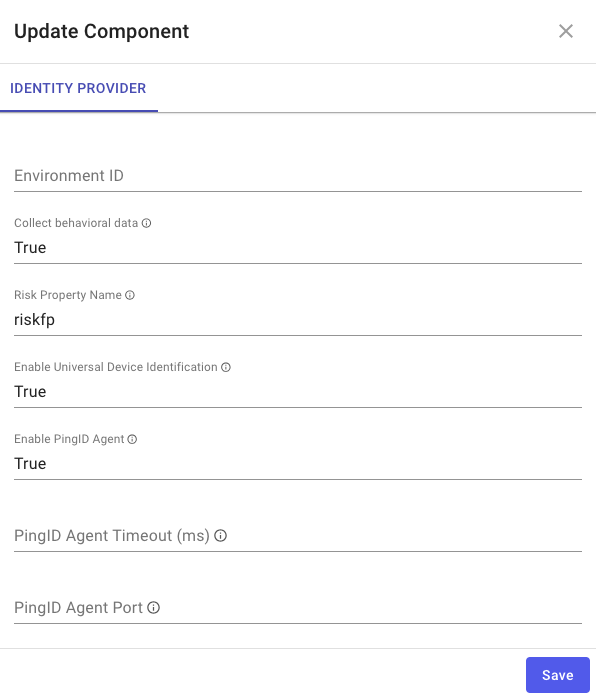
-
Set Enable PingID Agent to True.
-
If you don’t want to use the agent timeout (1000 ms), use the PingID Agent Timeout field to specify the timeout to use.
-
If you don’t want the agent to use the default port (9400), use the PingID Agent Port field to specify the port to use.
You can also enable and configure the PingID Device Trust agent using the Form connector (General tab, after enabling Device Profiling).
-
-
Continue designing your flow, using the possible risk evaluation responses for policies with the trust predictor.
-
Consider the risk level calculated for the trust predictor and the detailed data that’s included in the response under
details.device.agent. Note that thedetails.device.agentobject isn’t included in the response if the risk level calculated for the Trust predictor is HIGH. Learn more about agent-related fields included in the response in the Details data model table in the API documentation.
Installing the PingID Device Trust agent on Windows computers
Install the PingID Device Trust agent on a Windows computer with a GUI-based installation or with a command-line installation.
The GUI-based installation is only for testing purposes. Only install the agent on user computers with the CLI installation.
The installation script is read only once during the setup process. It isn’t referenced again after installation.
The agent is installed to: C:\Program Files\Ping Identity\PingID\Device Trust. You can’t define a custom path for installation.
Installation requirements
-
Administrator privileges for the computer
-
Windows 10 (64-bit) or Windows 11
-
TPM 2.0 support
GUI installation
-
Download the GUI-based installation from the PingID download page.
-
Run the downloaded .exe file to launch the installation wizard.
-
On the first screen of the wizard (Device Trust Agent Settings), enter the mandatory information.
-
If your company uses a proxy, click Configure Proxy and enter the necessary proxy information.
-
Click Next to proceed to the Optional Settings page
-
To run a custom script to provide the risk evaluation with additional data for the computer, enter the path to the relevant batch file. Also enter the script execution mode, which controls how often the script runs and how its output is cached. Learn more about the use of custom scripts with the PingID Device Trust predictor in Custom scripts.
-
Use the Custom domain field if sign-on flows are going to be initialized from a domain other than the PingOne base domain.
-
If you don’t want the agent to listen on the default port - 9400, enter a different port number.
CLI installation
-
Download the installation executable from the PingID download page.
-
From the command line, run the executable with the necessary parameters:
PingIdDeviceTrust_<version>.exe /LOG=installation.log /VERYSILENT /SUPPRESSMSGBOXES /PingOneBaseDomain="<PingOne base domain>" /EnvironmentID="<the environment id>" /ClientID="<the client id>" /ClientSecret="<the client secret>" /NORESTART
Mandatory parameters
| Parameter | Description |
|---|---|
|
The PingOne base domain, for example, pingone.com |
|
The ID of the environment that contains the worker app and the risk policy |
|
The client ID for the worker app |
|
The client secret for the worker app |
Optional parameters
| Parameter | Description |
|---|---|
|
The location of installation log file. If left out, no log file is created. |
|
Specify a port number if you don’t want the agent to listen on the default port, 9400. |
|
The path to the relevant batch file if you want to run a custom script to provide the risk evaluation with additional data for the computer. Learn more about using custom scripts with the PingID Device Trust predictor in Custom scripts. |
|
The script execution mode specifies how the custom script runs and how its output caches. Valid values include:
|
|
The interval in minutes, for running the script when |
|
The time of day for the script to run set in extended format (HH:MM) when |
|
If sign-on flows are initialized from a domain other than the PingOne base domain, specify the domain. |
|
If your company uses a proxy, specify the address. |
|
If the proxy requires authentication, specify the username. |
|
If the proxy requires authentication, specify the password. |
|
Include to prevent the display of UI elements such as progress window during CLI installation. |
|
Include to prevent the display of message boxes during CLI installation. |
|
Include to prevent the computer from rebooting when the installation is complete. |
Installing the PingID Device Trust agent on Mac computers
Install the PingID Device Trust agent on a Mac computer with a GUI-based installation or with a command-line installation.
The GUI-based installation is only for testing purposes. Only install the agent on user computers with the CLI installation.
The installation script is read only once during the setup process. It isn’t referenced again after installation.
The agent is installed to: /usr/local/pingid/DeviceTrust. You can’t define a custom path for installation.
Installation requirements
-
Administrator privileges for the computer
-
macOS 14 or later
|
The PingID Device Trust agent isn’t supported in the Safari browser. |
GUI installation
-
Download the Mac installation file from the PingID download page.
-
Extract the individual files:
-
Package file:
DeviceTrust.<version>.pkg -
CLI installer:
InstallPingIdDeviceTrust -
Installer settings: devicetrust.installer.properties
-
-
Copy the
devicetrust.installer.propertiesfile to the/tmpdirectory. This isn’t configurable - the installer looks for the properties file in/tmp. -
Update the
devicetrust.installer.propertiesfile with the values for the mandatory properties:-
PingOneBaseDomain
-
EnvironmentID
-
ClientID
-
ClientSecret
-
-
Specify values for any of the optional properties you want to use:
-
If your organization uses a proxy: ProxyAddress, ProxyUsername, ProxyPassword
-
To run a custom script that provides the risk evaluation with additional data about the computer, set ScriptFilePath to the path of your script. Also enter the script execution mode, which controls how often the script runs and how its output is cached. Learn more about using custom scripts with the PingID Device Trust predictor in Custom scripts.
-
If sign-on flows are initialized from a domain other than the PingOne base domain, set CustomDomain to that domain.
-
If you don’t want the agent to listen on the default port - 9400, set Port to a different port number.
-
If you want more detailed information to be logged during installation, set LogLevel to 1.
-
-
Launch the .pkg file to begin the installation.
-
Click Install.
CLI installation
-
Download the Mac installation file from the PingID download page.
-
Extract the individual files:
-
Package file:
DeviceTrust.<version>.pkg -
CLI installer:
InstallPingIdDeviceTrust -
Installer settings: devicetrust.installer.properties
-
-
From the command line, run the Mac installer, providing the necessary values for the parameters:
sudo ./InstallPingIdDeviceTrust "[-Package= full path to DeviceTrust .pkg]" "-PingOneBaseDomain=<PingOne base domain>" "-EnvironmentID=<EnvironmentID>" "-ClientID=<ClientID>" "-ClientSecret=<ClientSecret>" "[-ScriptFilePath=<ScriptFilePath>]" "[-Port=<Port>]" "[-CustomDomain=<CustomDomain>]" "[-ProxyAddress=<ProxyAddress>" "-ProxyUsername=<ProxyUsername>" "-ProxyPassword=<ProxyPassword>]"
Mandatory parameters
| Parameter | Description |
|---|---|
|
The full path of the package file (.pkg). If not specified, the installer looks for the .pkg file in the current folder. |
|
The PingOne base domain, for example, pingone.com. |
|
The ID of the environment that contains the worker app and the risk policy. |
|
The client ID for the worker app. |
|
The client secret for the worker app. |
Optional parameters
| Parameter | Description |
|---|---|
|
Specify a port number if you don’t want the agent to listen on the default port, 9400. |
|
The path to the relevant batch file if you want to run a custom script to provide the risk evaluation with additional data for the computer. Learn more about using custom scripts with the PingID Device Trust predictor in Custom scripts. |
|
The script execution mode specifies how the custom script runs and how its output caches. Valid values include:
|
|
The interval in minutes, for running the script when |
|
The time of day for the script to run set in extended format (HH:MM) when |
|
If sign-on flows are going to be initialized from a domain other than the PingOne base domain, specify the domain. |
|
If your company uses a proxy, specify the address. |
|
If the proxy requires authentication, specify the username. |
|
If the proxy requires authentication, specify the password. |
|
The level of logging carried out during installation and running of the agent. The default level is 0. To raise the logging level from Info to Debug, set LogLevel to 1. |
To uninstall the PingID Device Trust agent, run the following command:
sudo /usr/local/pingid/DeviceTrust/bin/uninstall
Logging
The installer logs the installation process, and the agent creates separate logs for its ongoing activity.
Log files on Windows
When installing on Windows, an installation log file is created if you included the /LOG parameter with the installation command. The value should be a full path.
For installation, the log level is set to DEBUG.
The path of the log file for the ongoing activity of the agent is C:\Program Files\Ping Identity\PingID\Device Trust\logs\PingIdDeviceTrust.log.
For the ongoing activity of the agent, the level is set to INFO. To raise the log level to DEBUG:
-
Open the Registry Editor.
-
Under HKEY_LOCAL_MACHINE\SOFTWARE\Ping Identity\PingId\DeviceTrust, add a new key of type
Dword32calledLogLevel. -
Set the value of the new key to 1.
-
After making the change to the registry, restart the PingIDESVC service or restart the computer.
To restore the logging level to INFO, change the value of the key to 0 and restart the PingIDESVC service or the computer.
There is no mechanism to limit the log file size. It’s best not to leave the logging at DEBUG level for an extended period of time.
Log files on Mac
When installing on Mac, two installation log files are created:
-
/tmp/devicetrust.cliinstaller.log -
/tmp/devicetrust.install.log
If an error occurred during installation, run the installation command again but set -LogLevel to 1. The log files will then contain more detailed information to use for debugging.
The path of the log file for the ongoing activity of the agent is /usr/local/pingid/DeviceTrust/logs/PingIdDeviceTrust.log.
If you encounter issues with the agent and want to raise the logging level of the activity log file to DEBUG, run the command:
sudo /usr/local/pingid/DeviceTrust/bin/install -LogLevel=1
To restore the logging level to INFO, run the command:
sudo /usr/local/pingid/DeviceTrust/bin/install -LogLevel=0
Custom scripts
When PingOne performs a risk evaluation using a policy that includes the PingID Device Trust predictor, the API response includes various device identification fields in the object device.agent. If you want to include additional identifying information, specify the path of a local script when installing the trust agent on individual computers.
-
The script should return a single string.
-
In the API response returned for the risk evaluation, the string generated by the script is included as the value for the field
device.agent.customScript.output. -
On Windows, the script should be a batch file.
-
On Mac computers, the script should be a shell script.
The following example is a script that’s run in order to pass a computer’s third-party-generated ID to the risk evaluation.
@echo off
powershell.exe -command "[System.BitConverter]::ToString(((Get-ItemProperty 'HKLM:\SYSTEM\CurrentControlSet\Services\ThirdPartyAgent\Sim').AG)).ToLower() -replace '-','' | ForEach-Object { Write-Host -NoNewline $_ }"
exit 0
|
If you use a custom script, the time it takes to run can affect user experience. You might need to adjust the agent timeout using the |
Examples of risk evaluation response
Sample responses for predictor:
The following is an example response from a risk evaluation where the agent successfully verified the trusted device:
"trustedDevice": {
    "reason": "PingID Device trust verified successfully",
    "level": "LOW",
    "type": "DEVICE",
    "status": "TRUST_VERIFIED"
}
The following is an example response from a risk evaluation where the agent failed to verify the trusted device (because of factors such as an invalid signature):
"trustedDevice": {
    "reason": "PingID Device trust verification failed",
    "level": "HIGH",
    "type": "DEVICE",
    "status": "TRUST_VERIFICATION_FAILED"
}
The following is an example response from a risk evaluation where the agent was unable to verify the trusted device because the agent wasn’t running or was unable to retrieve the JWT:
"trustedDevice": {
    "reason": "Not enough information to verify device trust",
    "level": "HIGH",
    "type": "DEVICE",
    "status": "NOT_AVAILABLE"
}
Agent-supplied information under device in risk evaluation API response
"device": {
    "agent": {
        "customScript": {
            "exitCode": 5,
            "output": "b90ce386-f74f-473c-bc27-f19b3569b8b5"
        },
        "loggedInUser": {
            "name": "jj",
            "objectSid": "objectSid",
            "domainName": "domainName"
        },
        "macAddress": [
            "0a-23-3b-fa-34-bb",
            "3d-21-fb-12-8b-h5",
            "ak-le-12-07-88-25"
        ],
        "os": {
            "name": "macOS",
            "version": "14.6.1"
        },
        "name": "mac-2CD4BNMD",
        "id": "94970C21-D879-6ACD-E208-99C6ECF9D7EA",
        "version": "0.1.0"
    },
    "os": {
        "name": "Mac OS X"
    },
    "browser": {
        "name": "Chrome"
    },
    "id": "Id-aeb87d04-9f59-4e68-aace-d7b211933a48",
    "estimatedDistance": 0
}