Creating an outbound rule
Create an outbound rule to define which users are provisioned and how attributes are mapped between PingOne and the external identity store.
If you are creating an outbound rule for a connection through an LDAP gateway, refer to Creating an outbound rule for a connection through an LDAP gateway.
Before you begin
Make sure you’ve created a connection.
|
Not all provisioning connection types support this provisioning. Learn more in Provisioning. You can add a disabled connection to a source or target of a rule, but it must be enabled. Learn more in Connections. |
Steps
-
In the PingOne admin console, go to Integrations > Provisioning.
-
Click and then click New Rule.
-
For Sync Direction, select PingOne as Source.
-
For Available Connections, click next to the appropriate connection to set it as the target and then click Continue.
-
In the Rule Details panel, enter a Name and Description for the rule and then click Next.
-
In the Directory Configuration panel:
-
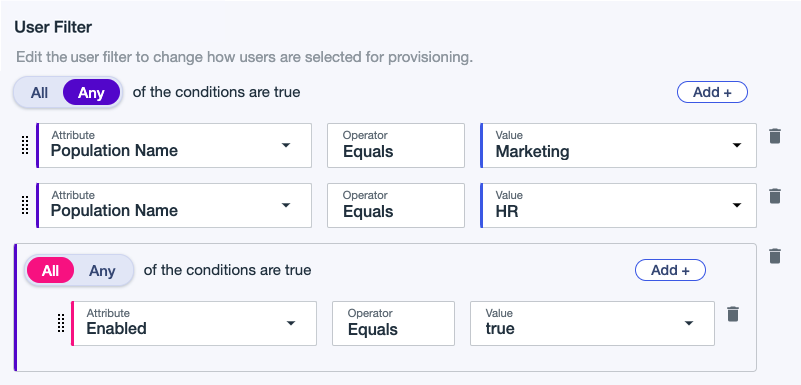
For User Filter, click Add Condition and define which users to include in provisioning based on population or user attributes. Learn more in Example user filters.
-
Enter the first condition:
-
Select All or Any to determine how the linked conditions will be evaluated: Boolean logical AND or OR.
-
Attribute: The user attribute on which to filter.
-
Operator: Supports operators
sw(starts with),ew(ends with),co(contains), andeq(equals). You can find a full list of operators and supported attributes in SCIM operators in the PingOne API documentation. -
Value: Enter the appropriate value.
If you select a group in the filter, updating or deleting the group can cause the provisioning rule to resync. The filter will also include all users with any kind of membership in the group. Learn more in Groups.
-
-
(Optional) Click Add to add another condition or condition set.
-
To delete a condition, click the Delete icon ().
-
-
For Groups, click Add Groups to select an existing group in outbound sync.
-
To search groups, enter a group name in the Search Group Name field.
-
To add groups, select a group in All Groups.
-
To remove a group, clear the checkbox for the group in All Groups.
-
To view provisioned groups, click Selected Groups.
-
To accept a merge or overwrite memberships when a group with the same name exists on the target, select the checkbox next to I understand and want to continue in the modal.
Merging or overwriting memberships applies only to SCIM, Slack, and GitHub EMU provisioning connections. Learn more in Creating a Slack connection, Creating a SCIM connection, and Creating a GitHub EMU connection.
-
-
-
Click Next.
-
In the Attribute Mapping panel, map attributes between the source and PingOne to ensure users are provisioned correctly.
The default attributes are based on the directory type of the gateway used. For outbound provisioning, the
RDNattribute defaults tocnfor Active Directory.-
To add an attribute mapping, click Add and enter the source and target attributes.
-
To use the expression builder, click the Gear icon (). Learn more in Using the expression builder.
You can also use Expression list values in the expression builder to create advanced expressions, such as conditional statements. Some attributes have metadata that define potential values.
For example, for Salesforce attribute mapping, you can see a list of values from Salesforce in the form of an Expression list. In the expression builder, enter a single quote to see potential values.
You can use a switch statement or an if-else statement to evaluate an expression based on a pattern match.
For example, to match an
accountIdattribute, enter the following in the expression builder:#core.switchExpr(#root.accountId, '0000EXAMPLEID', 'Valid' , 'Invalid')
For a switch statement with multiple cases and a match, enter the following in the expression builder:
#core.switchExpr(#root.accountId, '0000EXAMPLEID1', 'Full Access', '0000EXAMPLEID2', 'Restricted Access' , '0000EXAMPLEID3', 'Read-only Access', 'No Access')
The email attribute mapping is checked by default and included in updates.
-
To delete a mapping, click .
-
-
Click Save.
-
To enable the rule, click the toggle at the top of the details panel to the right (blue).
You can disable the rule by clicking the toggle to the left (gray).
Result
The Sync Status appears and the rule is listed under Rules. Learn more in Sync status.
Example user filters
This section shows some example user filters to define users for provisioning.
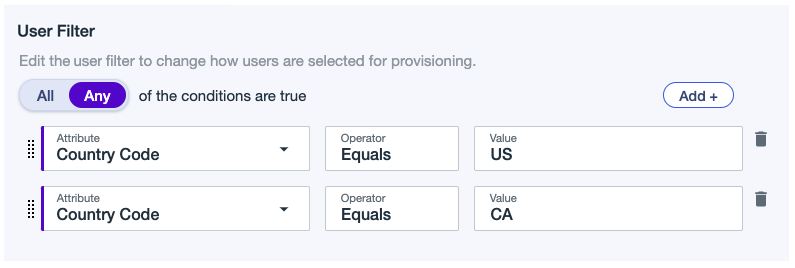
Example 1
A filter that includes users from the USA and Canada. Include users that match the following:
Country Code Equals US
OR
Country Code Equals CA
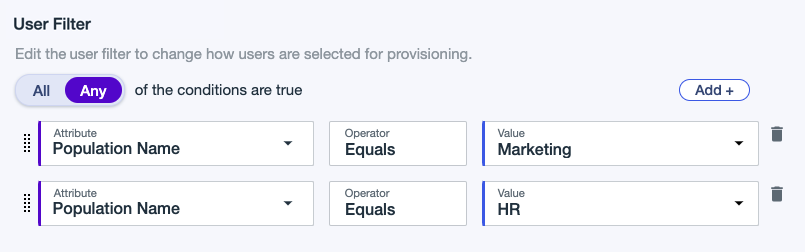
Example 2
A filter that includes users from the following populations:
Population Name Equals Marketing
OR
Population Name Equals HR