Configuring PingOne as the federated IdP
You’re ready to configure Microsoft Entra hybrid join with PingOne as the federated identity provider (IdP) after:
-
Reviewing the overview in Setting up PingOne as the federated IdP for Microsoft Entra ID
-
Completing the prerequisites in Before you begin configuring Microsoft Entra hybrid join with PingOne as the federated IdP
To set up PingOne as the federated IdP, you’ll configure PingOne to fulfill two use cases:
-
User authentication: Set up PingOne as the federated IdP to connect users to sign on to Microsoft 365.
-
Hybrid join: After setting up PingOne as the federated IdP, enable PingOne to process hybrid join requests to sync devices from on-premise Active Directory (AD) to Entra ID if your organization plans to transition their AD infrastructure to the cloud with Entra ID.
User authentication
Set up PingOne as the federated IdP for Entra ID so that your users can authenticate with PingOne when attempting to use single sign-on (SSO) to access resources like Microsoft 365.
Creating an attribute in PingOne
By default, Entra Connect Sync uses the userPrincipalName attribute from AD as the source of the Entra ID username. In most deployments, the userPrincipalName attribute value looks like an email address and might match the value of the email address (mail attribute) in the PingOne user record. However, in some deployments, the attributes don’t match.
If the values don’t match, PingOne can’t match a user record to the username token from Entra ID. To ensure PingOne can locate the user record, create a custom user attribute in PingOne to store the userPrincipalName attribute value instead of relying on the mail attribute as the username.
Steps
-
In the PingOne admin console, go to Directory > User Attributes and click the icon.
-
Select Declared for the attribute type and click Next.
-
Enter or edit the following:
-
Name: A unique identifier for the attribute, such as
ms-upn. -
Display Name (optional): The name of the attribute as you want it to display in the UI.
-
Description (optional): A brief description of the attribute.
-
Select the Enforce unique values checkbox and click Confirm in the Enable Enforce Unique Values modal.
-
Verify the Allow multiple values checkbox is cleared and No Validation is selected in the list.
-
-
Click Save.
Adding an LDAP gateway to connect PingOne with AD
Add an LDAP gateway and optionally enable Kerberos authentication to authenticate AD users through SSO.
Steps
-
In the PingOne admin console, add an LDAP gateway for Microsoft 365 and select Microsoft Active Directory for LDAP Directory Type.
-
To enable Kerberos authentication for a seamless SSO experience:
-
Select the Enable Kerberos Authentication checkbox.
-
Enter the Service Account User Principal Name and Service Account Password.
-
Click Save.
-
Configure the service account with the appropriate
servicePrincipalNameto enable Kerberos authentication.Learn more in SPN reference.
-
Configure end user browsers with the required trusted URIs to support Kerberos authentication.
-
-
Add a user type for cloud users:
-
On the Lookup tab of the LDAP gateway, click the icon.
-
Click Use default values to pre-populate fields with values PingOne needs when connecting to your on-premise AD.
-
Configure the following:
LDAP gateway configuration
Setting Description User Type
Enter a name for the user type, such as
cloud user.Select Password Authority
Select LDAP in the list.
Enable password changes from PingOne
Select to enable the checkbox.
User Search LDAP Base DN
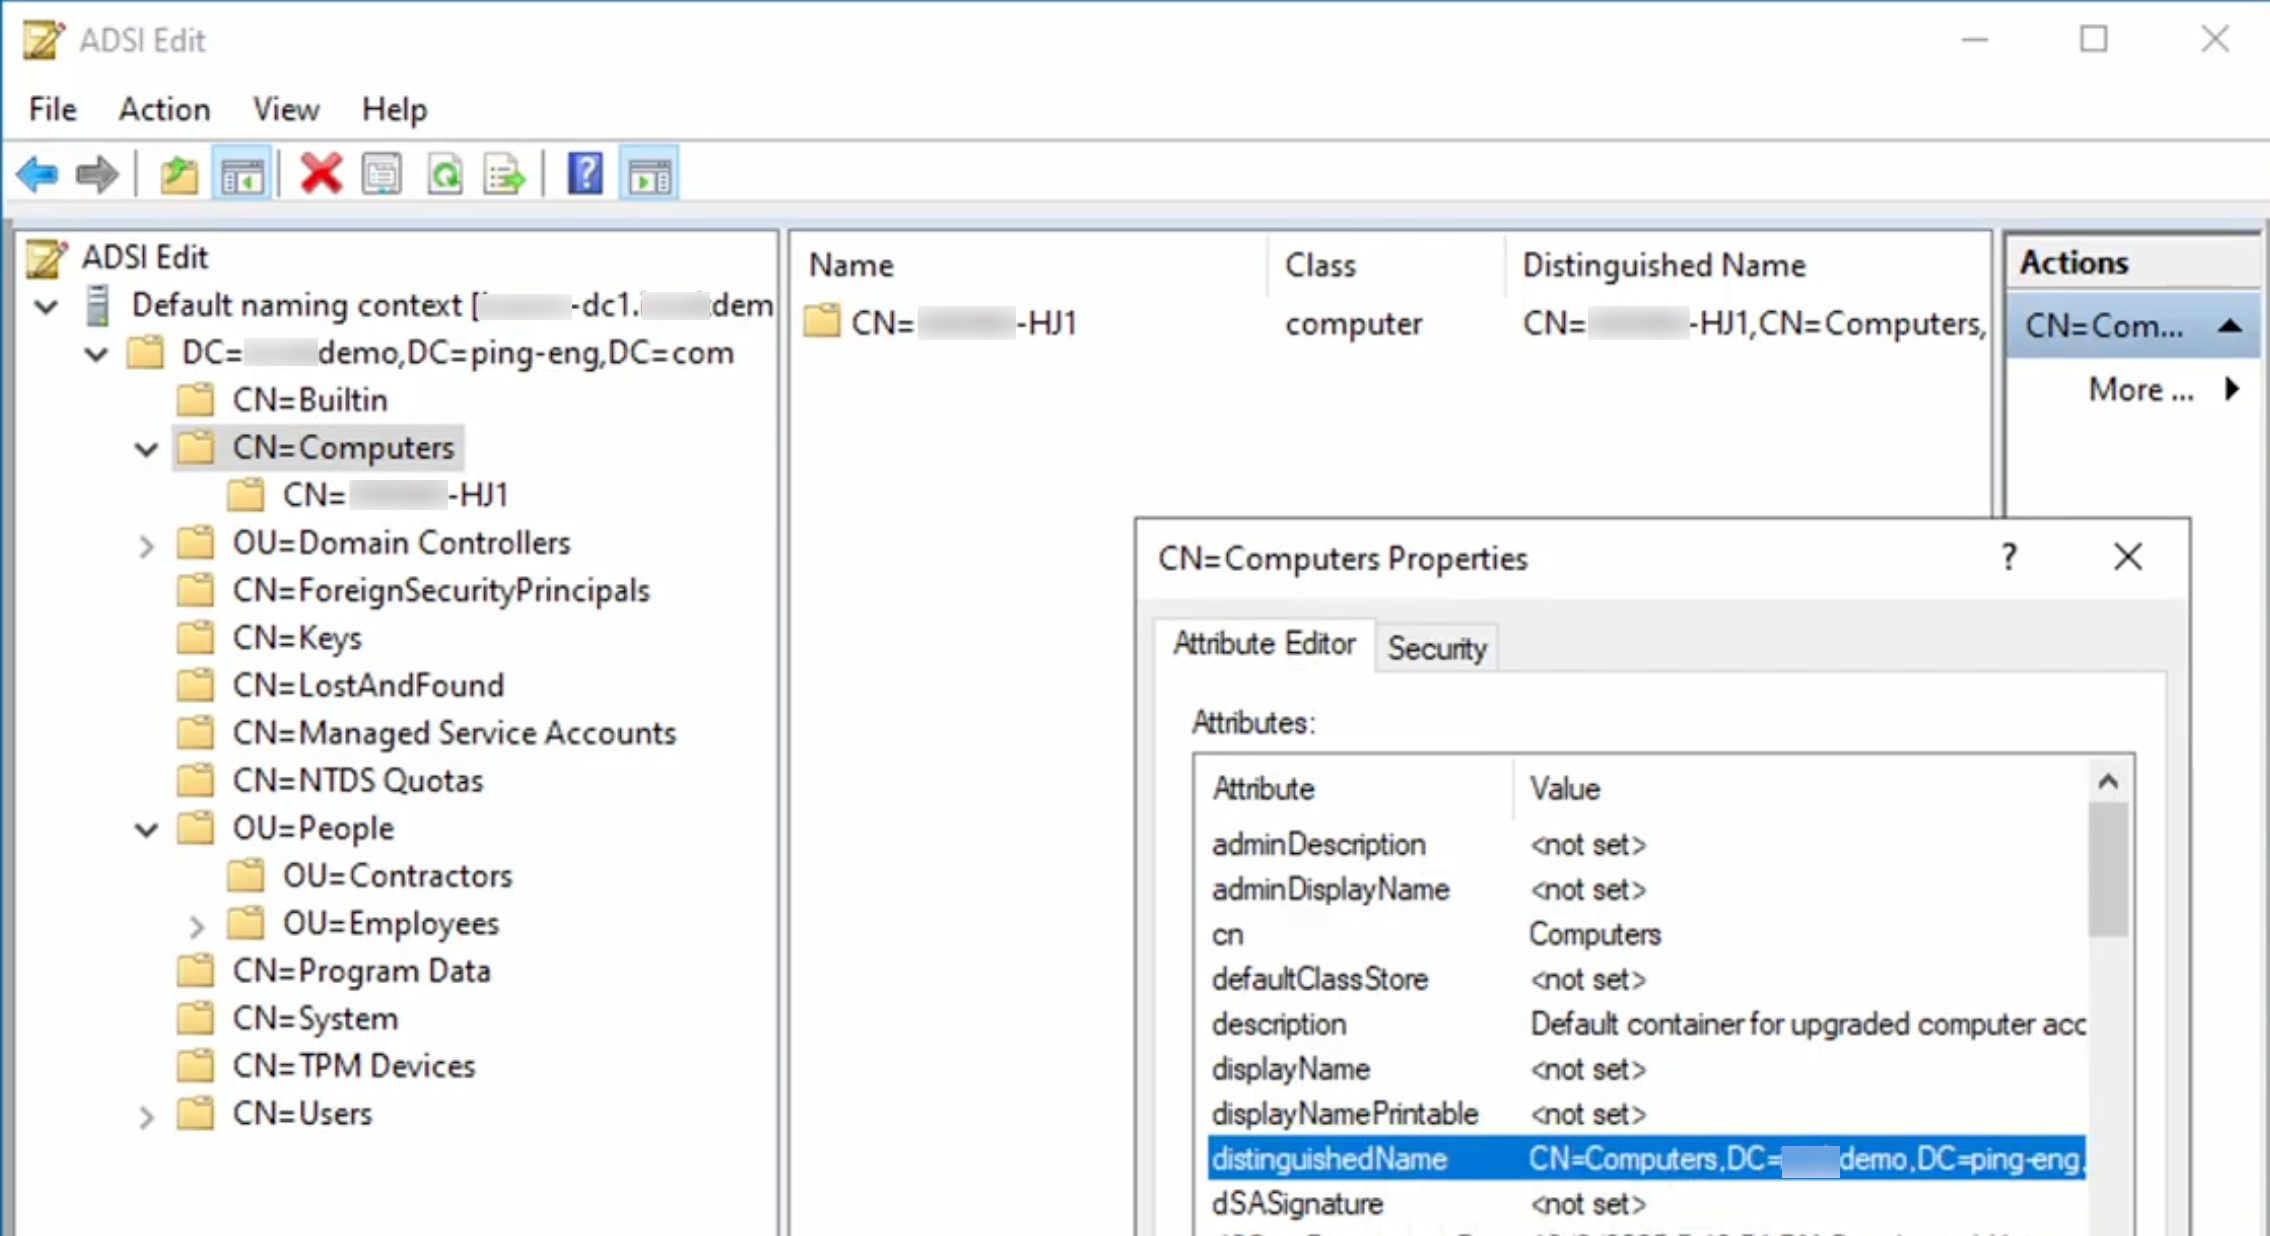
Enter the distinguished name (DN) of the organizational unit (OU) where users synced to Entra ID are located. Use a specific DN location where only the users are located, instead of a broad location that includes both users and devices.
Example
OU=Employees,OU=People,DC=pingdemo,DC=ping-eng,DC=comYou can find the DN in ADSI Edit:
-
Right-click the CN=Computers folder under your computer name.
-
In the CN=Computers Properties modal, locate the distinguishedName attribute and copy it.
User Link Attributes
Leave the pre-populated default attributes.
Enable migration of new users upon first authentication
Select to enable the checkbox.
LDAP Filter
Enter the following to limit the filter to search for AD user records only:
(&(objectClass=user)(objectCategory=person)(|(sAMAccountName=${identifier})(mail=${identifier})(userPrincipalName=${identifier})))Population
Select a population in the list.
Update PingOne user attributes as users sign on
Select to enable the checkbox.
Map Attributes
-
Leave the pre-populated default mappings.
The default source of External ID is the
mS-DS-ConsistencyGuidattribute because Entra Connect Sync uses themS-DS-ConsistencyGuidattribute as thesourceAnchorattribute to identify synced users by default. If you selected another AD user attribute as thesourceAnchorattribute in Installing Entra Connect Sync (step 11), select that AD user attribute as the source of External ID in this step. -
Add a mapping for the custom attribute you created in Creating an attribute in PingOne.
-
Click Add Mapping.
-
In the PingOne User Profile Attribute list, select the custom attribute you previously created to store
userPrincipalNamefrom AD user objects. -
In the LDAP Attribute field, enter
userPrincipalName.
-
You can find more information about the required attribute mappings in User type for cloud users.
-
-
Click Save.
-
Adding an authentication policy
Create an authentication policy with a Login step to verify AD user identities through LDAP authentication.
|
You can optionally use a DaVinci flow policy instead of an authentication policy to orchestrate the authentication experience. If your users access Microsoft 365 desktop applications, such as Excel for Windows, consider opting in to the Legacy Browser and WebView Compatible Rendering Mode early access feature in PingOne. Learn more in Managing opt-ins for early access features in PingOne. |
Steps
-
In the PingOne admin console, go to Authentication > Authentication and click Add Policy.
-
Enter a Policy Name, such as
Authentication policy for Microsoft 365. -
In the Step Type list, select Login.
-
In the Migrate Gateways Users upon First Authentication section, click Add Gateway User Type.
-
Select the Gateway and User Type you previously created in Adding an LDAP gateway to connect PingOne with AD.
-
To add multi-factor authentication (MFA):
-
Click Add step.
-
Select the desired step type.
-
Configure the step as required.
-
-
Click Save.
Adding a Microsoft 365 application
Add a Microsoft 365 application and run the PowerShell cmdlets to allow your users to sign on using PingOne.
If you’re using a custom domain for configuring hybrid join, refer to the following section to determine whether you can use your custom domain in the PowerShell cmdlets to set up PingOne as the federated IdP. Hybrid join doesn’t support using a custom domain if mutual TLS (mTLS) is enabled for the domain.
Custom domains
PingOne uses the Cloudflare infrastructure to handle traffic routing for custom domains created after March 17, 2025, but custom domains created before this date use the AWS CloudFront infrastructure.
Hybrid join using Entra ID only supports custom domains using the following infrastructure:
-
CloudFront
-
Cloudflare only if mTLS is disabled
Hybrid join doesn’t support custom domains using the Cloudflare infrastructure if mTLS is enabled. The following types of custom domains are supported:
| Custom domain infrastructure | Supported? |
|---|---|
CloudFront |
Yes |
Cloudflare with mTLS disabled |
Yes |
Cloudflare with mTLS enabled |
No |
To configure PingOne as the federated IdP using the PowerShell cmdlets in PingOne, you must:
-
Determine whether your custom domain traffic is routed through CloudFront or Cloudflare infrastructure.
-
For custom domains with traffic routed through Cloudflare, determine whether the domain has mTLS enabled.
-
Use either the custom domain or PingOne domain for the PowerShell cmdlets depending on which configuration your custom domain uses, as shown in the following diagram:
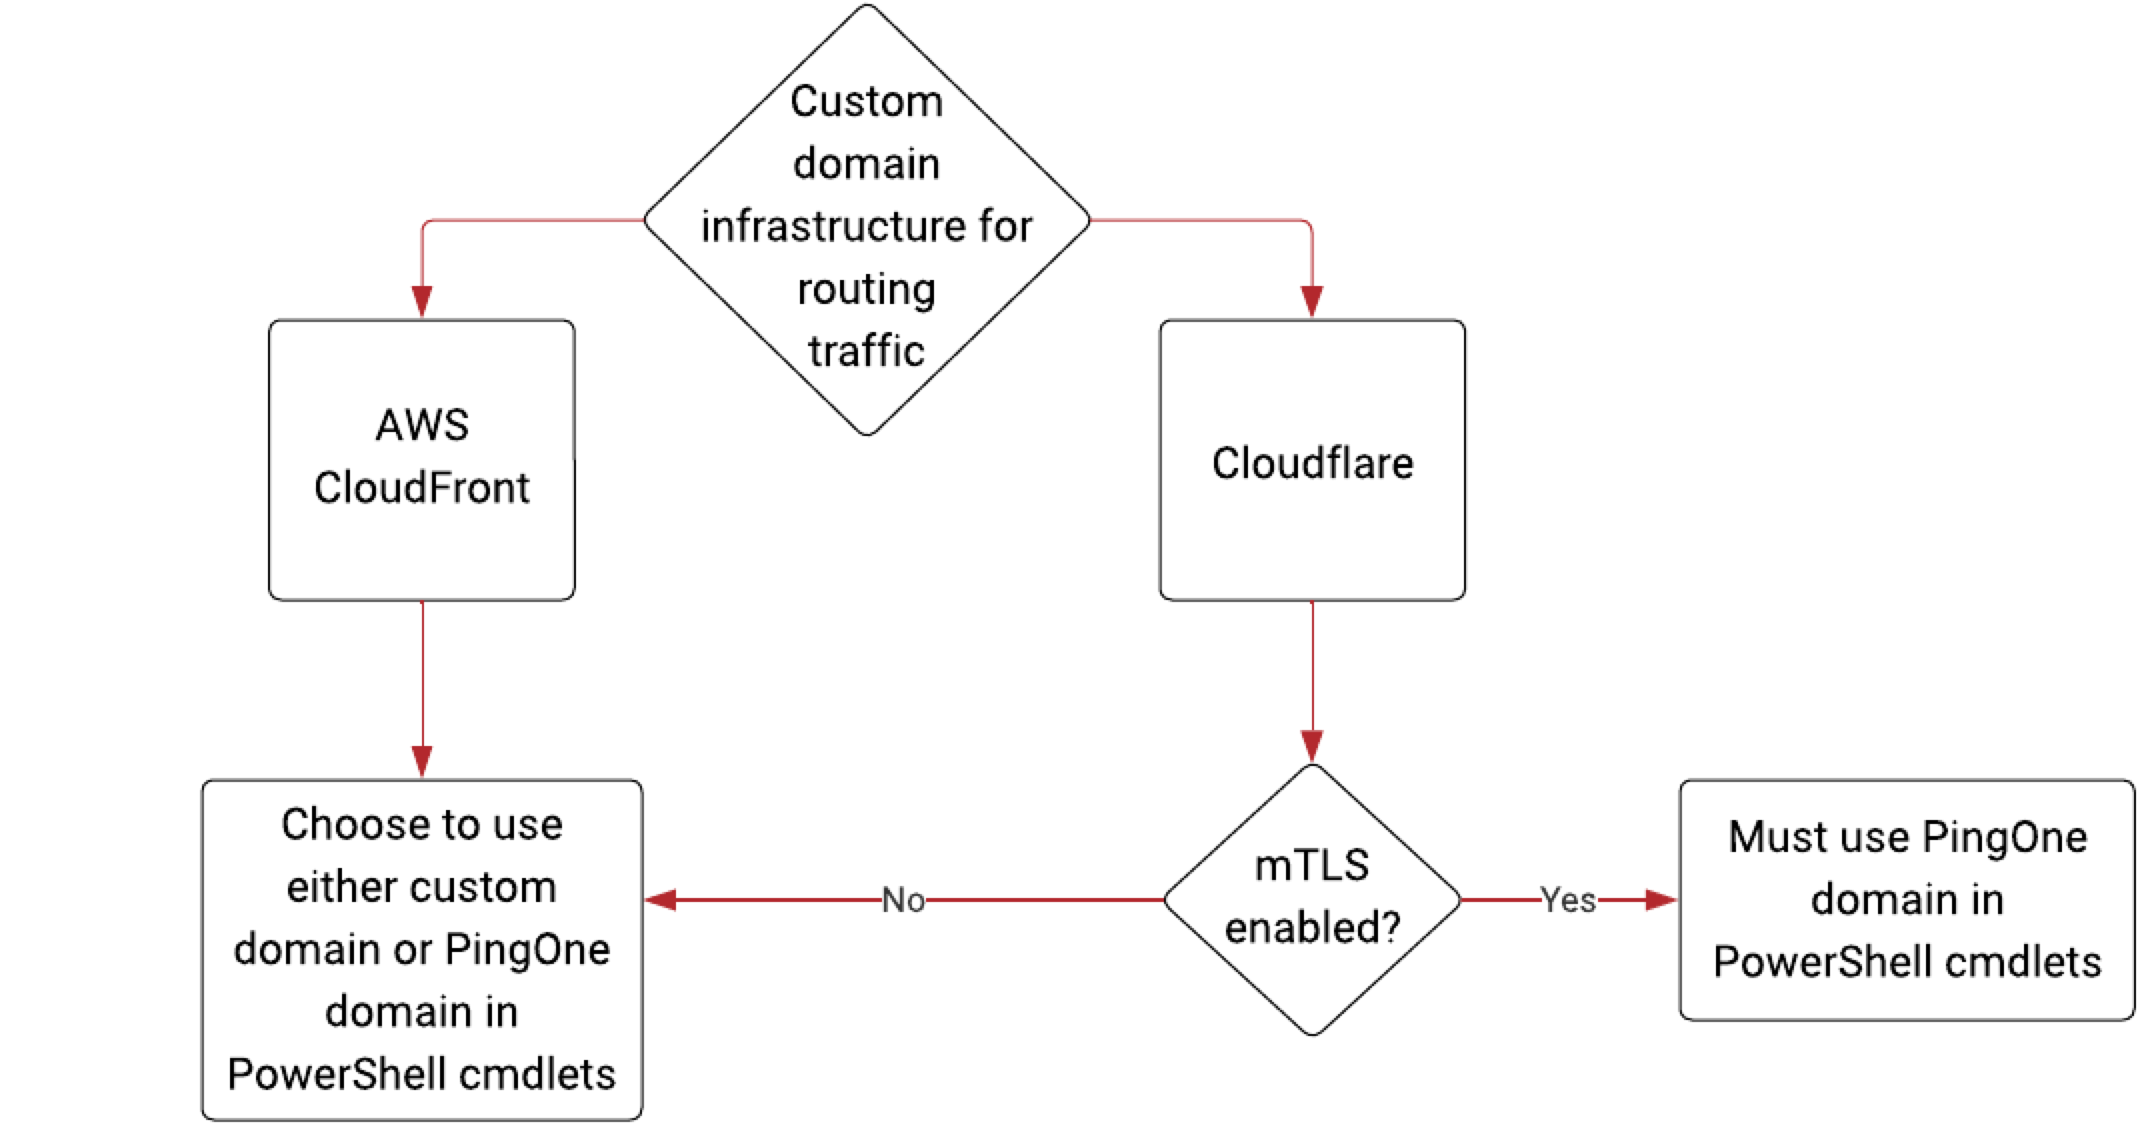
-
For custom domains using the CloudFront infrastructure, you can choose whether to use your custom domain or the PingOne domain.
-
For custom domains using the Cloudflare infrastructure:
-
If mTLS is disabled, you can choose whether to use your custom domain or the PingOne domain.
-
If mTLS is enabled, you can’t use your custom domain in the PowerShell cmdlets and must use the PingOne domain.
-
-
Steps
-
In the PingOne admin console, add a Microsoft 365 application.
-
In the Map Attributes step:
-
Map the ImmutableID and Subject attributes and sync them to Entra ID using the following advanced expression:
#string.uuidAsBase64Guid(user.externalId,null)
-
Map the UPN attribute by selecting the
userPrincipalNameattribute you previously created in the PingOne Mappings list.
-
-
If the authentication policy you previously created includes MFA, configure an authentication claim for the Microsoft 365 application to communicate to Entra ID that PingOne will handle MFA.
-
If you’re using a custom domain, determine whether your domain uses the CloudFront or Cloudflare infrastructure by opening a terminal window and choosing either of the following:
-
Run
nslookup <yourcustomdomain.com>.Result:
The following is an example response for a custom domain using the CloudFront infrastructure:
CloudFront routing example
Server:		10.247.247.54
Address:	10.247.247.54#53

Non-authoritative answer:
<yourcustomdomain.com>	canonical name = 08b31479-e3a6-43a7-900c-68fb8f4dc738.edge1.pingone.com.
08b31479-e3a6-43a7-900c-68fb8f4dc738.edge1.pingone.com	canonical name = d3j27p1mzr08wt.cloudfront.net.
Name:	d3j27p1mzr08wt.cloudfront.net
Address: 18.64.183.63
Name:	d3j27p1mzr08wt.cloudfront.net
Address: 18.64.183.104
Name:	d3j27p1mzr08wt.cloudfront.net
Address: 18.64.183.109
Name:	d3j27p1mzr08wt.cloudfront.net
Address: 18.64.183.116
The following is an example response for a custom domain using the Cloudflare infrastructure:
Cloudflare routing example
Server: 10.247.247.54 Address: 10.247.247.54#53 Non-authoritative answer: <yourcustomdomain.com> canonical name = a97e2bbf-6680-12b6-a2cf-97aa0b4a4227.edge1.pingone.com. a97e2bbf-6680-12b6-a2cf-97aa0b4a4227.edge1.pingone.com canonical name = 1238af3f-0d5b-4cc8-8460-8a35a26efc5d.ping-ccd.com. Name: 1238af3f-0d5b-4cc8-8460-8a35a26efc5d.ping-ccd.com Address: 130.250.137.31 -
Run
dig <yourcustomdomain.com>.Result:
The following is an example response for a custom domain using the CloudFront infrastructure:
CloudFront routing example
; <<>> DiG 9.10.6 <<>> <yourcustomdomain.com>
;; global options: +cmd
;; Got answer:
;; ->>HEADER<<- opcode: QUERY, status: NOERROR, id: 33676
;; flags: qr rd ra; QUERY: 1, ANSWER: 6, AUTHORITY: 0, ADDITIONAL: 1

;; OPT PSEUDOSECTION:
; EDNS: version: 0, flags:; udp: 4000
;; QUESTION SECTION:
;<yourcustomdomain.com>.	IN A

;; ANSWER SECTION:
<yourcustomdomain.com>.	284 IN CNAME 08b31479-e3a6-43a7-900c-68fb8f4dc738.edge1.pingone.com.
08b31479-e3a6-43a7-900c-68ab8f4dc738.edge1.pingone.com. 14471 IN CNAME	d3j27p1mzr08wt.cloudfront.net.
d3j27p1mzr08wt.cloudfront.net. 44 IN	A	18.64.183.63
d3j27p1mzr08wt.cloudfront.net. 44 IN	A	18.64.183.104
d3j27p1mzr08wt.cloudfront.net. 44 IN	A	18.64.183.116
d3j27p1mzr08wt.cloudfront.net. 44 IN	A	18.64.183.109

;; Query time: 4 msec
;; SERVER: 10.247.247.54#53(10.247.247.54)
;; WHEN: Tue Mar 04 14:41:08 PST 2025
;; MSG SIZE  rcvd: 248
The following is an example response for a custom domain using the Cloudflare infrastructure:
Cloudflare routing example
; <<>> DiG 9.10.6 <<>> <yourcustomdomain.com>
;; global options: +cmd
;; Got answer:
;; ->>HEADER<<- opcode: QUERY, status: NOERROR, id: 21291
;; flags: qr rd ra; QUERY: 1, ANSWER: 3, AUTHORITY: 0, ADDITIONAL: 1

;; OPT PSEUDOSECTION:
; EDNS: version: 0, flags:; udp: 4000
;; QUESTION SECTION:
;<yourcustomdomain.com>.	IN	A

;; ANSWER SECTION:
<yourcustomdomain.com>. 300	IN	CNAME	a97e2bbf-6680-12b6-a2cf-97aa0b4a4227.edge1.pingone.com.
a97e2bbf-6680-12b6-a2cf-97aa0b4a4227.edge1.pingone.com. 2501 IN CNAME 1238af3f-0d5b-4cc8-8460-8a35a26efc5d.ping-ccd.com.
1238af3f-0d5b-4cc8-8460-8a35a26efc5d.ping-ccd.com. 300	IN A 130.250.137.31

;; Query time: 36 msec
;; SERVER: 10.247.247.54#53(10.247.247.54)
;; WHEN: Tue Mar 04 14:47:09 PST 2025
;; MSG SIZE  rcvd: 211
-
-
If your custom domain uses the Cloudflare infrastructure, determine whether mTLS is enabled using the
/customDomains/{{customDomainId}}API endpoint. Learn more in Custom domains in the PingOne API documentation. -
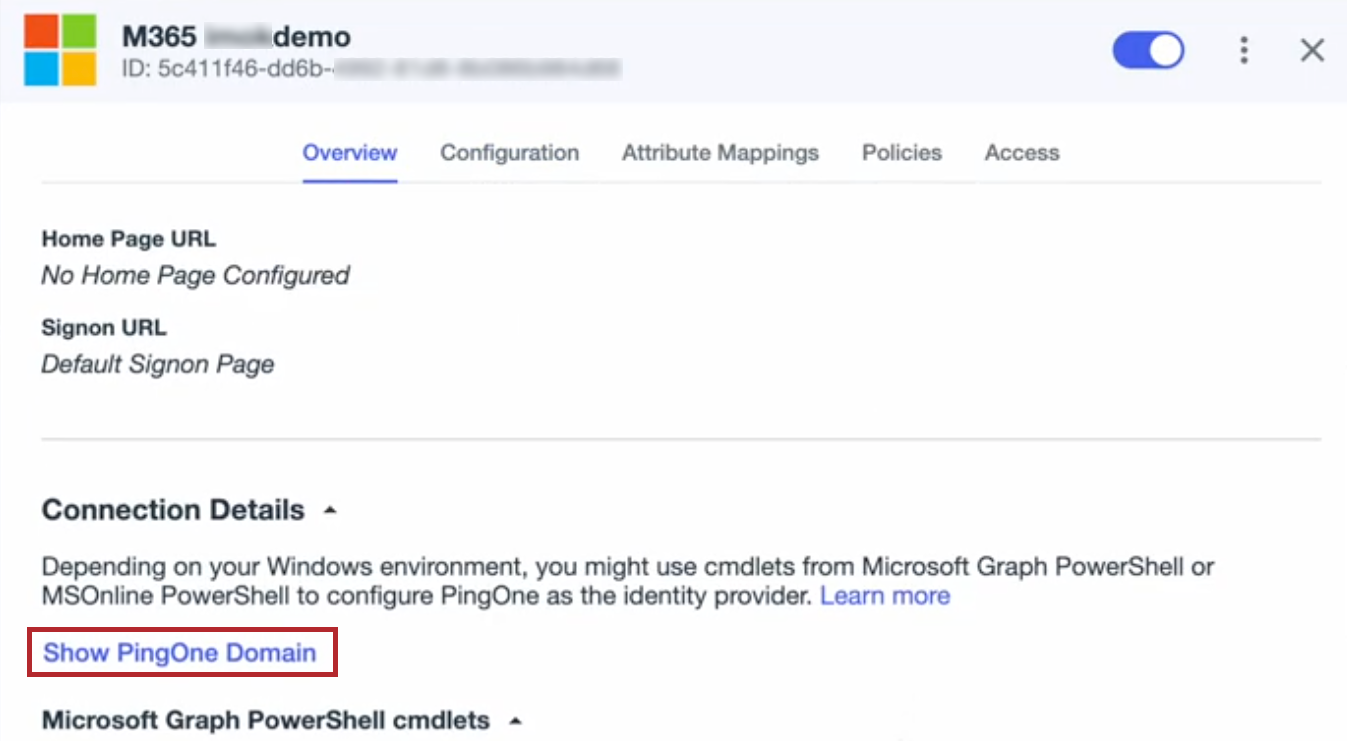
On the Overview tab, copy the PowerShell cmdlets to set up PingOne as the federated IdP, depending on whether you’re using a custom domain and how the domain is configured. Learn more in Custom domains.
-
If you aren’t using a custom domain, if you’re using a custom domain with the CloudFront infrastructure, or if you’re using a custom domain with the Cloudflare infrastructure with mTLS disabled, copy the default PowerShell cmdlets.
-
If you’re using a custom domain with the Cloudflare infrastructure with mTLS enabled, click Show PingOne Domain to change the PowerShell cmdlets to use the PingOne domain and copy the cmdlets.
-
-
Open PowerShell and select the Run as Administrator option.
-
In PowerShell, paste and run the cmdlets.
You might be prompted to sign on with your Entra account to run the cmdlets.
Result:
Your custom domain now has the Federated checkmark in the Entra admin center with PingOne as the federated IdP.
Updating the Microsoft 365 application
After adding the Microsoft 365 application, you’ll need to update it by:
-
Enabling advanced configuration.
-
Specifying the attribute to match a PingOne user record to the username from security token service (STS) requests. Refer to the example scenarios for guidance on which attribute to select, depending on your configuration.
Steps
-
In the PingOne admin console, go to Applications > Applications and select the Microsoft 365 application.
-
On the Overview tab, click Enable Advanced Configuration and click Enable in the confirmation modal.
-
On the Configuration tab, click the Pencil icon ().
-
In the Attribute to identify users from username tokens list, select the attribute for PingOne to use when matching the username from the STS request to an existing user reocrd.
Use the example scenarios in the following section for guidance on which attribute to select.
-
Click Save.
Example scenarios
The following scenarios describe example configurations and which attribute to select for PingOne to match to the username token:
Example 1: You use userPrincipalName from AD as the Entra ID username, and the userPrincipalName and mail attributes always share the same value.
| Attribute configurations | Username attribute selection |
|---|---|
You set up the following attribute configurations:
|
In this example configuration, you can select either None or Email Address if the Selecting either has the same outcome because the username in the username token is the |
Example 2: You use userPrincipalName from AD as the Entra ID username and store userPrincipalName from AD in PingOne.
| Attribute configurations | Username attribute selection |
|---|---|
You set up the following attribute configurations:
|
|
Example 3: You use an alternative AD user attribute as the Entra ID username.
| Attribute configurations | Username attribute selection |
|---|---|
You set User Principal Name to a different AD user attribute (not In this scenario, you must:
|
Select the custom attribute you created to store the AD attribute you set for User Principal Name in Entra. This enables PingOne to locate an existing user profile by matching the username in the username token to this attribute. If you don’t select the custom attribute you created, PingOne won’t be able to locate the user record for any user whose |
Assigning the authentication policy to the Microsoft 365 application
Assign the authentication policy you created in Adding an authentication policy to the Microsoft 365 application to set how PingOne authenticates users.
|
You can optionally use a DaVinci flow policy instead of an authentication policy to orchestrate the authentication experience. If your users access Microsoft 365 desktop applications, such as Excel for Windows, consider opting in to the Legacy Browser and WebView Compatible Rendering Mode early access feature in PingOne. Learn more in Managing opt-ins for early access features in PingOne. |
Results
A user can now sign on to Microsoft 365:
-
In a browser at https://www.office.com:
-
The user enters a username in the format of
<user>@domain.tld, wheredomain.tldis your verified custom domain. -
Microsoft redirects the browser to PingOne for authentication.
-
-
Using a Microsoft 365 desktop application, such as Excel for Windows:
-
The user enters their username.
-
The desktop application opens a sign-on modal coming from PingOne.
-
-
Using Kerberos authentication:
-
If Kerberos authentication is enabled with the required SPN and browser configuration, the user isn’t presented with a sign-on form, and no interaction is required unless your authentication policy uses MFA.
-
If Kerberos authentication isn’t enabled, the user is presented with a sign-on form from PingOne and must enter their AD username and password to complete the LDAP authentication process to your AD.
-
Hybrid join
Set up PingOne as the federated IdP and Entra Connect Sync to process hybrid join requests using the Kerberos protocol to sync devices from AD to Entra ID.
|
Device authentication using hybrid join is available as a limited access release for customers with a PingOne for Workforce Plus or Premium license in the North America (US) geography only and isn’t covered under standard Support service level agreements (SLAs). You can open support cases for feedback, bug reports, configuration questions, or other inquiries related, but resolution times for these cases will vary. These cases often require collaboration with our Engineering and Product teams, so response times might exceed the usual SLAs for your Support package. Topics for this feature are draft documentation for limited access purposes only and aren’t complete or final. |
Before you begin
Before you begin enabling hybrid join, you must complete the steps in User authentication to set up PingOne as the federated IdP for Entra ID.
Creating attributes and a population for hybrid joined devices
Create an attribute to indicate hybrid joined devices and to store the objectSid for the devices and add a population where hybrid joined device records will be created.
Steps
-
Add an attribute to indicate hybrid joined devices:
-
In the PingOne admin console, go to Directory > User Attributes and click the icon.
-
Select Declared for the attribute type and click Next.
-
Enter or edit the following:
-
Name: A unique identifier for the attribute.
-
Display Name (optional): The name of the attribute as you want it to display in the UI.
-
Description (optional): A brief description of the attribute.
-
Leave the Enforce unique values checkbox cleared.
-
Verify the Allow multiple values checkbox is cleared and No Validation is selected in the list.
-
-
Click Save.
-
-
Add an attribute to store
objectSidfor hybrid joined devices:-
Click the icon.
-
Select Declared for attribute type and click Next.
-
Enter or edit the following:
-
Name: A unique identifier for the attribute.
-
Display Name (optional): The name of the attribute as you want it to display in the user interface.
-
Description (optional): A brief description of the attribute.
-
Leave the Enforce unique values checkbox cleared.
-
Verify the Allow multiple values checkbox is cleared and No Validation is selected in the list.
-
-
Click Save.
-
-
Add a population where hybrid joined device records will be created:
-
Go to Directory > Populations and click the icon.
-
Enter a Population Name.
-
(Optional) Enter a Description.
-
Leave PingOne as the Identity Provider (default).
-
Leave the Default Population cleared so that this population isn’t the default.
-
Click Save.
-
Enabling Kerberos authentication
When the hybrid join process begins, the device sends a request security token (RST) message with a Kerberos token directly to PingOne as the federated IdP. The request occurs as part of an STS flow to obtain a security token and without a browser involved. If PingOne as the federated IdP is able to validate the Kerberos token, it creates an assertion and sends it to the device in an RST response (RSTR) message.
To allow PingOne to validate the Kerberos token, you must enable Kerberos authentication in the LDAP gateway for Microsoft 365.
Steps
-
In the PingOne admin console, go to Integrations > Gateways.
-
Select the LDAP gateway you previously created in Adding an LDAP gateway to connect PingOne with AD.
-
Enable Kerberos authentication for browser SSO so that PingOne can process hybrid join requests from devices:
-
On the Connection tab, click Edit.
-
Select the Enable Kerberos Authentication checkbox.
-
Enter the Service Account User Principal Name and Service Account Password.
-
Click Save.
-
Configure the service account with the appropriate
servicePrincipalNameto enable Kerberos authentication.Learn more in SPN reference.
-
Configure end user browsers with the required trusted URIs to support Kerberos authentication.
If you don’t want users to authenticate using Kerberos authentication, skip this step. When browsers aren’t configured to support Kerberos authentication, users are presented with a sign-on form.
-
Click Save.
-
Adding a user type for hybrid joined devices
Add a user type to your LDAP gateway for hybrid joined devices to allow PingOne to store the value from AD and send it to Microsoft 365.
Steps
-
In the PingOne admin console, go to Integrations > Gateways and select the LDAP gateway you previously created for Microsoft 365.
-
On the Lookup tab, click the icon.
-
Click Use default values to pre-populate fields with values PingOne needs when connecting to your on-premise AD.
-
Configure the following:
LDAP gateway configuration
Setting Description User Type
Enter a name for the user type, such as
hybrid joined devices.Select Password Authority
Select LDAP in the list.
Enable password changes from PingOne
Clear the checkbox to disable this option.
User Search LDAP Base DN
Enter the DN of the OU where devices to be joined to Entra are located. Use a specific DN location where only the devices are located, instead of a broad location that includes both users and devices.
Example
OU=Computers,DC=pingdemo,DC=ping-eng,DC=comUser Link Attributes
Leave the pre-populated default attributes.
Enable migration of new users upon first authentication
Select to enable the checkbox.
LDAP Filter
Enter the following to limit the filter to search for AD device records only:
(&(objectClass=computer)(sAMAccountName=${identifier}))Population
Select the population you previously created for hybrid joined devices in the list.
Update PingOne user attributes as users sign on
Clear the checkbox to disable this option.
Map Attributes
-
Click the Delete icon () for all attributes except Username and External ID.
The default source of External ID is the
mS-DS-ConsistencyGuidattribute. If Entra Connect Sync doesn’t populate the synced AD device objects with themS-DS-ConsistencyGuidvalue, update the source of External ID with another AD attribute that can be used to identify synced devices, such asobjectGUID. Make sure to use the same source for Username. -
For Username, use the same attribute used for External ID.
-
Map the Nickname attribute:
-
Click Add Mapping.
-
In the PingOne User Profile Attribute list, select Nickname.
-
in the LDAP Attribute field, enter
sAMAccountName.
-
-
Map the
objectSidattribute:-
Click Add Mapping.
-
In the PingOne User Profile Attribute list, select the custom attribute you previously created to store
objectSidfor hybrid joined devices. -
In the LDAP Attribute field, enter
objectSid.
-
You can find more information about the required attribute mappings in User type for hybrid joined devices.
-
-
Click Save.
Updating the Microsoft 365 application
Update the Microsoft 365 application you previously created by:
-
Configuring hybrid join support
-
Adding the attribute you created for hybrid joined devices
-
Enabling Kerberos authentication to allow users to use SSO
Steps
-
In the PingOne admin console, go to Applications > Applications and select the Microsoft 365 application.
If you didn’t already in Updating the Microsoft 365 application, click Enable Advanced Configuration on the Overview tab and click Enable in the confirmation modal.
-
On the Configuration tab, click and edit the following:
-
Subject NameIdentifier Format: Either leave the default
urn:oasis:names:tc:SAML:1.1:nameid-format:emailAddressselected or selecturn:oasis:names:tc:SAML:1.1:nameid-format:unspecifiedin the list. -
STS Token Type: Select SAML 1.1 for Office 365 in the list.
-
Attribute to indicate Entra hybrid joined devices: Select the attribute you previously created for hybrid joined devices in the list.
-
Show WS-Trust 1.3 Metadata Exchange URL in Powershell cmdlets: Select to enable the checkbox.
-
Enable Kerberos Authentication:
-
Select to enable the checkbox.
-
Click Add Gateway User Type.
-
For Gateway, select the LDAP gateway you created for Microsoft 365 in the list.
-
For User Type, select the user type you previously created for cloud users.
This allows PingOne to process RSTs with Kerberos tokens that desktop applications send for users.
-
Click Add Gateway User Type.
-
For Gateway, select the LDAP gateway you created for Microsoft 365 in the list.
-
For User Type, select the user type you previously created for hybrid joined devices.
This allows PingOne to process RSTs sent by devices with Kerberos tokens for devices.
-
-
Click Save.
-
-
On the Attribute Mappings tab, click and add three new attributes:
Microsoft 365 application attributes
Attribute Steps accounttype-
Click Add.
-
In the Attributes field, enter
accounttype. -
Click the More Options (⋮) icon and click Update NameFormat.
-
In the Update NameFormat modal, select http://schemas.microsoft.com/ws/2012/01 in the NameFormat list.
-
Click Update.
-
Click the Gear icon () to open the Advanced Expression modal.
-
Enter
"DJ"(including the quotation marks) for domain-joined devices in the Expression modal. -
Click Save.
onpremobjectguid-
Click Add.
-
In the Attributes field, enter
onpremobjectguid. -
Click the More Options (⋮) icon and click Update NameFormat.
-
In the Update NameFormat modal, select http://schemas.microsoft.com/identity/claims in the NameFormat list.
-
Click Update.
-
Click to open the Advanced Expression modal.
-
Enter
#string.uuidAsBase64Guid(user.externalId,null)in the Expression modal. -
Click Save.
primarysid-
Click Add.
-
In the Attributes field, enter
primarysid. -
In the PingOne Mappings list, select the attribute you previously created in Creating an attribute in PingOne to store
objectSidfor hybrid joined devices. -
Click the More Options (⋮) icon and click Update NameFormat.
-
In the Update NameFormat modal, select http://schemas.microsoft.com/ws/2008/06/identity/claims in the NameFormat list.
-
Click Update.
You can find more information about the required attribute mappings in Attribute mappings for the Microsoft 365 application.
-
-
On the Edit Attribute Mappings panel, click Save.
Updating the federated IdP setting
Entra hybrid join uses the WS-Trust 1.3 STS where devices send WS-Trust 1.3-compliant RSTs and expect to receive WS-Trust 1.3-compliant RSTRs. After enabling the Show WS-Trust 1.3 Metadata Exchange URL in PowerShell cmdlets setting in the Microsoft 365 application, you must re-run the PowerShell cmdlets to update Entra ID to use the new WS-Trust 1.3 metadata exchange URL.
Before you begin
If you’re using a custom domain for configuring hybrid join, refer to Custom domains and Adding a Microsoft 365 application (steps 4 and 5) to determine whether you can use your custom domain in the PowerShell cmdlets to update existing federation settings. Hybrid join doesn’t support using a custom domain if mTLS is enabled for the domain.
Steps
-
In the PingOne admin console, go to Applications > Applications and click the Microsoft 365 application.
-
On the Overview tab, copy the PowerShell cmdlets to change existing identity federation settings, depending on whether you’re using a custom domain and how the domain is configured (steps 4 and 5 in Adding a Microsoft 365 application):
-
If you aren’t using a custom domain, if you’re using a custom domain with the CloudFront infrastructure, or if you’re using a custom domain with the Cloudflare infrastructure with mTLS disabled, copy the default PowerShell cmdlets.
-
If you’re using a custom domain with the Cloudflare infrastructure with mTLS enabled, click Show PingOne Domain to change the PowerShell cmdlets to use the PingOne domain and copy the cmdlets.
-
-
Open PowerShell and select the Run as Administrator option.
-
In PowerShell, paste and run the cmdlets.
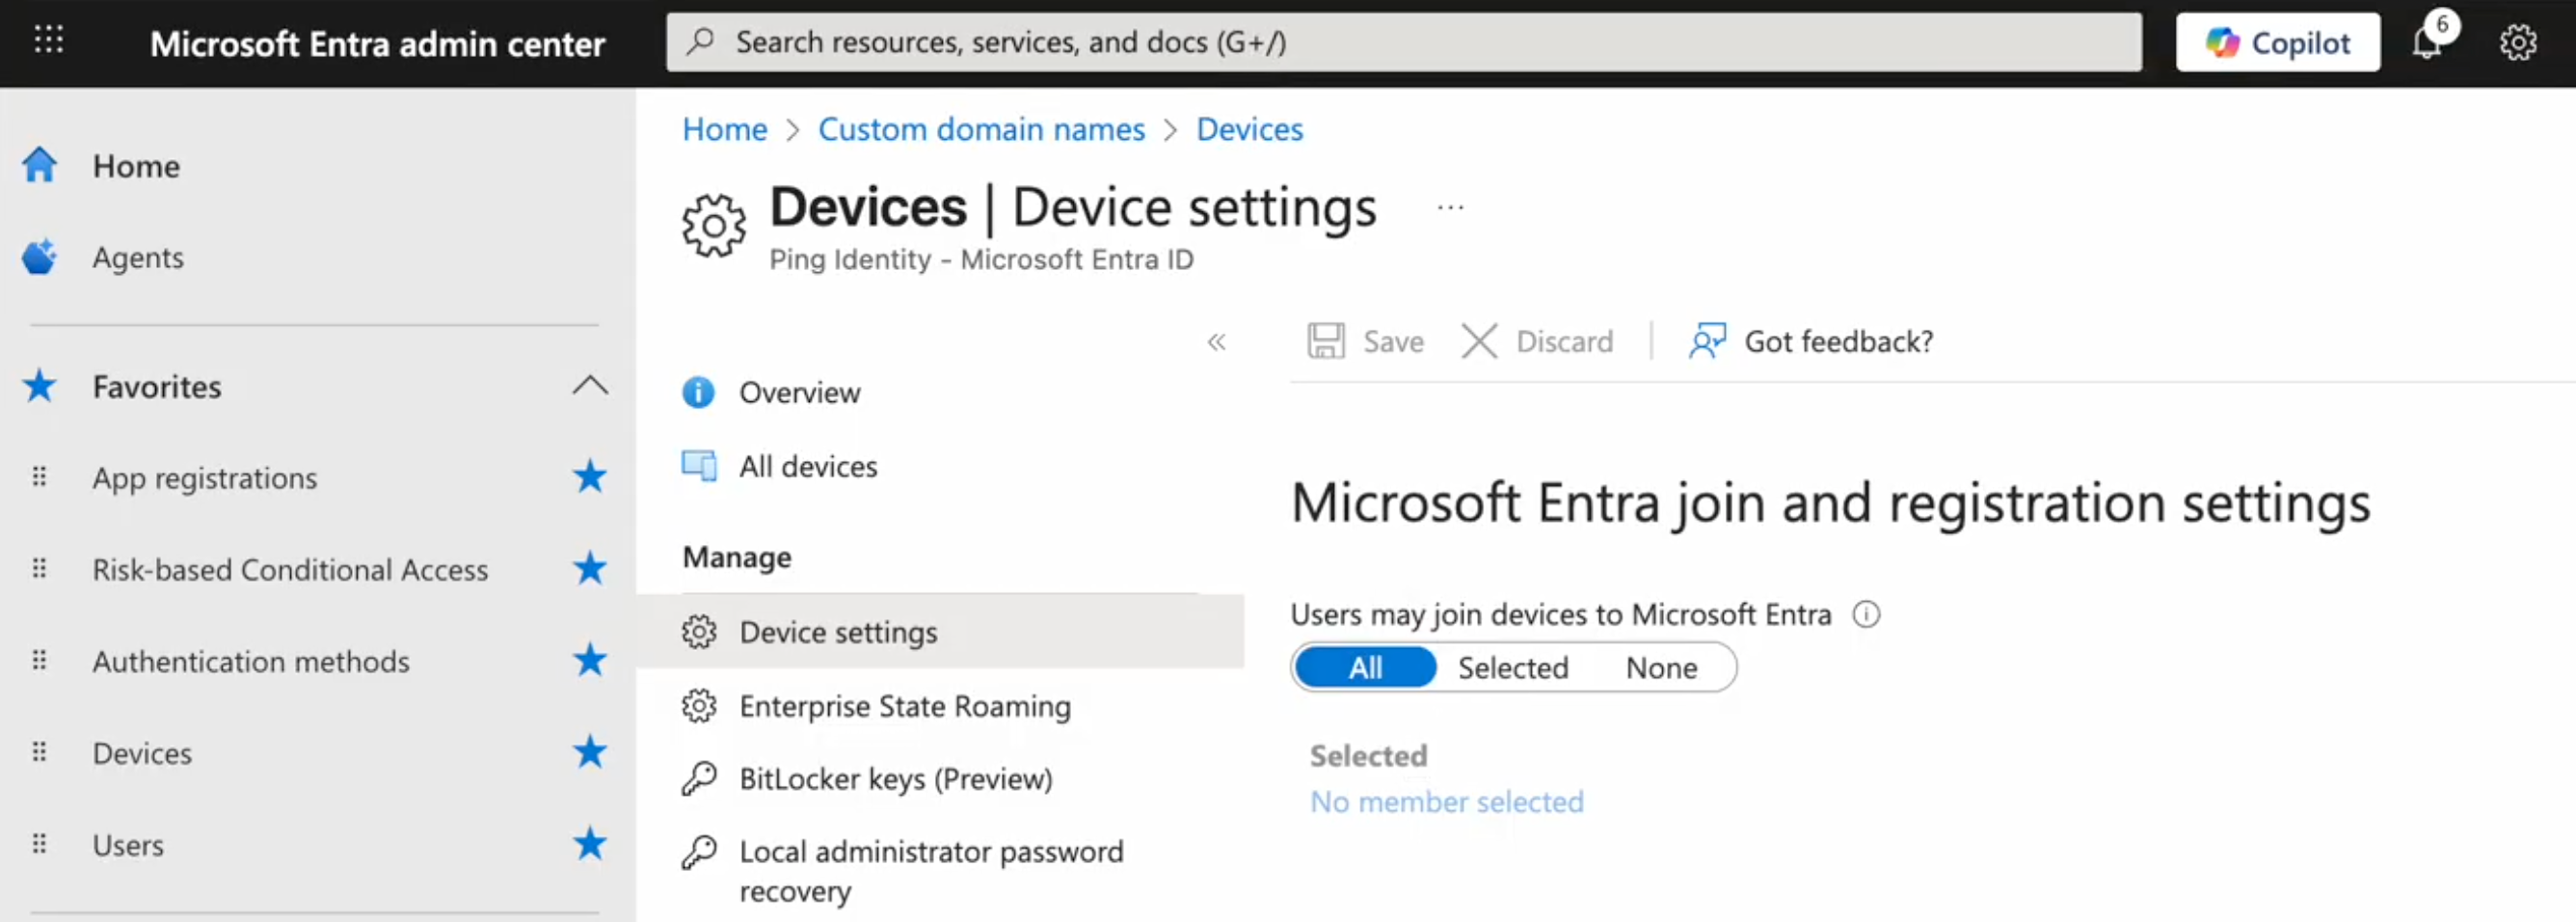
Allowing users to join their devices to Entra ID
Enable users to register their own devices with Entra ID as Entra joined devices. Learn more in Configure device settings in the Entra documentation.
Configuring Entra Connect Sync and verifying the SCP
Configure Entra Connect Sync and verify the service connection point (SCP) is properly configured to allow devices to be joined to your on-premise AD and Entra ID. A device isn’t eligible for hybrid join until Entra Connect Sync syncs the device to Entra ID.
Before you begin
Before you can complete the configuration steps in this section, you must download and install Entra Connect Sync.
Steps
-
Sign on to the computer on which Entra Connect Sync is installed.
-
Open the Entra Connect Sync application and click Configure.
-
In the Tasks step, click Configure device options and click Next.
-
In the Overview step, click Next.
-
In the Connect to Microsoft Entra ID step, enter your administrator credentials for your Entra tenant.
-
In the Device options step, select Configure Hybrid Microsoft Entra join and click Next.
-
In the Device systems step, select the Windows 10 or later domain-joined devices checkbox and click Next.
-
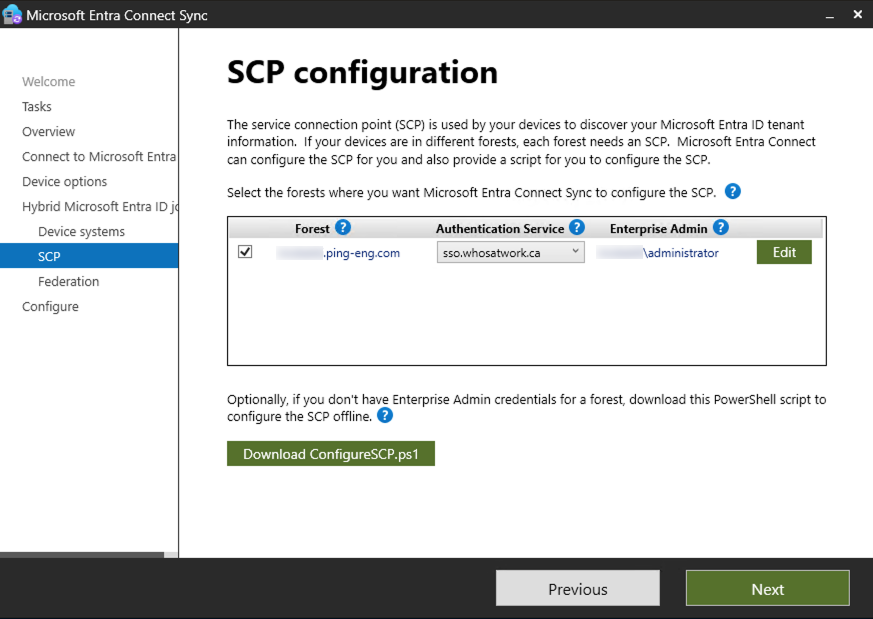
In the SCP configuration step:
-
For Forest, select the checkbox for your AD domain.
-
For Authentication Service, select the applicable PingOne domain in the list.
-
For Enterprise Admin, click Add.
Result:
A Windows Security Enterprise Admin Credentials sign-on modal opens.
-
Enter the applicable AD account credentials for an enterprise administrator and click OK.
-
In the SCP configuration step, click Next.
-
-
In the Federation step, click Next.
-
In the Configure step, click Configure and click Exit when the installation completes.
-
Confirm your Entra tenant and verified custom domain display in AD:
-
Open ADSI Edit and go to Action > Connect to.
-
In the Connection Settings modal:
-
For Connection Point, click Select a well known Naming Context.
-
Select Configuration in the list.
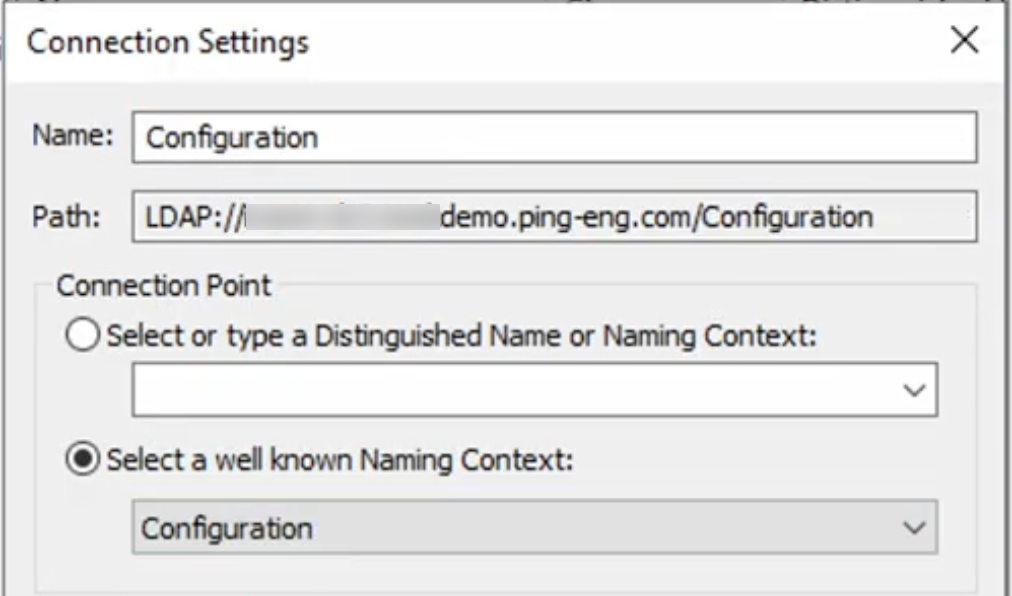
-
Click OK to close the Connection Settings modal.
-
-
Go to Configuration > CN=Configuration > CN=Services > CN=Device Registration Configuration.
-
Right-click CN=62a0ff2e-97b9-4513-943f-0d221bd30080 and click Properties.
-
In the Properties modal, locate keywords and click Edit.
-
In the Multi-valued String Editor modal, verify the following values exist and update them as needed:
-
azureADId:<tenant ID> -
azureADName:<verified custom domain>
-
-
Click OK to close the Multi-valued String Editor modal.
-
Click Apply and OK to close the Properties modal.
-
Close ADSI Edit.
-
Result
Devices joined to the domain found in the specified AD OU are now eligible for hybrid join after the next sync completes. They don’t typically display in the Entra admin center on the All devices page until after the next sync, but they might appear with a Registered status of Pending at this point.
(Optional) Disabling fallback sync in Windows
Recent Windows operating systems come with a fallback sync mechanism if a hybrid join request fails at the federated IdP. Consider disabling fallback sync on the device for which you want to verify the hybrid join process is configured properly. Disabling fallback sync allows PingOne as the federated IdP to handle hybrid join and any other scenarios that use the STS flow.
You can disable or re-enable the Fallback to Sync-Join setting by editing the DWORD in the Windows Registry.
|
Modifying the registry should be done with caution. Incorrect changes can cause serious operating system problems or corruption and can prevent your system from booting. |
Steps
-
On a Windows-based computer to be joined to the cloud, open Registry Editor.
-
Go to
Computer\HKEY_LOCAL_MACHINE\SOFTWARE\Microsoft\Windows\CurrentVersion\CDJand locate the FallbackToSyncJoin DWORD, as shown in the following image.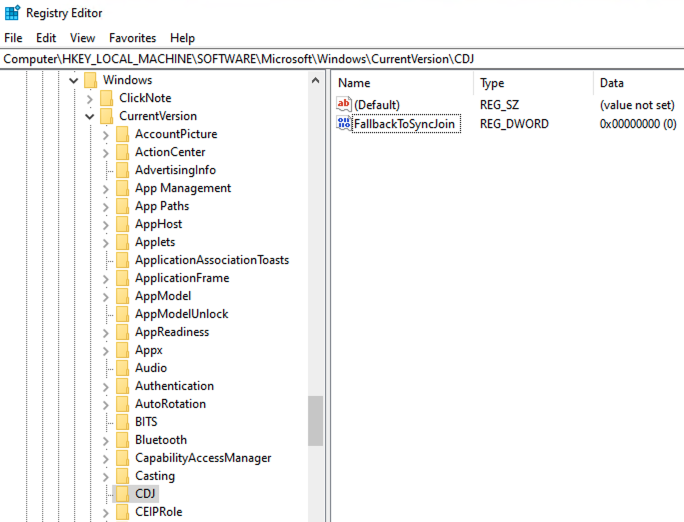
-
If the
CDJkey doesn’t exist inComputer\HKEY_LOCAL_MACHINE\SOFTWARE\Microsoft\Windows\CurrentVersion, create this new key by right-clicking in theCurrentVersionfolder and clicking New > Key. -
If the FallbackToSyncJoin DWORD doesn’t exist in the
CDJkey folder, create this new DWORD by right-clicking in theCDJkey folder and clicking New > DWORD (32-bit) Value.
-
-
To disable fallback sync:
-
Double-click the FallbackToSyncJoin DWORD.
-
Set Value data to
0. -
Click OK.
When disabled, the device won’t try fallback sync when
dsregcmd /joinfails.
-
-
To re-enable fallback sync:
-
Double click the FallbackToSyncJoin DWORD.
-
Set Value data to
1. -
Click OK.
The device will try fallback sync when
dsregcmd /joinfails.
-
You can find additional guidance on disabling the Fallback to Sync-Join setting in Troubleshoot devices using the dsregcmd command in the Entra documentation.
Validation
You’re ready to run the dsregcmd command to start the hybrid join process for a device and verify it succeeded. You can find examples of successful and failed responses in Reference and troubleshooting for Microsoft Entra hybrid join.
-
Sign on to a Windows-based computer.
-
Open PowerShell and select the Run as Administrator option.
-
In PowerShell, run
dsregcmd /statusto review the current state.Result:
The following is returned:
PS C:\Windows\System32> dsregcmd /status

+----------------------------------------------------------------------+
| Device State                                                         |
+----------------------------------------------------------------------+

             AzureAdJoined : NO
          EnterpriseJoined : NO
              DomainJoined : YES
AzureAdJoined : NOmeans the device isn’t hybrid joined to Entra ID yet.If it’s already joined, you can run
dsregcmd /leaveto remove the device from Entra ID, and you shouldn’t see this device in Devices > All devices in the Entra admin center. -
Run
dsregcmd /join /debugto start the hybrid join process.Example:
The following is an example response:
PS C:\Windows\System32> dsregcmd /join /debug
DsrCLI: logging initialized.
...
Join request ID: 7d05360e-378f-4e2e-81b1-0289d60b974b
Join response time: Thu, 10 Jul 2025 17:22:14 GMT
Join HTTP status: 200
DsrCmdJoinHelper::Join: AutoEnrollAsComputer completed successfully
DSREGCMD_END_STATUS
             AzureAdJoined : YES
          EnterpriseJoined : NO
                  DeviceId : 3f0817b9-ca17-4714-ab81-f7b5943dec7b
...
                  TenantId : 07ec9af2-7ce5-4ab7-8638-115736bbf990
AzureAdJoined : YESmeans the hybrid join attempt succeeded, and the device is now hybrid joined to Entra ID. You should now see the device in Devices > All devices in the Entra admin center.Troubleshooting:
If
dsregcmd /joinfails to hybrid join the device and it isn’t showing in the Entra admin center:-
If you ran the
dsregcmd /leavecmdlet to unjoin a device from Entra ID, it can take some time before you can join the device again. Try again in 5 - 15 minutes. -
Run
dsregcmd /join /debugagain to get additional information for troubleshooting. You can find troubleshooting information in Reference and troubleshooting for Microsoft Entra hybrid join.
-
-
Run
dsregcmd /statusagain.Result:
The following is returned:
PS C:\Windows\System32> dsregcmd /status
...
+----------------------------------------------------------------------+
| SSO State                                                            |
+----------------------------------------------------------------------+

                AzureAdPrt : YES
      AzureAdPrtUpdateTime : 2025-07-10 15:46:21.000 UTC
      AzureAdPrtExpiryTime : 2025-07-24 15:46:20.000 UTC
       AzureAdPrtAuthority : https://login.microsoftonline.com/07ec9af2-7ce5-4ab7-8638-115736bbf990
             EnterprisePrt : NO
    EnterprisePrtAuthority :
AzureAdPrt : YESmeans the device received a PRT from Entra ID for the signed-on user. -
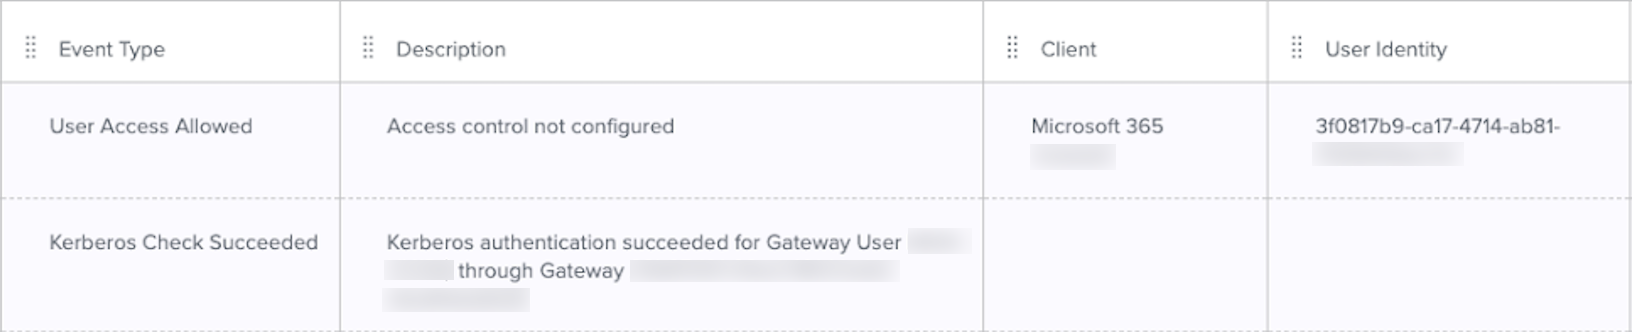
Verify an event displays in the PingOne audit log and the device you just joined displays in the population you created for hybrid joined devices:
-
In the PingOne admin console, go to Monitoring > Audit and review the newest events.
You should see a Kerberos Check Succeeded event.
-
Go to Directory > Users.
-
Click the Filter icon () and select the checkbox for the population you created for hybrid joined devices.
Result:
The Users list displays user records in the hybrid joined population. You should see a record for the device you joined. The Username will match the User Identity in the audit log.
-
Troubleshooting
Refer to Reference and troubleshooting for Microsoft Entra hybrid join for help troubleshooting issues.
What’s next
-
Repeat the steps in Validation for each device you want to be hybrid joined to both AD and Entra ID.
-
Implement the hybrid join configuration in your PingOne production environment and roll it out in stages to your users:
-
Move early adopters to a separate OU and configure Entra Connect Sync to sync devices from the early adopters OU only by running
dsregcmd /join /debugon those devices. This should prevent configuration issues from impacting all of your users. -
If you don’t experience issues with the early adopters OU, repeat step 2a with another set of users.
-
Gradually increase the set of users to cover all applicable users and devices.
-