Hosted account pages
Hosted account pages are pre-built, customizable web pages that provide end users with self-service capabilities for managing their accounts after they’ve signed on. They’re a key part of the end-user experience and are designed to help you quickly set up common end-user self-service operations without needing to build your own custom web pages from scratch.
Summary of features
These pages allow authenticated end users to perform essential account management tasks. The specific features available depend on your Advanced Identity Cloud configuration, but commonly include:
-
Profile management: End users can view and update their personal information (for example, name, email address, address) if they’re configured to be editable.
-
Security management:
-
Password updates: Allowing end users to change their password.
-
Multi-factor authentication (MFA): Managing registered devices or two-step verification settings.
-
Security questions: Viewing or resetting their security questions.
-
-
Access and entitlement viewing: End users can see details about their access within integrated applications, which often includes:
-
My applications: Viewing and navigating to applications they have access to.
-
Roles and entitlements: Seeing the roles and specific privileges (entitlements) they have been assigned in onboarded target applications.
-
Account controls: Allowing end users to download or delete their own account data (if enabled).
-
-
Identity governance: With Identity Governance[1], end users can also:
-
Manage delegates: Assign individuals to handle their access reviews or other delegated items.
-
View direct reports: Managers can access the accounts, entitlements, and roles of their direct reports.
-
Manage requests: Create or view requests they have submitted for gaining access to an application, entitlement, or role.
-
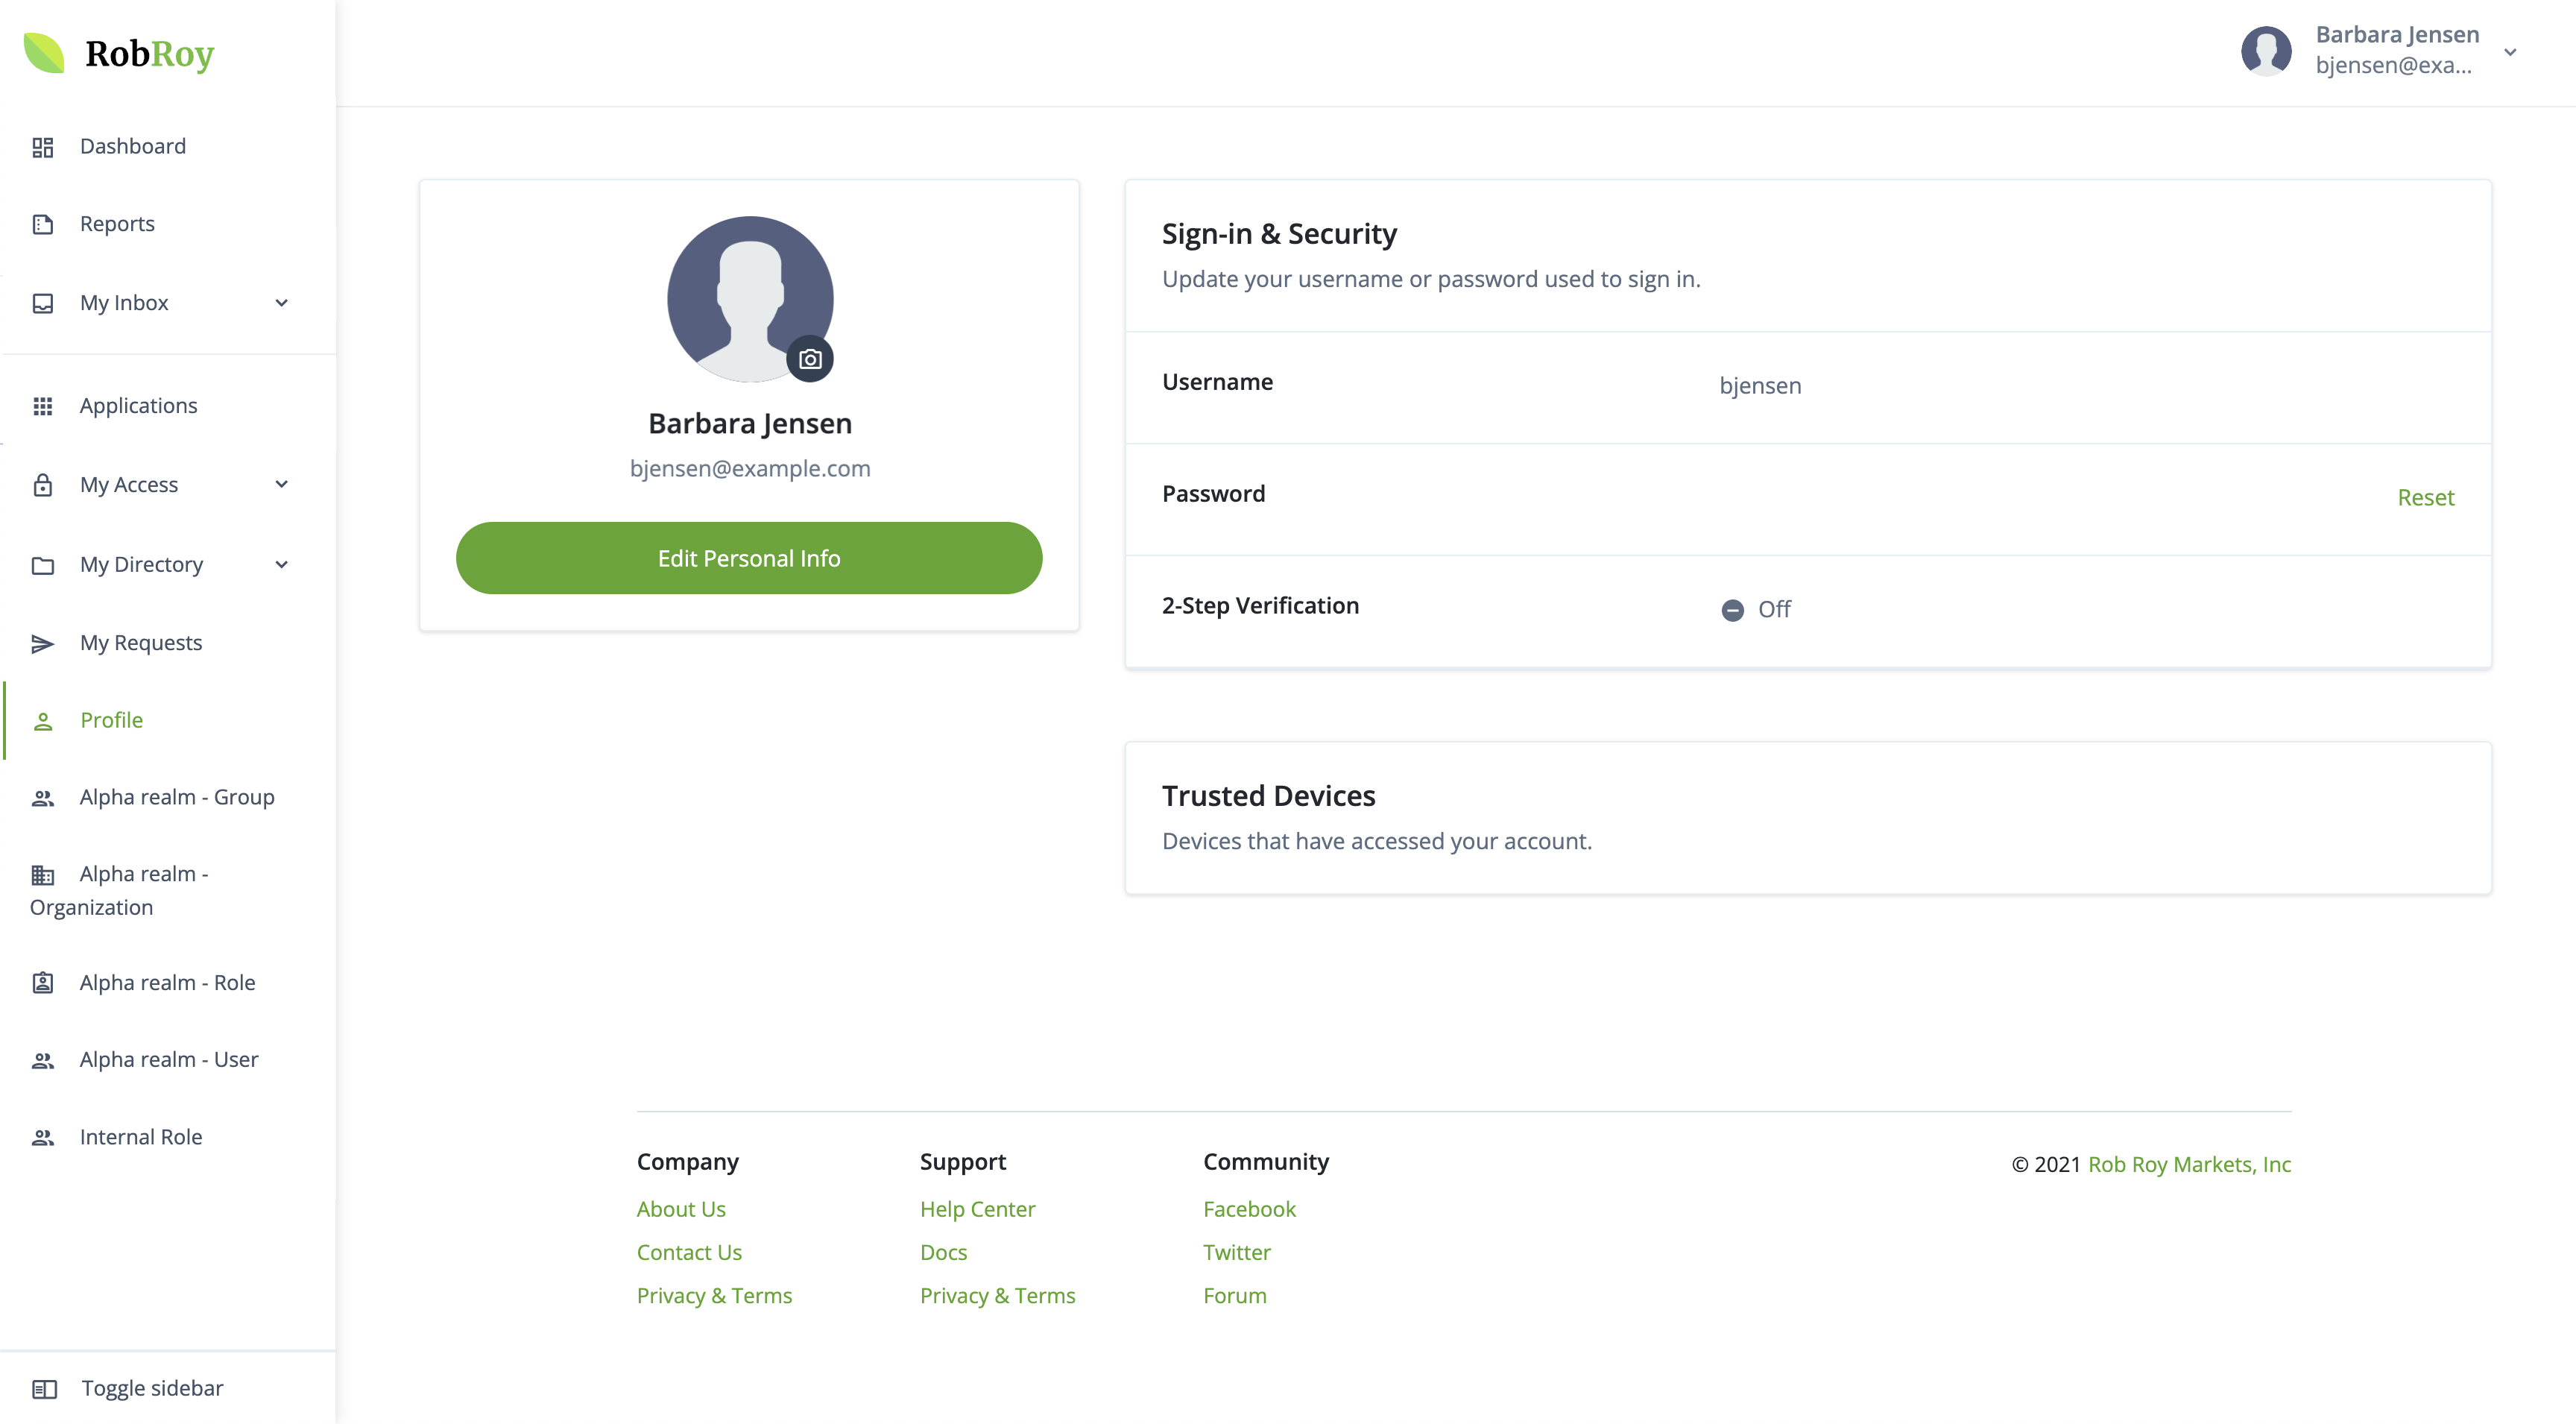
Account pages menu
The hosted account pages include a navigation menu that provides easy access to the various self-service features.
The items displayed in the menu depend on a number of factors:
-
Availability and visibility: Menu items display based on their availability and visibility as follows:
-
Available as standard, visible by default to all end users.
-
Available as standard, visible based on the delegated administrator privileges of the end user.
-
Available and visible to all end users as part of an add-on capability, such as IGA[1].
-
-
Configuration: You can override the visibility of menu items through configuration settings to suit your company’s needs. This lets you hide certain menu items that are not relevant to your end users. For example, hiding the organization menu item from organization administrators whose regular job only requires managing users within the organization, but not the organization itself. Learn more in Change menu item visibility.
You can also change the order and grouping of menu items in the navigation menu, add custom menu items, and modify their icons to align with your branding.
Menu items available as standard
The following table summarizes the behavior of the menu items that are available as standard in the hosted account pages:
| Menu item | Visibility | Description |
|---|---|---|
Dashboard |
|
Displays tasks and information that require the end user’s attention. |
Applications |
Lets the end user view and access their applications. Displays SAML-based applications and Bookmark applications, but not OAuth 2.0 applications. |
|
Profile |
Lets the end user view and edit their account profile, including personal information. The actions available on this page vary depending on the configurations set in Configure actions and information for end users. |
|
Reports |
Lets the end user view any reports shared with them by a tenant administrator. |
|
Alpha realm - Assignment |
|
Lets the end user access the management interface for the identity type. |
Alpha realm - Group |
||
Alpha realm - Organization |
||
Alpha realm - Role |
||
Alpha realm - User |
||
Internal Role |
Menu items available with add-on capabilities
The following table summarizes the behavior of the menu items that are available with add-on capabilities in the hosted account pages:
| Menu item | Visibility | Description |
|---|---|---|
My Inbox Submenu items:
|
|
Displays all items assigned to an end user. This includes:
|
My Access Submenu items:
|
Lets the end user view the access they have in Advanced Identity Cloud and via applications. This includes:
Learn more in Request access to resources. |
|
My Directory Submenu items:
|
Lets the end user manage the delegates and direct reports (employees) they have. End users can perform the following actions:
|
|
My Requests |
Lets the end user view and create requests to access resources, such as target applications, entitlements, or roles. Learn more in Request access to resources. |
Customize the account pages menu
Enable delegated administrator menu items
By default, the menu items related to delegated administrator privileges (for example, Alpha realm - User) aren’t visible to end users.
These menu items become visible only when an end user is assigned to an internal role that has at least the view privilege for the corresponding identity type.
The following steps describe how to create an internal role with the necessary privileges to manage an identity type and assign it to an end user.
-
In the Advanced Identity Cloud admin console, go to Identities > Manage.
-
Click Internal Roles.
-
Click New Internal Role.
-
In the New Internal Role modal:
-
Enter a name for the internal role. For example,
Delegated Administrator. -
(Optional) Enter a description for the internal role.
-
Click Next.
-
-
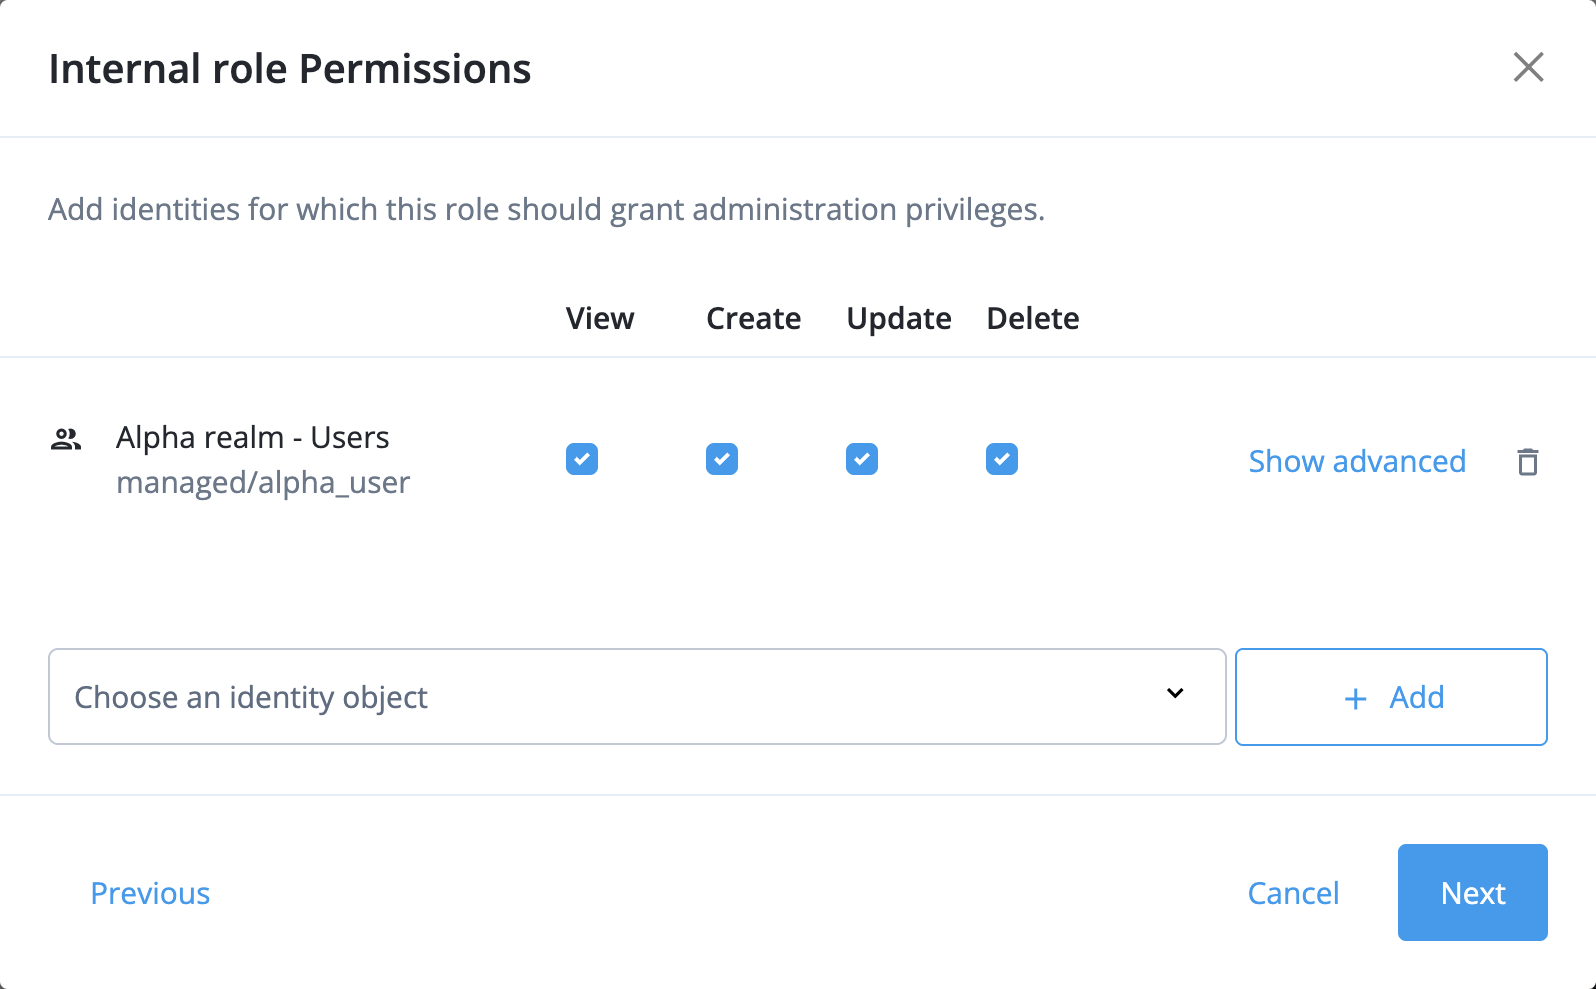
In the Internal role Permissions modal:
-
In the Choose an identity object list, select an identity type. For example, Alpha realm - Users.
-
Click Add.
-
Select at least the View privilege and any additional privileges for the identity type using the Create, Update, and Delete options.
-
(Optional) Repeat the previous three steps to add additional identity types and their corresponding privileges as necessary.
-
Click Next.
-
-
In the Dynamic Internal role Assignment modal, click Next.
-
In the Time Constraint modal, click Save to create the internal role.
-
In the Internal Role page, click the Members tab, then click Add Members.
-
In the Add Members modal, select a user identity from the Members list that you want to assign the internal role to, then click Save.
The end user can now see the corresponding delegated administrator menu items in the hosted account pages navigation menu when they sign on.
|
For more complex delegated administration use cases, learn more in: |
Change the visibility of a menu item
Change the visibility of menu items to streamline the end-user experience.
-
In the Advanced Identity Cloud admin console, go to Hosted Pages, then select a theme.
-
Select Account Pages.
-
In the panel on the right-hand side, click Layout, then scroll to the Navigation section.
-
To hide a menu item:
-
Find the menu item you want to hide, and click its ellipsis icon ().
-
Click Delete. This removes the menu item from the navigation menu, although it remains available for re-adding later.
-
Click Save.
-
-
To show a previously hidden menu item:
-
Click the add icon ().
-
From the list of available menu items, select the menu item you want to show, then click Next.
-
Configure the menu item:
-
(Optional) Change the Label.
-
(Optional) Change the Icon Code. For a list of available icon codes, refer to Material Icons.
-
(Optional) If the menu item has submenu items, select which submenu items to include using the checkboxes under Dropdown Items. By default, all submenu items are selected.
-
-
Click Add.
-
(Optional) Click the menu item’s drag indicator icon () and drag the menu item to the desired position in the menu.
-
Click Save.
-
Change menu item order and grouping
Change the order and grouping of menu items in the navigation menu to suit your company’s needs.
-
In the Advanced Identity Cloud admin console, go to Hosted Pages, then select a theme.
-
Select Account Pages.
-
In the panel on the right-hand side, click Layout, then scroll to the Navigation section.
-
To reorder menu items:
-
Click a menu item’s drag indicator icon () and drag it to the desired position in the menu.
-
Repeat for any other menu items you want to reorder.
-
-
To group menu items:
-
(Optional) Add additional divider menu items to the menu:
-
Click the add icon ().
-
From the list of available menu items, select Divider, then click Next.
-
Repeat as necessary to add multiple divider menu items.
-
-
(Optional) Remove existing divider menu items that you don’t need:
-
Find the divider menu item you want to remove, and click its ellipsis icon ().
-
Click Delete.
-
-
Click the drag indicator icon () of a Divider menu item and drag it to the desired position in the menu to create a visual separation between groups of menu items. Repeat for any other Divider menu items you want to reposition.
-
Click Save.
-
Change menu item label and icon
Change the label or icon for your menu items to better align with your company’s branding.
-
In the Advanced Identity Cloud admin console, go to Hosted Pages, then select a theme.
-
Select Account Pages.
-
In the panel on the right-hand side, click Layout, then scroll to the Navigation section.
-
Find the menu item you want to change, and click its ellipsis icon ().
-
Configure the menu item:
-
(Optional) Change the Label.
-
(Optional) Change the Icon Code. For a list of available icon codes, refer to Material Icons.
-
(Optional) If the menu item has submenu items, select which submenu items to include using the checkboxes under Dropdown Items. By default, all submenu items are selected.
-
-
Click Save.
Add custom menu items
Add a custom menu item to link to other Ping Identity resources such as the PingOne Dock, PingOne self service, or a specific journey or flow. You can also link to resources in your company that end users may need to access.
-
In the Advanced Identity Cloud admin console, go to Hosted Pages, then select a theme.
-
Select Account Pages.
-
In the panel on the right-hand side, click Layout, then scroll to the Navigation section.
-
Click the add icon ().
-
From the list of available menu items, select Custom Link, then click Next.
-
Configure the menu item:
-
Enter a menu Label.
-
(Optional) Change the Icon Code. For a list of available icon codes, refer to Material Icons. Otherwise, the default link icon () is used.
-
Enter an absolute URL for the custom menu item. The URL opens in a new browser tab when the end user clicks the menu item.
-
Click Add.
-
-
(Optional) Click the menu item’s drag indicator icon () and drag the menu item to the desired position in the menu.
-
Click Save.