Set up PingOne workers and configure them as Advanced Identity Cloud services
Integrate your Advanced Identity Cloud tenant environments with PingOne workers so that you can configure PingOne products (such as PingOne Protect and PingOne Verify) in your Advanced Identity Cloud authentication journeys.
PingOne workers are userless service applications that can perform administrative functions in PingOne. You connect to them from Advanced Identity Cloud using an access management service configured with the worker’s OpenID Connect (OIDC) credentials.
| You only need to set up workers once for each of your Advanced Identity Cloud tenant environments and their mapped PingOne environments. You can then use the same worker service configuration in each of your Advanced Identity Cloud tenant environments. |
Task 1: Create a worker application in each mapped PingOne environment
Create a worker application in each of your mapped PingOne environments. These provide access to the PingOne admin APIs using OpenID Connect (OIDC) credentials. In later tasks, you’ll configure each of your Advanced Identity Cloud tenant environments with these OIDC credentials.
In the PingOne admin console, perform the following steps for each of your mapped PingOne environments:
-
In the sidebar, click the Ping Identity logo to open the Environments page.
-
Click an environment in the list, then click Manage Environment.
-
Go to Applications > Applications, then click the add icon ().
-
In the Add Application panel:
-
In Application name, enter a unique name for the worker application.
For example,
PingOne Worker AIC. -
(Optional) Enter a Description for the application, select an Icon, or both. These don’t affect the operation of the worker application but do help you identify it in the list.
-
In Application Type, select Worker.
-
Click Save.
-
-
In the application properties panel for the worker application you created:
-
On the Roles tab, click Grant Roles.
-
On the Available responsibilities tab, select the Identity Data Admin row, and ensure the environment is correct.
-
Click Save.
-
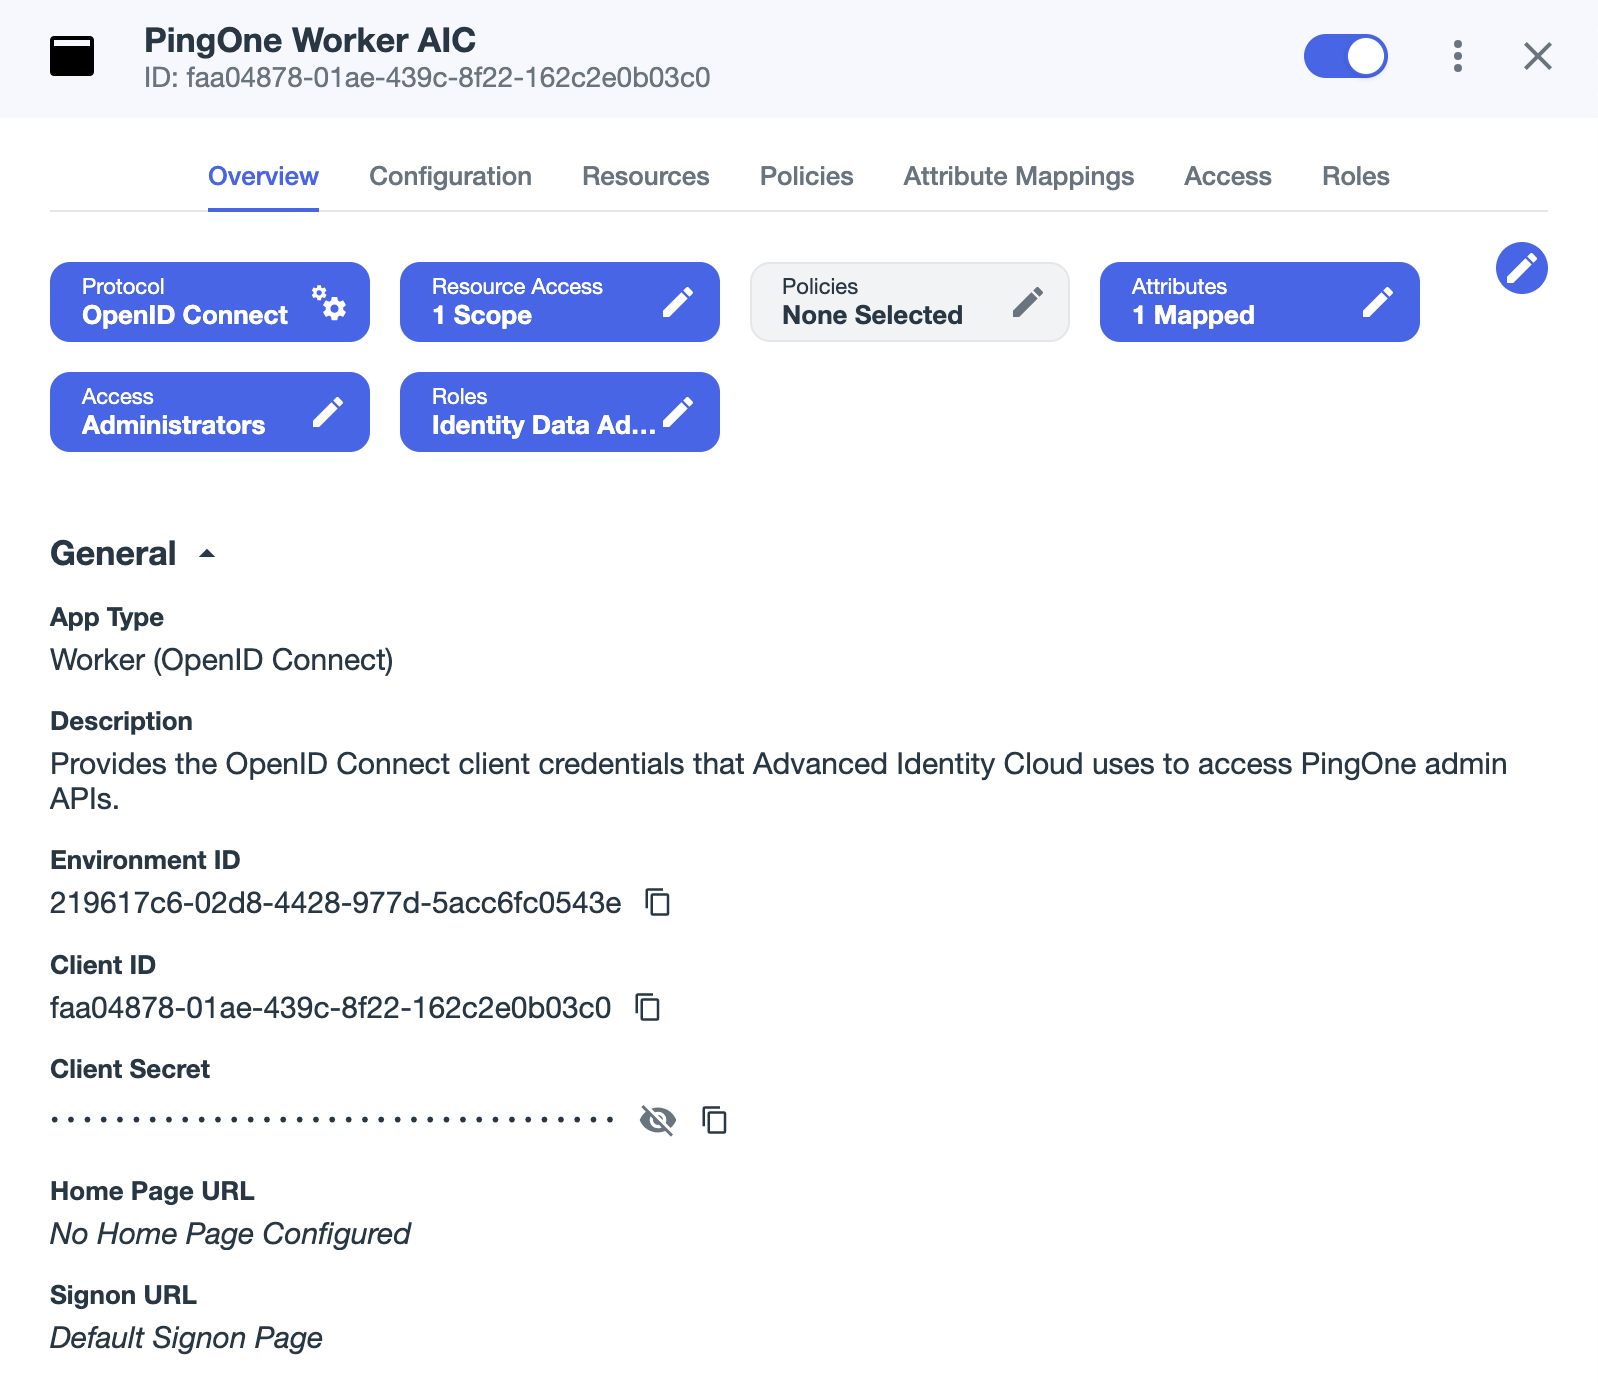
On the Overview tab, enable the worker application using the toggle switch in the top-right corner.
Your worker application should now resemble the following image:
-
Make a note of the following attributes in the Overview tab:
Use the Secret Mask () or Copy to Clipboard () buttons to obtain the value of the client secret. Attribute name Description Example value Environment ID
Identifier of the PingOne environment that contains the worker application.
219617c6-02d8-4428-977d-5acc6fc0543eClient ID
OIDC client ID of the worker application.
faa04878-01ae-439c-8f22-162c2e0b03c0Client Secret
OIDC client secret of the worker application.
zcyE2heP43H5kEUw.VF8YvaXYZ9-ryEsGhTMw85h_NSiEdJvTd3EBDODEvEfCMEM
-
Task 2: Create ESVs for the worker application credentials in each tenant environment
Create ESVs (Environment Secrets and Variables) in each of your Advanced Identity Cloud tenant environments to hold the client credentials and environment IDs of the PingOne worker applications you created in task 1. Creating ESVs lets you configure Advanced Identity Cloud in a way that’s compatible with the promotion process.
In each of your Advanced Identity Cloud tenant environments, perform the following steps:
-
Create the following ESVs using the attribute values from the tenant environment’s mapped PingOne environment.
ESV name ESV type Expression type PingOne attribute value esv-pingone-environment-idVariable
String
Environment ID
esv-pingone-worker-client-idVariable
String
Client ID
esv-pingone-worker-client-secretSecret
String
Client Secret
You can create variables and secrets using the Advanced Identity Cloud admin console or the API.
-
Create a variable or create a secret using the Advanced Identity Cloud admin console.
-
Create a variable or create a secret using the API.
-
Task 3: Create a service in your development environment
Create a PingOne Worker Service in your Advanced Identity Cloud development environment and configure it with the OIDC credentials of the worker application in its mapped PingOne environment. The service is used in Advanced Identity Cloud authentication journey nodes to connect to the PingOne APIs.
Configure the service
In your development environment:
-
In the Advanced Identity Cloud admin console, go to Native Consoles > Access Management.
-
Click Services.
-
Choose one of the following options:
-
If the PingOne Worker Service is in the list of services, select it.
-
If not:
-
Click Add a Service.
-
In Choose a service type, select
PingOne Worker Service, then click Create.
-
-
-
On the Secondary Configurations tab, click Add a Secondary Configuration.
-
On the New workers configuration page:
-
Enter a Name for the configuration. For example,
PingOne Worker AIC.Make a note of this name. You’ll use this value when you configure PingOne authentication journey nodes. -
In the Client ID and Environment ID fields, enter the OIDC client ID and environment ID respectively of the worker application in the development environment’s mapped PingOne environment.
Enter the literal values for these fields at this stage, not ESV placeholders. In later steps, you’ll replace the literal values with placeholders for their respective ESVs ( esv-pingone-environment-idandesv-pingone-worker-client-id). -
In the Client Secret Label Identifier field, enter an identifier to create a specific secret label to represent the OIDC client secret of the worker application. For example,
pingoneworkeraic. This field can only contain charactersa-z,A-Z,0-9, and.and can’t start or end with a period.In later steps, you’ll use this identifier to create a mapping to the esv-pingone-worker-client-secretESV. -
Click Create
-
-
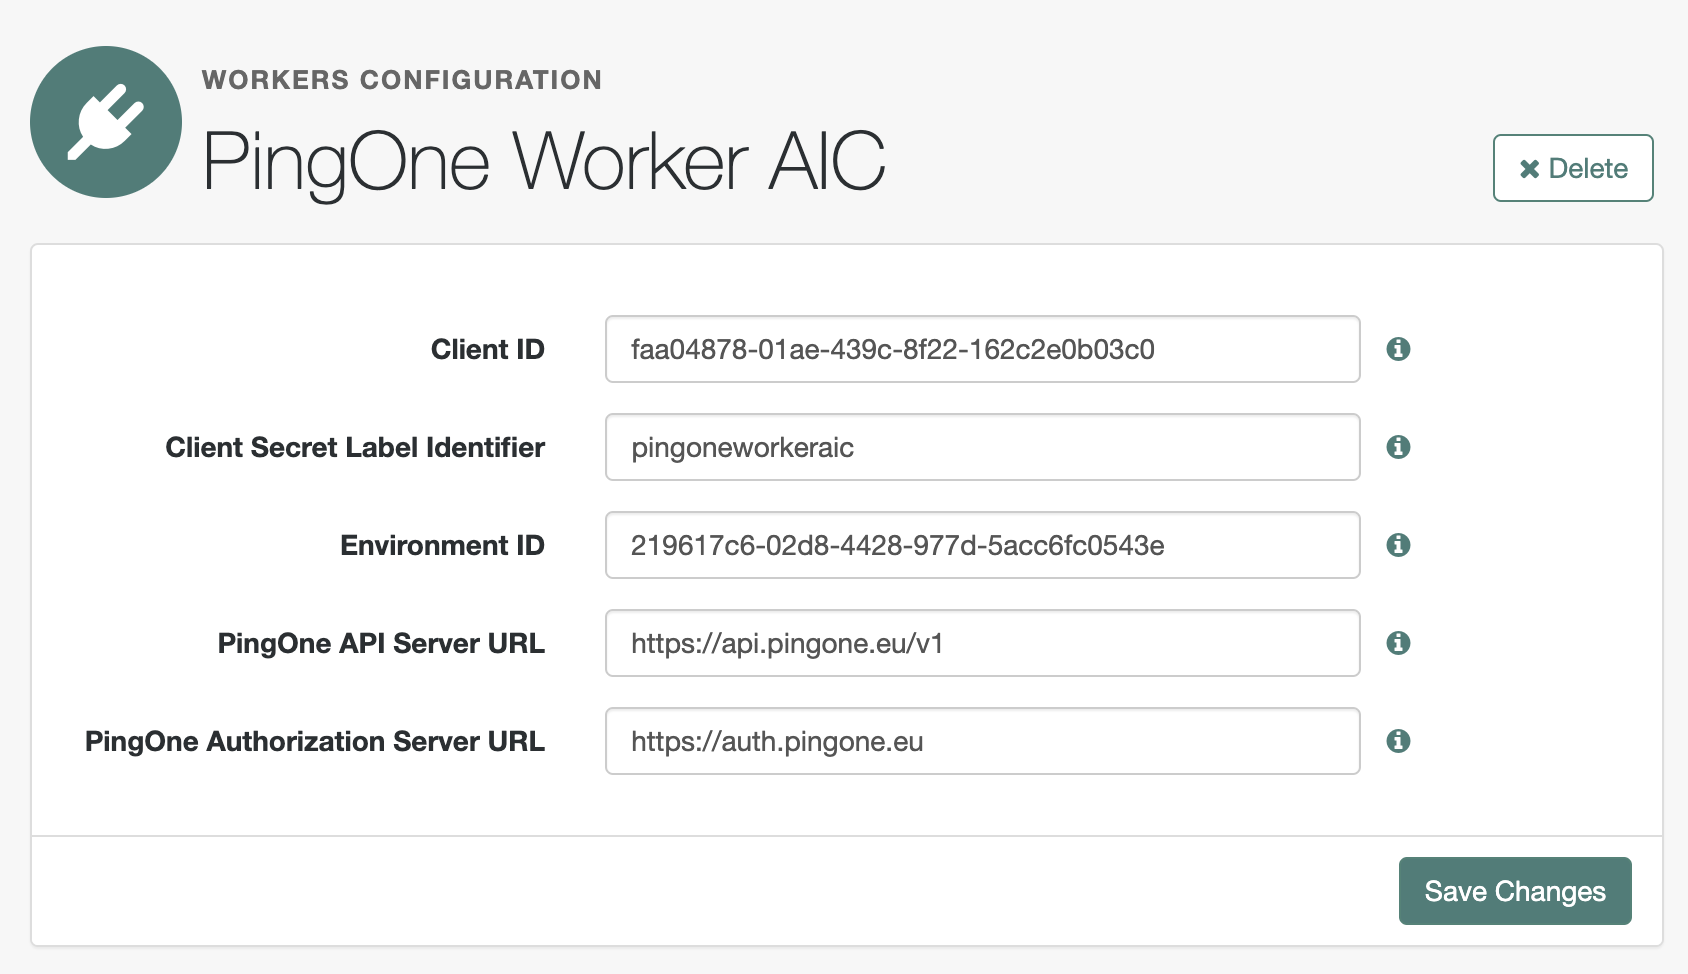
On the Workers Configuration page, ensure that the PingOne API Server URL and PingOne Authorization Server URL are correct for the region of your PingOne servers:
Region Authorization URL API URL North America
(Excluding Canada)
https://auth.pingone.comhttps://api.pingone.com/v1Canada
https://auth.pingone.cahttps://api.pingone.ca/v1Europe
https://auth.pingone.euhttps://api.pingone.eu/v1Asia-Pacific
https://auth.pingone.asiahttps://api.pingone.asia/v1 -
Confirm your configuration resembles the image below, and then click Save changes.
Map the Client Secret Label Identifier of the service to an ESV secret
To make the esv-pingone-worker-client-secret ESV available to the PingOne Worker Service, you must map it using the secret label identifier pingoneprotectworker.
In your development environment:
-
In the Advanced Identity Cloud admin console, click Native Consoles > Access Management.
-
Go to Realm > Secret Stores.
-
Click the ESV secret store, then click Mappings.
-
Click + Add Mapping.
-
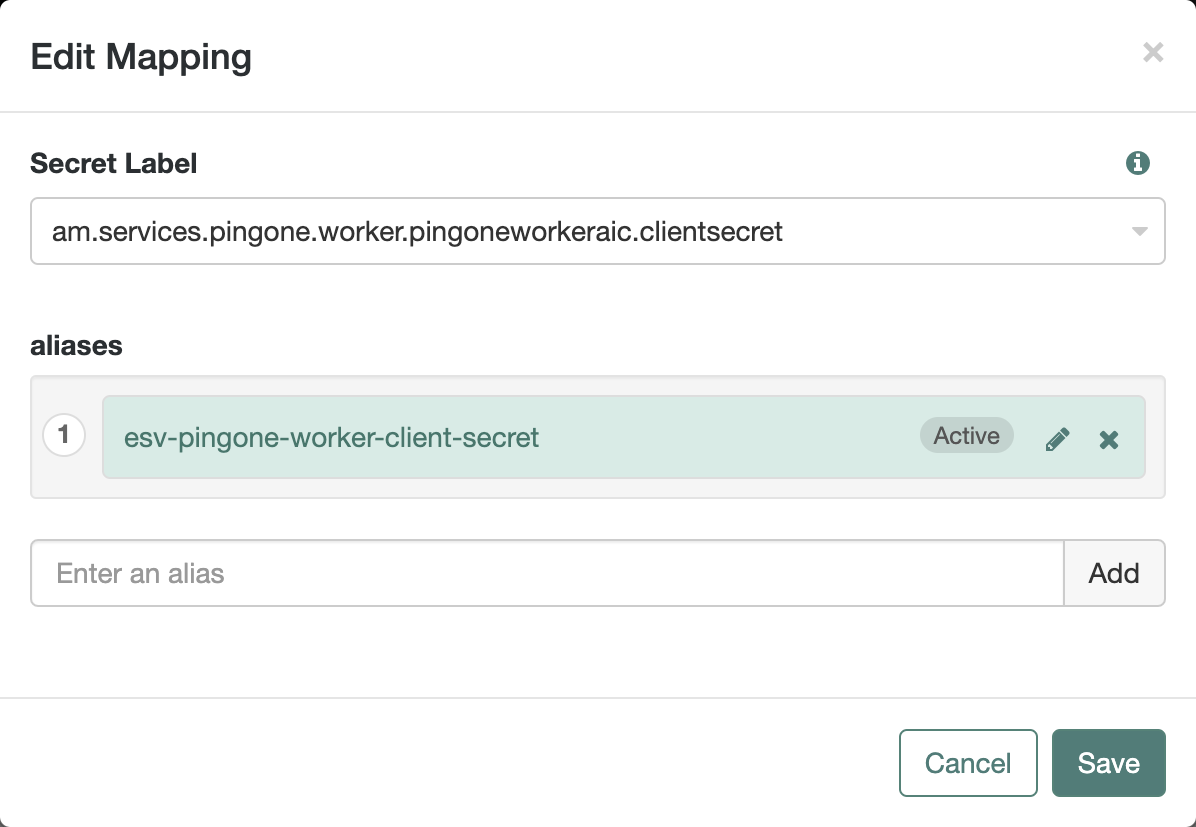
In Secret Label, select the label generated when you entered the Client Secret Label Identifier previously. For example, if you entered Client Secret Label Identifier of
pingoneworkeraicthe secret label will beam.services.pingone.worker.pingoneworkeraic.clientsecret. -
In aliases, enter the name of the ESV secret you created earlier (
esv-pingone-worker-client-secret), then click Add.
The result resembles the following:
-
-
Click Create.
Learn more about mapping secrets and label identifiers for Advanced Identity Cloud in Secret labels.
Insert ESV placeholders into the service configuration
To make the esv-pingone-environment and esv-pingone-worker-client-id ESVs available to the PingOne Worker Service, you must replace the literal values in the worker service configuration with ESV placeholders.
In your development environment, follow the instructions in Insert ESV placeholders into the secondary configuration of a PingOne worker service.
Task 4: Test the integration
It’s not possible to directly test the PingOne worker service in isolation. Instead, you need to trigger a downstream PingOne service (for example, PingOne Protect, PingOne Verify) from within a journey or policy, and observe whether that interaction (facilitated by the worker service) succeeds or fails.
In your development environment:
-
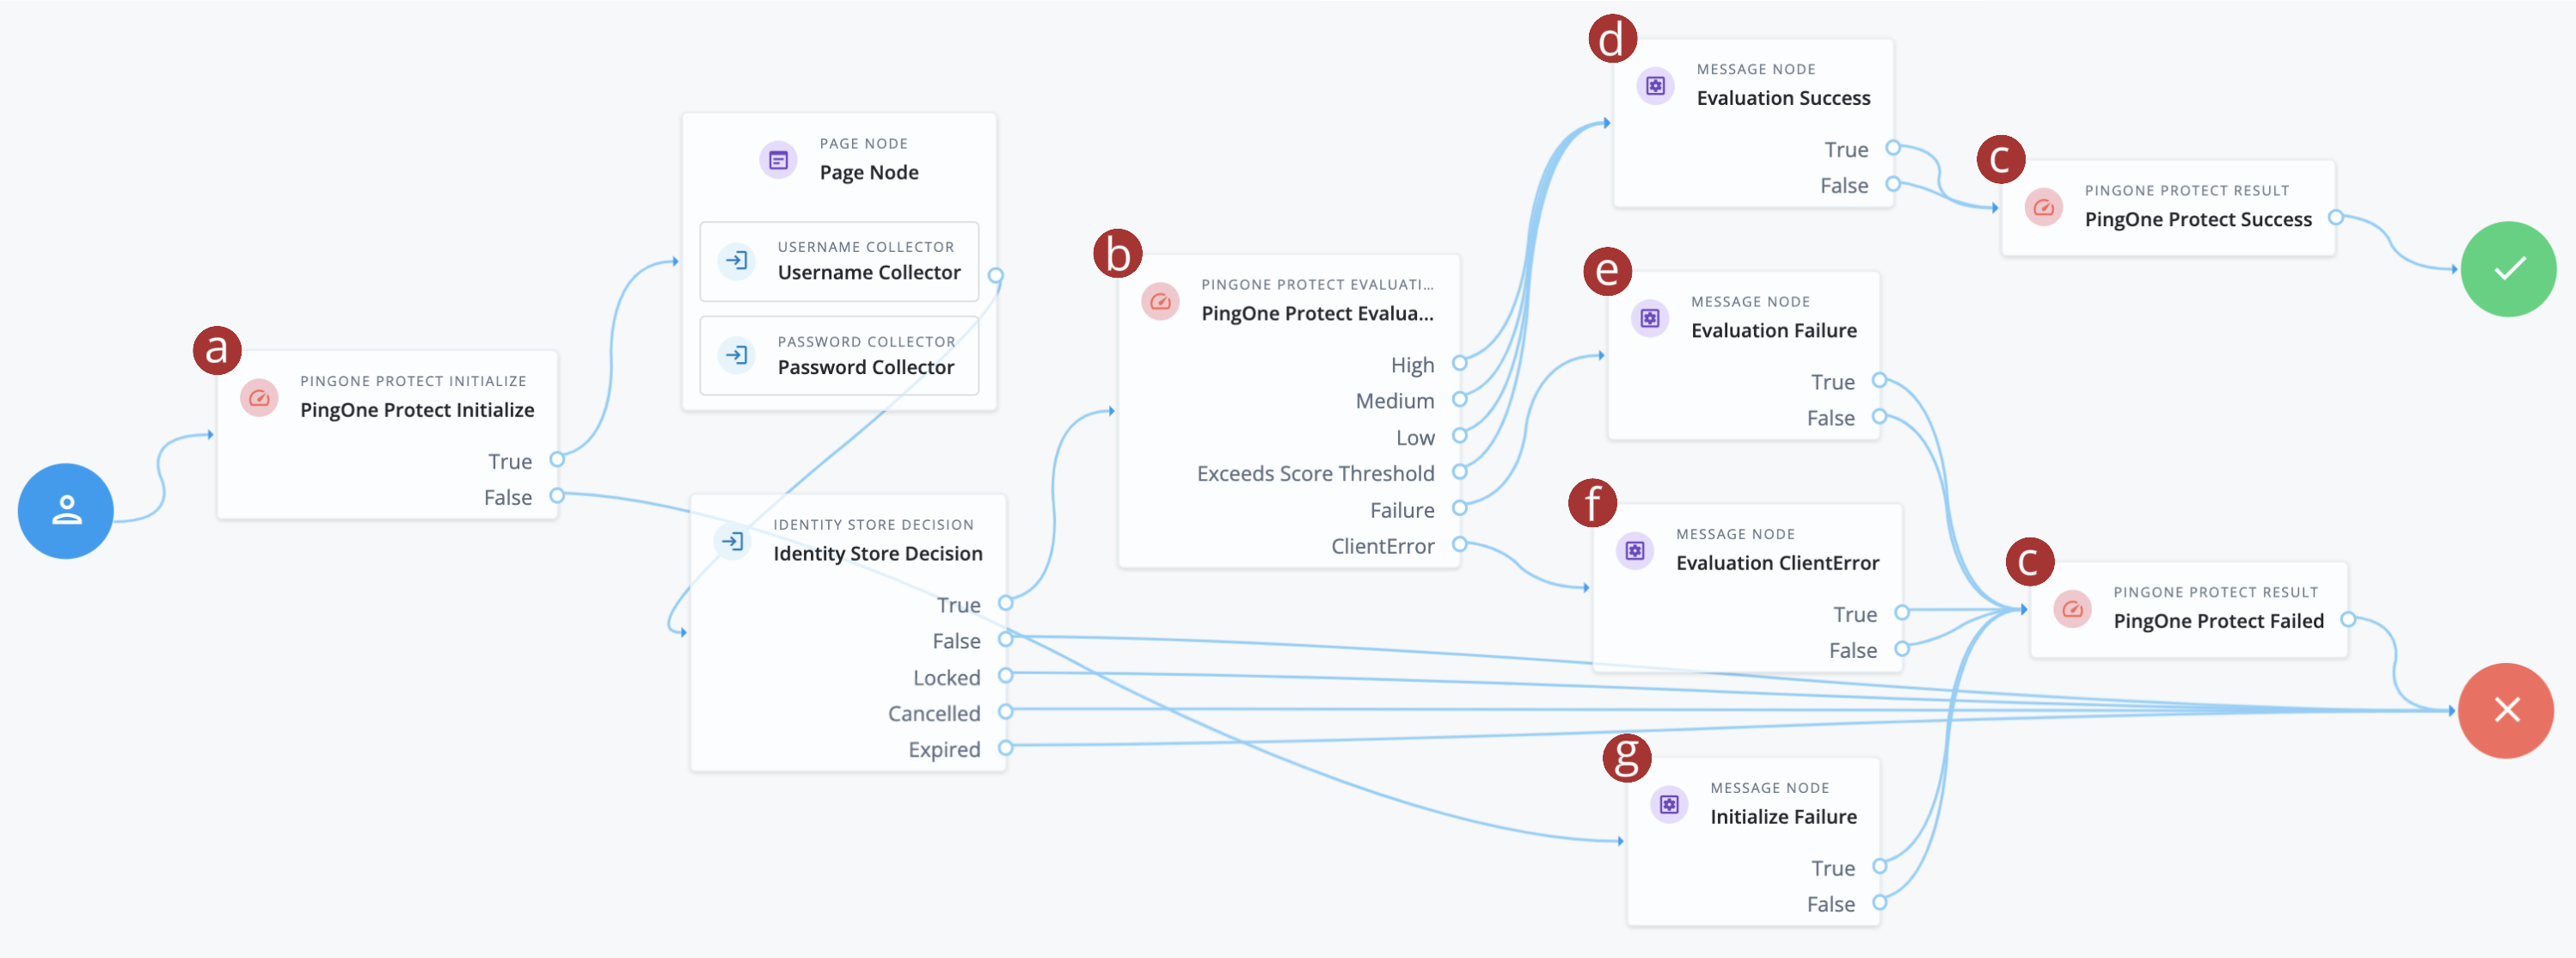
Create a basic authentication journey that uses PingOne authentication nodes, such as the following:
-
a PingOne Protect Initialize node: This node initializes the PingOne Signals (Protect) SDK to collect contextual data for risk evaluation.
-
b PingOne Protect Evaluation node: This node evaluates the risk score based on the contextual data collected by the PingOne Signals (Protect) SDK.
-
c PingOne Protect Result nodes: These nodes send transaction feedback to PingOne Protect, which is vital for the continuous learning and optimization of the PingOne Protect models. Over time, this feedback helps PingOne Protect learn what constitutes legitimate and fraudulent activity in your environment.
-
d Evaluation Success Message node: This node captures any outcomes where the risk evaluation was performed successfully, regardless of whether the risk was high or low.
-
e Evaluation Failure Message node: This node captures the outcomes where no risk evaluation was performed. This is usually a strong indication that the worker service is not configured correctly.
-
f Evaluation ClientError Message node: This node captures the outcomes where the client is not configured correctly, such as when a PingOne Signals (Protect) SDK could not be initialized.
-
g Initialize Failure Message node: This node captures the outcomes where the client failed to initialize a PingOne Signals (Protect) SDK to capture risk signals. If you use hosted pages to run the journey, the PingOne Signals (Protect) SDK for Web is initialized automatically, so this node is unlikely to be reached.
-
-
Configure the PingOne Protect nodes as follows:
PingOne Protect Initialize node
-
Location:
-
Insert the node at the start of the journey, before the Page node.
-
-
Connections:
-
Connect the True outcome to the Page node.
-
Connect the False outcome to the Initialize Failure Message node.
-
-
Configuration:
-
In the PingOne Worker Service ID field, select the worker service you created in task 3. For example,
PingOne Worker AIC. -
Select the Store Risk Evaluation checkbox. This enables the node to store the risk evaluation in the session. This lets you view the risk evaluation output when debugging and testing the journey.
-
Accept the default values for the other fields.
-
PingOne Protect Evaluation node
-
Location:
-
Insert the node after the Identity Store Decision node.
-
-
Connections:
-
Connect the High, Medium, Low, and Exceed Score Threshold outcomes to the Evaluation Success Message node.
-
Connect the Failure outcome to the Evaluation Failure Message node.
-
Connect the ClientError outcome to the Evaluation ClientError Message node.
-
-
Configuration:
-
In the PingOne Worker Service ID field, select the worker service you created in task 3. For example,
PingOne Worker AIC. -
Accept the default values for the other fields.
-
PingOne Protect Result node (connected to the Success node)
-
Location:
-
Insert the node before the Success node.
-
-
Connections:
-
Connect the outcome to the Success node.
-
-
Configuration:
-
In the Name field, enter
PingOne Protect Success. -
In the Completion Status field, select
SUCCESS.
-
PingOne Protect Result node (connected to the Failure node)
-
Location:
-
Insert the node before the Failure node.
-
-
Connections:
-
Connect the outcome to the Failure node.
-
-
Configuration:
-
In the Name field, enter
PingOne Protect Failure. -
In the Completion Status field, select
FAILURE.
-
-
-
Configure four Message nodes as follows:
Message node: Evaluation Success
-
Location:
-
Insert the node after the PingOne Protect Evaluation node.
-
-
Connections:
-
Connect both outcomes to the PingOne Protect Result success node.
-
-
Configuration:
-
Set the Name and Message fields to
Evaluation Success.
-
Message node: Evaluation Failure
-
Location:
-
Insert the node after the PingOne Protect Evaluation node.
-
-
Connections:
-
Connect both outcomes to the PingOne Protect Result failure node.
-
-
Configuration:
-
Set the Name and Message fields to
Evaluation Failure.
-
Message node: Evaluation ClientError
-
Location:
-
Insert the node after the PingOne Protect Evaluation node.
-
-
Connections:
-
Connect both outcomes to the PingOne Protect Result failure node.
-
-
Configuration:
-
Set the Name and Message fields to
Evaluation ClientError.
-
Message node: Initialize Failure
-
Location:
-
Insert the node after the PingOne Protect Evaluation node.
-
-
Connections:
-
Connect both outcomes to the PingOne Protect Result failure node.
-
-
Configuration:
-
Set the Name and Message fields to
Initialize Failure.
-
-
-
Test the journey by running the journey’s Preview URL in a new incognito browser window as an end user:
-
If you reach the Evaluation Success Message node, the integration is working correctly.
-
If you reach the Evaluation Failure Message node, check the worker service configuration:
-
Ensure that the ESVs contain the correct values from the worker in the mapped PingOne environment.
-
Ensure that the ESVs are correctly mapped in the Advanced Identity Cloud service.
-
-
If you reach the Evaluation ClientError or Initialize Failure Message nodes, check that you have correctly included and connected the PingOne Protect Initialize node.
-
Task 5: Promote the integration to your other environments
Once you have successfully tested the integration in your development environment, you can promote the worker service configuration to your other environments (UAT[1], staging, production) using the standard promotion process.
-
Determine the promotion order of your tenant environments. This will depend on whether you have a standard promotion group of environments or whether you also have additional UAT environments.
-
In promotion order, for each of the tenant environments in your promotion group, perform the following steps:
-
Ensure that the following ESVs are present and correctly set with values from the tenant environment’s mapped PingOne environment:
-
esv-pingone-environment-id -
esv-pingone-worker-client-id -
esv-pingone-worker-client-secret
-
-
Run a promotion to move the configuration changes to the tenant environment from its respective lower tenant environment. Learn more in:
-
-
(Optional) If you have sandbox[2] environments:
-
Repeat task 3 for each of your sandbox environments to create a service.
-
Repeat task 4 for each of your sandbox environments to test the integration.
-