Use PingOne Protect for risk-based authentication and fraud detection
Integrate your Advanced Identity Cloud tenant environments with PingOne Protect to add risk-based authentication and fraud detection to your user journeys.
PingOne Protect uses continuous, intelligence-based fraud detection to evaluate real-time risk signals from a user’s device, network, and behavior. This allows for an adaptive response to authentication requests, enhancing security while minimizing user friction.
Why use PingOne Protect?
-
Adaptive security: Dynamically adjusts authentication requirements based on real-time risk signals (for example, location, device, behavioral anomalies). This means low-risk logins are frictionless, while high-risk attempts trigger additional challenges (MFA, step-up authentication) enhancing security without burdening legitimate users.
-
Reduced fraud: Proactively identifies and mitigates fraudulent activities, such as account takeover (ATO), credential stuffing, and bot attacks, by analyzing a wide range of contextual factors during authentication.
-
Improved user experience: Minimizes friction for legitimate users by only prompting for additional authentication when truly necessary, leading to higher conversion rates and user satisfaction.
-
Granular control: Provides detailed insights into risk scores and enables administrators to define specific policies for different risk levels within Advanced Identity Cloud authentication journeys.
Learn more about PingOne Protect integration use cases.
How to integrate with PingOne Protect
To integrate with PingOne Protect:
-
Set up PingOne integration:
You only need to perform this setup for the first PingOne product you integrate with Advanced Identity Cloud. -
Set up mapped PingOne environments for each of your tenant environments.
-
Set up PingOne workers and configure them as services in each of your tenant environments.
-
-
Set up an authentication journey in your development environment using the PingOne Protect authentication nodes:
-
Promote the authentication journey to your production tenant environment.
-
Train the PingOne Protect risk models to optimize risk evaluation for your company.
How to load test PingOne Protect
When you plan to load test your integration with PingOne Protect, select the Performance/Load Test Request - Protect Integration option in the support case submission wizard when submitting your plan. This ensures that PingOne Protect can be scaled appropriately to handle the expected load during your test.
Learn more in Create a test plan.
How to set up a PingOne Protect authentication journey
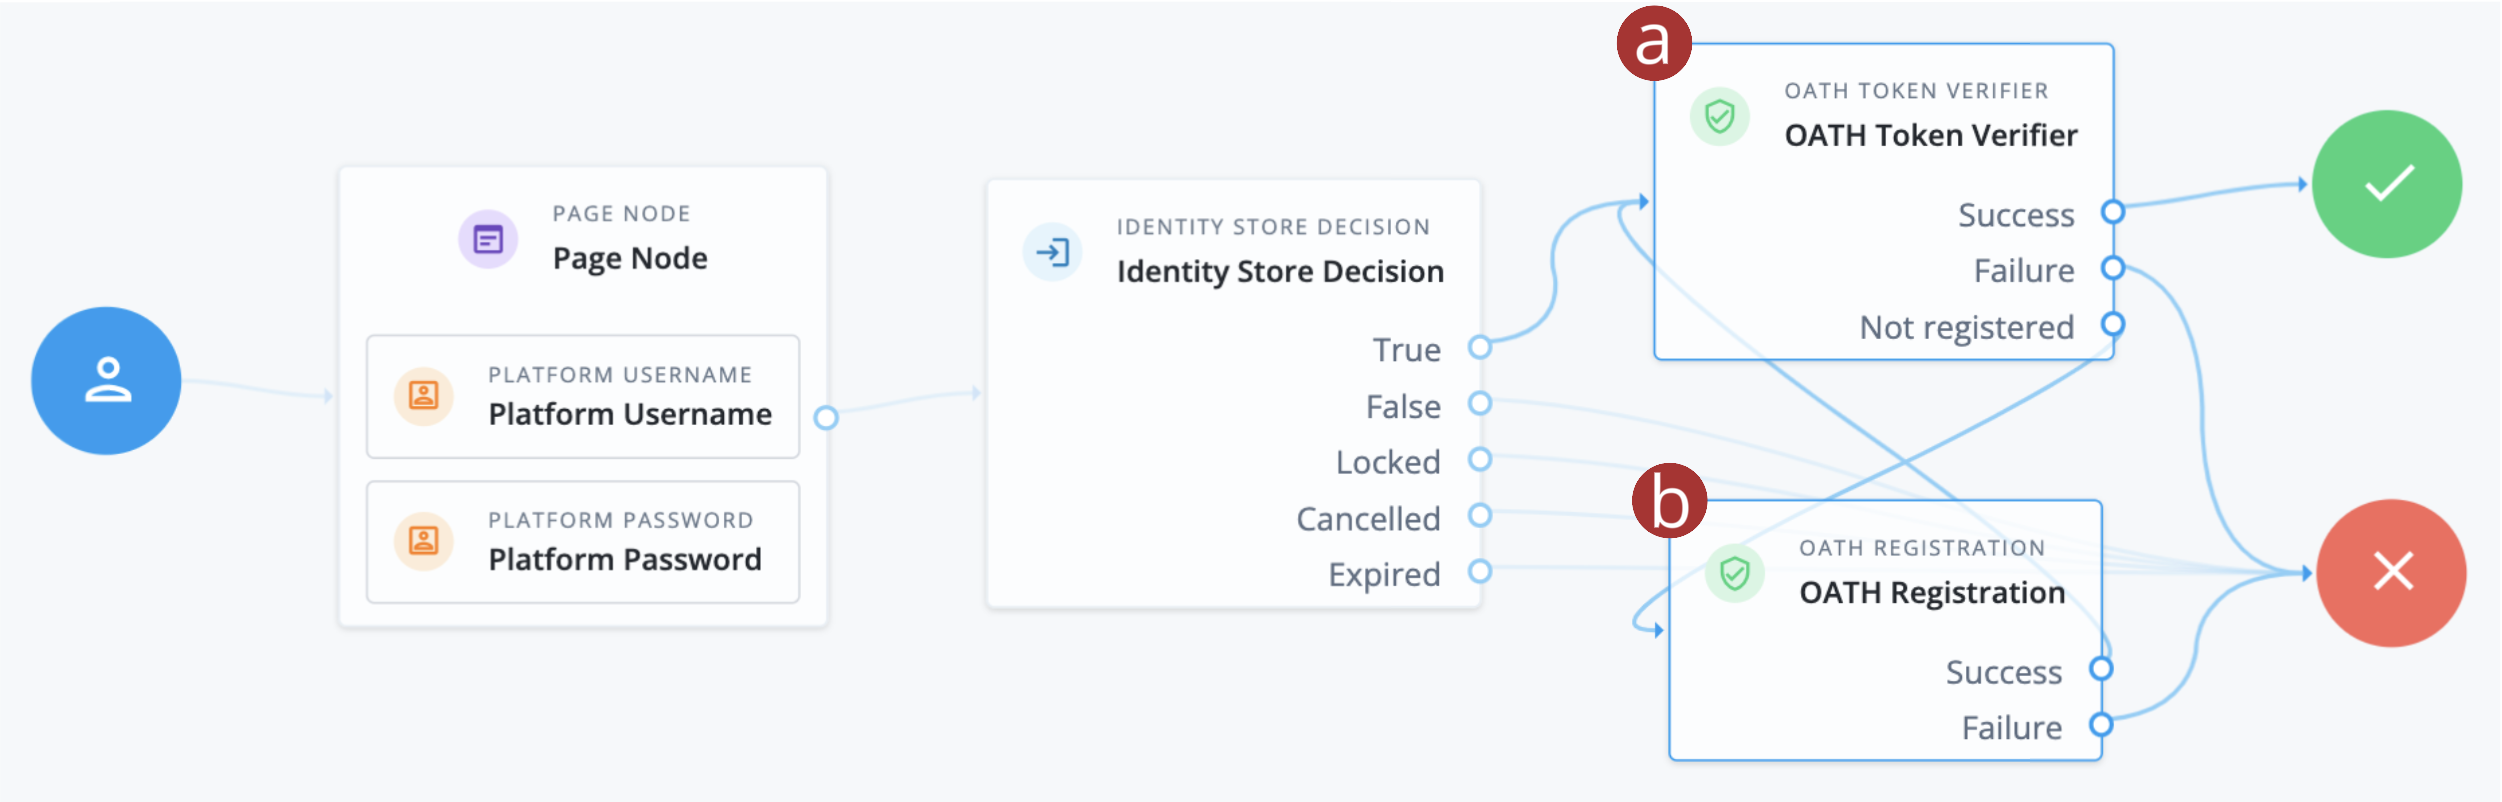
Task 1: Set up an authentication journey with MFA
-
Create the following authentication journey. It’s a basic username and password journey with OATH authentication nodes added to provide a second factor of authentication, also known as multifactor authentication (MFA).
-
a OATH Token Verifier node: This node verifies a one-time password (OTP) generated by an OATH-compliant mobile authenticator application.
-
b OATH Registration node: This node allows a user to register and link a new OATH-compliant mobile authenticator application to their account by scanning a QR code.
This example is a minimum viable journey that is missing important features such as recovery code display, recovery code entry, and retry logic. For a more complete example, refer to OATH Token Verifier node. -
-
Configure the OATH nodes as follows:
OATH Token Verifier node
-
Location:
-
Insert the node after the Identity Store Decision node.
-
-
Connections:
-
Connect the Success outcome to the Success node.
-
Connect the Failure outcome to the Failure node.
-
Connect the Not registered outcome to the OATH Registration node.
-
-
Configuration:
-
Accept the default values for all fields.
-
OATH Registration node
-
Location:
-
Insert the node after the OATH Token Verifier node.
-
-
Connections:
-
Connect the Success outcome to the OATH Token Verifier node.
-
Connect the Failure outcome to the Failure node.
-
-
Configuration:
-
In the Issuer field, enter a name suited to your company. For example,
My Company. This is the name that appears in the authenticator application when users register for OATH. -
Accept the default values for the other fields.
-
-
-
Test the journey by running the journey’s Preview URL in a new incognito browser window as an end user. You can use the following authenticator applications to register for OATH and generate OATH tokens:
-
Any third-party authenticator application that supports the Time-Based One-Time Password (TOTP) open standard. For example, Google Authenticator or Salesforce Authenticator.
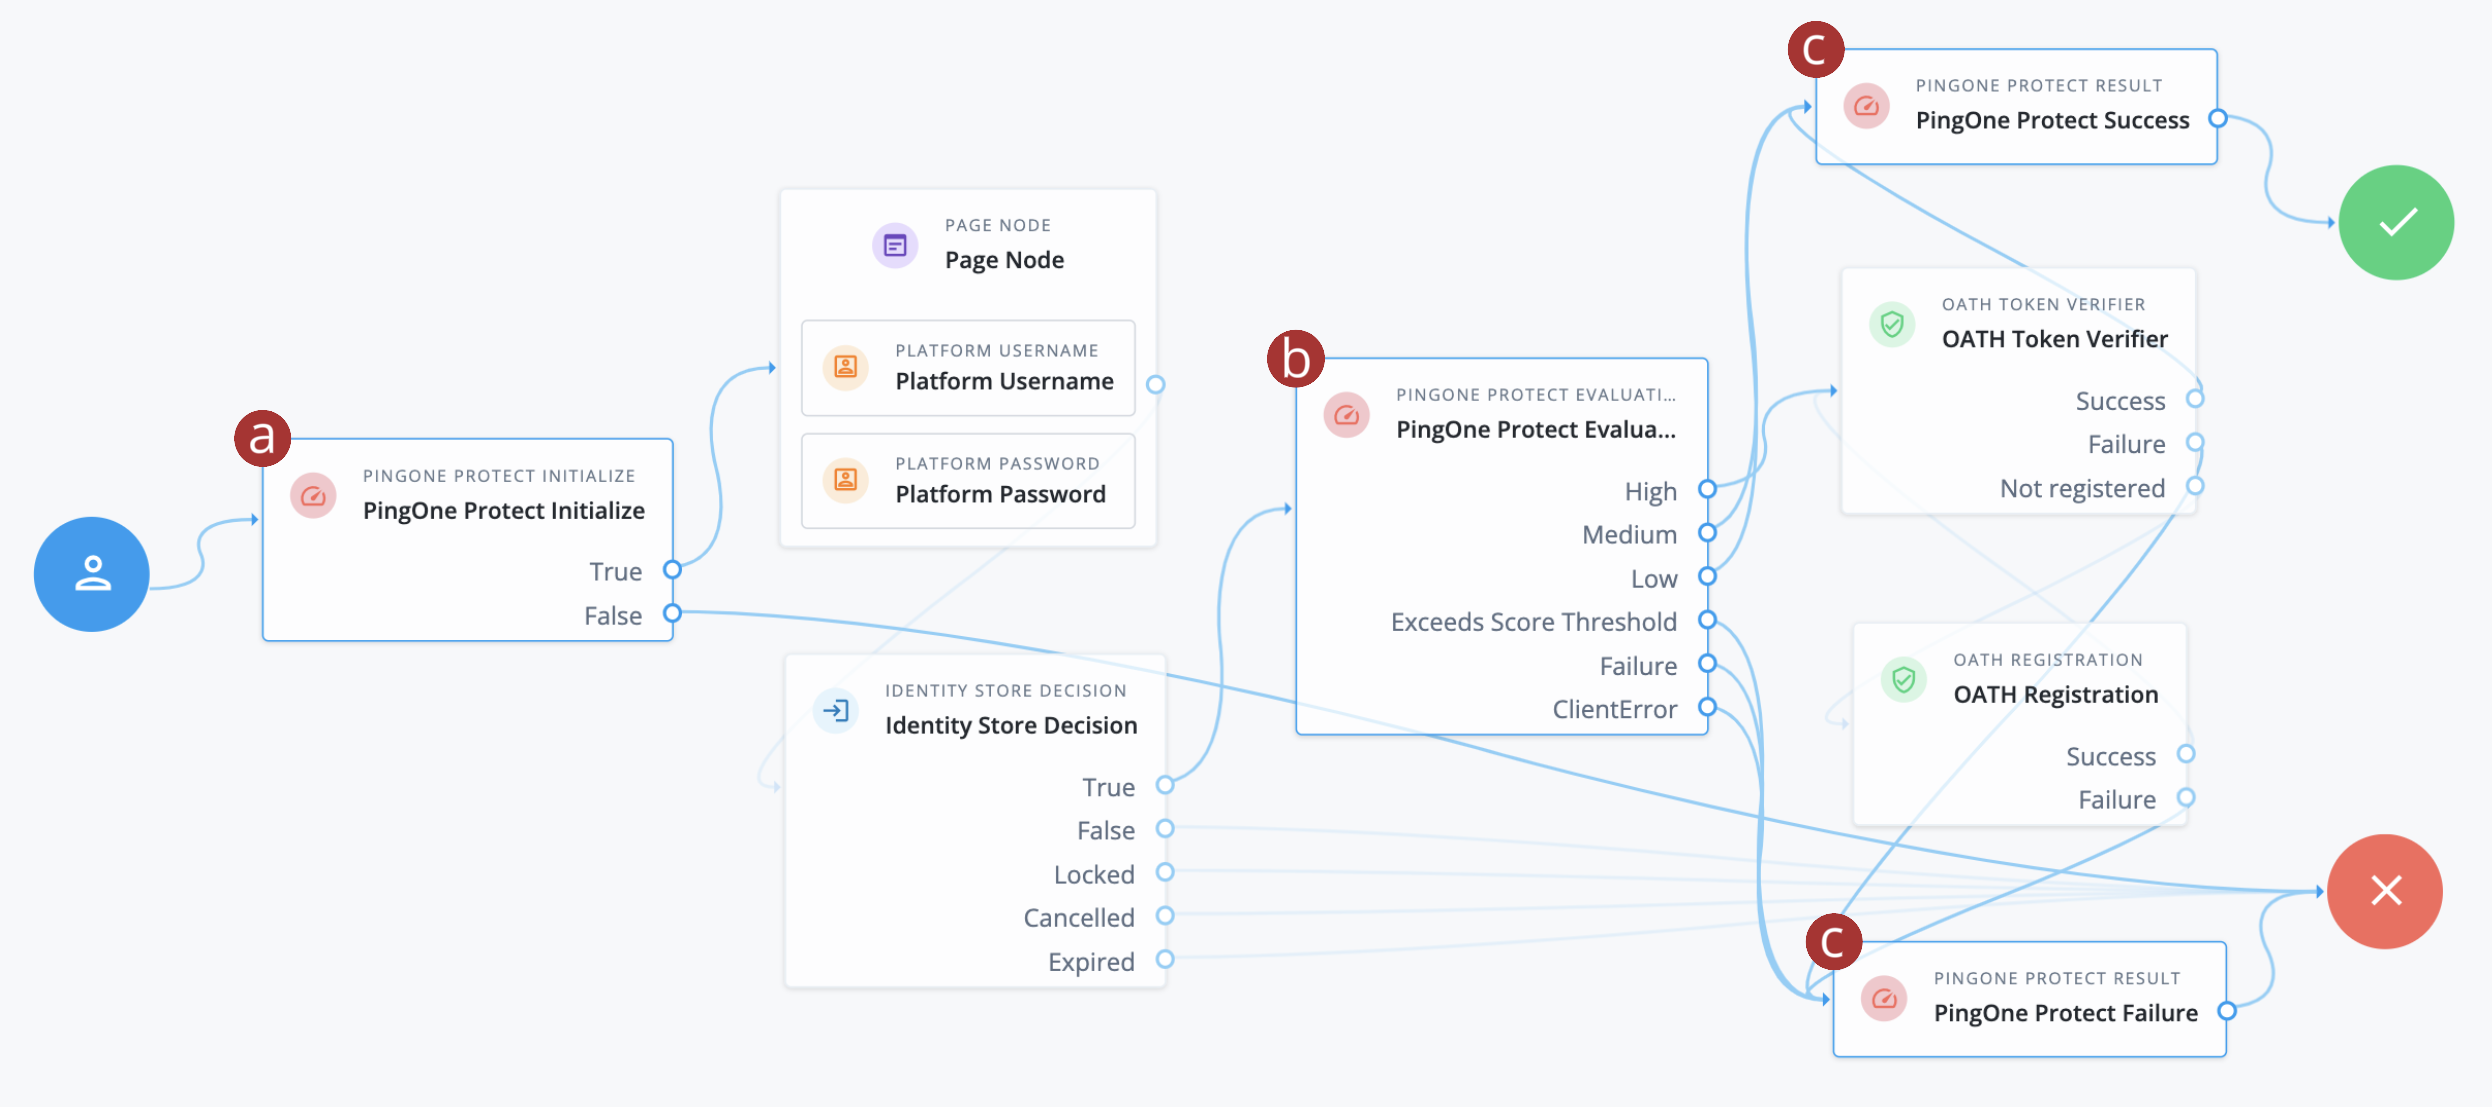
Task 2: Add PingOne Protect risk evaluation
-
Modify the authentication journey you created in task 1 using the following diagram as guidance. It adds PingOne Protect nodes to perform risk evaluation and reduce MFA fatigue. Only users with a high risk score require MFA to complete sign on, while users with a low or medium risk score can sign on without MFA. Users with a risk score above a defined threshold redirect to the Failure node.
-
a PingOne Protect Initialize node: This node initializes the PingOne Signals (Protect) SDK to collect contextual data for risk evaluation.
-
b PingOne Protect Evaluation node: This node evaluates the risk score based on the contextual data collected by the PingOne Signals (Protect) SDK.
-
c PingOne Protect Result nodes: These nodes send transaction feedback to PingOne Protect, which is vital for the continuous learning and optimization of the PingOne Protect models. Over time, this feedback helps PingOne Protect learn what constitutes legitimate and fraudulent activity in your environment.
-
-
Configure the PingOne Protect nodes as follows:
PingOne Protect Initialize node
-
Location:
-
Insert the node at the start of the journey, before the Page node.
-
-
Connections:
-
Reconnect the Start node to this node.
-
Connect the True outcome to the Page node.
-
Connect the False outcome to the Failure node.
-
-
Configuration:
-
In the PingOne Worker Service ID field, select a worker service. For example,
PingOne Worker AIC. -
Select the Store Risk Evaluation checkbox. This enables the node to store the risk evaluation in the session. This lets you view the risk evaluation output when debugging and testing the journey.
-
Accept the default values for the other fields.
-
PingOne Protect Evaluation node
-
Location:
-
Insert the node after the Identity Store Decision node.
-
-
Connections:
-
Connect the High outcome to the OATH Token Verifier node.
-
Connect the Medium and Low outcomes to the PingOne Protect Result success node.
-
Connect the Exceed Score Threshold, Failure, and ClientError outcomes to the PingOne Protect Result failure node.
-
-
Configuration:
-
In the PingOne Worker Service ID field, select a worker service. For example,
PingOne Worker AIC. -
Accept the default values for the other fields.
-
PingOne Protect Result node (connected to the Success node)
-
Location:
-
Insert the node before the Success node.
-
-
Connections:
-
Reconnect the Success outcome of the OATH Token Verifier node to this node.
-
Connect the outcome of this node to the Success node.
-
-
Configuration:
-
In the Name field, enter
PingOne Protect Success. -
In the Completion Status field, select
SUCCESS.
-
PingOne Protect Result node (connected to the Failure node)
-
Location:
-
Insert the node before the Failure node.
-
-
Connections:
-
Reconnect the Failure outcome of the OATH Token Verifier node to this node.
-
Reconnect the Failure outcome of the OATH Registration node to this node.
-
Connect the outcome of this node to the Failure node.
-
-
Configuration:
-
In the Name field, enter
PingOne Protect Failure. -
In the Completion Status field, select
FAILURE.
-
-
-
Test the journey by running the journey’s Preview URL in a new incognito browser window as an end user:
-
If you use the same test user, device, and IP address as the test in task 1, you should receive a low risk score and be able to sign on without being prompted for MFA.
-
If you use a different device, IP address, or both, you may receive a high risk score and need to sign on using MFA.
-
Task 3: View risk evaluation output
To view the risk evaluation output, enable debug mode for the journey. This lets you view the risk evaluation output in a pop-up window when running the journey:
-
As a tenant administrator, follow the instructions in Enable debug mode.
-
As an end user, follow the instructions in View debug information in a pop-up window to run tests on the journey:
-
As you navigate the journey, the debug pop-up window displays the risk evaluation output, including the risk score and details about the risk predictors that contributed to the score.
-
To trigger a high risk score, you can use a different device, IP address, or both. For example, if you used a desktop computer in task 2, try using a mobile phone or tablet with a different IP address.
These are some examples of risk evaluation outputs you might see in the debug pop-up window:
- Low risk evaluation output
-
Example low-risk response
{
    "universalId": "id=d646ed76-6b7e-4e47-993a-1b2fc672e588,ou=user,o=alpha,ou=services,ou=am-config",
    "transactionId": "4ca6d66e-e857-4127-ada7-4d01d97e2801-request-7/0",
    "PingOneProtectEvaluationNode.worker": "PingOne Worker AIC",
    "PingOneProtectEvaluationNode.RISK": {
        "_links": {
            "self": {
                "href": "https://api.pingone.eu/v1/environments/89693e13-3ad2-4b3d-9b66-b9c723f134a2/riskEvaluations/34e40f28-0fe8-4dba-a963-b03481b9723f"
            },
            "environment": {
                "href": "https://api.pingone.eu/v1/environments/89693e13-3ad2-4b3d-9b66-b9c723f134a2"
            },
            "event": {
                "href": "https://api.pingone.eu/v1/environments/89693e13-3ad2-4b3d-9b66-b9c723f134a2/riskEvaluations/34e40f28-0fe8-4dba-a963-b03481b9723f/event"
            }
        },
        "id": "34e40f28-0fe8-4dba-a963-b03481b9723f",
        "environment": {
            "id": "89693e13-3ad2-4b3d-9b66-b9c723f134a2"
        },
        "createdAt": "2025-07-31T18:19:11.868Z",
        "updatedAt": "2025-07-31T18:19:11.868Z",
        "event": {
            "completionStatus": "IN_PROGRESS",
            "ip": "123.123.123.123",
            "flow": {
                "type": "AUTHENTICATION"
            },
            "user": {
                "id": "id=d646ed76-6b7e-4e47-993a-1b2fc672e588,ou=user,o=alpha,ou=services,ou=am-config",
                "name": "barbara.jensen",
                "type": "EXTERNAL"
            },
            "sharingType": "SHARED",
            "browser": {
                "userAgent": "Mozilla/5.0 (Macintosh; Intel Mac OS X 10_15_7) AppleWebKit/537.36 (KHTML, like Gecko) Chrome/138.0.0.0 Safari/537.36"
            }
        },
        "riskPolicySet": {
            "id": "2671d412-c9cb-08ee-2582-ec7e080c58cb",
            "name": "Default Risk Policy"
        },
        "result": {
            "level": "LOW",
            "score": 0,
            "source": "AGGREGATED_SCORES",
            "type": "VALUE"
        },
        "details": {
            "ipAddressReputation": {
                "score": 0,
                "domain": {
                    "asn": 2856,
                    "sld": "btcentralplus",
                    "tld": "com",
                    "organization": "bt-central-plus",
                    "isp": "british telecommunications plc"
                },
                "level": "LOW"
            },
            "estimatedSpeed": 0,
            "anonymousNetworkDetected": false,
            "country": "united kingdom",
            "previousSuccessfulTransaction": {
                "ip": "123.123.123.123",
                "timestamp": "2025-07-31T18:09:41.024Z",
                "anonymousNetworkDetected": false,
                "country": "united kingdom",
                "state": "kent",
                "city": "willesborough"
            },
            "device": {
                "id": "Id-ddd38f1d-50ee-4742-bbad-75b02ef242a0",
                "estimatedDistance": 0,
                "os": {
                    "name": "Mac OS X"
                },
                "browser": {
                    "name": "Chrome"
                },
                "lastSeen": "2025-07-31T18:09:41.547Z"
            },
            "state": "kent",
            "city": "willesborough",
            "estimatedDistance": 0,
            "impossibleTravel": false,
            "suspiciousDevice": {
                "level": "LOW",
                "type": "DEVICE"
            },
            "userLocationAnomaly": {
                "reason": "Not enough information to assess risk score",
                "status": "IN_TRAINING_PERIOD",
                "type": "USER_LOCATION_ANOMALY"
            },
            "ipVelocityByUser": {
                "level": "LOW",
                "threshold": {
                    "source": "MIN_NOT_REACHED"
                },
                "velocity": {
                    "distinctCount": 1,
                    "during": 3600
                },
                "type": "VELOCITY"
            },
            "userVelocityByIp": {
                "level": "LOW",
                "threshold": {
                    "source": "MIN_NOT_REACHED"
                },
                "velocity": {
                    "distinctCount": 1,
                    "during": 3600
                },
                "type": "VELOCITY"
            },
            "geoVelocity": {
                "level": "LOW",
                "type": "GEO_VELOCITY"
            },
            "botDetection": {
                "level": "LOW",
                "type": "BOT"
            },
            "newDevice": {
                "level": "LOW",
                "reason": "This device has been used recently",
                "status": "KNOWN_DEVICE",
                "type": "DEVICE"
            },
            "ipRisk": {
                "level": "LOW",
                "type": "IP_REPUTATION"
            },
            "userBasedRiskBehavior": {
                "level": "LOW",
                "reason": "NA",
                "type": "USER_RISK_BEHAVIOR"
            },
            "anonymousNetwork": {
                "level": "LOW",
                "type": "ANONYMOUS_NETWORK"
            },
            "adversaryInTheMiddle": {
                "reason": "Not enough information to assess risk score",
                "status": "IN_TRAINING_PERIOD",
                "type": "ADVERSARY_IN_THE_MIDDLE"
            },
            "trafficAnomaly": {
                "level": "LOW",
                "type": "TRAFFIC_ANOMALY"
            }
        }
    },
    "pageNodeCallbacks": {
        "0": 0,
        "1": 1
    },
    "PingOneProtectEvaluationNode.riskEvalID": "34e40f28-0fe8-4dba-a963-b03481b9723f",
    "realm": "/alpha",
    "authLevel": 0,
    "objectAttributes": {
        "userName": "barbara.jensen"
    },
    "username": "barbara.jensen"
}
The key information is the
resultobject, which contains the risk evaluation result:... "result": { "level": "LOW", "score": 0, "source": "AGGREGATED_SCORES", "type": "VALUE" }, ...The granular risk evaluation details are in the
detailsobject, which contains information about the risk predictors that contributed to the low risk score:... "botDetection": { "level": "LOW", "type": "BOT" }, "newDevice": { "level": "LOW", "reason": "This device has been used recently", "status": "KNOWN_DEVICE", "type": "DEVICE" }, "ipRisk": { "level": "LOW", "type": "IP_REPUTATION" }, "userBasedRiskBehavior": { "level": "LOW", "reason": "NA", "type": "USER_RISK_BEHAVIOR" }, "anonymousNetwork": { "level": "LOW", "type": "ANONYMOUS_NETWORK" }, ... - High risk evaluation output
-
Example high-risk response
{
    "universalId": "id=d646ed76-6b7e-4e47-993a-1b2fc672e588,ou=user,o=alpha,ou=services,ou=am-config",
    "transactionId": "73522655-5f0b-4665-a93b-1942029fcbc5-request-7/0",
    "PingOneProtectEvaluationNode.worker": "PingOne AIC Worker",
    "PingOneProtectEvaluationNode.RISK": {
        "_links": {
            "self": {
                "href": "https://api.pingone.eu/v1/environments/89693e13-3ad2-4b3d-9b66-b9c723f134a2/riskEvaluations/e232ee9f-30c4-4744-9196-6fa933a21af4"
            },
            "environment": {
                "href": "https://api.pingone.eu/v1/environments/89693e13-3ad2-4b3d-9b66-b9c723f134a2"
            },
            "event": {
                "href": "https://api.pingone.eu/v1/environments/89693e13-3ad2-4b3d-9b66-b9c723f134a2/riskEvaluations/e232ee9f-30c4-4744-9196-6fa933a21af4/event"
            }
        },
        "id": "e232ee9f-30c4-4744-9196-6fa933a21af4",
        "environment": {
            "id": "89693e13-3ad2-4b3d-9b66-b9c723f134a2"
        },
        "createdAt": "2025-07-18T17:22:21.604Z",
        "updatedAt": "2025-07-18T17:22:21.604Z",
        "event": {
            "completionStatus": "IN_PROGRESS",
            "ip": "163.5.241.56",
            "flow": {
                "type": "AUTHENTICATION"
            },
            "user": {
                "id": "barbara.jensen",
                "name": "barbara.jensen",
                "type": "EXTERNAL"
            },
            "sharingType": "SHARED",
            "browser": {
                "userAgent": "Mozilla/5.0 (X11; CrOS x86_64 14541.0.0) AppleWebKit/537.36 (KHTML, like Gecko) Chrome/137.0.0.0 Safari/537.36"
            }
        },
        "riskPolicySet": {
            "id": "2671d412-c9cb-08ee-2582-ec7e080c58cb",
            "name": "Default Risk Policy"
        },
        "result": {
            "level": "HIGH",
            "score": 125,
            "source": "AGGREGATED_SCORES",
            "type": "VALUE"
        },
        "details": {
            "ipAddressReputation": {
                "score": 0,
                "domain": {
                    "asn": 206092,
                    "sld": "",
                    "tld": "",
                    "organization": "",
                    "isp": "internet utilities europe and asia limited"
                },
                "level": "LOW"
            },
            "anonymousNetworkDetected": true,
            "country": "france",
            "previousSuccessfulTransaction": {
                "ip": "31.53.231.23",
                "timestamp": "2025-07-18T17:08:04.339Z",
                "anonymousNetworkDetected": false,
                "country": "united kingdom",
                "state": "kent",
                "city": "willesborough"
            },
            "device": {
                "id": "Id-fd394416-0fb6-4856-86a8-5d5b1ca44f6a",
                "os": {
                    "name": "Chrome OS"
                },
                "browser": {
                    "name": "Chrome"
                }
            },
            "state": "paris",
            "city": "paris",
            "estimatedDistance": 273568.0437,
            "impossibleTravel": false,
            "suspiciousDevice": {
                "level": "LOW",
                "type": "DEVICE"
            },
            "ipVelocityByUser": {
                "level": "LOW",
                "threshold": {
                    "source": "MIN_NOT_REACHED"
                },
                "velocity": {
                    "distinctCount": 2,
                    "during": 3600
                },
                "type": "VELOCITY"
            },
            "userLocationAnomaly": {
                "reason": "Not enough information to assess risk score",
                "status": "IN_TRAINING_PERIOD",
                "type": "USER_LOCATION_ANOMALY"
            },
            "geoVelocity": {
                "level": "LOW",
                "type": "GEO_VELOCITY"
            },
            "userVelocityByIp": {
                "level": "LOW",
                "threshold": {
                    "source": "MIN_NOT_REACHED"
                },
                "velocity": {
                    "distinctCount": 1,
                    "during": 3600
                },
                "type": "VELOCITY"
            },
            "botDetection": {
                "level": "LOW",
                "type": "BOT"
            },
            "newDevice": {
                "level": "HIGH",
                "reason": "This device has not been used recently",
                "status": "UNKNOWN_DEVICE",
                "type": "DEVICE"
            },
            "ipRisk": {
                "level": "LOW",
                "type": "IP_REPUTATION"
            },
            "userBasedRiskBehavior": {
                "level": "LOW",
                "reason": "NA",
                "type": "USER_RISK_BEHAVIOR"
            },
            "anonymousNetwork": {
                "level": "HIGH",
                "type": "ANONYMOUS_NETWORK"
            },
            "adversaryInTheMiddle": {
                "reason": "Not enough information to assess risk score",
                "status": "IN_TRAINING_PERIOD",
                "type": "ADVERSARY_IN_THE_MIDDLE"
            },
            "trafficAnomaly": {
                "level": "LOW",
                "type": "TRAFFIC_ANOMALY"
            }
        }
    },
    "pageNodeCallbacks": {
        "0": 0,
        "1": 1
    },
    "PingOneProtectEvaluationNode.riskEvalID": "e232ee9f-30c4-4744-9196-6fa933a21af4",
    "realm": "/alpha",
    "authLevel": 0,
    "objectAttributes": {
        "userName": "barbara.jensen"
    },
    "username": "barbara.jensen"
}
The key information is the
resultobject, which contains the risk evaluation result:... "result": { "level": "HIGH", "score": 125, "source": "AGGREGATED_SCORES", "type": "VALUE" }, ...The granular risk evaluation details are in the
detailsobject, which contains information about the risk predictors that contributed to the high risk score:... "botDetection": { "level": "LOW", "type": "BOT" }, "newDevice": { "level": "HIGH", "reason": "This device has not been used recently", "status": "UNKNOWN_DEVICE", "type": "DEVICE" }, "ipRisk": { "level": "LOW", "type": "IP_REPUTATION" }, "userBasedRiskBehavior": { "level": "LOW", "reason": "NA", "type": "USER_RISK_BEHAVIOR" }, "anonymousNetwork": { "level": "HIGH", "type": "ANONYMOUS_NETWORK" }, ...
-
How to train PingOne Protect risk models
By default, PingOne Protect is preconfigured with a default machine learning model that assesses risk based on various predictors such as user behavior, device characteristics, and network context.
PingOne Protect’s default risk model isn’t something you train in the traditional sense of a machine learning model where you feed it large datasets directly. Instead, it’s an intelligent, pre-configured system that continuously learns and adapts based on the real-world data it processes from your authentication and user activities.
The following stages describe how to train (or, more accurately, optimize) the default risk model in PingOne Protect.
Stage 1: Run with production data (passive training)
The primary training mechanism for PingOne Protect’s underlying machine learning models is simply to integrate it into your authentication flows and let it observe real user behavior.
Ping Identity recommends running with the default risk policy for 1 - 3 weeks for workforce usage or 2 - 4 weeks for customer usage. During this period, PingOne Protect’s models will build a baseline understanding of normal behavior for your users and environment. This includes learning patterns related to device, location, network, and user-specific habits.
Crucially, ensure you send transaction feedback. After an authentication or transaction is completed, you should use the PingOne Protect Result nodes to tell PingOne Protect whether the transaction was a SUCCESS or FAIL.
This feedback loop is essential for the machine learning models to correctly learn and differentiate between legitimate and fraudulent activities.
Stage 2: Monitor and analyze with the threat protection dashboard
After the initial observation period, use the PingOne Protect threat protection dashboard to analyze the activity in your environment. This dashboard provides insights into risk evaluations, including:
-
Number of abnormal activities
-
High-risk locations and factors
-
Riskiest users
-
Distribution of browser and operating systems
Focus on identifying false positives. These are legitimate user interactions that PingOne Protect flagged as high or medium risk. Analyze why these were flagged as risky by looking at the specific predictors involved.
Stage 3: Refine risk policies and predictor scores (active optimization)
You don’t directly modify the default model itself. Instead, you fine-tune how its output is translated into a final risk score and level using risk policies:
-
Based on your analysis of false positives (and false negatives, though these are harder to spot immediately), you can adjust the scores assigned to individual predictors within your risk policies.
-
You can modify the default risk policy or create new targeted policies.
-
For each predictor (for example,
Anonymous Network,IP Velocity, orUser Location Anomaly), you can map its calculated risk level (low, medium, or high) to a specific numerical score. -
You also define the risk thresholds that determine when a total aggregated score results in a low, medium, or high overall risk level.
For example, if IP Location Anomaly frequently causes false positives for your legitimate users who travel, you might reduce the score assigned to a high risk for that specific predictor, or create a more lenient predictor for specific user groups.
This active optimization process is iterative. You should continue to monitor the threat protection dashboard and adjust your risk policies as needed based on ongoing user behavior and risk evaluations.