Provision an application
|
The topics in this section are for tenants created on or after January 12, 2023. Learn more in Application management migration FAQ. |
On the Applications page, use the Provisioning tab to set up provisioning and configure the following:
-
Details about the application.
-
Properties in the target application.
-
Data in the target application.
-
Mappings from the Advanced Identity Cloud admin console to the target application.
-
Rules that specify the actions to take when certain reconciliation events occur.
-
Reconciliation to ensure data is synchronized between the Advanced Identity Cloud admin console and the target application.
-
Schedules to run reconciliation of accounts.
-
Privacy and consent for end-user data sharing and synchronization.
-
Provisioning rules to specify actions to take when provisioning between Advanced Identity Cloud and a target application.
-
Advanced Sync to create and manage mappings between an identity profile and an application or between applications.
You must register an application before you can use the Provisioning tab. Afterward, you can use the Provisioning tab to create and manage connections to a target system like Salesforce.
The object type determines the side tabs that display on the Provisioning tab.
Use the object type list to select an object type, such as Group.
Afterward, you can configure properties in the different sub-tabs under the Provisioning tab.
| Provisioning tab | Description | Related sections |
|---|---|---|
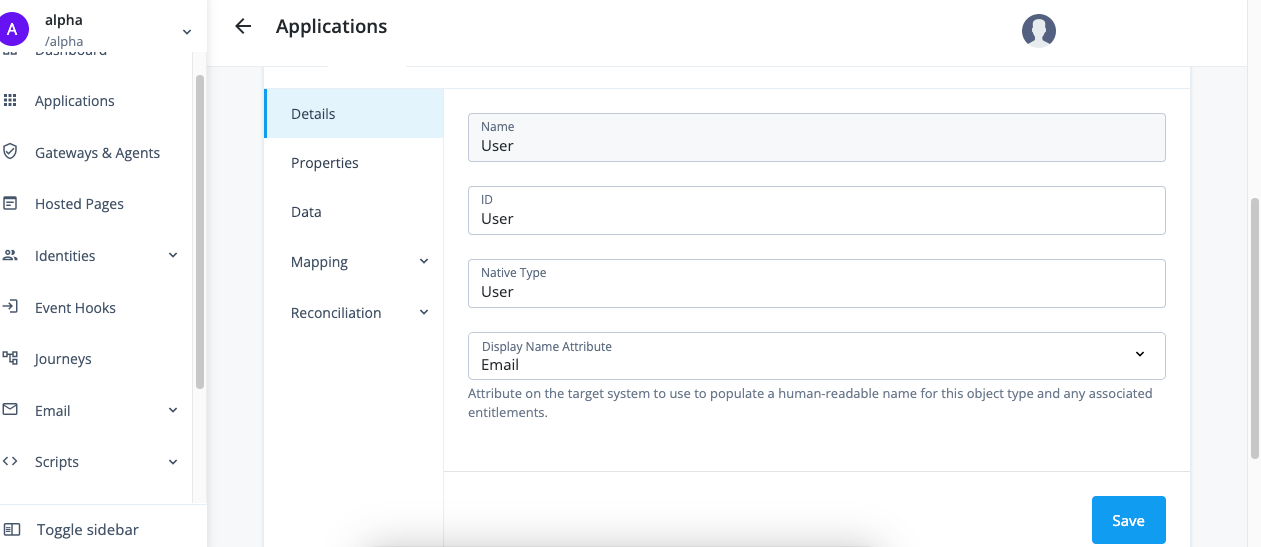
Details |
View and manage an application, including name, ID, and native type. |
N/A |
Properties |
View and manage properties for the selected object type. |
|
Data |
View data about the selected object type. |
|
Mapping |
View and manage mappings from the Advanced Identity Cloud admin console properties to external system properties and from external system properties to the Advanced Identity Cloud admin console properties. |
|
Reconciliation |
Preview mappings on target applications between external systems and the Advanced Identity Cloud admin console, and reconcile the data between the two systems. View and manage rules for the users and groups that use your application. View and manage schedules for Full and Incremental reconciliation. |
|
Privacy & Consent |
Manage end-user data sharing and synchronization. |
|
Rules |
View and manage provisioning rules for mappings between Advanced Identity Cloud and a target application. |
|
Advanced Sync |
Create and manage mappings between an identity profile and an application or between applications. |
Provision settings for an application
While the application templates contain the same basic settings, some applications have specific settings that you must configure in the Provisioning tab. The following section lists these provisioner settings.
Learn more about accessing built-in connectors through the IDM native admin console in Connectors.
| For existing applications that use a deprecated version, there’s no upgrade requirement. You can safely continue using your current version unless notified otherwise. To use a newer application template version, you must create a new application. |
Active Directory
Details
-
In the Advanced Identity Cloud admin console, on the Provisioning tab, click Set up Provisioning:
-
If setting up provisioning for the first time:
-
If you haven’t configured a remote server, click New Connector Server and follow the steps to create a server.
-
If you configured one remote server, it’s automatically selected.
-
If you configured multiple remote servers, choose a server.
-
-
When editing existing settings in the Connection area, click Settings.
-
-
Configure the following fields:
Field Description Host Name or IP
The hostname or IP address for the Active Directory domain controller.
Port
The port for connecting to the Active Directory domain controller.
Use SSL
Enable to use SSL to connect to the Active Directory domain controller. The default value is
true.Login Account DN
The distinguished name for the login account.
Password
The password for the login account.
Base DNs
The base context for Active Directory users and groups.
Base DNs to Synchronize (optional)
The base context for Active Directory users and groups to synchronize.
Although this field is optional, an authoritative app requires this context for liveSync to function. You should also verify the bind account can query
uSNChanged. -
Click Show advanced settings.
-
To filter users and groups:
-
To only connect a subset of users by applying a query filter based on user attributes, enable Filter users.
-
To apply a filter to users manually:
-
Choose to assign to if All or Any conditions are met.
-
Set the conditions for assigning filters.
-
In the User Object Classes field, enter the names of object classes a user must have for inclusion.
If you installed Microsoft Exchange, you can add properties to extensionAttribute1throughextensionAttribute15only if you addmsExchCustomAttributesto the application’s User Object Classes list and set Read Schema totrue.
-
-
To use a query to apply a filter to users:
-
Click Advanced Editor.
-
Edit the query code.
-
-
-
To only connect a subset of groups by applying a query filter based on user attributes, enable Filter groups.
-
To apply a filter to groups manually:
-
Choose to assign to if All or Any conditions are met.
-
Set the conditions for assigning filters.
-
-
To filter users and groups:
-
Click Advanced Editor.
-
Edit the query code.
-
-
-
-
To use block-based LDAP controls, enable Use Block-based controls.
-
To use paged results control, enable Use Paged Results control. If Use Block-based controls is enabled, specifies the LDAP Paged Results control is preferred over the VLV control when retrieving entries. The default value is
true. -
To set the change log attribute in the change log entry, set the Change Number Attribute field. The default value is
changeNumber. -
To set the object classes that Advanced Identity Cloud uses as filters when synchronizing, add classes to the Object Classes to synchronize field. The default value is
user. -
To set the sort attribute to use VLV indexes on the resource, set the Virtual List View (VLV) Sort Attribute field. The default value is
sAMAccountName. -
To set the name of the attribute that holds the password, set the Password Attribute field. The default value is
unicodePwd. -
To have the LDAP provisioner read the schema from the server, enable Read Schema. The default value is
false. -
To have Advanced Identity Cloud modify group membership when entries are renamed or deleted, enable Maintain LDAP Group Membership. The default value is
true. -
To specify the group attribute to update with the DN of newly added users, set the Group Member Attribute field. The default value is
member. -
To specify the name of the attribute that maps to the OpenICF UID attribute, set the UID Attribute field. The default value is
objectGUID. -
To specify the password hash algorithm, set the Password Hash Algorithm field.
-
Enter the Account Username Attributes that hold the account’s username.
-
To synchronize only the modified properties on a target resource, select Exclude Unmodified.
-
To use timestamps for liveSync operations instead of the changelog, select Timestamp for Sync Token.
-
Click Connect.
-
Verify the information in the Details tab.
Adobe Admin Console
Details
The Advanced Identity Cloud Adobe Admin Console application lets you manage users, groups, and user group memberships between Adobe Admin Console and Advanced Identity Cloud. This application requires an Adobe Admin Console administrator account and a properly configured Adobe Admin Console.
| The steps for configuring Adobe Admin Console should be used as an outline, as the specific options, menus, and features could have changed. |
Before you can configure the Advanced Identity Cloud application, you must create and configure a project in Adobe Admin Console. You need an Adobe Admin Console developer account to complete this procedure:
-
Create or log in to an Adobe Admin Console developer account.
-
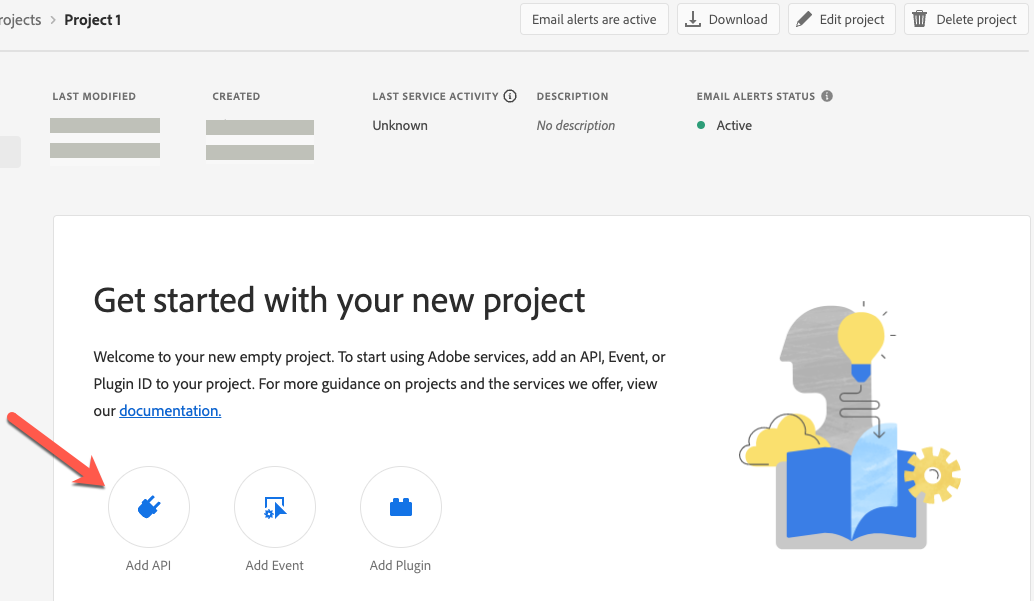
From the Adobe Developer Console, click the Projects tab, and then click Create new project.
Show Me

-
On the Project Name page, click Add API.
Show Me
-
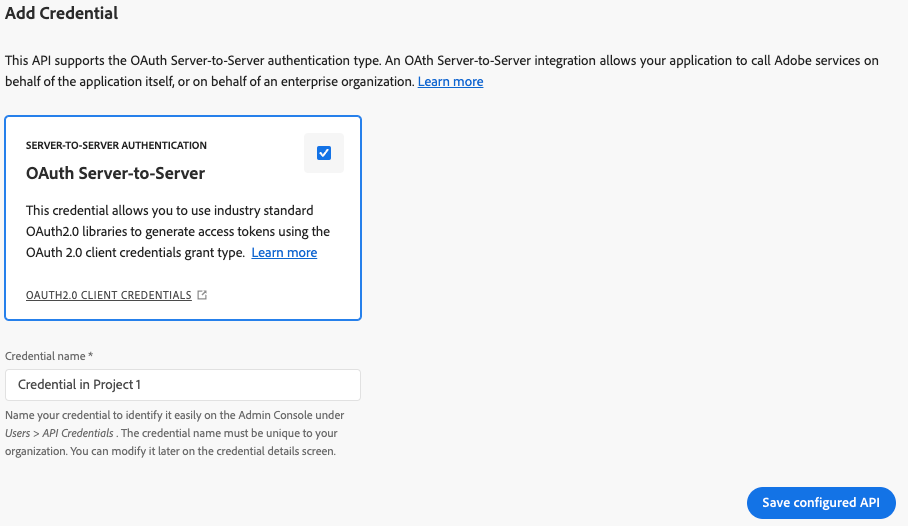
In the Add an API window, select User Management API, and click Next.
Show Me

-
In the Add Credential area, select OAuth Server-to-Server, enter a Credential name, and then click Save configured API.
Show Me
-
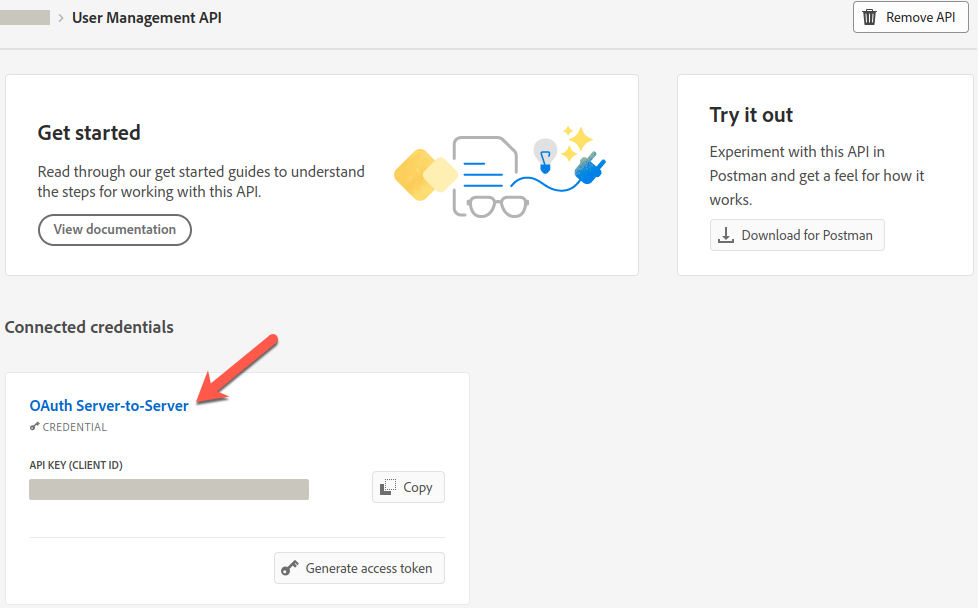
On the Project Name > User Management API page, in the Connected credentials area, click the credential you just added (OAuth Server-to-Server).
Show Me
-
From the Credential detail tab, make note of the following:
-
CLIENT ID
-
CLIENT SECRET
-
SCOPES
-
ORGANIZATION ID
Show Me
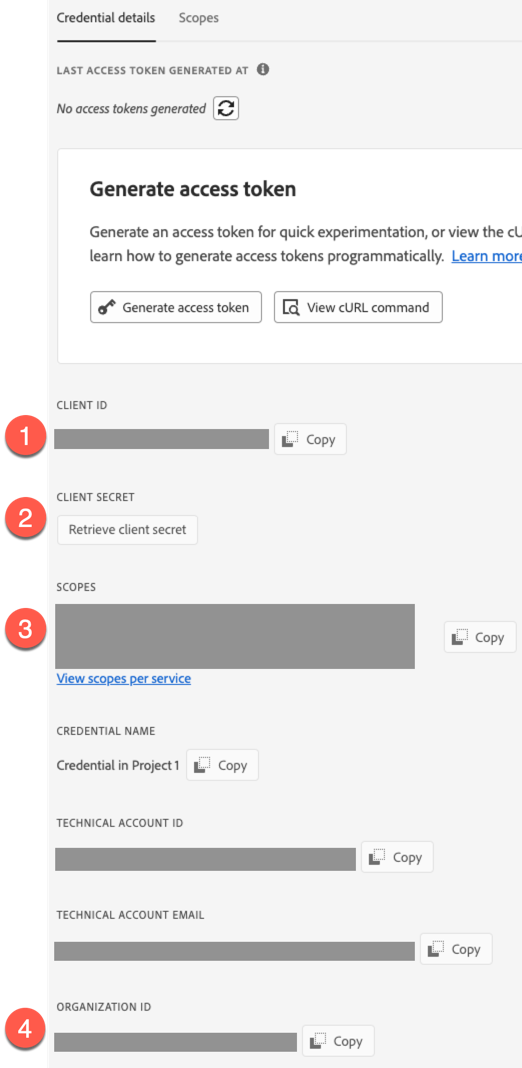
Use these values when you configure provisioning for an Advanced Identity Cloud Adobe Admin Console application.
-
-
Complete Adobe Admin Console requirements.
-
In the Advanced Identity Cloud admin console, on the Provisioning tab:
-
If setting up provisioning for the first time, click Set up Provisioning.
-
If editing existing settings, in the Connection area, click Settings.
-
-
Configure the following fields:
Field Description Service URI
The service endpoint URI.
Organization ID
Your organization’s unique ID. For example,
12345@AdobeOrg.Refer to Adobe Admin Console requirements for help locating this value.
Token Endpoint
The endpoint to query for a new access token.
Client ID
The client ID for OAuth 2.0 flow.
Refer to Adobe Admin Console requirements for help locating this value.
Client Secret (optional)
The client secret for OAuth 2.0 flow.
Refer to Adobe Admin Console requirements for help locating this value.
-
Optionally, click Show advanced settings to set any of the following options:
Field Description Scope (optional)
The OAuth 2.0 scope(s) to use.
Refer to Adobe Admin Console requirements for help locating this value.
Group Read Rate Limit
Defines throttling for group read operations either per second ("30/sec") or per minute ("100/min").
User Read Rate Limit
Defines throttling for user read operations either per second ("30/sec") or per minute ("100/min").
Write Rate Limit
Defines throttling for write operations (create/update/delete) either per second ("30/sec") or per minute ("100/min").
Maximum Connections
The maximum size of the HTTP connection pool. The default is 10 connections.
Connection Timeout
The timeout for the underlying HTTP connection in seconds. The default is 30 seconds.
-
Click Connect.
-
Verify the information in the Details tab.
AS400
AS400 is a mainframe on-premises computer and database that can store identity data. The AS400 application enables you to manage and synchronize users between AS400 and Advanced Identity Cloud. The application can only be a target application.
The following instructions assume you have access to an AS400 instance as an administrator.
Details
-
Set up a remote connector server (RCS).
-
Set up the AS400 connector with your RCS.
-
In the Advanced Identity Cloud admin console, on the Provisioning tab:
-
If setting up provisioning for the first time, click Set up Provisioning.
-
When editing existing settings in the Connection area, click Settings.
-
-
Configure the following fields:
Field Description Host Name
Host name or IP address of AS400.
User Name
The username to log in to AS400.
Password
The password to log in to AS400.
Use SSL?
Enable to use SSL to connect to the AS400 application. The default value is
false. -
Optionally, click Show advanced settings to set the following option:
Option Description Maximum Connections (optional)
The maximum number of connections.
Maximum Lifetime (optional)
The maximum time for an available connection to exist. The default value is 86400000 milliseconds.
Maximum Inactivity (optional)
The the maximum amount of inactive time before an available connection closes. The default value is 3600000 milliseconds.
Maximum Use Time (optional)
The maximum time a connection can be in use before it closes. The default value is
-1which indicates that there is no time limit.Maximum Use Count (optional)
The maximum number of times a connection can be used before it is replaced in the pool. The default value is
-1which indicates that there is no limit.Is run Maintenance
Indicates whether the maintenance thread is used to cleanup expired connections. The default is
true.Is thread used
Indicates whether threads are used in communication with the host servers and for running maintenance. The default is
true.Cleanup Interval (optional)
Specifies how often the maintenance daemon runs. The default value is 300000 milliseconds.
Exclude Unmodified
Select this option to synchronize only the modified properties on a target resource.
-
Click Connect.
-
Verify the information in the Details tab.
Atlassian Jira
The Advanced Identity Cloud Atlassian Jira application lets you manage and synchronize data between Advanced Identity Cloud and Atlassian Jira.
Details
-
In the Advanced Identity Cloud admin console, on the Provisioning tab:
-
If setting up provisioning for the first time, click Set up Provisioning.
-
When editing existing settings in the Connection area, click Settings.
-
-
Configure the following fields:
Field Description SCIM Endpoint
The URL defining the root for the SCIM endpoint. For example,
https://myserver.com/service/scim.SCIM Protocol Version
Choose version 1 or version 2. The default is 1.
Authentication Method
The method for authenticating on the remote server:
BASIC,OAUTH, orTOKEN. The default isTOKEN. -
Depending on the Authentication Method, configure the applicable fields:
-
BASIC
-
OAUTH
-
TOKEN
Field Description User
The basic authentication username for the SCIM service.
Password
The basic authentication password for the SCIM service.
Field Description Token Endpoint
The OAuth 2.0 endpoint where a new access token is requested for the SCIM service.
Client Id
The OAuth 2.0 client identifier for the SCIM service.
Client Secret
The OAuth 2.0 client secret for the SCIM service.
Scope
The OAuth 2.0 scope to use.
Grant Type
The OAuth 2.0 grant type to use (
client_credentialsorrefresh_token).Refresh Token
Used by the
refresh_tokenGrant Type.Field Description Auth Token
The auth token for the SCIM service.
-
-
Configure the HTTP connection pool:
Field Description Maximum Connections
The maximum size of the http connection pool. The default is 10 connections.
-
Optionally, click Show advanced settings to set any of the following options:
Field Description Disable Http Compression
Content compression is enabled by default. Select this property to true to disable it.
Connection Timeout
Define a timeout (in seconds) for the underlying http connection. The default is 30 seconds.
Debug/Test settings
Only use these settings for test environments. Don’t enable for production environments. Selecting this option displays the following options:
-
Accept Self Signed Certificates: Enable to accept self-signed certificates.
-
Disable Host Name Verifier: Enable to disable hostname verifiers.
Read Schema
Read/discover the schema from the Atlassian SCIM endpoint. If
true(enabled), the application reads the schema from the server. Iffalse(disabled), the application provides a default schema based on the object classes in the configuration. The default value istrue(enabled).Exclude Unmodified
Select this option to synchronize only the modified properties on a target resource.
-
-
Click Connect.
-
Verify the information in the Details tab.
Azure AD
Details
This requires a Microsoft account and a Microsoft Azure application set up.
-
Click Certificates and Secrets > New Client Secret.
-
Enter a description and choose an expiration date.
-
Click Save.
-
Copy your client secret.
-
Click API Permissions.
-
Select Add a permissions > MS Graph > Application Permissions.
-
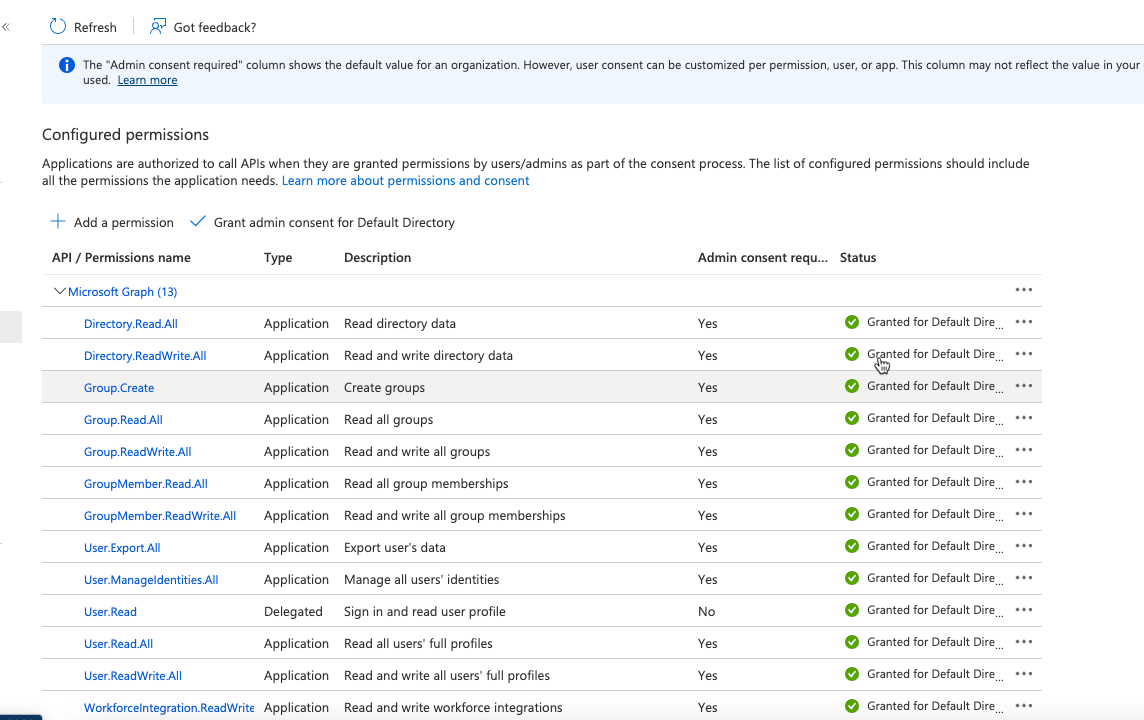
Use the search function to find and select the following 13 permissions:
-
Click Add permissions.
-
Click Grant admin consent for default directory.
-
Copy the following values:
-
application (client) id
-
directory (tenant) id
-
client credentials/secret
-
-
In the Advanced Identity Cloud admin console, on the Provisioning tab:
-
If setting up provisioning for the first time, click Set up Provisioning.
-
When editing existing settings in the Connection area, click Settings.
-
-
Configure the following fields:
Field Description Tenant
The Azure AD tenant name or id.
Client ID
The client ID the connector uses during the OAuth 2.0 flow.
Client Secret
The client secret the connector uses during the OAuth 2.0 flow.
Read Rate Limit
Define throttling for read operations either per second ("30/sec") or per minute ("100/min").
Write Rate Limit
Define throttling for write operations (create/update/delete) either per second ("30/sec") or per minute ("100/min").
Perform Hard Delete
If true, the delete operation permanently deletes the Azure object.
License Cache Expiry Time
Defines the expiry time (in minutes) for cached license information; for example, service plan data. The default value is 60 minutes.
-
Optionally, click Show advanced settings to set the following option:
Option Description Exclude Unmodified
Select this option to synchronize only the modified properties on a target resource.
-
Click Connect.
-
Verify the information in the Details tab.
BeyondTrust
The Advanced Identity Cloud BeyondTrust application lets you manage and synchronize data from Advanced Identity Cloud to BeyondTrust. This application can only be a target application.
Details
-
In the Advanced Identity Cloud admin console, on the Provisioning tab:
-
If setting up provisioning for the first time, click Set up Provisioning.
-
When editing existing settings in the Connection area, click Settings.
-
-
Configure the following fields:
Field Description SCIM Endpoint
The HTTP URL defining the root for the SCIM endpoint (https://myserver.com/service/scim/v2).
Token Endpoint
The OAuth 2.0 endpoint where a new access token is requested for the SCIM service.
Client Id
The OAuth 2.0 client identifier for the SCIM service.
Client Secret
The OAuth 2.0 client secret for the SCIM service.
Scope
The OAuth 2.0 scope to use.
Grant Type
The OAuth 2.0 grant type to use (
client_credentialsorrefresh_token).Refresh Token
Used by the
refresh_tokenGrant Type.Maximum Connections
The maximum size of the http connection pool. The default is 10 connections.
-
Optionally, click Show advanced settings to set any of the following options:
Field Description Disable Http Compression
Content compression is enabled by default. Select this property to true to disable it.
Connection Timeout
Define a timeout (in seconds) for the underlying http connection. The default is 30 seconds.
Debug/Test settings
Only use these settings for test environments. Don’t enable for production environments. Selecting this option displays the following options:
-
Accept Self Signed Certificates: Enable to accept self-signed certificates.
-
Disable Host Name Verifier: Enable to disable hostname verifiers.
Read Schema
Read/discover the schema from the BeyondTrust SCIM endpoint. If
true(enabled), the application reads the schema from the server. Iffalse(disabled), the application provides a default schema based on the object classes in the configuration. The default value istrue(enabled).Exclude Unmodified
Select this option to synchronize only the modified properties on a target resource.
-
-
Click Connect.
-
Verify the information in the Details tab.
CSV File
Details
-
In the Advanced Identity Cloud admin console, on the Provisioning tab, click Set up Provisioning:
-
If setting up provisioning for the first time:
-
If you have not configured a remote server, click New Connector Server and follow the steps to create a server.
-
If you configured one remote server, it is automatically selected.
-
If you configured multiple remote servers, choose a server.
-
-
When editing existing settings in the Connection area, click Settings.
-
-
Follow the steps on the Set up CSV modal.
-
Click Next.
-
Configure the following fields:
Field Description CSV File
The full file path to the CSV file that is the application data source. The path uses uses the file location format /opt/data/file.csv.
UID Column
The UID column name in the CSV file; the primary search key. The default value is
uid.Password Column
The password column name in the CSV file; the primary search key. The default is
password. -
Optionally, click Show advanced settings to set any of the following options:
Field Description Quote Character
The default value is
".Field Delimiter
The default value is
'.Newline String
The default value is
/n.Space Replacement String
The default value is
_.Sync Retention Count
The default value is
3.Exclude Unmodified
Select this option to synchronize only the modified properties on a target resource.
-
Click Connect.
-
Verify the information in the Details tab.
Database Table
Details
-
In the Advanced Identity Cloud admin console, on the Provisioning tab, click Set up Provisioning:
-
If setting up provisioning for the first time:
-
If you have not configured a remote server, click New Connector Server and follow the steps to create a server.
-
If you configured one remote server, it is automatically selected.
-
If you configured multiple remote servers, choose a server.
-
-
When editing existing settings in the Connection area, click Settings.
-
-
Configure the following fields:
Field Description JDBC Connection Url
The URl for the JDBC database address that contains the table that you are provisioning. The format of the url depends on the type of database. For example,
jdbc:mysql://localhost:3306/contractordb?serverTimezone=UTCorjdbc:oracle:thin:@//localhost:3306/contractordb. The address includes the name of the database you are connecting to.JDBC Driver
The class name of the driver you are using to connect to a database. The name varies depending on the type of database you are using, such as
oracle.jdbc.OracleDriverorcom.mysql.jdbc.Driver.Username
The username sent to the JDBC driver to establish a connection.
Password
The password sent to the JDBC driver to establish a connection.
Table
The name of the table in the JDBC database that contains the user accounts. The default is
TABLE_NAME.Key Column
The column value that is the unique identifier for rows in the table. The default is
KEY_COLUMN. -
Optionally, click Show advanced settings to set any of the following options:
Field Description Validate resources and passwords
Enable to validate resources and passwords. After enabling this option, in the Password Column field, enter the name of the column in the table that holds the password values.
Activate Sync ICF Interface
Enable to poll for synchronization events, which are native changes to target objects. After enabling this option, in the Change Log Column field, enter the change log column that stores the latest change time.
Allow empty string
Enable to allow empty strings instead of null values, except for OracleSQL.
Quote Database Column Names
Enable to place specific quote characters around column names in the SQL that is generated to access the database. After enabling this option, in the Quote Characters field, enter the characters to use for quotes.
Rethrow All SQL Exceptions
Enable to show SQL Exceptions with
code = 0. The default value istrue.Native Timestamps
Enable to retrieve timestamp data.
All Native
Enable to retrieve in a database-native format.
Validate Connection
Enable to specify a SQL query used to validate connections. After enabling this option, in the Validation SQL Query (optional) field, enter the SQL query for validating connections.
Validation Interval (ms)
Enter the validation interval in milliseconds. The default value is
3000.Validation Connection Query Timeout (ms)
Enter the validation connection query timeout in milliseconds. The default value is
-1.Initial Pool size
Enter the initial pool size. The default value is
10.Maximum Idle
Enter the maximum idle time. The default value is
100.Minimum Idle
Enter the minimum idle time. The default value is
10.Maximum Wait (ms)
Enter the maximum wait time in milliseconds. The default value is
30000.Maximum Active
Enter the maximum active time. The default value is
100.Maximum Age (ms)
Enter the maximum age in milliseconds. The default value is
0.Minimum Evictable Idle Time (ms)
Enter the minimum evictable idle time in milliseconds. The default value is
60000.Time Between Eviction Runs(ms)
Enter the time between eviction checks in milliseconds. The default value is
5000.Test Connection When Idle
Enable to test the connection when idle.
Test Connection On Borrow
Enable to test the connection on borrow.
Exclude Unmodified
Select this option to synchronize only the modified properties on a target resource.
-
Click Connect.
-
Verify the information in the Details tab.
Directory Services (DS)
Details
-
In the Advanced Identity Cloud admin console, on the Provisioning tab, click Set up Provisioning:
-
If setting up provisioning for the first time:
-
If you have not configured a remote server, click New Connector Server and follow the steps to create a server.
-
If you configured one remote server, it is automatically selected.
-
If you configured multiple remote servers, choose a server.
-
-
When editing existing settings in the Connection area, click Settings.
-
-
Configure the following fields:
Field Description Host Name or IP
The hostname or IP address for the Directory Services domain controller.
Port
The port for connecting to the Directory Services domain controller.
Use SSL
Enable to use SSL to connect to the Directory Services domain controller.
Login Account DN
The distinguished name for the login account.
Password
The password for the login account.
Base DNs for Directory Services users and groups
The base context for Directory Services users and groups.
-
Click Show advanced settings.
-
To filter users and groups:
-
To only connect a subset of users by applying a query filter based on user attributes, enable Filter users.
-
To apply a filter to users manually:
-
Choose to assign to if All or Any conditions are met.
-
Set the conditions for assigning filters.
-
In the User Object Classes field, enter the names of object classes a user must have for inclusion.
-
-
To use a query to apply a filter to users:
-
Click Advanced Editor.
-
Edit the query code.
-
-
-
To only connect a subset of groups by applying a query filter based on user attributes, enable Filter groups.
-
To apply a filter to groups manually:
-
Choose to assign to if All or Any conditions are met.
-
Set the conditions for assigning filters.
-
-
To filter users and groups:
-
Click Advanced Editor.
-
Edit the query code.
-
-
-
-
To use block-based LDAP controls, enable Use Block-based controls.
-
To use paged results control, enable Use Paged Results control. If Use Block-based controls is enabled, specifies the LDAP Paged Results control is preferred over the VLV control when retrieving entries. The default value is
true. -
To set the change log attribute in the change log entry, set the Change Number Attribute field. The default value is
changeNumber. -
To set the object classes that Advanced Identity Cloud uses as filters when synchronizing, add classes to the Object Classes to synchronize field. The default value is
inetOrgPerson. -
To set the sort attribute to use VLV indexes on the resource, set the Virtual List View (VLV) Sort Attribute field. The default value is
uid. -
To set the name of the attribute that holds the password, set the Password Attribute field. The default value is
userPassword. -
To have the LDAP provisioner read the schema from the server, enable Read Schema. The default value is
false. -
To have Advanced Identity Cloud modify group membership when entries are renamed or deleted, enable Maintain LDAP Group Membership. The default value is
false. -
To specify the group attribute to update with the DN of newly added users, set Group Member Attribute field. The default value is
uniqueMember. -
To specify the name of the attribute that maps to the OpenICF UID attribute, set UID Attribute field. The default value is
entryUUID. -
To use timestamps for liveSync operations instead of the changelog, select Timestamp for Sync Token.
-
To synchronize only the modified properties on a target resource, select Exclude Unmodified.
-
Click Connect.
-
Verify the information in the Details tab.
DocuSign
Details
The Advanced Identity Cloud DocuSign application lets you manage DocuSign service accounts and synchronize DocuSign accounts and Advanced Identity Cloud identities.
You must have a DocuSign administrator account and be able to add an integrator key (DocuSign Documentation).
| To modify the settings for an existing provisioning connection, in the Advanced Identity Cloud admin console, click the Provisioning tab, and then click Settings. |
-
In DocuSign, set up a DocuSign app and integration key:
-
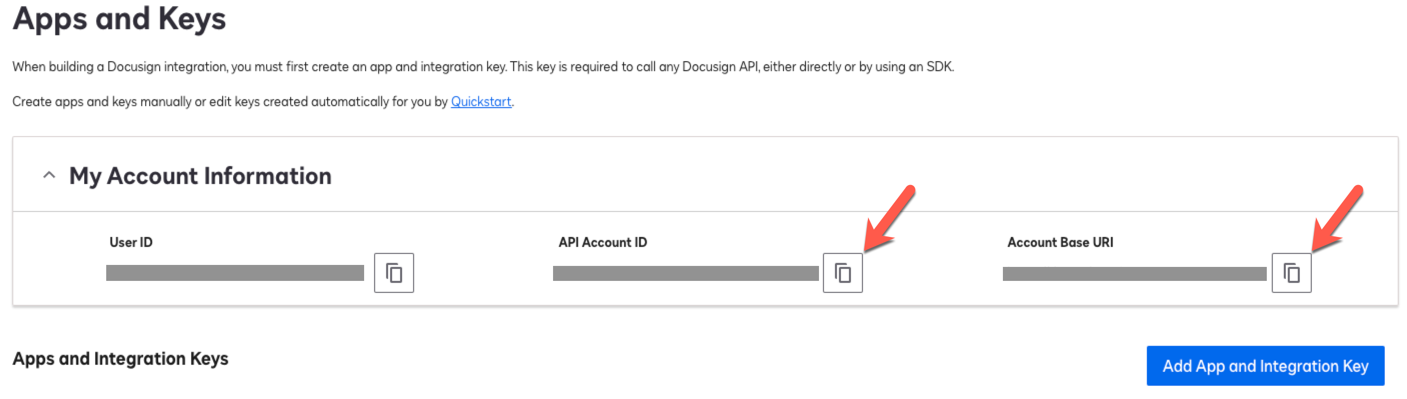
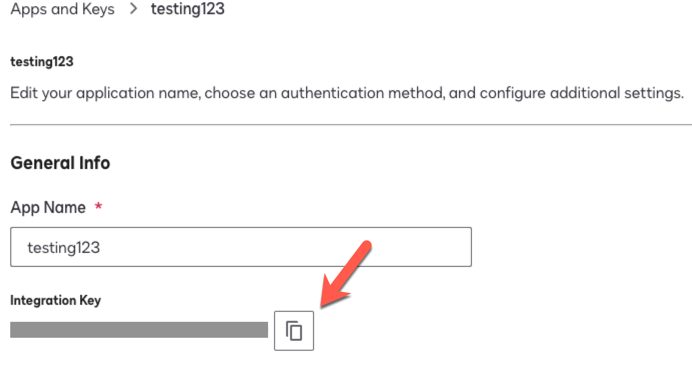
Log in to DocuSign and go to Integrations > Apps and Keys.
-
On the Apps and Keys page, in the My Account Information area, copy and save the following values:
DocuSign field Advanced Identity Cloud application field API Account ID
Account
Account Base URI
Service Endpoint URI
Show Me
-
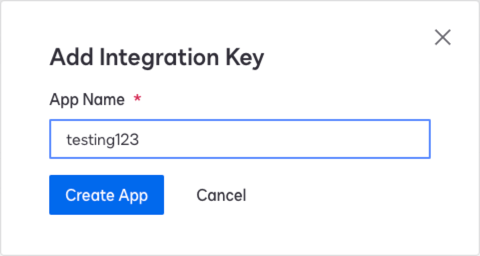
Click Add App and Integration Key.
Show Me

-
In the Add Integration Key modal, enter an App Name, and click Create App.
Show Me
-
On the Apps and Keys > App Name page, copy the Integration Key and save the value. Use this value as the Client Id in Advanced Identity Cloud.
Show Me
-
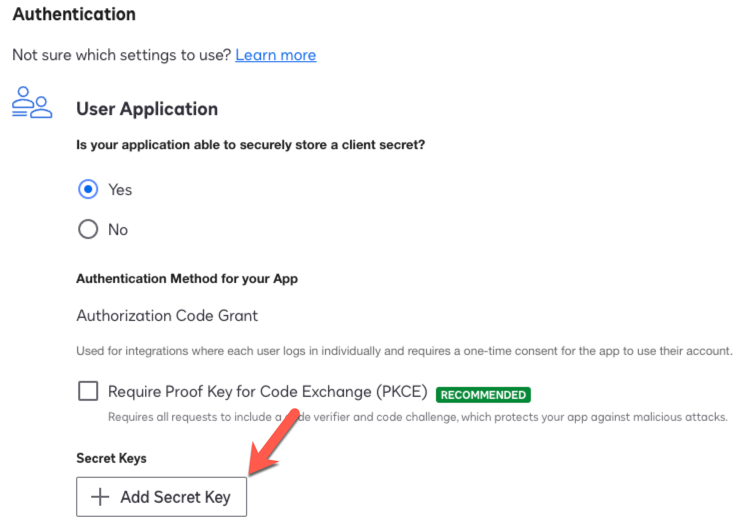
In the Authentication area, click + Add Secret Key, and copy and save the value. Use this value as the Client Secret in Advanced Identity Cloud.
Show Me
Keep DocuSign open, as you’ll need to add information during provisioning configuration. -
-
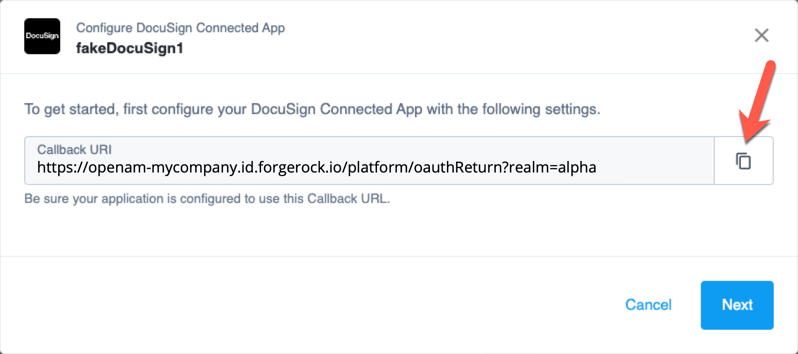
In the Advanced Identity Cloud admin console, click the Provisioning tab, and then click Set up Provisioning.
-
In the Configure DocuSign Connected App modal, copy the Redirect URI, and click Next.
Show Me
-
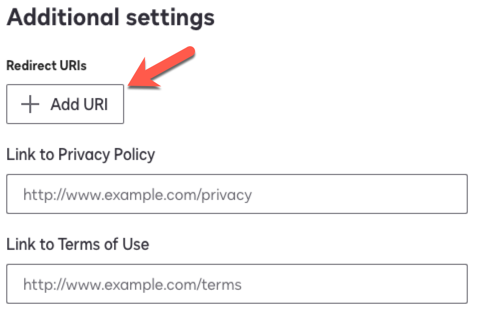
In DocuSign, in the Additional settings area, click Add URI, paste the redirect URI, and click Save.
Show Me
-
Go to Integrations > API Usage Center, and from the API Limit area, make note of the following:
-
Hourly Limit
-
Burst Limit
Show Me

Use these values in the Advanced Identity Cloud advanced settings.
-
-
In the Advanced Identity Cloud admin console, configure the following fields:
Field Description Service Endpoint URI
The DocuSign Account Base URI.
Account
The DocuSign API Account ID.
Client ID
The client ID for OAuth 2.0 flow. The DocuSign Integration Key.
Client Secret
The client secret for OAuth 2.0 flow. The DocuSign Secret Key.
Maximum Connections
The maximum size of the HTTP connection pool. The default is 10 connections.
Connection Timeout
The timeout for the underlying HTTP connection in seconds. The default is 30 seconds.
-
Optionally, click Show advanced settings to set any of the following options:
Field or option Description Use Basic Auth for Token Negotiation
Select this option to send the client ID and client secret to DocuSign as authorization headers. If the option is not selected, the ID and secret are sent as form data.
Hour Rate Limit
The hourly rate limit for the DocuSign API. The DocuSign Hourly Limit.
Burst Rate Limit
The burst rate limit for the DocuSign API. The DocuSign Burst Limit.
Disable Http Compression
Content compression is enabled by default. Select this option to disable it.
Debug/Test settings
Only use these settings for test environments. Don’t enable for production environments. Selecting this option displays the following options:
-
Accept Self Signed Certificates: Enable to accept self-signed certificates.
-
Disable Host Name Verifier: Enable to disable hostname verifiers.
Exclude Unmodified
Select this option to synchronize only the modified properties on a target resource.
-
-
Click Connect.
-
Verify the information in the Details tab.
Epic
Contact your Ping Customer Success Outcome Manager (CSOM) or Account Executive to learn about this application.
Google Workspace
Details
-
In the Advanced Identity Cloud admin console, on the Provisioning tab:
-
If setting up provisioning for the first time, click Set up Provisioning.
-
When editing existing settings in the Connection area, click Settings.
-
-
Find and copy the Authorized Redirect URI.
-
Log in to Google Cloud Console.
-
In the Credentials area of your project, enter the Authorized Redirect URI you copied in an earlier step.
-
Save your work.
-
Return to the Advanced Identity Cloud admin console.
-
On the Provisioning tab, set the Client ID and Client Secret.
-
Optionally, click Show advanced settings to set the following option:
Option Description Exclude Unmodified
Select this option to synchronize only the modified properties on a target resource.
-
Click Connect.
-
When you are redirected to Google, log in using your admin credentials.
-
On the next screen, click Allow. You are then redirected back to the Advanced Identity Cloud admin console.
-
Verify the information in the Details tab.
LDAP
Details
-
In the Advanced Identity Cloud admin console, on the Provisioning tab, click Set up Provisioning:
-
If setting up provisioning for the first time:
-
If you have not configured a remote server, click New Connector Server and follow the steps to create a server.
-
If you configured one remote server, it is automatically selected.
-
If you configured multiple remote servers, choose a server.
-
-
When editing existing settings in the Connection area, click Settings.
-
-
Configure the following fields:
Field Description Host Name or IP
The hostname or IP address for the LDAP domain controller.
Port
The port for connecting to the LDAP domain controller.
Use SSL
Enable to use SSL to connect to the LDAP domain controller.
Login Account DN
The distinguished name for the login account.
Password
The password for the login account.
Base DNs for LDAP users and groups
The base context for LDAP users and groups.
-
Click Show advanced settings.
-
To filter users and groups:
-
To only connect a subset of users by applying a query filter based on user attributes, enable Filter users.
-
To apply a filter to users manually:
-
Choose to assign to if All or Any conditions are met.
-
Set the conditions for assigning filters.
-
In the User Object Classes field, enter the names of object classes a user must have for inclusion.
-
-
To use a query to apply a filter to users:
-
Click Advanced Editor.
-
Edit the query code.
-
-
-
To only connect a subset of groups by applying a query filter based on user attributes, enable Filter groups.
-
To apply a filter to groups manually:
-
Choose to assign to if All or Any conditions are met.
-
Set the conditions for assigning filters.
-
-
To filter users and groups:
-
Click Advanced Editor.
-
Edit the query code.
-
-
-
-
To use block-based LDAP controls, enable Use Block-based controls.
-
To use paged results control, enable Use Paged Results control. If Use Block-based controls is enabled, specifies the LDAP Paged Results control is preferred over the VLV control when retrieving entries. The default value is
false. -
To set the change log attribute in the change log entry, set the Change Number Attribute field. The default value is
changeNumber. -
To set the object classes that Advanced Identity Cloud uses as filters when synchronizing, add classes to the Object Classes to synchronize field. The default value is
inetOrgPerson. -
To set the sort attribute to use VLV indexes on the resource, set the Virtual List View (VLV) Sort Attribute field. The default value is
uid. -
To set the name of the attribute that holds the password, set the Password Attribute field. The default value is
userPassword. -
To have the LDAP provisioner read the schema from the server, enable Read Schema. The default value is
true. -
To have Advanced Identity Cloud modify group membership when entries are renamed or deleted, enable Maintain LDAP Group Membership. The default value is
false. -
To specify the group attribute to update with the DN of newly added users, set Group Member Attribute field. The default value is
uniqueMember. -
To specify the name of the attribute that maps to the OpenICF UID attribute, set UID Attribute field. The default value is
entryUUID. -
To use timestamps for liveSync operations instead of the changelog, select Timestamp for Sync Token.
-
To synchronize only the modified properties on a target resource, select Exclude Unmodified.
-
Click Connect.
-
Verify the information in the Details tab.
Oracle E-Business Suite (EBS)
The Advanced Identity Cloud Oracle E-Business Suite (EBS) application lets you manage and synchronize accounts between EBS and Advanced Identity Cloud.
Details
-
Set up a remote connector server (RCS).
-
The EBS connector is bundled with RCS, but you must download the JDBC driver. For more information, refer to Install the EBS connector.
-
In the Advanced Identity Cloud admin console, on the Provisioning tab:
-
If setting up provisioning for the first time, click Set up Provisioning.
-
When editing existing settings in the Connection area, click Settings.
-
-
Configure the following fields:
Field Description EBS Database URL
The Oracle EBS database connection URL.
EBS Database User
The Oracle EBS user.
EBS Database User Password
The Oracle EBS user password.
JDBC Driver (optional)
The fully qualified Java class name of the JDBC driver to use.
-
Optionally, click Show advanced settings to set the following option:
Option Description Exclude Unmodified
Select this option to synchronize only the modified properties on a target resource.
-
Click Connect.
-
Verify the information in the Details tab.
PingOne
Details
The Advanced Identity Cloud PingOne application lets you manage and synchronize data between PingOne and Advanced Identity Cloud. Configuration requires a PingOne administrator account and a properly configured PingOne environment.
Before you can configure the Advanced Identity Cloud application, you must register an application in PingOne. You need a PingOne environment to complete this procedure:
-
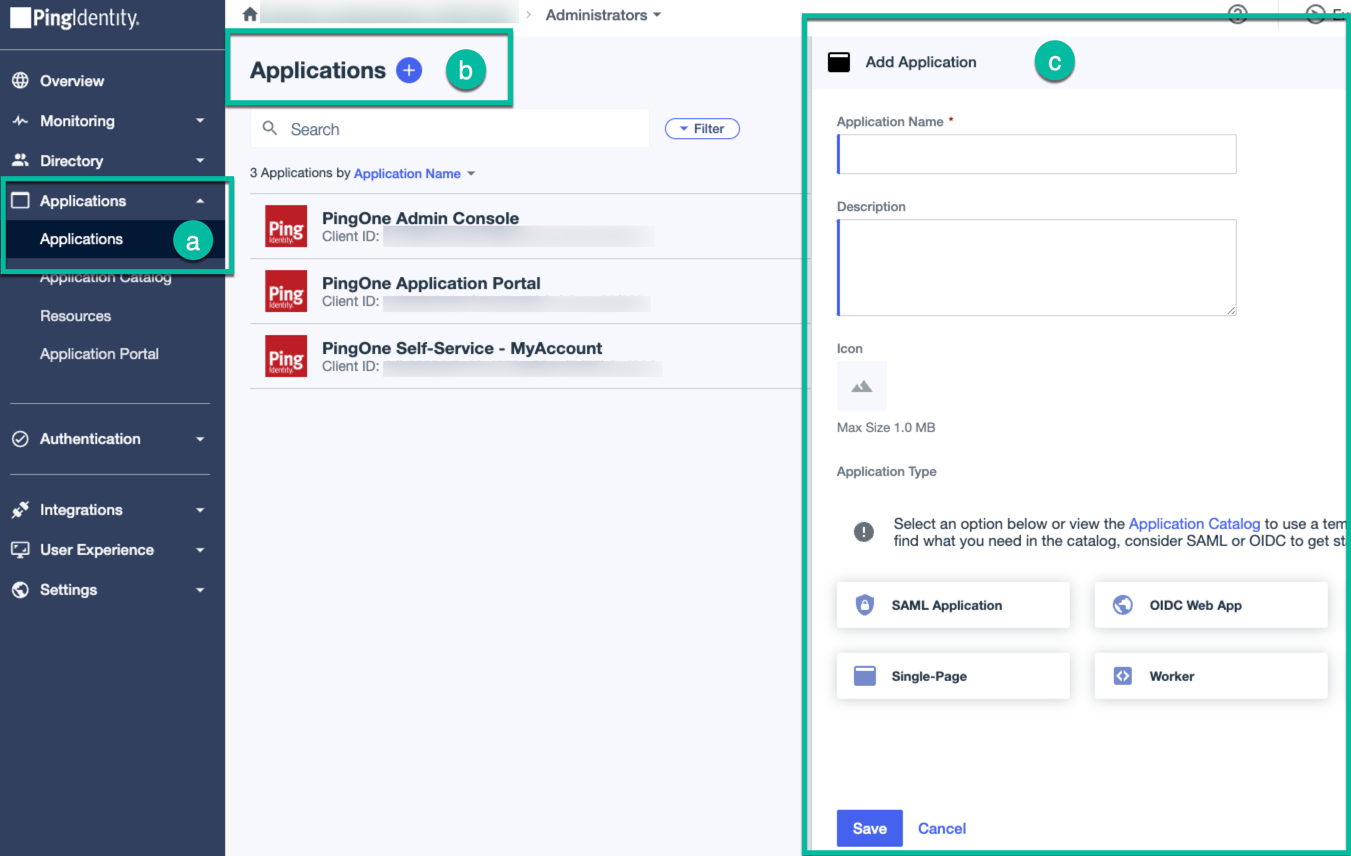
In your PingOne environment, create a new application:
-
From the menu, expand the Applications node, and click Applications.
-
On the Applications page, click the add button.
-
In the Add Application window, enter the necessary details, select the Worker application type, and click Save.
Show Me
-
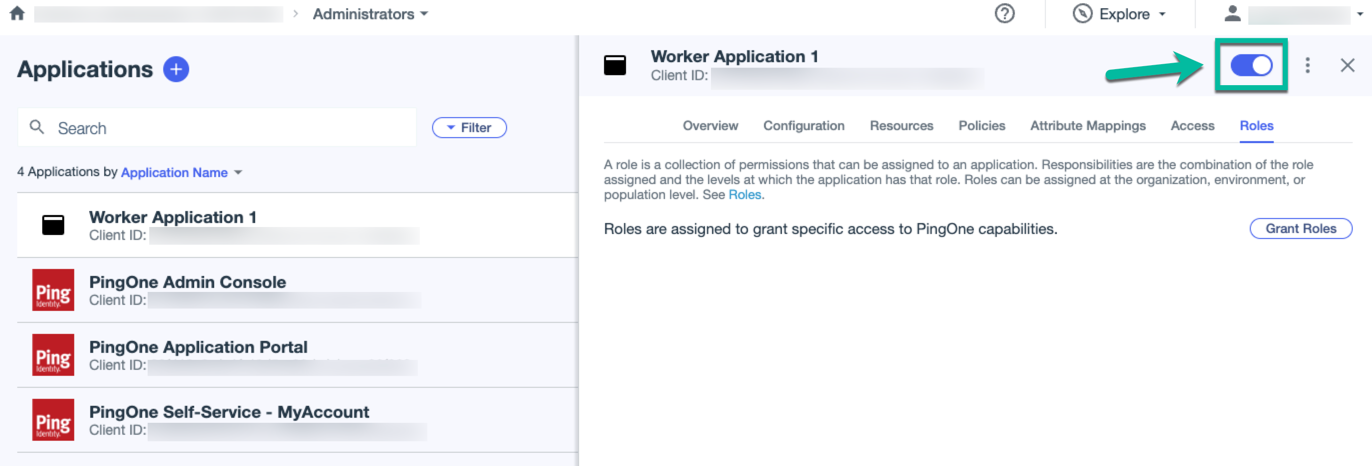
-
In the Application Name window, enable the application.
Show Me
-
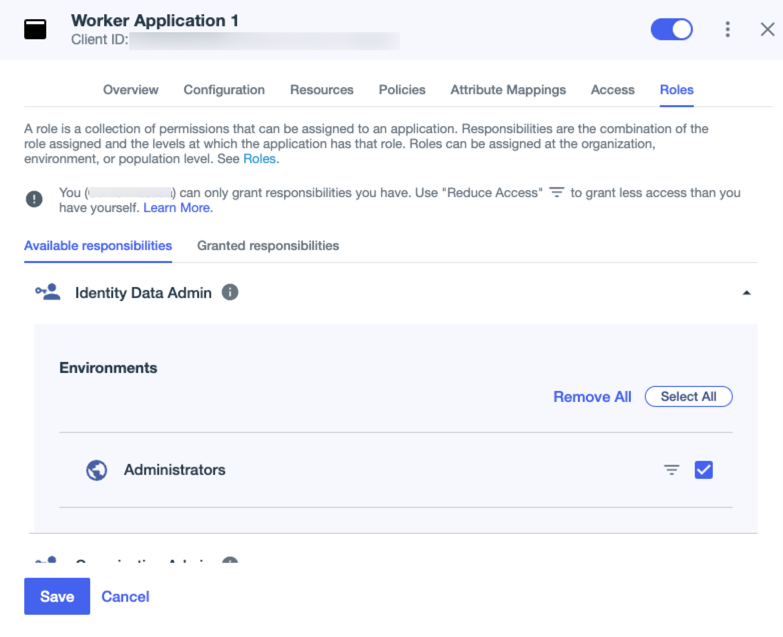
On the Roles tab, click Grant Roles.
-
On the Available Responsibilities tab, expand the Identity Data Admin node, select the applicable environment, and click Save.
Show Me
-
Click the Configuration tab, and make note of the following:
-
URLs > Token Endpoint
-
General > Client ID
-
General > Client Secret
-
General > Environment ID
Use these values when you configure provisioning for an Advanced Identity Cloud PingOne application.
-
-
Complete PingOne requirements.
-
In the Advanced Identity Cloud admin console, on the Provisioning tab:
-
If setting up provisioning for the first time, click Set up Provisioning.
-
If editing existing settings, in the Connection area, click Settings.
-
-
Configure the following fields:
Field Description Service Uri
The service endpoint URI. The URI top-level domain changes based on region. Learn more in Working with PingOne APIs.
Token Endpoint
The OAuth 2.0 access token endpoint.
Environment Id
The environment identifier for your PingOne environment.
Client Id
The client ID for OAuth 2.0 flow.
Client Secret
The client secret for OAuth 2.0 flow.
Grant Type
The OAuth 2.0 grant type to use (
client_credentialsorrefresh_token). -
To use Basic Auth to send the Client Id and Client Secret to PingOne as authorization headers, select Use Basic Auth For OAuth Token Neg. If the option is not selected, the Id and Secret will be sent as form data.
-
Optionally, click Show advanced settings to set any of the following options:
Field Description Maximum Connections
The maximum size of the HTTP connection pool. The default is 10 connections.
Connection Timeout
The timeout for the underlying HTTP connection in seconds. The default is 30 seconds.
Exclude Unmodified
Select this option to synchronize only the modified properties on a target resource.
-
Click Connect.
-
Verify the information in the Details tab.
PowerShell
You can use the PowerShell Connector Toolkit to create connectors that can provision any Microsoft system, including but not limited to Active Directory, Microsoft SQL, MS Exchange, SharePoint, Office365, and Azure. Any task performed with PowerShell can be executed through connectors based on this toolkit.
The PowerShell Connector Toolkit lets you develop connectors in PowerShell that address the requirements of your Microsoft Windows ecosystem. The framework is included with the .NET RCS server. Note that the framework itself is not a connector.
The Powershell Connector toolkit is built-in to the .NET RCS server.
Connectors created with the PowerShell Connector Toolkit run on the .NET platform and require the installation of a .NET connector server on the Windows system. To install the .NET connector server, refer to Sync identities.
| The PowerShell connector combines a command-line shell and scripting language, built on the .NET Framework. For more information, refer to PowerShell Documentation. |
Details
-
In the Advanced Identity Cloud admin console, on the Provisioning tab:
-
If setting up provisioning for the first time:
-
If you have not done so already, create an application.
-
On the Provisioning tab, click Set up Provisioning.
-
-
When editing existing settings in the Connection area, click Settings.
-
-
Configure the following fields:
Field Description Active Directory Host
The host name or IP address of the Active Directory server.
Active Directory Port
The port number on which the remote resource listens for connections.
Login
The user account in the remote resource that is used for the connection.
Password
The password of the user account that is used for the connection
Authenticate Script
The name of a script file that uses a custom PowerShell script to implement the ICF authenticate operation. The ICF authenticate operation lets an application authenticate an object on the target system, usually with a unique identifier (username) and a password.
To reference a script, use the following format
C:\path\to\script\script.ps1.Create Script
The name of a script file that uses a custom PowerShell script to implement the ICF create operation. The ICF create operation lets an application create objects on the target system.
To reference a script, use the following format
C:\path\to\script\script.ps1.Delete Script
The name of a script file that uses a custom PowerShell script to implement the ICF delete operation. The ICF delete operation lets an application delete objects on the target system.
To reference a script, use the following format
C:\path\to\script\script.ps1.Schema Script
The name of a script file that uses a custom PowerShell script to implement the ICF schema operation. The ICF schema operation lets an application describe the types of objects that it can handle on the target system and the operations and options that the connector supports foreach object type.
To reference a script, use the following format
C:\path\to\script\script.ps1.Search Script
The name of a script file that uses a custom PowerShell script to implement the ICF search operation. The ICF search operation lets an application search for objects on the target system.
To reference a script, use the following format
C:\path\to\script\script.ps1.Sync Script
The name of a script file that uses a custom PowerShell script to implement the ICF sync operation. The ICF sync operation lets an application poll the target system for synchronization events created by changes to target objects.
To reference a script, use the following format
C:\path\to\script\script.ps1.Test Script
The name of a script file that uses a custom PowerShell script to implement the ICF test operation. The ICF test operation lets an application test the connector configuration against the target system.
To reference a script, use the following format
C:\path\to\script\script.ps1.Update Script
The name of a script file that uses a custom PowerShell script to implement the ICF update operation. The ICF update operation lets an application update (modify or replace) objects on the target system.
To reference a script, use the following format
C:\path\to\script\script.ps1.UID attribute name
The attribute on the resource that contains the object
UID.NAME attribute name
The attribute on the resource that contains the object
NAME.Substitute UID and NAME in query filter
Enable if the
UIDandNAMEshould be replaced by the value defined in theNameAttributeNameandUidAttributeNamein the query filter. -
Optionally, click Show advanced settings to set any of the following options:
Field Description Variables Prefix
To avoid variable namespace conflicts, define a prefix for script variables. All variables are injected into the script under that prefix and can be used with the dotted notation.
The default value is
Connector.Query Filter Type
To define the format used when injecting the query into the connector, set a query filter type by clicking one of the following:
-
Map - The query filter is a map.
-
Ldap - The query filter is in LDAP search format, for example,
(cn=Joe). -
Native - The query filter is a native OpenICF query filter.
-
AdPsModule - The query filter is compatible with the Active Directory PowerShell module,
Get-ADUser Filter.
Reload script on execution
To reload the script from disk every time the connector executes the script, enable this setting.
This can be useful for debugging. In production, disable this setting.
Use Interpreter’s Pool
To leverage the PowerShell RunSpace Pool, enable this setting.
Min interpreter pool size
The minimum size of the interpreter pool. The default value is
1.Max interpreter pool size
The maximum size of the interpreter pool. The default value is
5.Pool cleanup interval
To specify the interval (in minutes) to discard unused interpreter instances. To avoid cleaning up unused interpreter instances, set this property to
0. The default value is60.PS Modules to Import
An array of additional PowerShell modules that must be imported
Custom Properties
An array of Strings that define custom configuration properties. Each property uses the format
name=value.Exclude Unmodified
Select this option to synchronize only the modified properties on a target resource.
-
-
Click Connect.
-
Verify the information in the Details tab.
Salesforce or Salesforce Community User
You can use a Salesforce application template or a Salesforce Community User application template to provision, reconcile, and synchronize Salesforce, Salesforce Portal, and Salesforce Community accounts.
Details
-
In the Advanced Identity Cloud admin console, go to the Provisioning tab.
-
On the Provisioning tab, click Set up Provisioning.
-
In the Callback URI field, copy the callback URI.
-
In another browser, log in to Salesforce.
-
In platform tools, go to the app manager.
-
Create a new connected app button.
-
Configure the following settings:
-
Connected App Name
-
API Name
-
Contact email
-
Custom
-
-
(Custom environment only) Enter the Login URL for the application.
-
Enter the Consumer Key.
-
Enter the Consumer Secret.
-
Optionally, click Show advanced settings to set the following option:
Option Description Exclude Unmodified
Select this option to synchronize only the modified properties on a target resource.
-
Click Connect. You are redirected to Salesforce.
-
Log in to Salesforce. You are redirected to Advanced Identity Cloud.
-
Verify the information in the Details tab.
SAP SuccessFactors Account or SAP SuccessFactors HR
The SAP SuccessFactors connectors let you synchronize SAP SuccessFactors users with the Advanced Identity Cloud admin console users.
Details
-
If setting up provisioning for the first time, on the Provisioning tab, click Set up Provisioning.
-
When editing existing settings in the Connection area, click Settings.
-
Configure the following fields:
Field Description Host
The hostname or IP address for your SuccessFactors application.
Client ID
The client ID for your SuccessFactors application.
User ID
The user ID for your SuccessFactors application.
Private Key
The private key which is used for signing JWT.
Company Id
The company ID as present in the target application.
-
Optionally, click Show advanced settings to set any of the following options:
Field Description Person Segments
Enable to retrieve data based on person segments.
Page Size
The page size for the search operation.
Maximum Connections
The maximum allowed timeout for the connection (in seconds).
Connection Timeout
The connection timeout for the connection (in seconds).
Use Proxy
Enable to use a proxy server to connect to your SuccessFactors application.
After you enable this option, set the following fields:
-
HTTP Proxy Host Name: The host name of the HTTP Proxy server.
-
HTTP Proxy Port: The port of the HTTP Proxy server.
-
HTTP Proxy Username: The username for logging into the HTTP Proxy server.
-
HTTP Proxy Password: The password for logging into the HTTP Proxy server.
Exclude Unmodified
Select this option to synchronize only the modified properties on a target resource.
-
-
Click Connect.
-
Verify the information in the Details tab.
-
SAP User Management
The SAP User Management connector lets you synchronize users from Advanced Identity Cloud to SAP user accounts. This application can only be a target application.
Details
-
Set up a remote connector server (RCS).
-
In the Advanced Identity Cloud admin console, on the Provisioning tab:
-
If setting up provisioning for the first time, click Set up Provisioning.
-
When editing existing settings in the Connection area, click Settings.
-
-
Configure the following fields:
Field/Option Description SAP Application Server FQDN
The FQDN of your SAP Application Server. For example,
sap.example.com.SAP Gateway Host
The SAP gateway host name.
SAP Gateway Server
The SAP gateway server.
SAP User
The SAP Logon user.
Password
The SAP Logon password.
SAP Client
The SAP client.
SAP System Number
The SAP system number.
SAP System Language
The language of the remote SAP system.
SAP Router
The IP address, port, and optional password of the SAP router, if applicable. The syntax is
/H/host/S/port/W/optionalPassword. For example:/H/203.0.113.0/S/3299/W/48npb_hg815.77rr62.hdjCUA
Whether to enable SAP Central User Administration (CUA).
-
Optionally, click Show advanced settings to set any of the following options:
Field/Option Description Destination
SAP JCo destination name.
Direct Connection
If selected, use a direct connection to an SAP ABAP Application server or SAP router. If cleared, use a connection to a group of SAP instances through a SAP message server.
Target Directory
The directory to write classes.
Warning Level
The compiler warning level.
Disabled Global AST Transformations
A list of global AST transformations which should not be loaded even if they are defined in
META-INF/org.codehaus.groovy.transform.ASTTransformationfiles. By default, none are disabled.SourceEncoding
The encoding for source files.
X509 Certificate
The X509 certificate to supply for authentication.
Trace
Whether to enable RFC trace.
CPIC Trace
Whether to enable CPIC trace. Possible values are
0-3.SAP Message Server Host
The message server host.
Group
The group name of the application servers. Used when you log in to a logon group that uses load balancing.
Message Server Service
The message server service name.
R3 Name
The name of the SAP system used when you log in to a logon group that uses load balancing.
SNC Mode
Flag used to activate SNC (Secure Network Connection). Possible values are
0(OFF) and1(ON).SNC QoP
The connection security level to use. Possible values are:
1Authentication only
2Integrity protection
3Privacy protection
8Use the application server value
snc/data_protection/use9Use the application server value
snc/data_protection/maxSNC Library
The external library path for the Secure Network Connection service. The default is the system-defined library as defined in the environment variable
SNC_LIB.SNC Partner Name
The application server ABAP SNC name. For example,
"p:CN=ABC, O=MyCompany, C=US". You can find the name in the profile parametersnc/identity/ason the AS ABAP.SNC Name
The connector SNC name. For example,
"p:CN=OpenIDM, O=MyCompany, C=US". This parameter is optional, but set it to make sure that the correct SNC name is used for the connection.SNC SSO
Whether the connection should be configured for single sign-on (SSO). Possible values are
0(OFF) and1(ON).Pool Capacity
The maximum number of idle connections kept open by the destination. If there is no connection pooling, set this to
0. The default value is1.For optimum performance, set this value to an integer between
5and10.Expiration time
After this time (in milliseconds) has elapsed, the system closes the free connection. The default value is
60000.Max Get time
If the pool has allocated the maximum allowed number of connections, the maximum time (in milliseconds) to wait for a connection.
Peak Limit
The maximum number of active connections that can be created for a destination simultaneously. The value
0is unlimited.Expiration Period
After this time (in milliseconds) has elapsed, the destination checks released connections for expiration.
Exclude Unmodified
Select this option to synchronize only the modified properties on a target resource.
-
Click Connect.
-
Verify the information in the Details tab.
SCIM
Details
-
In the Advanced Identity Cloud admin console, on the Provisioning tab:
-
If setting up provisioning for the first time, click Set up Provisioning.
-
If editing existing settings, in the Connection section, click Settings.
-
-
Configure the following fields:
Field Description SCIM Endpoint
The URL defining the root for the SCIM endpoint. For example,
https://myserver.com/service/scim.SCIM Protocol Version
Choose version 1 or version 2. The default is 1.
Authentication Method
The method for authenticating on the remote server:
BASIC,OAUTH, orTOKEN. The default isOAUTH. -
Depending on the Authentication Method, configure the applicable fields:
-
BASIC
-
OAUTH
-
TOKEN
Field Description User
The basic authentication username for the SCIM service.
Password
The basic authentication password for the SCIM service.
Field Description Token Endpoint
The OAuth 2.0 endpoint where a new access token is requested for the SCIM service.
Client Id
The OAuth 2.0 client identifier for the SCIM service.
Client Secret
The OAuth 2.0 client secret for the SCIM service.
Scope
The OAuth 2.0 scope to use.
Grant Type
The OAuth 2.0 grant type to use (
client_credentialsorrefresh_token).Refresh Token
Used by the
refresh_tokenGrant Type.Field Description Auth Token
The auth token for the SCIM service.
-
-
Fill out the following fields:
Field Description Use TLS Mutual Authentication
Select to use TLS Mutual Authentication.
Maximum Connections
The maximum size of the http connection pool. The default is 10 connections.
-
If you selected Use TLS Mutual Authentication, configure the following fields:
Field Description Client Certificate Alias
The client certificate alias.
Client Certificate Password
The client certificate password.
-
Optionally, click Show advanced settings to set any of the following options:
Field Description Disable Http Compression
Content compression is enabled by default. Select this property to true to disable it.
Use an HTTP Proxy
Select to use an HTTP proxy.
Connection Timeout
Define a timeout (in seconds) for the underlying http connection. The default is 30 seconds.
Debug/Test settings
Only use these settings for test environments. Don’t enable for production environments. Selecting this option displays the following options:
-
Accept Self Signed Certificates: Enable to accept self-signed certificates.
-
Disable Host Name Verifier: Enable to disable hostname verifiers.
Read Schema
Read/discover the schema from the SCIM endpoint. The default value is
true.Exclude Unmodified
Select this option to synchronize only the modified properties on a target resource.
-
-
Click Connect.
-
Verify the information in the Details tab.
Scripted Groovy
The generic Groovy Connector Toolkit runs a Groovy script for any operation, such as search, update, create, and others, on any external resource. The Groovy Connector Toolkit is not a complete connector in the traditional sense. Rather, it is a framework you use to write your own Groovy scripts to address the requirements of your implementation. For more information, refer to Groovy Connector Toolkit.
Details
-
In the Advanced Identity Cloud admin console, on the Provisioning tab:
-
If setting up provisioning for the first time:
-
If you have not done so already, create an application.
-
On the Provisioning tab, click Set up Provisioning.
-
-
When editing existing settings in the Connection area, click Settings.
-
-
Configure the following fields:
Field Description Script Base Class
Base class name for scripts (must derive from Script).
Script Roots
The root folder that stores the scripts. If the value is null or empty, the classpath value is used.
Custom Sensitive Configuration
Custom Sensitive Configuration script for Groovy ConfigSlurper.
Schema Script
The name of a connector file that uses a custom Groovy script to implement the ICF schema operation. The ICF schema operation lets a connector describe the types of objects that it can handle on the target system and the operations and options that the connector supports foreach object type.
Test Script
The name of a connector file that uses a custom Groovy script to implement the ICF test operation. The ICF test operation lets a connector test the connector configuration against the target system.
Create Script
The name of a connector file that uses a custom Groovy script to implement the ICF create operation. The ICF create operation lets a connector create objects on the target system.
Update Script
The name of a connector file that uses a custom Groovy script to implement the ICF update operation. The ICF update operation lets a connector update (modify or replace) objects on the target system.
Authenticate Script
The name of a connector file that uses a custom Groovy script to implement the ICF authenticate operation. The ICF authenticate operation lets a connector authenticate an object on the target system, usually with a unique identifier (username) and a password.
Delete Script
The name of a connector file that uses a custom Groovy script to implement the ICF delete operation. The ICF delete operation lets a connector delete objects on the target system.
Resolve Username Script
The name of a connector file that uses a custom Groovy script to implement the ICF resolve username operation. The ICF resolve username operation lets a connector resolve an object to its UID, based on its username.
Search Script
The name of a connector file that uses a custom Groovy script to implement the ICF search operation. The ICF search operation lets a connector search for objects on the target system.
Customizer Script
The name of the file that lets you customize the Apache HTTP client connection pool, proxy, default headers, timeouts, and so on.
Target Directory
Directory into which to write classes.
-
Optionally, click Show advanced settings to set any of the following options:
Field Description Warning Level
The warning level of the compiler. If not set, the default value is
1.Min. Recompilation Interval
Sets the minimum amount of time after a script can be recompiled. If not set, the default value is
100.Custom Configuration
Custom Configuration script for Groovy ConfigSlurper.
Tolerance
The error tolerance, which is the number of non-fatal errors (per unit) that should be tolerated before compilation is aborted. If not set, the default value is
10.Debug
If true, debugging code should be activated.
Classpath
The classpath for use during compilation.
Disabled Global AST Transformations
Sets a list of global AST transformations which should not be loaded even if they are defined in META-INF/org.codehaus.groovy.transform.ASTTransformation files. By default, none are disabled.
Verbose
If true, the compiler should produce action information.
Source Encoding
The encoding for source files. If not set, the default value is
UTF-8.Recompile Groovy Source
If set to true, recompilation is enabled.
Exclude Unmodified
Select this option to synchronize only the modified properties on a target resource.
-
Click Connect.
-
Verify the information in the Details tab.
Scripted REST
The Scripted REST connector is an implementation of the Scripted Groovy Connector Toolkit. It uses Groovy scripts to interact with any REST API. This connector type lets you develop a fully functional REST-based connector for in-house or cloud-based application. For more information, refer to Scripted REST connector.
Details
-
In the Advanced Identity Cloud admin console, on the Provisioning tab, click Set up Provisioning:
-
If setting up provisioning for the first time:
-
If you have not configured a remote server, click New Connector Server and follow the steps to create a server.
-
If you configured one remote server, it is automatically selected.
-
If you configured multiple remote servers, choose a server.
-
-
When editing existing settings in the Connection area, click Settings.
-
-
Configure the following fields:
Field Description Service Address
The service URI (example: http://myservice.com/api).
Proxy Address
The optional Proxy server URI (example: http://myproxy:8080).
Username
The remote user to authenticate with.
Password
The password to authenticate with.
Default Content Type
The default HTTP request content type. One of
TEXT,XML,HTML,URLENC,BINARY, orJSON. If not set, the default value isJSON.Default Request Headers
Placeholder for default HTTP request headers.
Default Authentication Method
The default authentication method for the connection. Specify
BASICorOAUTH. If not set, the default value isBASIC.If Default Authentication Method is set to OAUTH, configure the following fields:
-
Token Endpoint: When using OAuth 2.0, this property defines the endpoint where a new access token should be queried for (https://myserver.com/oauth2/token).
-
Client ID: The secure client identifier for OAuth 2.0.
-
Client Secret: The secure client secret for OAuth 2.0.
-
Refresh Token: The refresh token used to renew the access token for the refresh_token grant type.
-
Scopes: The optional scopes to use for OAuth 2.0.
Grant Type
The grant type to use. Specify
CLIENT_CREDENTIALS,REFRESH_TOKEN, orAUTHORIZATION_CODE. If not set, the default value isCLIENT_CREDENTIALS.Custom Sensitive Configuration
Custom Sensitive Configuration script for Groovy ConfigSlurper.
Custom Configuration
Custom Configuration script for Groovy ConfigSlurper.
Script Roots
The root folder that stores the scripts. If the value is null or empty, the classpath value is used.
Authenticate Script
The name of a connector file that uses a custom REST request to implement the ICF authenticate operation. The ICF authenticate operation lets a connector authenticate an object on the target system, usually with a unique identifier (username) and a password.
Create Script
The name of a connector file that uses a custom REST request to implement the ICF create operation. The ICF create operation lets a connector create objects on the target system.
Update Script
The name of a connector file that uses a custom REST request to implement the ICF update operation. The ICF update operation lets a connector update (modify or replace) objects on the target system.
Delete Script
The name of a connector file that uses a custom REST request to implement the ICF delete operation. The ICF delete operation lets a connector delete objects on the target system.
Search Script
The name of a connector file that uses a custom REST request to implement the ICF search operation. The ICF search operation lets a connector search for objects on the target system.
Test Script
The name of a connector file that uses a custom REST request to implement the ICF test operation. The ICF test operation lets a connector test the connector configuration against the target system.
Sync Script
The name of a connector file that uses a custom REST request to implement the ICF sync operation. The ICF sync operation lets a connector poll the target system for synchronization events created by changes to target objects.
Schema Script
The name of a connector file that uses a custom REST request to implement the ICF schema operation. The ICF schema operation lets a connector describe the types of objects that it can handle on the target system and the operations and options that the connector supports for each object type.
Resolve Username Script
The name of a connector file that uses a custom REST request to implement the ICF resolve username operation. The ICF resolve username operation lets a connector resolve an object to its UID, based on its username.
Script On Resource
The name of a connector file that uses a custom REST request to implement the ICF script on resource operation. The ICF script on resource operation lets a connector runs a script directly on the target resource.
Customizer Script
The name of the file that lets you customize the Apache HTTP client connection pool, proxy, default headers, timeouts, and so on.
-
-
Optionally, click Show advanced settings to set any of the following options:
Field Description Target Directory
Directory into which to write classes.
Warning Level
The warning level of the compiler. If not set, the default value is
1.Recompilation Interval
Sets the minimum of time after a script can be recompiled. If not set, the default value is
100.Script Base Class
Base class name for scripts (must derive from Script).
Tolerance
The error tolerance, which is the number of non-fatal errors (per unit) that should be tolerated before compilation is aborted. If not set, the default value is
10.Debug
If true, debugging code should be activated.
Classpath
The classpath for use during compilation.
Disabled Global AST Transformations
Sets a list of global AST transformations which should not be loaded even if they are defined in META-INF/org.codehaus.groovy.transform.ASTTransformation files. By default, none are disabled.
Verbose
If true, the compiler should produce action information.
Source Encoding
The encoding for source files. If not set, the default value is
UTF-8.Recompile Groovy Source
If set to true, recompilation is enabled.
Exclude Unmodified
Select this option to synchronize only the modified properties on a target resource.
-
Click Connect.
-
Verify the information in the Details tab.
Scripted Table
The Scripted SQL connector is an implementation of the Scripted Groovy Connector Toolkit. This connector lets you use Groovy scripts to interact with any SQL database. To use this connector, you must write a Groovy script for each operation that you want the connector to perform (create, read, update, delete, authenticate, and so on). For more information, refer to Scripted SQL connector.
Details
-
In the Advanced Identity Cloud admin console, on the Provisioning tab, click Set up Provisioning:
-
If setting up provisioning for the first time:
-
If you have not configured a remote server, click New Connector Server and follow the steps to create a server.
-
If you configured one remote server, it is automatically selected.
-
If you configured multiple remote servers, choose a server.
-
-
When editing existing settings in the Connection area, click Settings.
-
-
Configure the following fields:
Field Description User
The connection username sent to the JDBC driver to establish a connection.
Password
The connection password sent to the JDBC driver to establish a connection.
JDBC URL
The URL for the JDBC driver.
JDBC Driver
The class name of the driver you are using to connect.
Create Script
The name of a connector file that uses a custom SQL command to implement the ICF create operation. The ICF create operation lets a connector create objects on the target system.
Update Script
The name of a connector file that uses a custom SQL command to implement the ICF update operation. The ICF update operation lets a connector update (modify or replace) objects on the target system.
Delete Script
The name of a connector file that uses a custom SQL command to implement the ICF delete operation. The ICF delete operation lets a connector delete objects on the target system.
Search Script
The name of a connector file that uses a custom SQL command to implement the ICF search operation. The ICF search operation lets a connector search for objects on the target system.
Authenticate Script
The name of a connector file that uses a custom SQL command to implement the ICF authenticate operation. The ICF authenticate operation lets a connector authenticate an object on the target system, usually with a unique identifier (username) and a password.
Schema Script
The name of a connector file that uses a custom SQL command to implement the ICF schema operation. The ICF schema operation lets a connector describe the types of objects that it can handle on the target system and the operations and options that the connector supports foreach object type.
Sync Script
The name of a connector file that uses a custom SQL command to implement the ICF sync operation. The ICF sync operation lets a connector poll the target system for synchronization events created by changes to target objects.
Test Script
The name of a connector file that uses a custom SQL command to implement the ICF test operation. The ICF test operation lets a connector test the connector configuration against the target system.
Script Root(s)
The root folder that stores the scripts. If the value is null or empty, the classpath value is used.
-
Optionally, click Show advanced settings to set any of the following options:
Field Description Validation Query
The SQL query used to validate connections from this pool before returning them to the caller. If specified, this query does not have to return any data, it just can’t throw a SQLException. The default value is
null. Example values are:-
SELECT 1(mysql) -
select 1 from dual(oracle) -
SELECT 1(MS Sql Server)
Validation Interval
To avoid excess validation, only run validation at most at this frequency - time in milliseconds. If a connection is due for validation, but has been validated previously within this interval, it will not be validated again. The default value is
30000(30 seconds).Exclude Unmodified
Select this option to synchronize only the modified properties on a target resource.
-
-
Click Connect.
-
Verify the information in the Details tab.
ServiceNow
Before you configure ServiceNow, refer to the Before you start section in ServiceNow connector.
Details
-
In ServiceNow, create an OAuth API endpoint for external clients.
-
Note your instance url, username, and password.
-
After auto-generating your secret, copy the client id and client secret.
-
In the connector configuration, you must include a ServiceNow user who has
adminandrest_api_explorerroles.If you don’t want to assign the
adminrole to the ServiceNow user, you must ensure that the user has access to the following tables:-
sys_user_has_role -
sys_user_grmember -
sys_user_delegate -
sys_user_role -
sys_user_group -
core_company -
cmn_department -
cmn_cost_center -
cmn_location
-
-
In the Advanced Identity Cloud admin console, on the Provisioning tab:
-
If setting up provisioning for the first time, click Set up Provisioning.
-
When editing existing settings in the Connection area, click Settings.
-
-
Configure the following settings:
Field Description ServiceNow instance
URL of the ServiceNow instance. For example, dev00000.service-now.com
Username
An API user in ServiceNow that can consume the REST API.
Password
Password for the end user.
Client ID
Client ID of the OAuth 2.0 application in ServiceNow.
Client Secret
Client Secret for the preceding Client ID.
-
Optionally, click Show advanced settings to set the following option:
Option Description Exclude Unmodified
Select this option to synchronize only the modified properties on a target resource.
-
Click Connect.
-
Verify the information in the Details tab.
Webex
Details
The Advanced Identity Cloud Webex application lets you manage and synchronize data between Webex Control Hub and Advanced Identity Cloud. A Webex administrator account is required.
| To modify the settings for an existing provisioning connection, in the Advanced Identity Cloud admin console, click the Provisioning tab, and then click Settings. |
-
In Webex, set up a Webex integration application:
-
Create a Webex developer account.
-
Create an integration application and add the required scopes to manage users, groups, licenses, and roles. Minimum required scopes:
-
spark-admin:people_write -
spark-admin:people_read -
spark-admin:licenses_read -
spark-admin:roles_read -
identity:groups_rw -
identity:groups_read
-
-
Save the client secret and client ID.
Keep your Webex integration application window open, as you’ll need to add information during provisioning configuration.
-
-
In the Advanced Identity Cloud admin console, click the Provisioning tab, and then click Set up Provisioning.
-
In the Configure Webex App modal, copy the Redirect URI, and click Next.
Show Me
-
In Webex, in your Webex integration application Redirect URI(s) area, paste the redirect URI, and click Save.
Show Me
-
In the Advanced Identity Cloud admin console, configure the following fields:
Field Description Client ID
The client ID for OAuth 2.0 flow.
Client Secret
The client secret for OAuth 2.0 flow.
Service URI
The service endpoint URI.
Token Endpoint
The OAuth 2.0 access token endpoint.
-
Optionally, click Show advanced settings to set any of the following options:
Field Description Maximum Connections
The maximum size of the HTTP connection pool. The default is 10 connections.
Connection Timeout
The timeout for the underlying HTTP connection in seconds. The default is 30 seconds.
Exclude Unmodified
Select this option to synchronize only the modified properties on a target resource.
-
Click Connect.
-
Verify the information in the Details tab.
Workday
Details
-
In the Advanced Identity Cloud admin console, on the Provisioning tab:
-
If setting up provisioning for the first time, click Set up Provisioning.
-
When editing existing settings in the Connection area, click Settings.
-
-
Make sure you have the requirements mentioned on the Connect to Workday page.
-
Click Next.
-
Configure the following fields:
Field Description Workday Host Name
The hostname of the Workday instance. For example,
example.workday.net.Workday Tenant Name
The Workday tenant that you are connecting to.
Username
The username for connecting to the Workday tenant.
Password
The password for connecting to the Workday tenant.
-
Optionally, click Show advanced settings to set any of the following options:
Field Description Enforce Connection Timeout
Enable to set the timeout (in seconds) the application waits for a request to be sent to the Workday instance. After you enable this option, enter a value in the Connection Timeout (seconds) field.
Enforce Receive Timeout
Enable to set the timeout (in seconds) the application waits for a response from the Workday instance. After you enable this option, enter a value in the Receive Timeout (seconds) field.
Use Proxy
Enable to use an HTTP proxy server to connect to Workday. After you enable this option, set the following fields:
-
Proxy Host Name: The hostname for the proxy.
-
Proxy Port: The port for the proxy.
Set Effective Date
Enable to set an effective date or a duration during which access to Workday is granted. After you enable this option, set the Effective Date field. Valid values for the Effective Date field are
X-Path function,XML Schema, orDuration. If set toDuration, the effective date is the current date + duration.Exclude Unmodified
Select this option to synchronize only the modified properties on a target resource.
-
-
Click Connect.
-
Verify the information in the Details tab.
Manage application attributes
Properties are the application attributes that Advanced Identity Cloud creates automatically. You can use the Properties tab to view and modify the properties of an account object or group/organization identity that can access your application.
The tab displays the name, identity type, and other information such as multivalued or required, for a property.
Add or edit a property
-
On the Properties tab, do one of the following:
-
To add a new property, click Add a Property.
-
To edit a property, double-click a property.
-
-
In the Name drop-down field, select a property.
-
In the Type drop-down field, select a property type.
-
Set one or more of the following options:
Field Description Multi-valued
Make the property a multi-value property.
Required
Make the property a required property.
User-specific
Make the property specific to individual users and not roles. If you don’t check this option, the property appears in the role’s relationship page when you add a role to an application.
-
Optionally, click Show advanced settings to set any of the following options:
Field Description Creatable
Make the property creatable.
Readable
Make the property readable. Required for the property to appear in the Users & Roles tab.
Updatable
Make the property updatable.
Returned by default
Set the property to be returned by default. Requires the Readable option to be checked.
Enumerated Values
A list of allowed values that constrain the values you can set for the property. Supported for string and array type properties.
To define a list of values for this property:
-
Beside the Values field, click the plus sign.
-
In the text field, enter the unique identifier for the value.
-
In the value field, enter the display text for the value.
-
To add another value, click the plus sign, and repeat steps 2 and 3 above.
-
To delete a value, click the negative sign beside a value.
-
-
Click Save.
Set a property as user-specific
You can set a property to be for a specific user.
-
On the Properties tab, click a property.
-
Enable User-specific.
-
Click Save.
Set the display order of a property
When you add a new user or role, you specify properties for the identity. You can set the display order of the properties.
-
In the Provisioning page, under the application name and logo, click the drop-down arrow and select a user or role. For example, select User.
-
On the Properties tab, to set the order of a property, drag and drop a property up or down to the desired location.
-
To verify your changes, add a new user or role. For example, on the Users & Roles tab, select Users, and click + Assign Users.
-
The modal should display the properties in the order that you set.
View user access data
After you successfully connect to the target application, review the Data tab to verify the users and groups/organizations that have access to the application.
End-user data sharing
Users who have accounts in target applications can share their data with other applications. After a preference to share data with other applications has been configured, data from the target applications is synchronized with Advanced Identity Cloud.
Configure end-user data sharing (consent-based provisioning)
-
In the Advanced Identity Cloud admin console, on the Provisioning tab, click the Privacy & Consent tab.
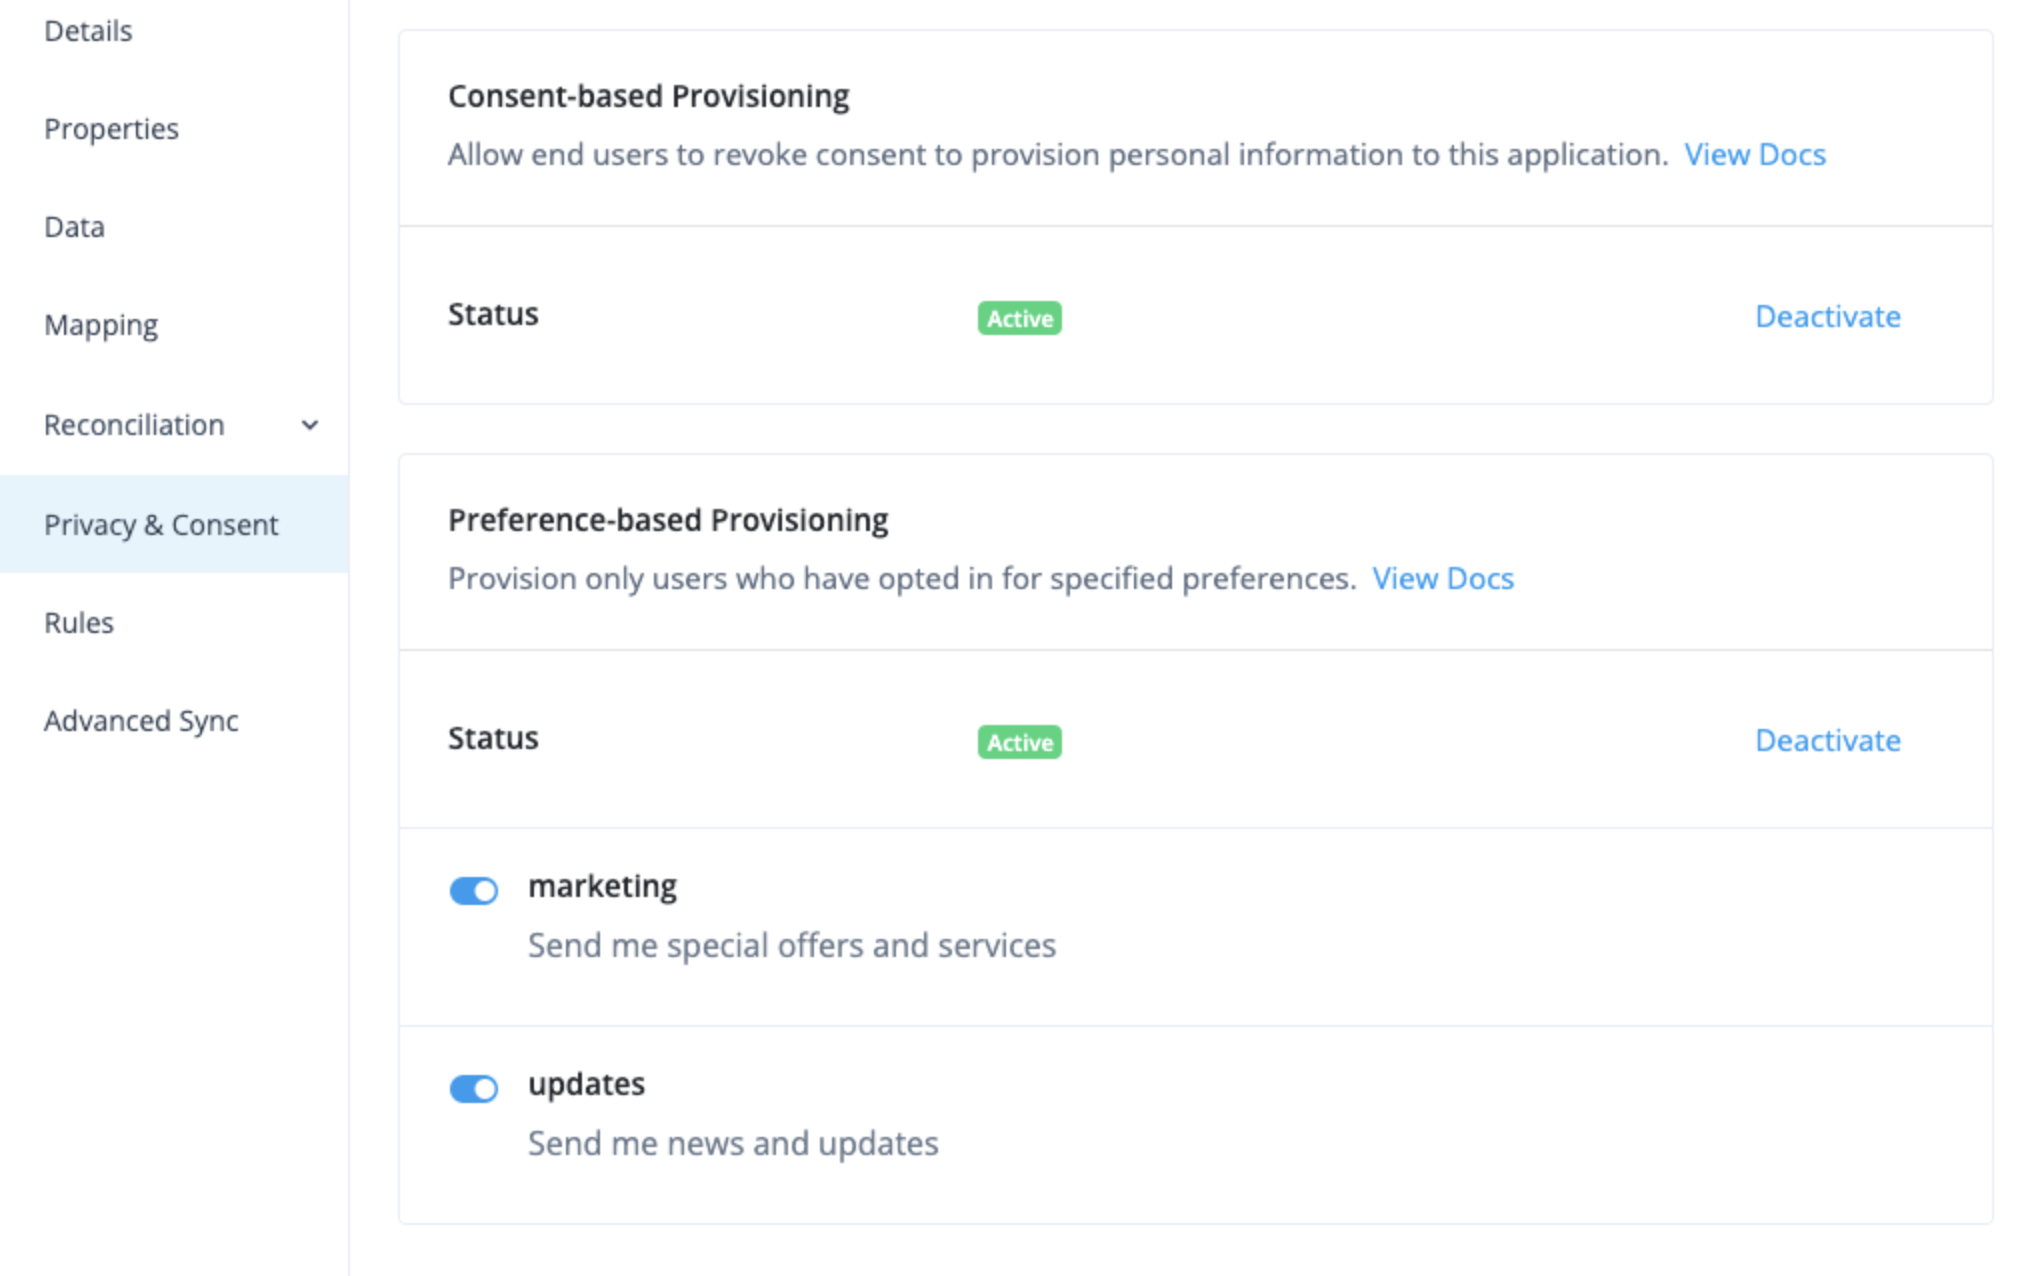
-
In the Consent-based Provisioning section, click Activate to let end users prevent sharing of their personal data. To remove consent-based provisioning, click Deactivate.
-
To share only the data of users who have set sharing preferences:
-
In the Advanced Identity Cloud admin console, go to Hosted Pages and select Realm Default theme.
-
Go to Account Pages and select Layout.
-
Enable the Consent option.
-
Click Save. The end-user profile page now displays the Personal Data Sharing option.
-
Configure preference-based provisioning
-
In the Advanced Identity Cloud admin console, on the Provisioning tab, click the Privacy & Consent tab.
-
In the Preference-based Provisioning section, click Activate to provision only users who have opted in for specified preferences. To remove preference-based provisioning, click Deactivate.
-
Choose which preferences to enable for end users:
-
marketing - to send special offers and services
-
updates - to send news and updates
-
-
In the Advanced Identity Cloud admin console, go to Hosted Pages and select Realm Default theme.
-
Go to Account Pages and select Layout.
-
Enable the Preferences checkbox.
-
Click Save. The end-user profile page now displays the communication Preferences section.
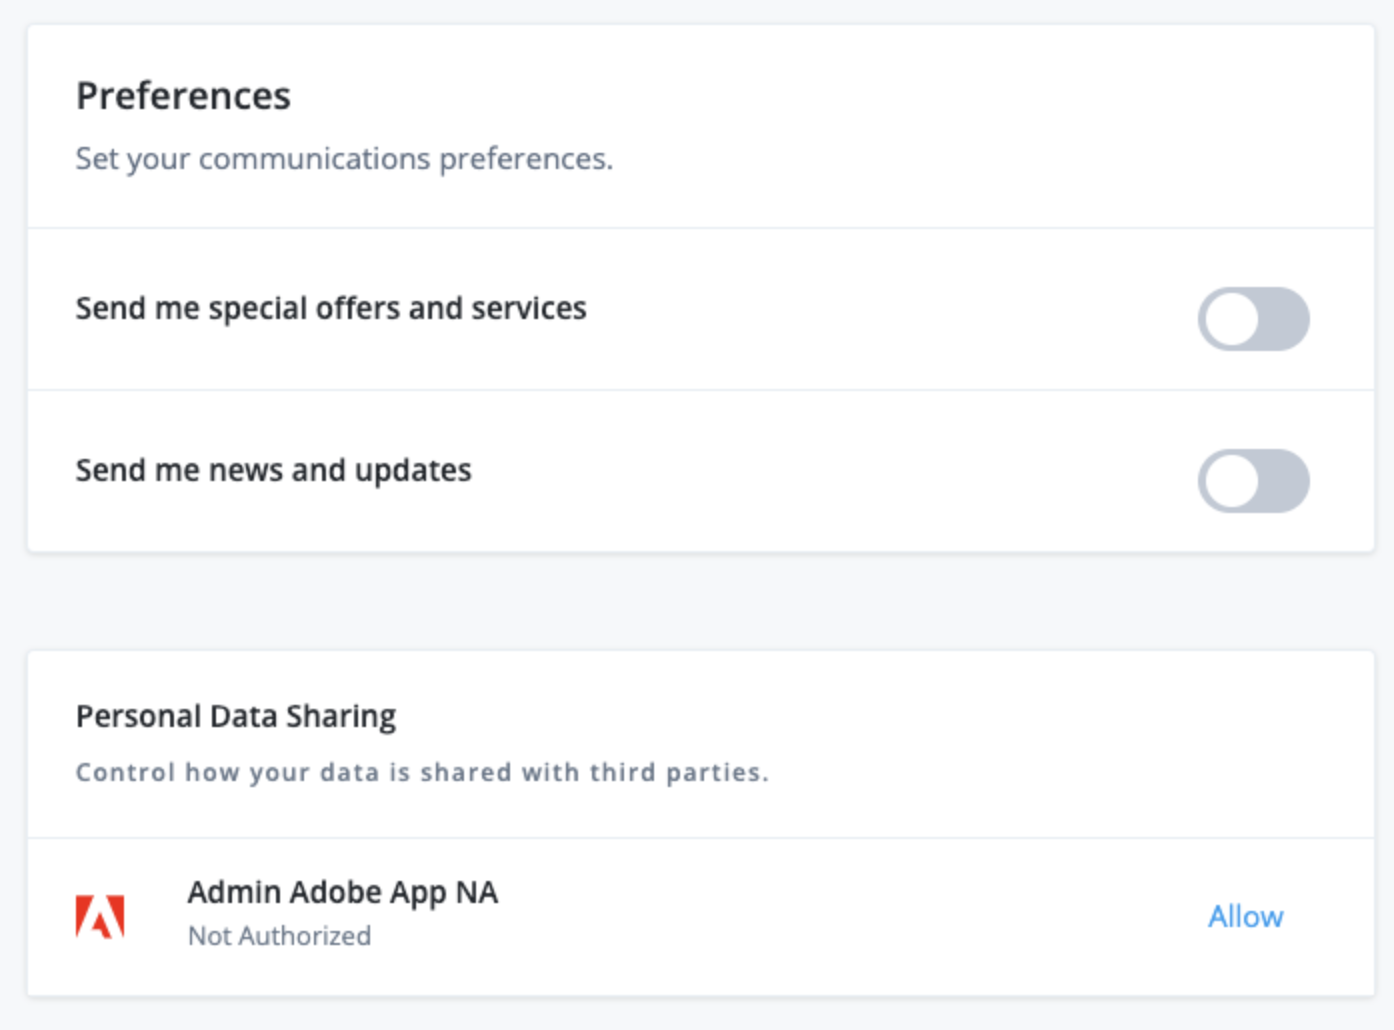
Manage mappings
The Mapping tab lets you create identity object and attribute mappings between Advanced Identity Cloud and an external system application. You define mappings between a source and a target.
The definition of source and target depends on if you’re provisioning user attributes from Advanced Identity Cloud (source) to an external target application (target) or if you’re reconciling user attributes from an external authoritative application (source) to Advanced Identity Cloud (target).
| To avoid inconsistencies between systems, don’t update mappings while a provisioning or reconciliation is in progress. |
Create a mapping (provisioning)
-
In the Advanced Identity Cloud admin console, go to Applications, then select your application, then click the Provisioning tab.
-
In the left navigation panel, click the Mapping tab.
-
Click + Add a property to open a mapping configuration modal.
-
In the list of targets, select an attribute to update in the external target application.
-
Click Next.
-
Edit a mapping (provisioning)
-
In the Advanced Identity Cloud admin console, go to Mappings, then click a mapping to open its configuration modal.
-
In the list of sources, select an Advanced Identity Cloud attribute to provide a source value.
This step is optional if you intend to apply a transformation script or a default value.
Create a mapping (authoritative)
If your application is connected to an external authoritative application:
-
Click + Add a property to open a mapping configuration modal.
-
In the list of targets, select an Advanced Identity Cloud attribute to update.
-
Click Next.
Edit a mapping (authoritative)
-
Click a mapping to open its mapping configuration modal.
-
In the list of sources, select an attribute from the external authoritative application to provide a source value.
This step is optional if you intend to apply a transformation script or a default value.
-
(Optional) Apply a transformation script to the mapping.
-
(Optional) Apply a conditional update to the mapping.
-
(Optional) Apply a default value to the mapping.
-
Click Save to save the mapping and close the mapping configuration modal.
Apply a transformation script to a mapping
You can apply a transformation script to a mapping to compute a target value using a combination of source values and string manipulations. For example, you may want to combine first name and last name attributes into a single name attribute.
-
Refer to steps 1 - 3 in Create a mapping (provisioning).
-
In the mapping configuration modal:
-
Check Apply transformation script.
-
Insert your transformation script into the Transformation Script editor. Refer to these examples:
-
(Optional) To use custom global variables in the script, refer to Define custom global variables for a script.
-
Click Save to save the mapping and close the mapping configuration modal.
-
Source object behavior
The source object in a transformation script changes depending on what you select from the
drop-down list of sources:
-
If you select a source attribute, such as
source.name, thesourceobject represents just that attribute. For example, to accessname.familyNameyou would referencesource.familyName. -
If you don’t select a source attribute, the
sourceobject represents the entire identity object and its attributes. For example, to accessname.familyNameyou would referencesource.name.familyName.
Transformation script example 1
source.name ? source.name.familyName : null ;In this example, the script checks if a value exists for source.name. If it does, we know
source.name is an object and familyName is one of the attributes on that object, so the script
sets the field with the value of source.name.familyName. Otherwise, the script sets this field
to null.
Transformation script example 2
source.givenName + ' ' + source.sn ;In this example, the script sets the field to a combination of the given name and surname, with a space in the middle; for example, "Jane Fergus".
Transformation script example 3a
source.active ? 'active' : 'inactive';In this example, the script checks if the source.active property has any value set. If true,
the script sets this field to the string active. Otherwise, the script sets the field to inactive.
Transformation script example 3b
You can configure the previous script slightly differently if you prefer (as described in
Source object behavior). If you select source.active from the drop-down list of sources,
source.active is represented as source in the transformation script. So the transformation
script would be:
source ? 'active' : 'inactive';Apply a conditional update to a mapping
You can apply a conditional update to a mapping so that the target attribute is only updated when
certain conditions evaluate to true.
-
Refer to steps 1 – 3 in Create a mapping (provisioning).
-
In the mapping configuration modal:
-
Click Show advanced settings.
-
Check Apply conditional update.
-
Choose one of the following ways to conditionally update the attribute:
-
To use filter fields:
-
Make sure Filter is selected.
-
Use the fields to set the conditions that must occur to update the attribute.
For example, if you want to update the attribute only for users in the United States, select "Country" from the list of attributes, select "is" from the list of operators, and enter "United States" in the open text field:
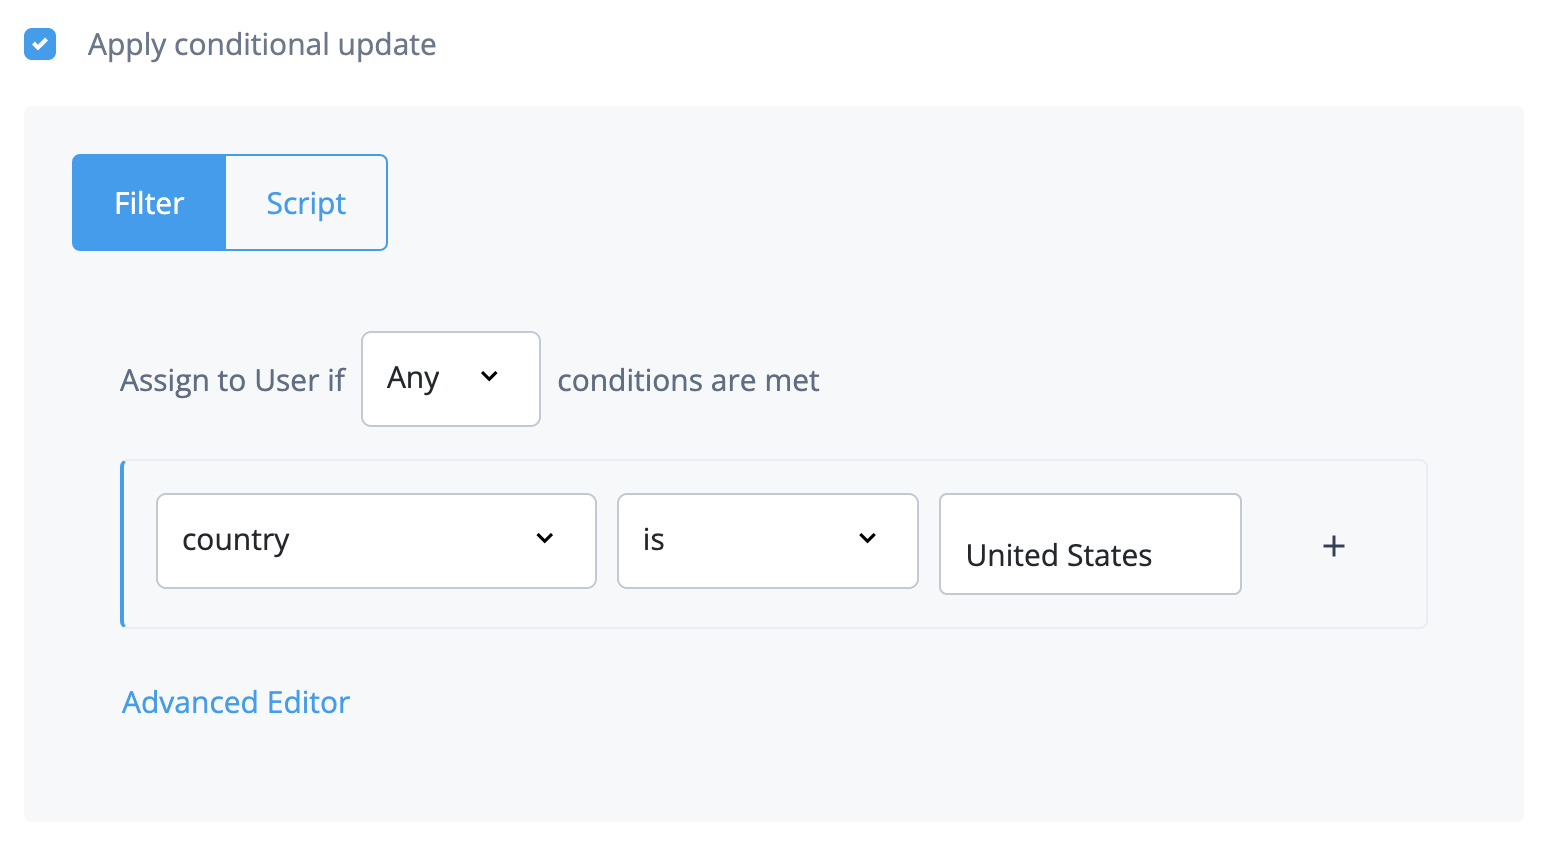
-
-
To use a filter query:
-
Make sure Filter is selected.
-
Click Advanced Editor.
If you build a filter with the filter fields, it is automatically populated as a query filter in the advanced editor. -
In the editor, edit the query filter.
For example, if you want to update the attribute only for users in the United States, enter
/object/country eq "United States":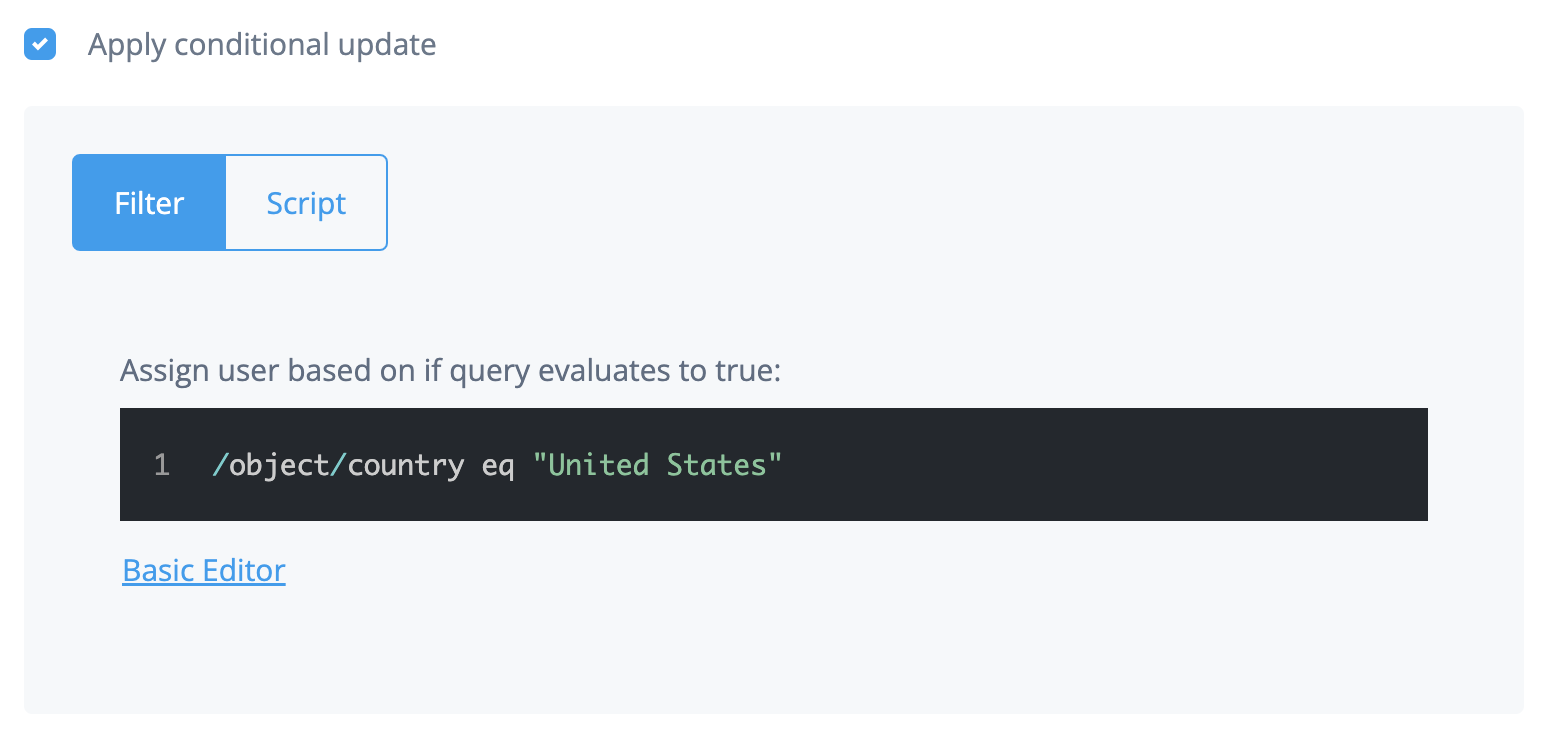
-
-
To use a script:
-
Click Script.
-
In the Conditional Update Script field, modify the script that defines the condition.
For example, if you want to update the attribute only for users in the United States, enter
object.country == "United States":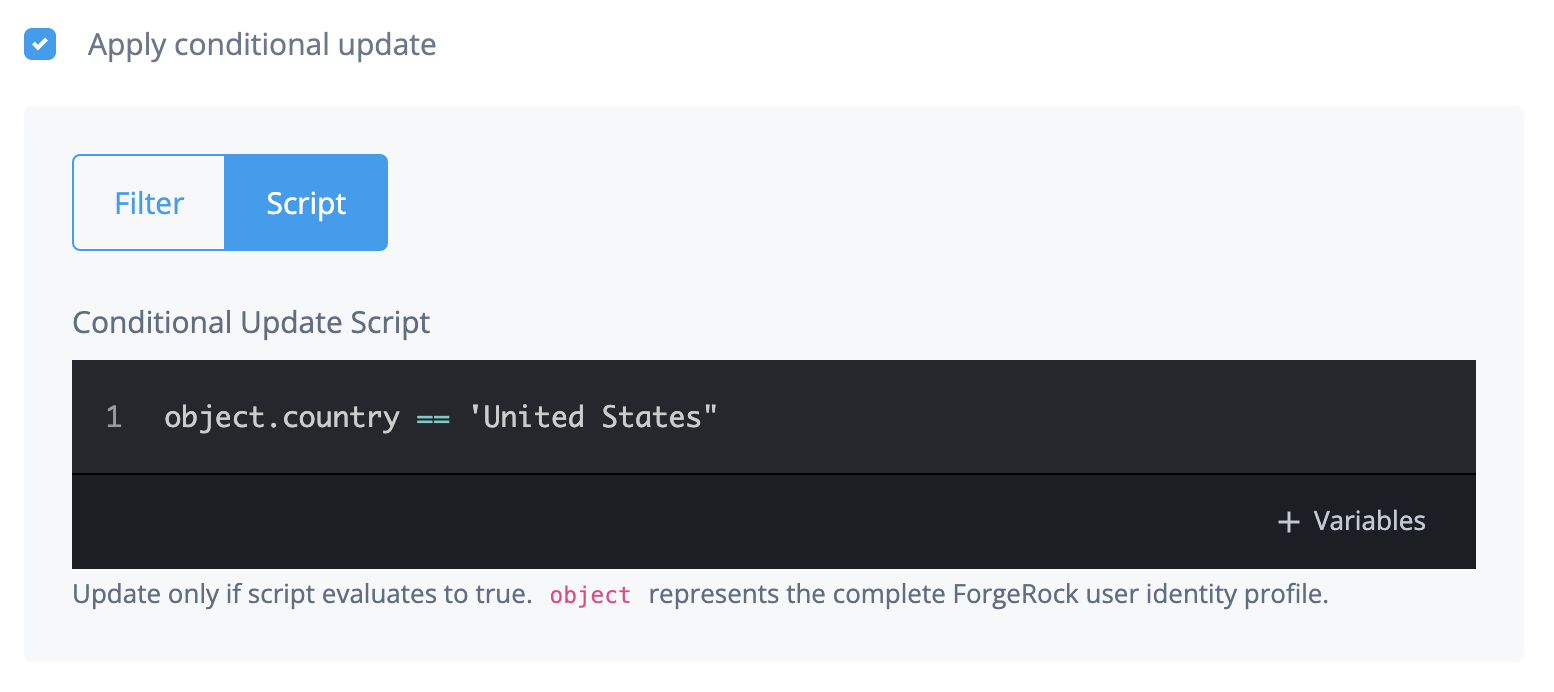
-
(Optional) To use custom global variables in the script, refer to Define custom global variables for a script.
-
-
-
Click Save to save the mapping and close the mapping configuration modal.
-
Apply a default value to a mapping
You can apply a default value to a mapping. The default value is applied to a target attribute if
the result of a mapping (including after any transformation script or conditional update) is a
value of null.
-
Refer to steps 1 - 3 in Create a mapping (provisioning).
-
In the mapping configuration modal:
-
Click Show advanced settings.
-
Check Apply a default if value is
null. -
Insert your default value into the editor.
-
Click Save to save the mapping and close the mapping configuration modal window.
-
Define custom global variables for a script
-
In the Transformation Script field or the Conditional Update Script field, click + Add Variables.
-
To specify the variables in a JSON format, check the JSON toggle.
-
To give the variable a name, enter a name in the Name field.
-
To give the variable a value, enter a value in the Value field.
-
To add more global variables for your script, click the plus sign and repeat the previous two steps.
-
Click Save.
Preview a mapping
Previewing provides an example of how user mapping appears from source to target.
| You can preview mappings only in target applications. |
-
In the left navigation panel, click the Mapping tab.
-
Click Preview.
-
In the list, choose an end user to preview. The page displays a preview of the target object that will be created when provisioning.
-
Click Done.
Delete a mapping
-
In the Advanced Identity Cloud admin console, go to Applications, then select your application, then click the Provisioning tab.
-
In the left navigation panel, click the Mapping tab.
-
Click a mapping.
-
Find the mapping you want to delete and click its ellipsis icon (), then click Delete.
-
In the Delete Mapping? modal, click Delete.
Reconcile and synchronize end-user accounts
A reconciliation operation involves a target system (the system with user account updates) and the Advanced Identity Cloud admin console (the system that receives the updates). For example, a Salesforce application and the Advanced Identity Cloud admin console. Mappings define the relationship between the target system and the Advanced Identity Cloud admin console.
The goal of reconciliation is to ensure synchronization and consistency between the Advanced Identity Cloud admin console and the external system application. Reconciliation uses the details you define in the Mappings tab to determine how to map and update properties.
Running reconciliation syncs end-user account changes, such as new accounts, updated accounts, and deleted accounts from an authoritative application to Advanced Identity Cloud.
Run or schedule a reconciliation
To manually run a reconciliation:
-
In the Advanced Identity Cloud admin console, go to Applications, select your application, then click the Provisioning tab.
-
From the Reconciliation drop-down menu, select Reconcile and click Reconcile Now.
To schedule a full or incremental reconciliation:
-
In the Advanced Identity Cloud admin console, go to Applications, select your application, then click the Provisioning tab.
-
From the Reconciliation drop-down menu, select Settings.
-
Click Set Up in the Schedule Jobs section to configure a Full Reconciliation or an Incremental Reconciliation.
Synchronize an identity
You can synchronize an identity in Advanced Identity Cloud with an identity that exists in a target system. To achieve this, Advanced Identity Cloud models the identity in the target system and makes it available for mapping as a series of objects and properties:
- Account object
-
The account object represents the user entity in the target system. Examples of account object properties are name and email.
For example, in a Salesforce application, the
account.emailobject property is mapped tomailin the Advanced Identity Cloud user identity. - Non-account object
-
Non-account objects represent entities linked to the user entity in the target system. Examples of non-account objects are roles, groups, departments, permissions, and licenses.
For example, in a Salesforce application, the
groupobject property is mapped to theGroupIdsfield in the Advanced Identity Cloud user identity.
Each templated application in Advanced Identity Cloud contains an account object and may contain one or more non-account objects that are modelled specifically to the target system.
Manually set non-account objects for an account object
After you create certain connectors and run reconciliation, you can start mapping the account object to various non-account objects. These non-account objects are predefined. For more information about connectors with predefined non-account objects, refer to Connectors with predefined non-account objects.
However, connectors for non-authoritative applications, such as a Scripted REST connector, a Scripted Groovy connector, or a Scripted Table connector, don’t have predefined non-account objects. The reason is that these types of connectors can have different non-account objects. These non-account objects are nonpredefined objects.
For connectors for non-authoritative applications, you must manually select the non-account objects that map to specific properties for an account object.
-
Select the Provisioning tab.
-
Select the Properties tab.
-
Edit a property.
-
On the Edit Property screen, enable Constrain values for this property.
-
On the Edit Property screen, enable Application Object Type.
-
In the Select Object Type drop-down field, select a non-account object type to map to the current property.
-
On the Edit Property screen, enable Entitlement.
-
Click Save.
Connectors with predefined non-account objects
The following connectors have predefined non-account object types. After creating a connector that is listed in the table and running reconciliation, you can associate the account object in the second column with the non-account objects in the third column.
| Connector | Account object | Predefined non account objects |
|---|---|---|
Active Directory |
|
|
Azure AD |
|
|
Google Workspace |
|
|
LDAP |
|
|
Powershell |
|
N/A |
Salesforce |
|
|
SAP SuccessFactors |
__GROUP__ |
|
SCIM |
|
|
Sripted Groovy |
|
N/A |
Scripted REST |
|
N/A |
Sripted SQL |
|
N/A |
ServiceNow |
|
|
Map target system object properties to Identity Cloud
To ensure all properties that are associated with a user account or role account synchronize during reconciliation, perform the following steps.
-
If your connector is not predefined, perform the steps in Manually set non-account objects for an account object.
-
Select the Provisioning tab.
-
Click Mapping.
-
Follow steps 3 - 6 in Edit a mapping (authoritative).
Run a reconciliation
Before you perform the following steps, to ensure you synchronize all information for the identity, map all relevant object properties with the identity.
-
On the Reconciliation > Reconcile tab, click the ellipsis (…) to the right of a mapping.
-
Click Reconcile Identity.
-
Verify the information on the page, and click Reconcile Identity.
-
After the reconciliation process is complete, click Done.
View a report about the last reconciliation
You can view information about the last reconciliation, such as:
-
The percent of all accounts successfully reconciled.
-
Information about each reconciled account: mapping source, mapping target, attempted action, and the result of the reconciliation.
Before you perform the following steps, make sure you run reconciliation.
-
On the Reconciliation > Settings tab, click Show advanced settings.
-
To view a searchable table report of the last reconciliation results, set Persist Associations to
true.-
If set to true, the UI displays a reconciliation report table and a search field that lets you search the table. The table displays below the reconciliation percentage graphic and percentage bars.
-
If set to false, the UI does not display a reconciliation report table.
To filter the report results, enter text in the Search users field.
To view different subsets of the report (1-to-1 match / no match), click View and select an item from the drop-down list.
-
|
To avoid performance issues for large reconciliation jobs, set Persist Associations to |
Manage reconciliation schedules
The Schedules section of the Reconciliation > Settings tab lets you view and schedule reconciliation events for accounts or groups/organizations that have access to your application.
You can schedule two types of reconciliation:
-
Full Reconciliation: A process that completely synchronizes the source and target. This process usually happens once a week on a weekend or once a month but at longer intervals. The long intervals are because the synchronization process is very labor-intensive and can take a large amount of time depending on the reconciliation data.
-
Incremental Reconciliation: Also referred to as liveSync, incremental reconciliation is a process that only synchronizes the deltas between the source and target. You can run incremental reconciliation every few minutes to get new updates. For example, if you run an incremental reconciliation at 12:55 PM, then again at 2:00 PM, the Advanced Identity Cloud admin console only looks at the timeframe in between to update, create, or delete data if anything changes in the source or target. Depending on the application, a timestamp or change number is used to synchronize the delta.
You can edit existing schedules and activate or deactivate them.
Set up a full or incremental reconciliation schedule
The initial state of a schedule is inactive.
-
On the Reconciliation > Settings tab, go to the Schedules section.
-
Click an inactive schedule: Full Reconciliation or Incremental Reconciliation.
-
Choose one of the following ways to edit the schedule:
-
Edit the fields on the Set up page and click Save Schedule.
-
To use a text editor to edit the schedule:
-
Enable the Use cron toggle.
-
Enter a valid cron string in the Frequency field.
-
Click Save Schedule.
-
-
Manage reconciliation rules
You use rules to define the actions you want Advanced Identity Cloud to perform when certain events occur during reconciliation. For example, if reconciliation detects that an identity object exists in Advanced Identity Cloud but not in the target application, Advanced Identity Cloud creates an identity object in the target application and links it to a source object in Advanced Identity Cloud if both of the following are true:
-
Reconciliation detects that the identity object exists in Advanced Identity Cloud but not in the target application.
-
You select Advanced Identity Cloud to take the action
CREATE.
Each rule has an action. Advanced Identity Cloud performs the action when a rule triggers an action to be performed on a record. Advanced Identity Cloud evaluates each record. When an event meets a rule condition, Advanced Identity Cloud performs the action you have defined for that rule.
The Situation Rules section of the Reconciliation > Settings tab displays the name and action of the rules for your application.
Situation (application) rules
| Situation rule | Description |
|---|---|
|
The source identity object matches multiple target identity objects based on the defined unique attribute. There must be a one-to-one link between a source and target identity object. can’t accurately make this link due to ambiguity. |
|
For authoritative apps only. The target identity object links to a missing source. This usually means the source identity object was deleted. |
|
The source links to a missing target identity object. This usually means the target identity object was deleted. |
|
The target identity object is linked to an old source object, usually deleted,
and can’t be linked to the new source identity object.
This usually the source identity object was deleted
and tried to recreate the source object.
On reconciliation, Advanced Identity Cloud
identified that it already found a source and target identity object linked.
For more information on |
|
The reconciliation finds a valid target identity object with no link established. This usually means another reconciliation needs to happen to establish a link (if you set the action to |
|
The source identity object doesn’t qualify, but target identity objects were found. |
|
A link is found, but the target identity object is missing. Advanced Identity Cloud had a matching source and target with a link but can no longer find the target identity object. |
|
The ideal situation for a record. The source and target identity objects both exist and a valid link between the two are present. This means the source and target both have a unique identifier that can only match one-to-one, and Advanced Identity Cloud established a link between the two. |
|
A valid source and target identity object match, but there is no link between the two. On a following reconciliation, Advanced Identity Cloud creates a link and the record moves from Found to the Confirmed rule. |
|
The source identity object doesn’t find a target identity object. This usually means a new record was created on the source, and typically, the action is Create. This creates a target identity object and links the source and target identity object. |
Rule action types
When a reconciliation determines the situation of a record, you must specify the action to be taken. There can only be one action per situation rule.
| Action | Description |
|---|---|
|
An asynchronous process has started. Don’t perform any action or generate any report. |
|
Create a target identity object and link the source and target. |
|
Delete the target identity object and unlink the source and target. |
|
Flag the link situation as an exception and log the incident. |
|
Don’t change the link or target object state. |
|
Create a link between the source and the correlated target identity object. |
|
Don’t perform any action or generate any report. |
|
Onboard the account and link the correlated target object. |
|
Don’t perform any action but report what would happen if the default action were performed. |
|
Unlink the linked target from the source. |
|
Update the target identity object and create a link between source and target. |
Configure basic and advanced correlation between accounts
You can correlate the user accounts in an application to user accounts in the Advanced Identity Cloud admin console. This correlation is important because account attributes in the application may have different names than account attributes in the Advanced Identity Cloud admin console.
The Account Correlation section of the Reconciliation > Settings tab lets you choose the attribute(s) to use to match users in your application to users in the Advanced Identity Cloud admin console.
-
On the Reconciliation > Settings tab, go to the Account Correlation section.
-
Click Match using.
-
In the Attribute(s) to Match list, choose the attribute(s) to use to match users in the target system to users in the Advanced Identity Cloud admin console.
-
To use a query to set or edit match attributes, click Use advanced query.
-
For an authoritative application:
-
Choose to correlate a user if any or all attributes are matched.
-
Use the User property field to set the user property(s) to match.
-
-
For a target application:
-
Edit the correlation query script.
-
-
-
Click Save.
Manage reconciliation events
Event hooks allow you to set an action that occurs when a specific event happens.
The Event Hooks section of the Reconciliation > Settings tab lets you view and define event hooks for reconciliation events.
Add an event hook
-
On the Reconciliation > Settings tab, in the Event Hooks section, you can view a table of available event hooks by Name and Script.
In the Script column, the default state is Not Configured.-
The event hook workflows include:
-
Account Change Detected -
Create -
Update -
Delete -
Link -
Unlink
-
-
-
Click an event hook row or click Add on the right of an event hook row to open the Add Event Hook modal.
-
Edit the script for the event hook.
-
Click Save or Save and Close.
Configure account change detection
To maintain data consistency between a source and target system, you can configure an event hook script to detect account changes during reconciliation. The script allows administrators to perform custom logic in response to unexpected changes in the target application. This response can be to revert the change, email the application owner, log a message, begin a workflow, or another action that the script author chooses because of the change.
-
In the Event Hooks section of the Reconciliation > Settings tab, click Account Change Detected or Add to open the Add Event Hook modal.
-
Add a script and include optional Passed Variables.
For example:
// Available bindings
// oldSource = Advanced Identity Cloud’s local version of the account
// source = Remote version of the account
// isLinked
// accountQualifier = default

if (isLinked) { (1)
  // if value has a delta, revert to existing value
  if(oldSource.value !== source.value) { (2)
    source.value = oldSource.value; (3)
    // Overwrite the account
    //source = openidm.update('system/connector-name/User/' + source['_id'], null, source);
  }
}
source; (4)
Only make direct updates of the
sourceobject in thesourcesystem, if it’s necessary that the change is reverted immediately after it’s detected. Direct in-memory changes of thesourceobject are preferred.If you choose to update the
sourceobject directly in the remote system, the state returned by the update must have all of the original fields that the synchronization engine used when it originally queried thesourceobject. These fields are located in the mappingsdefaultSourceFields.1 Only execute if the account is already linked. 2 Check if the incoming value is different from the existing value. 3 Revert the incoming value back to the existing value. 4 Send the modified object back to the sync engine. The script expects that the return value is the current state of the source object or account that IDM is using. The script should always return what the author wants the state of the account to be, either by directly changing the bound sourceobject or by returning the result of direct updates to thesourceobject in thesourcesystem. -
Click Save and Close to set the Script state to Configured.
Restrict reconciliation to specific identities
-
On the Reconciliation > Settings tab, click Show advanced settings.
-
Configure the following settings:
-
To restrict reconciliation to specific identities in an application by defining an explicit source query:
-
Enable Filter Source.
-
Choose to filter the source if Any or All conditions are met.
-
Use the remaining fields to define the explicit source query. You can define the query using all the properties available in the target system.
-
-
To restrict reconciliation to specific identities in Advanced Identity Cloud by defining an explicit target query:
-
Enable Filter Target.
-
Choose to filter the target if Any or All conditions are met.
-
Use the remaining fields to define the explicit target query using all the properties available in Advanced Identity Cloud.
-
-
To filter the application identities that are included in reconciliation using a script:
-
Enable Valid Source Script.
-
Edit the script.
-
-
To view a searchable table report of the last reconciliation results, set Persist Associations to
true. For more information, refer to View a report about the last reconciliation. -
To filter the Advanced Identity Cloud admin console identities that are included in reconciliation using a script:
-
Enable Valid Target Script.
-
Edit the script.
-
-
To allow correlation of source objects to empty target objects, enable Correlate empty target objects.
-
To prefetch each link in the database before processing each source or target object, enable Prefetch Links.
-
To allow reconciliations from an empty source to delete all data in a target resource, enable Allow reconciliations from an Empty Source.
-
To tune performance by adjusting the number of concurrent threads dedicated to reconciliation, in the Threads Per Reconciliation field, enter the number of concurrent threads.
-
To set the synchronization token used for incremental inbound reconciliation, enter a value in the Sync Token field.
-
-
Click Save.
Reset the last reconciliation job
You may need to reset the last reconciliation job if it failed or if it made a change you want to revert; for example, if the last reconciliation job added a new application user.
To reset the last reconciliation job, you must reset the sync token attribute. The sync token attribute stores the value of the last incremental reconciliation job that synced data inbound from a target system to Advanced Identity Cloud.
-
In your target system, get or create the reset value for the sync token attribute. To understand how to do this, refer to the documentation provided by the vendor of your target system.
-
In the Advanced Identity Cloud admin console, go to Applications > Provisioning > Reconciliation.
-
Click the Settings tab.
-
Scroll down and click Show advanced settings.
-
In the Sync Token text field, enter a new value for the sync token attribute.
-
Click Save.
Manage provisioning rules
Provisioning rules define the actions to perform when provisioning between Advanced Identity Cloud and a target application.
The Rules tab displays the action and result for your application.
Rule action types
Rule action types specify the consequence of an action and the related action to perform when an application event occurs.
| The application-name placeholder represents the application template name displayed in the Advanced Identity Cloud admin console. |
| Action | Result |
|---|---|
application-name application is assigned |
Create account in application-name |
application-name account is updated |
Update account in application-name |
application-name account is revoked |
Delete account in application-name |
Identity is deleted |
Delete account in application-name |
Provisioning failure |
Do nothing |
Edit a provisioning rule
Edit a provisioning rule to specify an action to perform in the target application after successfully completing a rule action in Advanced Identity Cloud:
-
In the Advanced Identity Cloud admin console, go to Applications > Provisioning > Rules, click the ellipsis icon ( ) adjacent to a rule and click Edit or click the row of the rule.
-
In the Edit Provisioning Rule modal, select the action option to perform on the target application:
-
For application is assigned and account is updated:
-
Select the Action to perform in application-name when an account is assigned or updated in Advanced Identity Cloud:
-
Create or Update account
-
Do nothing
-
-
Select one of the following actions to perform after successfully completing the first action:
-
Do nothing
-
Execute a script
Learn more in Launch a script as a post action.
-
-
Click Save.
-
-
For account is revoked:
-
Choose the Action to perform in application-name when an account is revoked in Advanced Identity Cloud:
-
Delete account in application-name
-
Do nothing
-
Execute a script
Learn more in Launch a script as an action.
-
-
Click Save.
-
-
For Identity is deleted:
-
Choose the Action to perform in application-name when an identity is deleted in Advanced Identity Cloud:
-
Delete account in application-name
-
Do nothing
-
Execute a script
Learn more in Launch a script as an action.
-
-
Click Save.
-
-
For Provisioning failure:
-
Choose the Action to perform in application-name when provisioning fails:
-
Do nothing
-
Execute a script
Learn more in Script triggers defined in mappings.
-
-
Click Save.
-
-
Manage advanced sync
In addition to the mapping on the Mapping tab, the Advanced Sync tab lets you create as many mappings as you want between your current application object type and another application or identity profile. The data can flow either to or from your current application and object type.
Swap the sync direction depending on if your current application is the source or target. The source and target determine if you’re sending or receiving data from:
-
Application to application
-
Application to identity profile (custom or default)
-
Identity profile (custom or default) to application
Configure advanced sync mappings
For each application, there are different object types, and advanced sync is specific to each object type. For example, an application could have the Account and Group object type.
To create a new Advanced Sync mapping:
-
In the Advanced Identity Cloud admin console, go to Applications, select your application, then click the Provisioning tab and select an object type for a mapping:
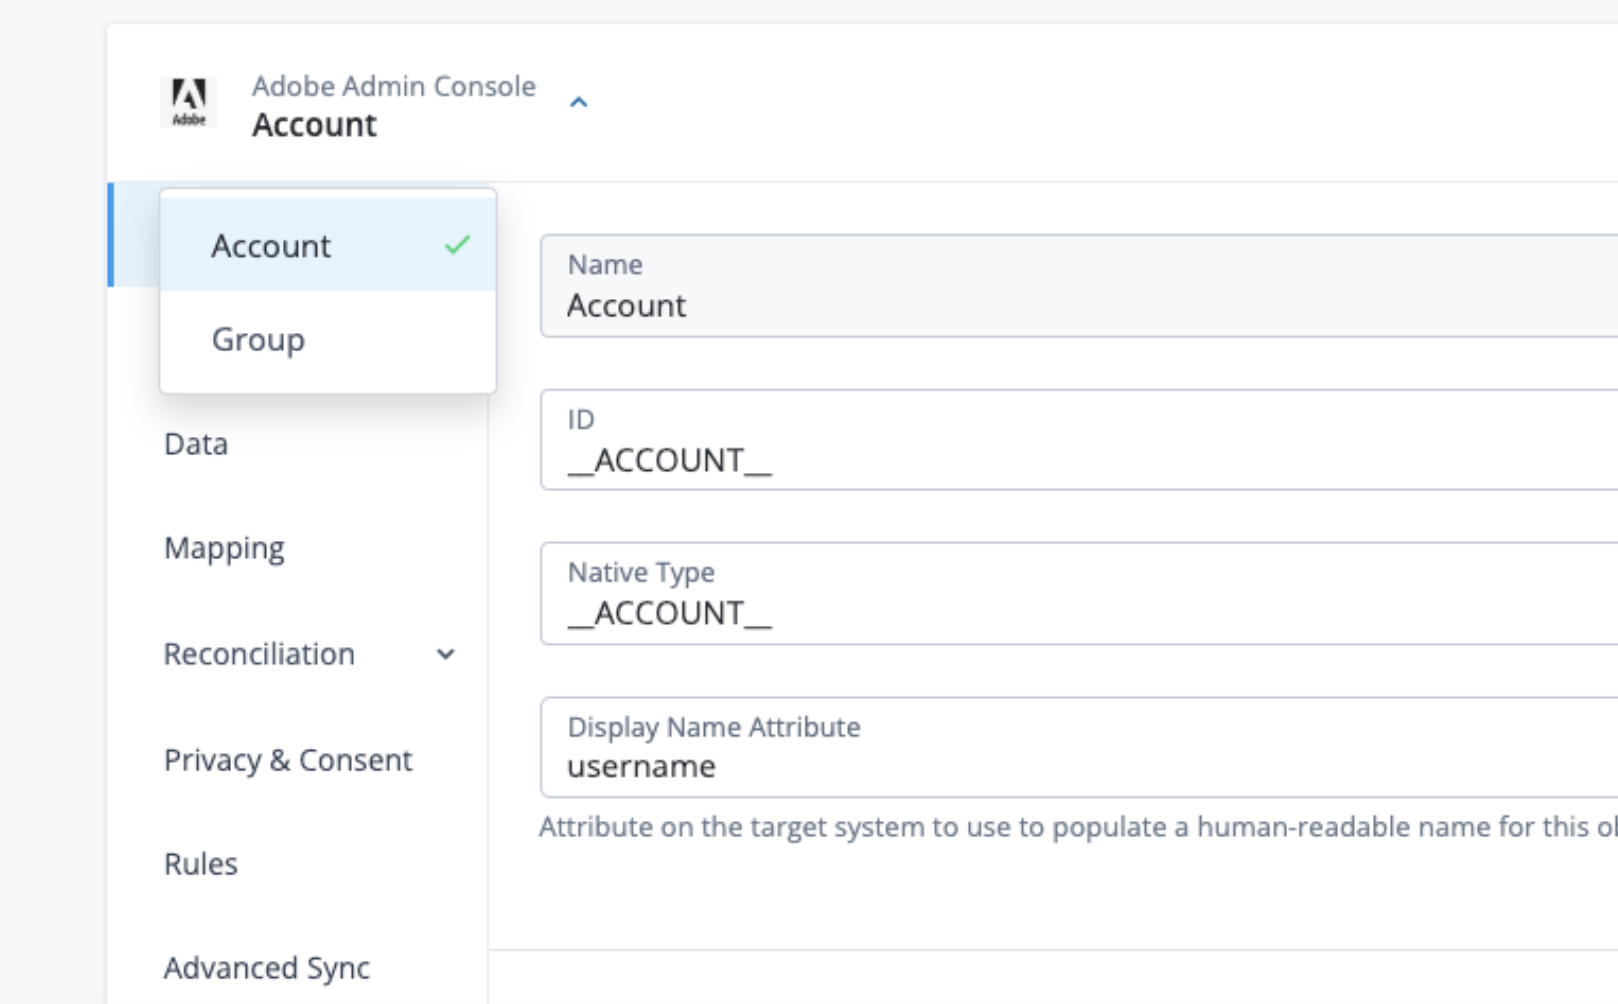
-
On the Advanced Sync tab, click Sync Data.
One half of the mapping is always the current application and the current object type. This half of the mapping can be the source or target. After you’ve created the mapping, you can’t change the source, target, and sync direction.
-
In the Add Sync Data modal:
-
Set your source to Sync From an Application and choose from the object types the application supports.
-
Set your target to Sync To an Application and Object type, or to an Identity Profile.
By default, you’re syncing from the current application and object type, and you choose to sync to an application and object type, or to an identity profile.
If you created a custom identity profile through the IDM admin console (native console), it’s available to select in the Identity Profile list. Learn more in Create and modify object types. To reverse the sync source and target, click the arrow.
-
-
Click Save to add the mapping.
Edit or delete an advanced sync mapping
To edit or delete an advanced sync mapping:
-
On the Advanced Sync tab, click the ellipsis icon ( ) adjacent to the mapping to edit or delete.
-
Click Edit or click the row of the mapping to open the Mapping page where you Define the mapping rules and add properties, apply transformation scripts and conditional updates, and configure other advanced settings.
-
To remove a mapping, click Delete.
Define and preview mapping rules
To define mapping rules to reconcile the source with the target, add a property to the mapping:
-
On the Mapping tab, click Add a property to open the Add a property modal, then select a target-property-name in the property list.
-
On the next window of the modal, select a source-property-name (optional) from the property list.
Selecting a source-property-name is optional if you’re defining a transformation script or adding a default value.
-
(Optional) Select the Apply transformation script checkbox. Learn more about transformation scripts in Apply a transformation script to a mapping.
-
(Optional) Click Show advanced settings and select:
-
(Optional) Apply conditional update. Learn more about conditional updates in Apply a conditional update to the mapping.
-
(Optional) Apply a default if value is
null. Learn more about how to Apply a default value to a mapping.
-
-
Click Save.
If the mapping source is an identity profile, click Preview to view an example of how the mapping displays between the source and target. Learn more in Preview a mapping.
Configure a correlation
The goal of correlation is to avoid creating duplicate records in a target system. If duplicate records are a possibility, you can define a correlation query to try to find a record in the target environment that matches a record in the source environment. If a matching record is found, the query updates the existing record rather than create a new record.
Learn more in Correlate source objects with existing target objects.
To configure the correlation query in advanced sync:
-
On the Correlation Query tab, click Configure to open the Edit Correlation modal.
-
View or edit the default correlation query.
-
Click Save.
After you’ve saved a correlation, click Edit adjacent to Custom to open the modal and edit the query, if needed.
Correlation best practice
Typically, you choose a unique property to match, such as a username or email. For example, if you have an account/user mapping, you could correlate the email address. If the email field in the target is called Email, and in the source, it’s called mail, in the correlation query, you’d direct Advanced Identity Cloud to look at the Email field it receives from the target and attempt to find a match for the mail field in the source. Depending on the result of the attempted match, Advanced Identity Cloud will take the action specified by the appropriate situation rule.
|
All situation rules have the |
Reconciliation
In advanced sync, reconciliation uses the details you define on the Mapping tab to determine how to map and update properties between two systems.
Running reconciliation syncs all data in the source and target systems, not just the data that has changed. Learn more about Source reconciliation and Target reconciliation.
Run a manual reconciliation
When you perform a reconciliation, sets of data between the source and target systems are evaluated based on the defined mapping rules. You can review details about how individual records are evaluated by setting Persist Associations in the Advanced tab to true. Learn more in Reconciliation association details.
To run a manual reconciliation for an advanced sync mapping:
-
In the Advanced Identity Cloud admin console, go to Applications > Provisioning > Advanced Sync.
-
On the Advanced Sync tab, click the ellipsis icon ( ) adjacent to the mapping to edit.
-
Click Edit or click the row of the mapping to open the Mapping page, which opens additional advanced sync options.
-
On the Reconcile tab, click Reconcile Now to Reconcile your data between source-name and target-name.
Understanding reconciliation results
Advanced Identity Cloud uses the first three mapping rules that have a source and target object defined to display reconciliation results, for example:
-
source.userPrincipalName -
source.mail -
source.surname
| The target object will always exist in the mapping rule, however, target data might not show in the reconciliation results table. |
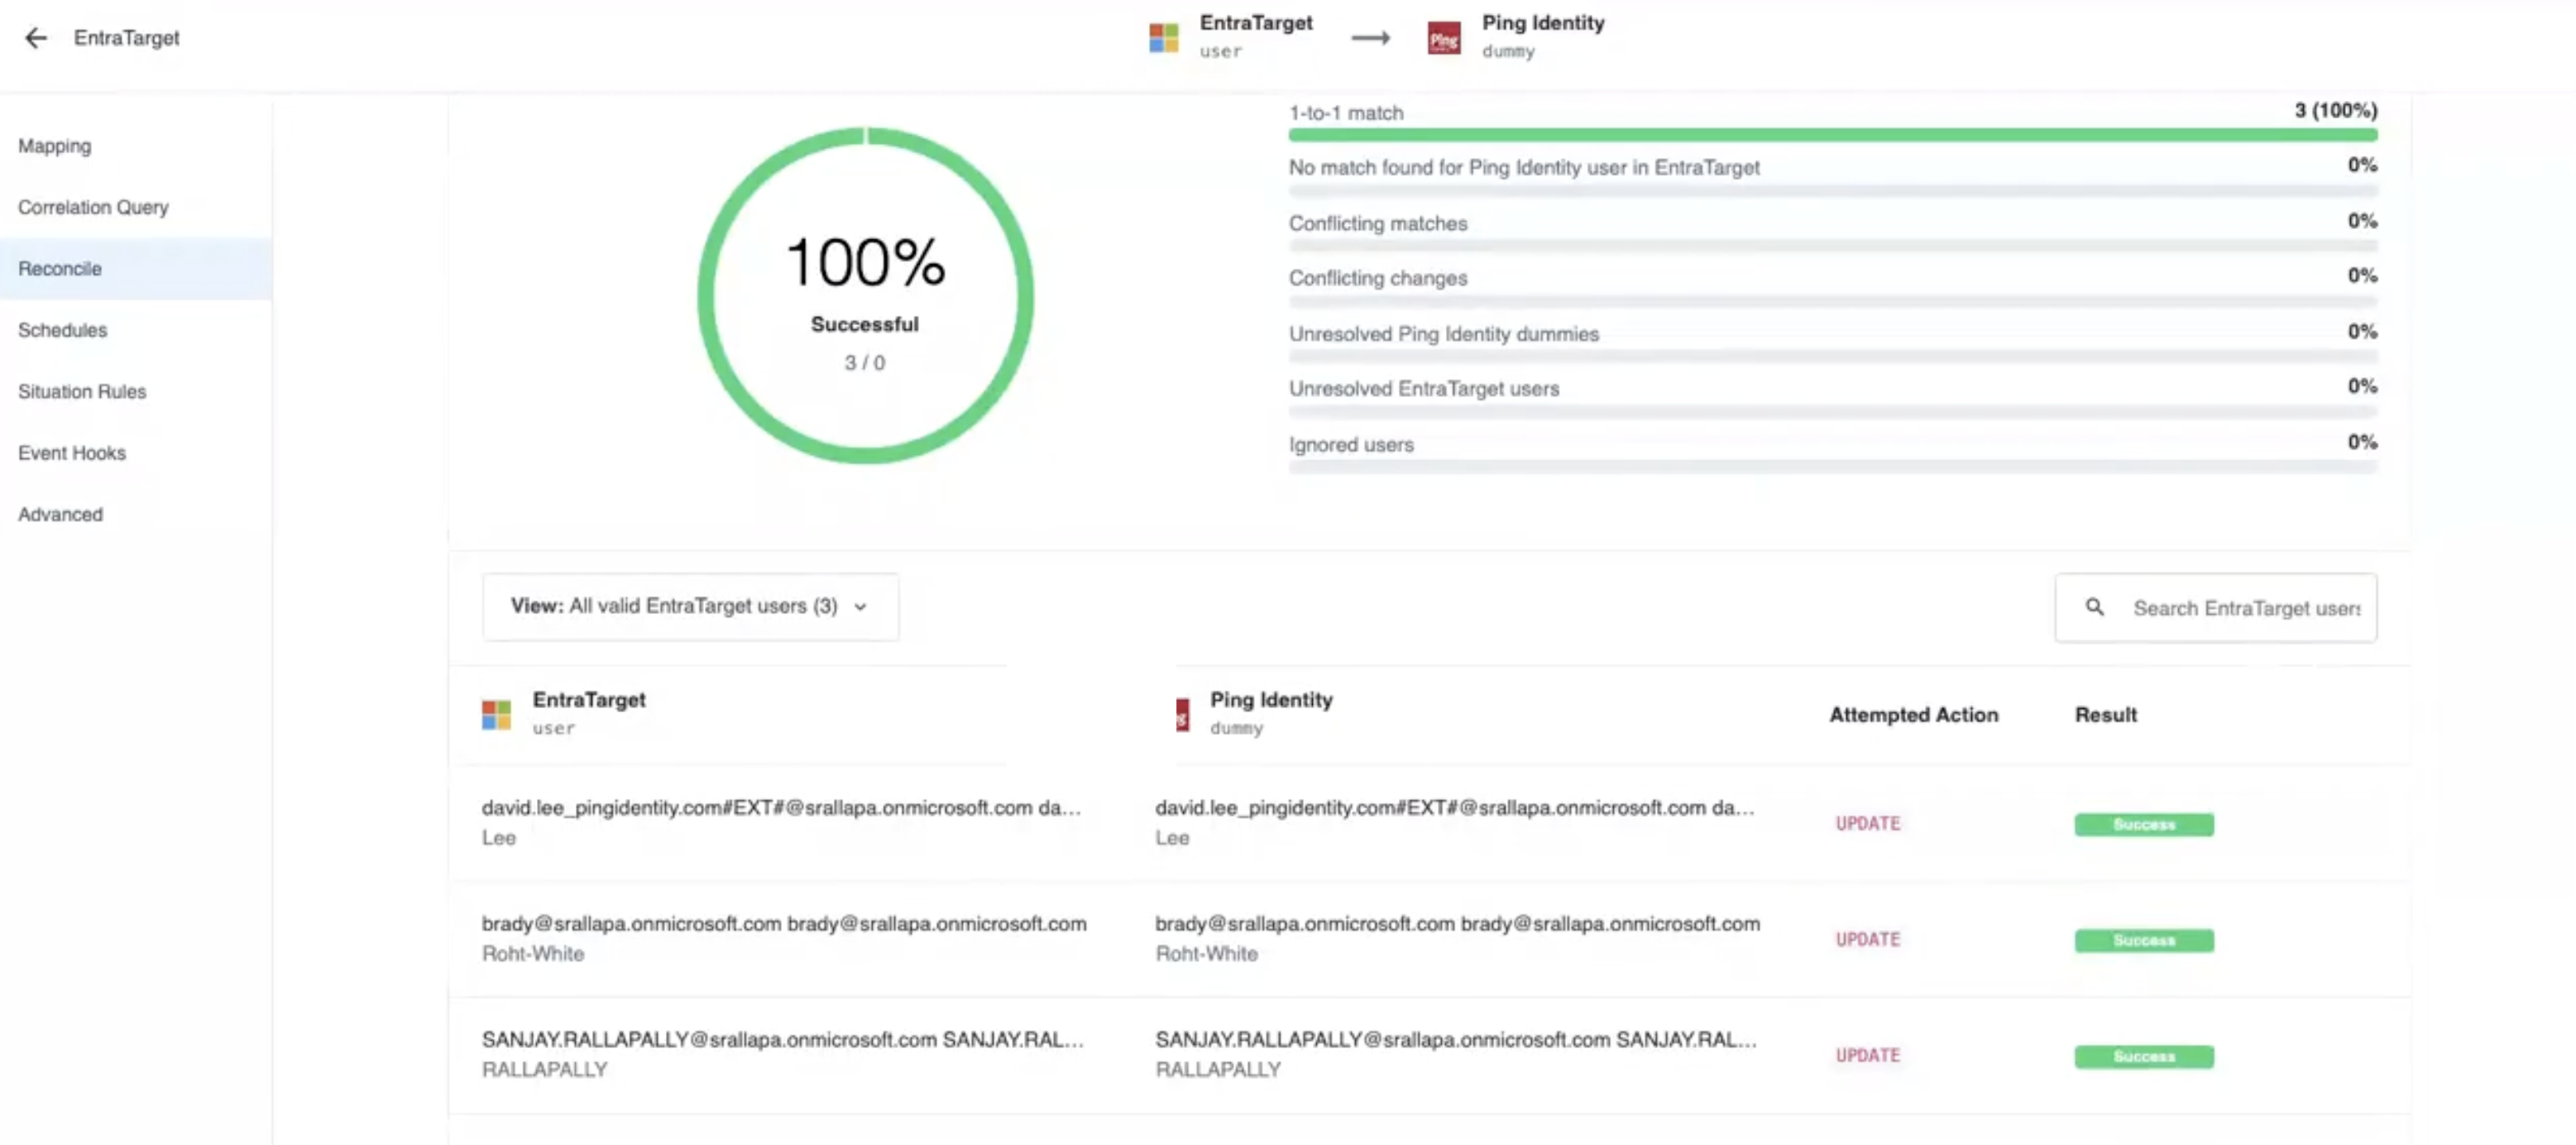
If there is no data in the first three rows of mapping rules, no data or Not found displays for the reconciliation results. Learn more in View a report about the last reconciliation.
|
| If a mapping contains a transformation script and a target, but no source, the mapping rule won’t be used to display reconciliation results for the source column. |
Manage advanced sync schedules
On the Advanced Sync > Schedules tab, create a schedule to Periodically perform a full reconciliation:
-
Click the Full Reconciliation row or click Set Up adjacent to the
InactiveStatus column.The initial schedule state is inactive. -
In the Schedule Full Reconciliation Job modal, manually configure the Frequency and interval or Use cron.
-
To manually schedule a full reconciliation (default):
-
In the Frequency section:
-
Enter a value for Run every X day(s). Alternatively, from the day(s) drop-down list, select:
-
hour(s)
-
days(s) (default)
-
week(s)
-
month(s)
-
-
(Optional) Select the Set a Start Time checkbox and enter values for:
-
mm/dd/yyyy
-
--:-- -- (time in hours:minutes seconds)
-
Timezone (GMT + 0:00). Learn more in the Time zones chart.
-
-
For Repeat, choose one of the following intervals:
-
X times
-
Until specific date
-
Indefinitely
-
-
-
Click Save.
If you specify a start date and an end date, the time zones must match to create a valid schedule.
-
-
To schedule a full reconciliation using cron:
-
Enable the Use cron toggle.
-
In the Frequency field, Enter a valid cron string.
An Invalid Cronerror displays if the cron string isn’t valid. -
Click Save.
-
-
Define advanced sync situation rules
Each advanced sync situation rule has an action. Advanced Identity Cloud performs the action when a rule triggers an action to be performed on a record. Advanced Identity Cloud evaluates each record. When an event meets a rule condition, Advanced Identity Cloud performs the action you’ve defined for that rule.
On the Advanced Sync > Situation Rules tab, a table displays the Situation and Action that Define rules for various sync situations.
Advanced sync situation rules
| Situation | Description |
|---|---|
|
|
|
|
|
|
|
|
|
|
|
|
|
|
|
|
|
|
|
|
|
|
|
|
|
|
Advanced sync rule action types
When a reconciliation determines the situation of a record, you must specify the action to be taken.
Async is the default action state.
|
| Action | Description |
|---|---|
|
|
|
|
|
|
|
|
|
|
|
|
|
|
|
|
|
|
Edit advanced sync situation rules
To edit the situation rules you’ve defined for advanced sync situations:
-
On the Situation Rules tab, click the Situation rule to edit or click the ellipsis icon ( ) adjacent to the Situation and Action, then click Edit.
-
In the Situation Rule modal, in the When situation occurs list, select Perform Action (default) or Execute Script:
-
For Execute Script:
-
Enter your script in the commented code block:
// Script has access to the following variables:
// source, target, sourceAction, linkQualifier, context, recon
// the recon.actionParam object contains information about the current recon operation.
-
-
-
In the second list for When situation occurs, select an action as described in Advanced sync rule action types.
-
For advanced settings, click Show advanced settings to display the following options:
-
Restrict situation lets you Specify query filters or add a script to restrict policy actions to a subset of records where situation is applicable.
-
Execute script on action complete lets you Set up a script to execute after your action is complete.
-
-
Click Save.
Trigger advanced sync event hooks
Event hooks allow you to Trigger a script or a workflow when specified reconciliation events occur.
On the Event Hooks tab, you can view and define event hooks for reconciliation events.
Add an event hook
-
On the Event Hooks tab, you can view a table of available event hooks by Name and Script.
In the Script column, the default state is Not Configured.-
The event hook workflows include:
-
Account Change Detected(Learn more) -
Create -
Update -
Delete -
Link -
Unlink
-
-
-
Click an event hook row or click Add on the right of an event hook row to open the Add Event Hook modal.
-
Edit the script for the event hook.
-
Click Save or Save and Close.
Configure advanced reconciliation settings
In advanced sync, the Advanced tab includes settings to Filter and tune reconciliation to improve performance.
| Name | Definition |
|---|---|
|
|
|
|
|
|
|
|
|
|
|
|
|
|
|
|
|
|
To configure advanced reconciliation settings:
-
On the Advanced Sync > Advanced tab, configure the following optional settings:
-
(Optional) To restrict reconciliation to specific records in a source by defining an explicit source query:
-
Enable the Filter Source checkbox.
-
Choose to filter the source if Any or All conditions are met.
-
Use the remaining fields to define the explicit source query using all properties available in the source system.
-
-
(Optional) To restrict reconciliation to specific records in the target by defining an explicit target query:
-
Enable the Filter Target checkbox.
-
Choose to filter the target if Any or All conditions are met.
-
Use the remaining fields to define the explicit target query using all the properties available in the target.
-
-
(Optional) To filter the records that are included in reconciliation using a script:
-
Enable the Valid Source Script checkbox.
-
Edit the script.
-
-
(Optional) To record associations between source or target objects, which allows the UI to show results of the last reconciliation, set Persist Associations to
true. Learn more in View a report about the last reconciliation.To avoid performance issues for large reconciliation jobs, set Persist Associations to
false. Learn more in Reconciliation association details. -
(Optional) To filter the target records that are included in reconciliation using a script:
-
Enable the Valid Target Script checkbox.
-
Edit the script.
-
-
(Optional) To allow correlation of source objects to empty target objects, enable the Correlate empty target objects checkbox.
-
(Optional) To prefetch each link in the database before processing each source or target object, enable the Prefetch Links checkbox.
-
(Optional) To allow reconciliations from an empty source to delete all data in a target resource, enable the Allow reconciliations from an Empty Source checkbox.
-
(Optional) To tune performance by adjusting the number of concurrent threads dedicated to reconciliation, in the Threads Per Reconciliation field, enter the number of concurrent threads.
The default number of Threads Per Reconciliation is 10.
-
-
Click Save.