Creating a custom report using Advanced Reporting
|
Advanced Identity Cloud add-on capability
Contact your Ping Identity representative if you want to add Advanced Reporting to your Advanced Identity Cloud subscription. |
Description
Estimated time to complete: 15 minutes
In this use case, you create a custom report called Userlist by Expertise by Organization
that generates a list of experts within an organization. The use case also
shows how to create a duplicate of the report called Count of Userlist By Expertise By Organization
that generates a count of experts within an organization.
Goals
After completing this use case, you’ll know how to do the following:
-
Create a new custom report draft.
-
Add a data source and user-provided parameters.
-
Add filters for the report’s data.
-
Run and view the report.
-
Publish the report.
-
Duplicate the report.
-
Edit the report and add an aggregate count to the report.
-
Export and download the report.
-
Show how the end user can access the report.
Before you begin
For this use case, you’ll need to have:
-
A basic understanding of Advanced Identity Cloud concepts:
-
Advanced Reporting
-
Journeys
-
-
An Advanced Identity Cloud tenant with the Advanced Reporting feature.
-
Access to the tenant as an administrator.
-
A set of test data to help correctly configure the report.
-
An end user test account.
Tasks
Creating a new custom report draft
-
In the Advanced Identity Cloud admin console, go to Reports > New Report.
-
In the New Report modal, enter the following:
-
Name: Enter a descriptive name for the report. For this example, enter
Userlist by Expertise by Organization. -
Description (optional): Enter a description for the report.
-
Who Can Run: Enter users who can run the report. For example, enter a test user in your database, such as
john.doe.
-
-
Click Next.
Adding a data source and user-provided parameters
-
Click Data Source.
-
In the Add a Data Source modal, select Users. This data source provides access to the user database.
-
Click Next.
-
-
In the right pane, under Settings, click Data and select the following columns:
-
Username
-
Generic Indexed String 1
-
-
In the right pane, click Organizations to which I Belong.
-
Click and then click Add as Data Source.
-
Under users/orgs, select the Org Name checkbox.
-
-
Next, add report parameters for
orgNameandexpertise:-
Scroll down to Parameters and click for the
orgNameparameter. -
In the Add a Parameter modal, enter the following:
-
Name: Enter
orgNamefor the parameter’s descriptive name. -
Input Label: Enter
Org Namefor the parameter’s input label. -
Input Type: Select String for the parameter’s input type.
-
-
Click Save.
-
-
Click to add the next parameter.
-
Name: Select
expertisefor the parameter’s descriptive name. -
Input Label: Select
Expertisefor the parameter’s input label. -
Input Type: Select String for the parameter’s input type.
-
Multivalued: Select the Multivalued checkbox to accept one or more values.
-
-
Click Save.
Adding filters for the report’s data
You need to configure filters for retrieving the correct data from your database.
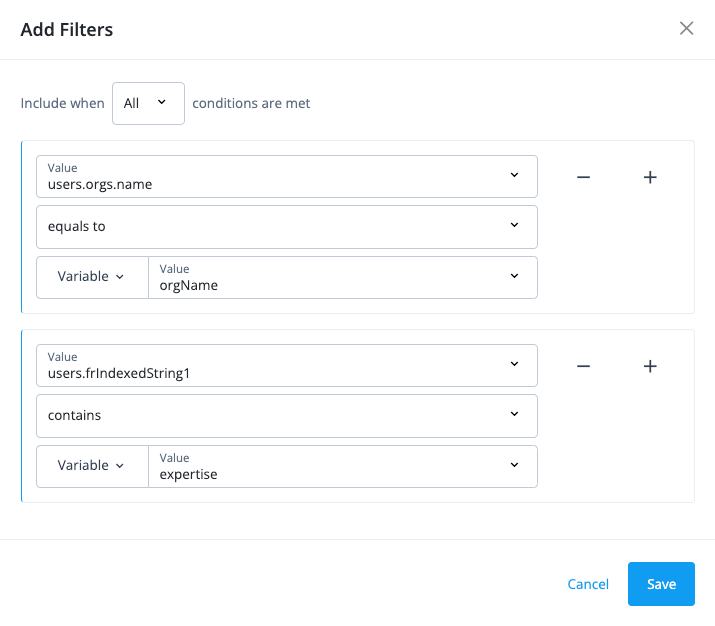
Create two filter rules for the orgName and expertise variables.
-
In the right pane, click next to Filters.
-
In the Add Filters modal, enter or select the following:
-
Any|All: Select All to require that all conditions must be met to be included in the filter.
-
Value: Select the users.orgs.name value for the filter rule.
-
Condition: Select the equals to condition for the filter rule.
-
Literal or Variable: Select Variable# for the filter, and then select the value, orgName.
-
-
Click , and then click Add Rule.
-
Value: Select the
users.frIndexedString1for the filter rule. -
Condition: Select the contains condition for the filter rule.
-
Select Variable for the filter, and then select the value, expertise.
-
-
Click Save.
Running and viewing the report
-
In the Advanced Identity Cloud admin console, return to the Reports page.
-
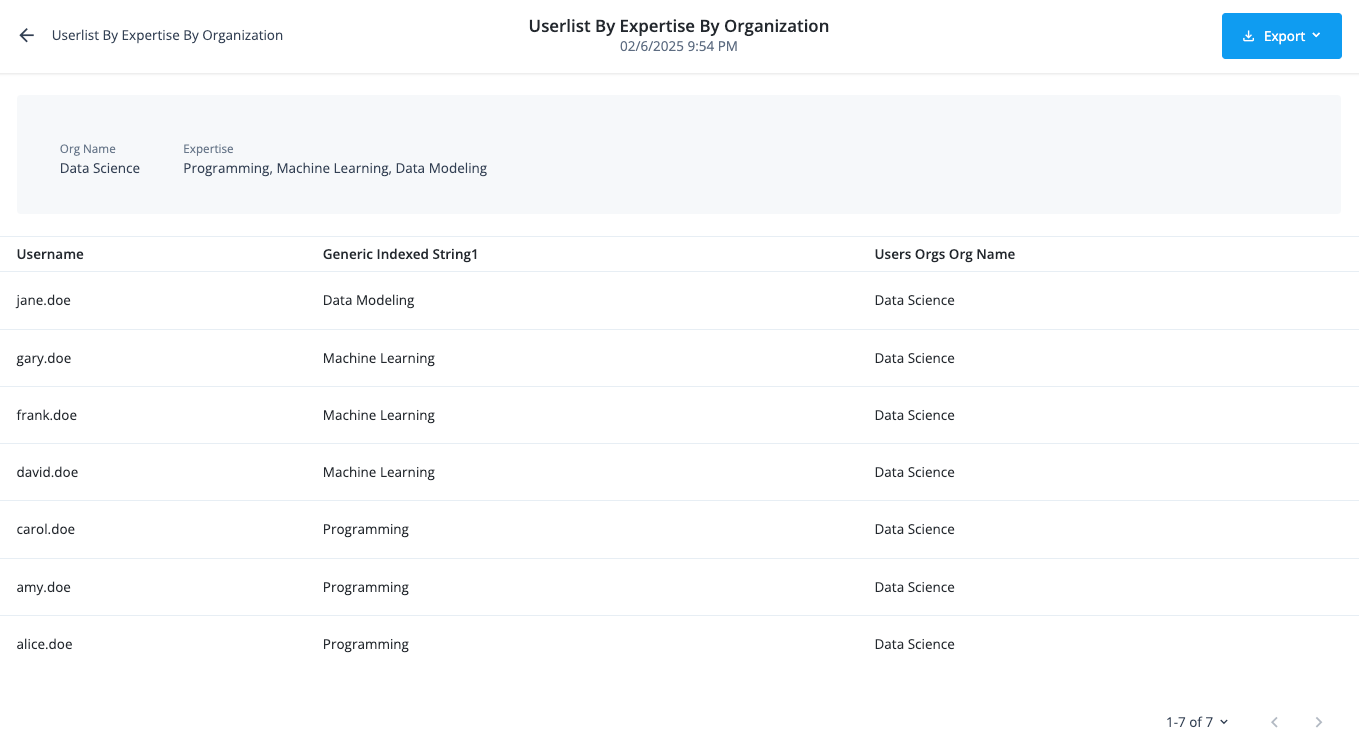
Locate your newly created report, Userlist by Expertise by Organization. In the report file, click Run.
-
On the Reports page, enter the following input parameters for the report:
-
Org Name: Enter
Data Sciencefor the organization name. -
Expertise: Enter
Programming,Machine Learning, andData Modeling.
-
-
Click Run Report.
-
On the Run History tab, click View Report.
Publishing the report
-
After reviewing the draft of your report, return to the Reports page and look for your report.
-
On the report tile, click , and then click Publish. The Published icon appears in the top right of the report tile.
Duplicating the report
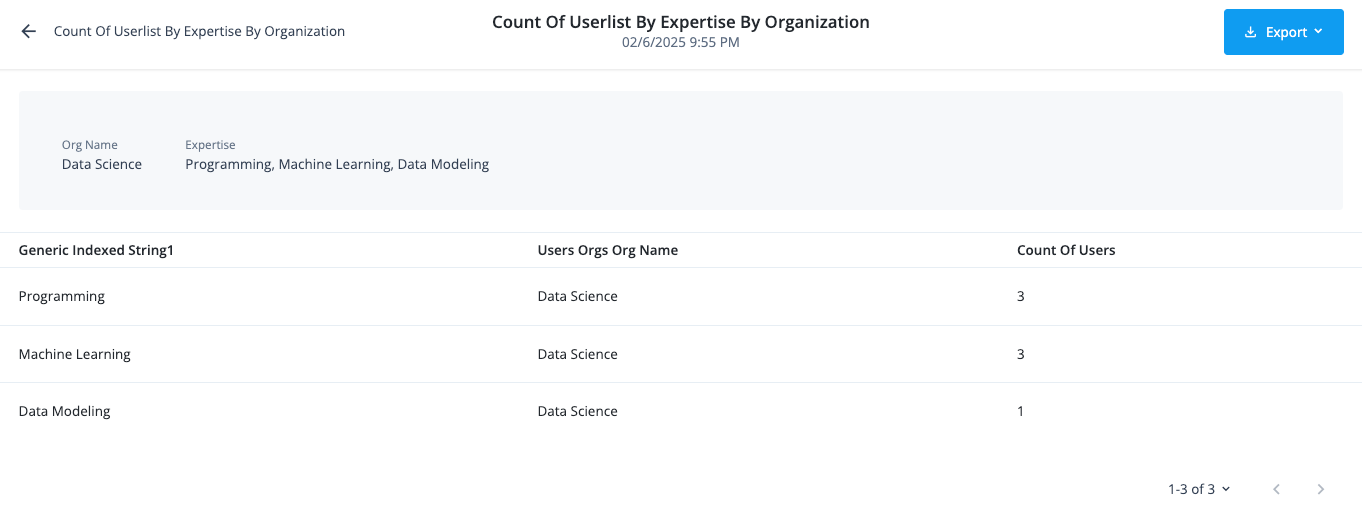
You can create a similar report with different parameters or columns by duplicating the original report and editing the new report copy. In this example, you’ll create a new report listing the count of users by expertise in an organization.
-
On the Reports page, search for a report you want to copy. In this example, you’ll search for
Userlist by Expertise by Organization. -
Click , and then click Duplicate.
-
In the Duplicate Report modal, enter the following:
-
Name: Enter
Count of Userlist By Expertise By Organizationfor the report name. -
Description (optional): Enter a general description for the new duplicate report.
-
Users: Select a test user in your database, such as
john-doe.
-
-
Click Duplicate.
Editing the copy and adding an aggregate count to the report
-
On the Reports page, locate your report. In this example, search for
Count of Userlist By Expertise By Organization. -
Click , and then click Edit.
-
In the right pane, scroll down the users data source properties, and clear the Username checkbox.
-
In the right pane, scroll down to Aggregate, and click .
-
In the Add an Aggregate modal, enter the following:
-
Name: Enter
Count of Usersfor a descriptive name. -
Type: Select
Count of specific rowsfor the type of parameter. -
Value: Select
users.frIndexedString1for the parameter value.
-
-
Click Save.
-
-
Click Save at the upper right of the page to apply your edits to the report.
-
On the Reports page, locate your report, and click Run.
-
On the Reports page, enter the following input parameters for the report:
-
Org Name: Enter
Data Sciencefor the organization name. -
Expertise: Enter
Programming,Machine Learning, andData Modeling.
-
-
Click Run Report, and then click View Report.
-
Exporting and downloading the report
-
On the Reports page, locate your report.
-
Click , and then click Run History. If the report isn’t available, run the report again.
-
Click the Download icon (), and select Export CSV.
-
After the download generates, click Download Report (CSV).
-
Open the CSV file to review the results.
Showing how the end user can access the report
-
In the Advanced Identity Cloud admin console, click Journeys.
-
Click the Login journey.
-
In the Preview URL field, click and paste the URL into an incognito window.
-
In the end-user sign-on page, enter the end user’s
User NameandPassword. The end user should be the one who can run the report, such asjohn.doe. -
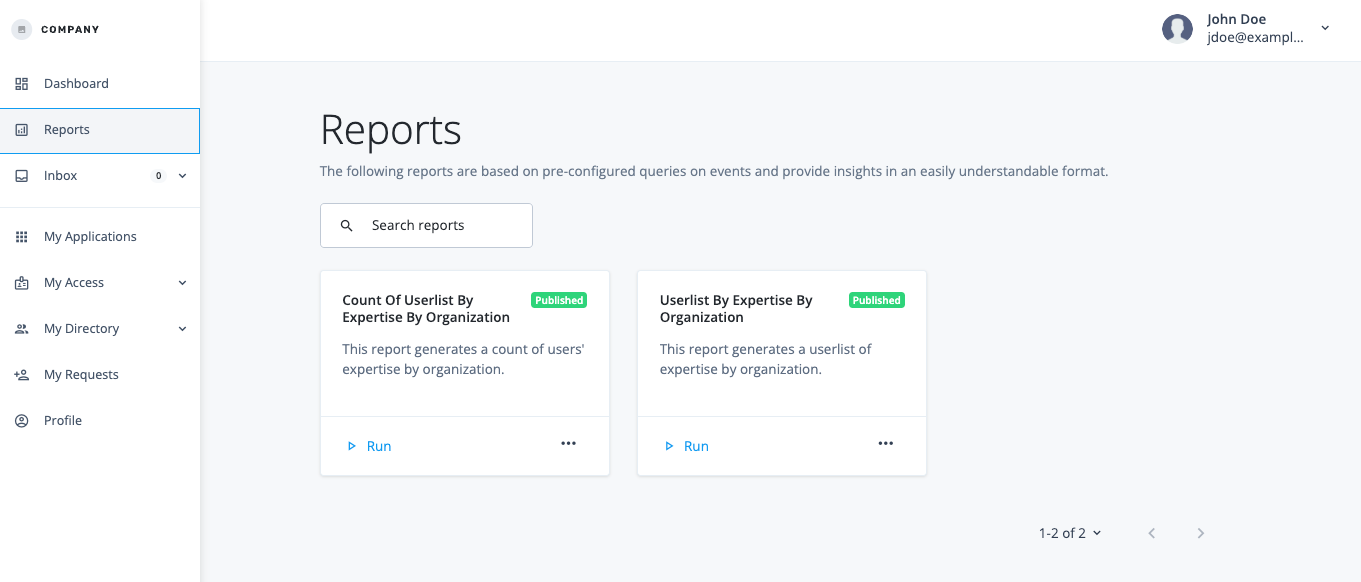
In the hosted account pages, click Reports. The Reports page displays the reports.
Validation
To validate your work:
-
In the Advanced Identity Cloud admin console, go to Reports.
-
On the Reports page, enter
userlistin the search box. -
Click Userlist By Expertise By Organization.
-
Click and then Run History.
-
On the Run History tab, check the report status. If the report displays
Expired, you need to run the report again. -
Click the Run Report tab, enter the following parameters:
-
Org Name: Enter
Data Science. -
Expertise: Enter
Programming,Machine Learning, andData Modeling.
-
-
Click Run Report.
-
View the report to check that the report displays the data configured for it.
Troubleshooting
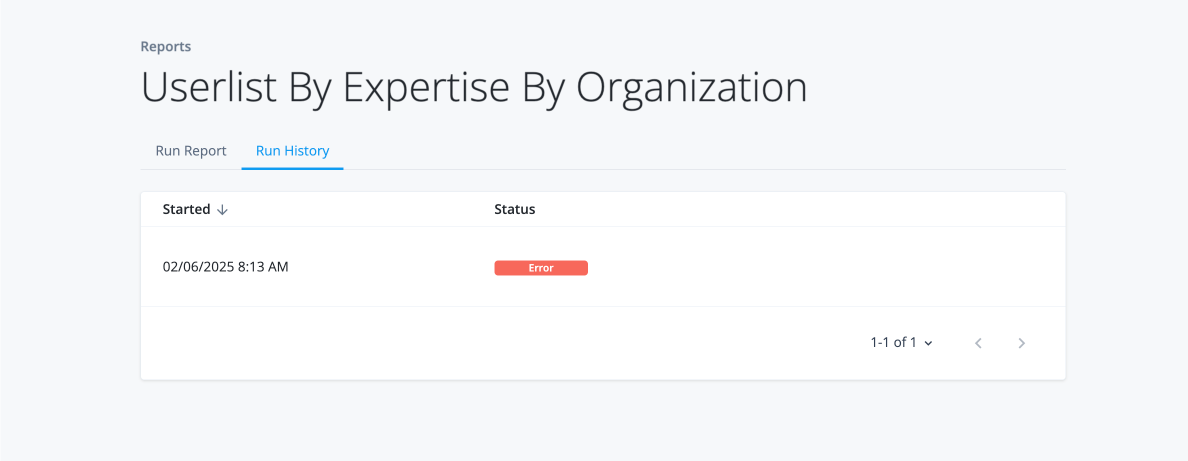
Error when running a report
If you run a report and encounter an error, it’s likely because of an incorrect mapping of parameters and variables that’s preventing the system from retrieving the user’s data from the database.
-
Check the report’s filters
-
In the Advanced Identity Cloud admin console, click Reports and locate your report.
-
Go to > Edit.
-
In the right pane, scroll down to Filters and go to > Edit Filter.
-
Review which variables are mapped to the reports parameters.
-
-
Check user details:
-
In the Advanced Identity Cloud admin console, go to Identities > Manage.
-
Search for a test user.
-
On the Details tab, check the variables used for your report. For example, in this use case, check the following:
-
Generic Indexed String1
-
-
On the user’s page, click Organizations to which I Belong. Check the user’s organizations.
-
-
Edit your filters:
-
In the Advanced Identity Cloud admin console, click Reports and locate your report.
-
Go to > Edit.
-
In the right pane, scroll down to Filters and go to > Edit Filter.
-
Make changes to the filters.
-
Click Save.
-
Run the report and check that it contains the correct data.
-