Push Sender node
The Push Sender node sends push notification messages to a device for multi-factor authentication (MFA).
Example
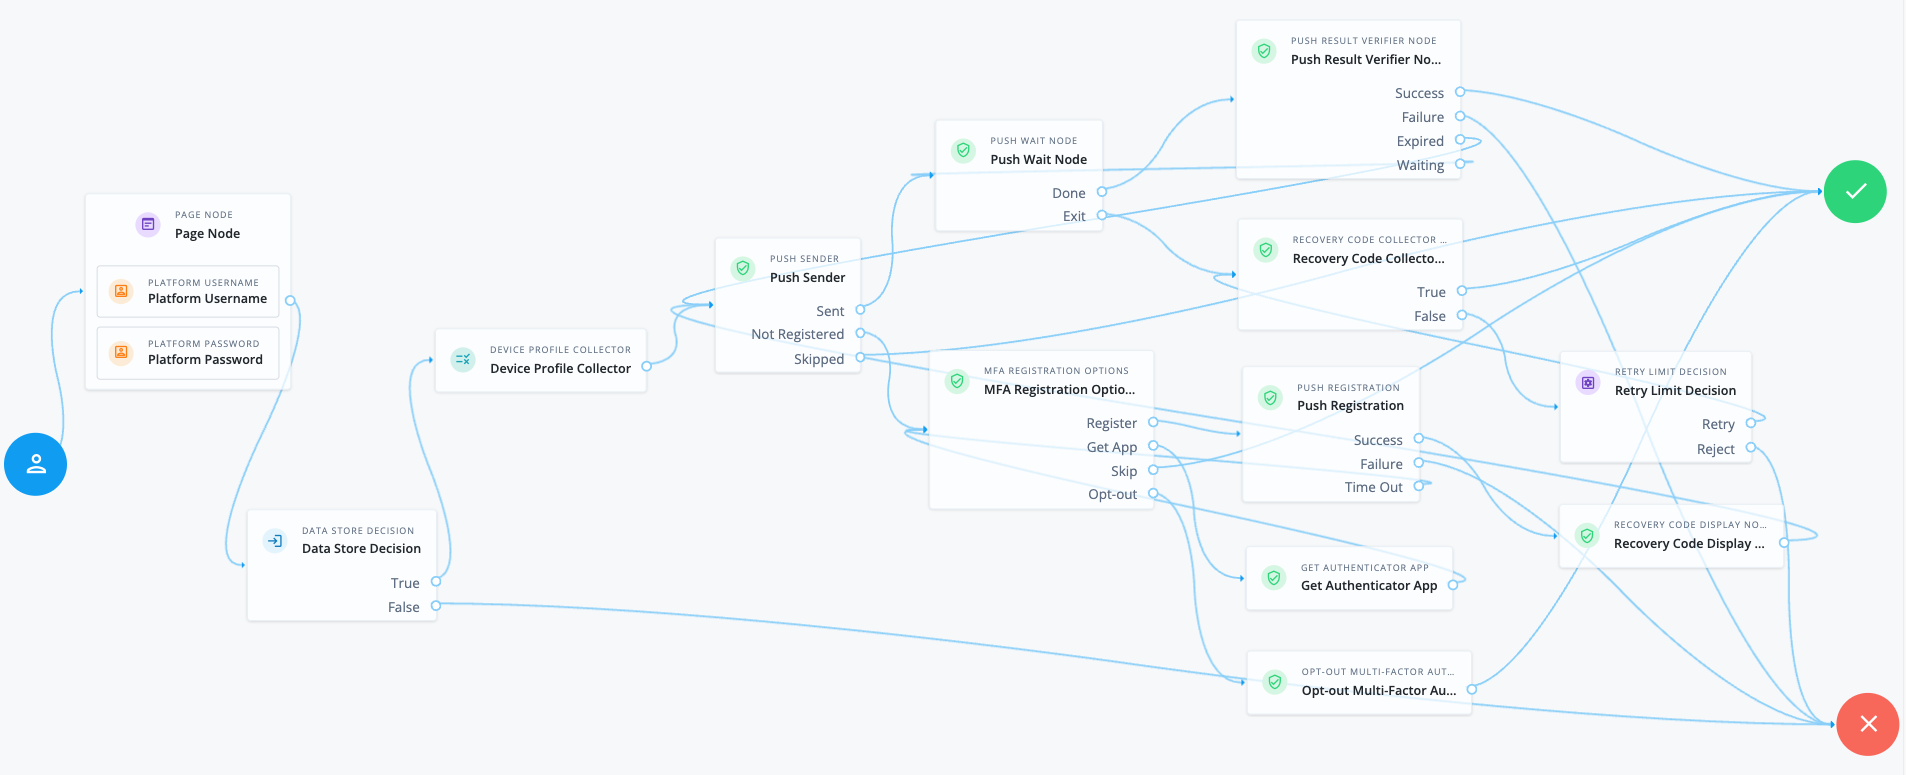
The following example shows one possible implementation of multi-factor push authentication, which uses this node:
Node connections
| Source node | Outcome path | Target node |
|---|---|---|
Page Node containing nodes to collect credentials. Implement a Platform Username node and a Platform Password node earlier in the journey. |
→ |
Data Store Decision |
Data Store Decision |
True |
Device Profile Collector |
False |
Failure |
|
Device Profile Collector |
→ |
Push Sender |
Push Sender |
Sent |
Push Wait |
Not Registered |
MFA Registration Options |
|
Skipped |
Success |
|
Push Wait |
Done |
Push Result Verifier |
Exit |
Recovery Code Collector Decision |
|
Push Result Verifier |
Success |
Success |
Failure |
Failure |
|
Expired |
Push Sender |
|
Waiting |
Push Wait |
|
MFA Registration Options |
Register |
Push Registration |
Get App |
Get Authenticator App |
|
Skip |
Success |
|
Opt-out |
Opt-out Multi-Factor Authentication |
|
Recovery Code Collector Decision |
True |
Success |
False |
Retry Limit Decision |
|
Push Registration |
Success |
Recovery Code Display Node |
Failure |
Failure |
|
Time Out |
MFA Registration Options |
|
Get Authenticator App |
→ |
MFA Registration Options |
Opt-out Multi-Factor Authentication |
→ |
Success |
Retry Limit Decision |
Retry |
Recovery Code Collector Decision |
Reject |
Failure |
|
Recovery Code Display Node |
→ |
Push Sender |
After verifying the user’s credentials, evaluation continues to the Device Profile Collector node to collect the device’s location and then proceeds to the Push Sender node.
If the user has a registered device:
-
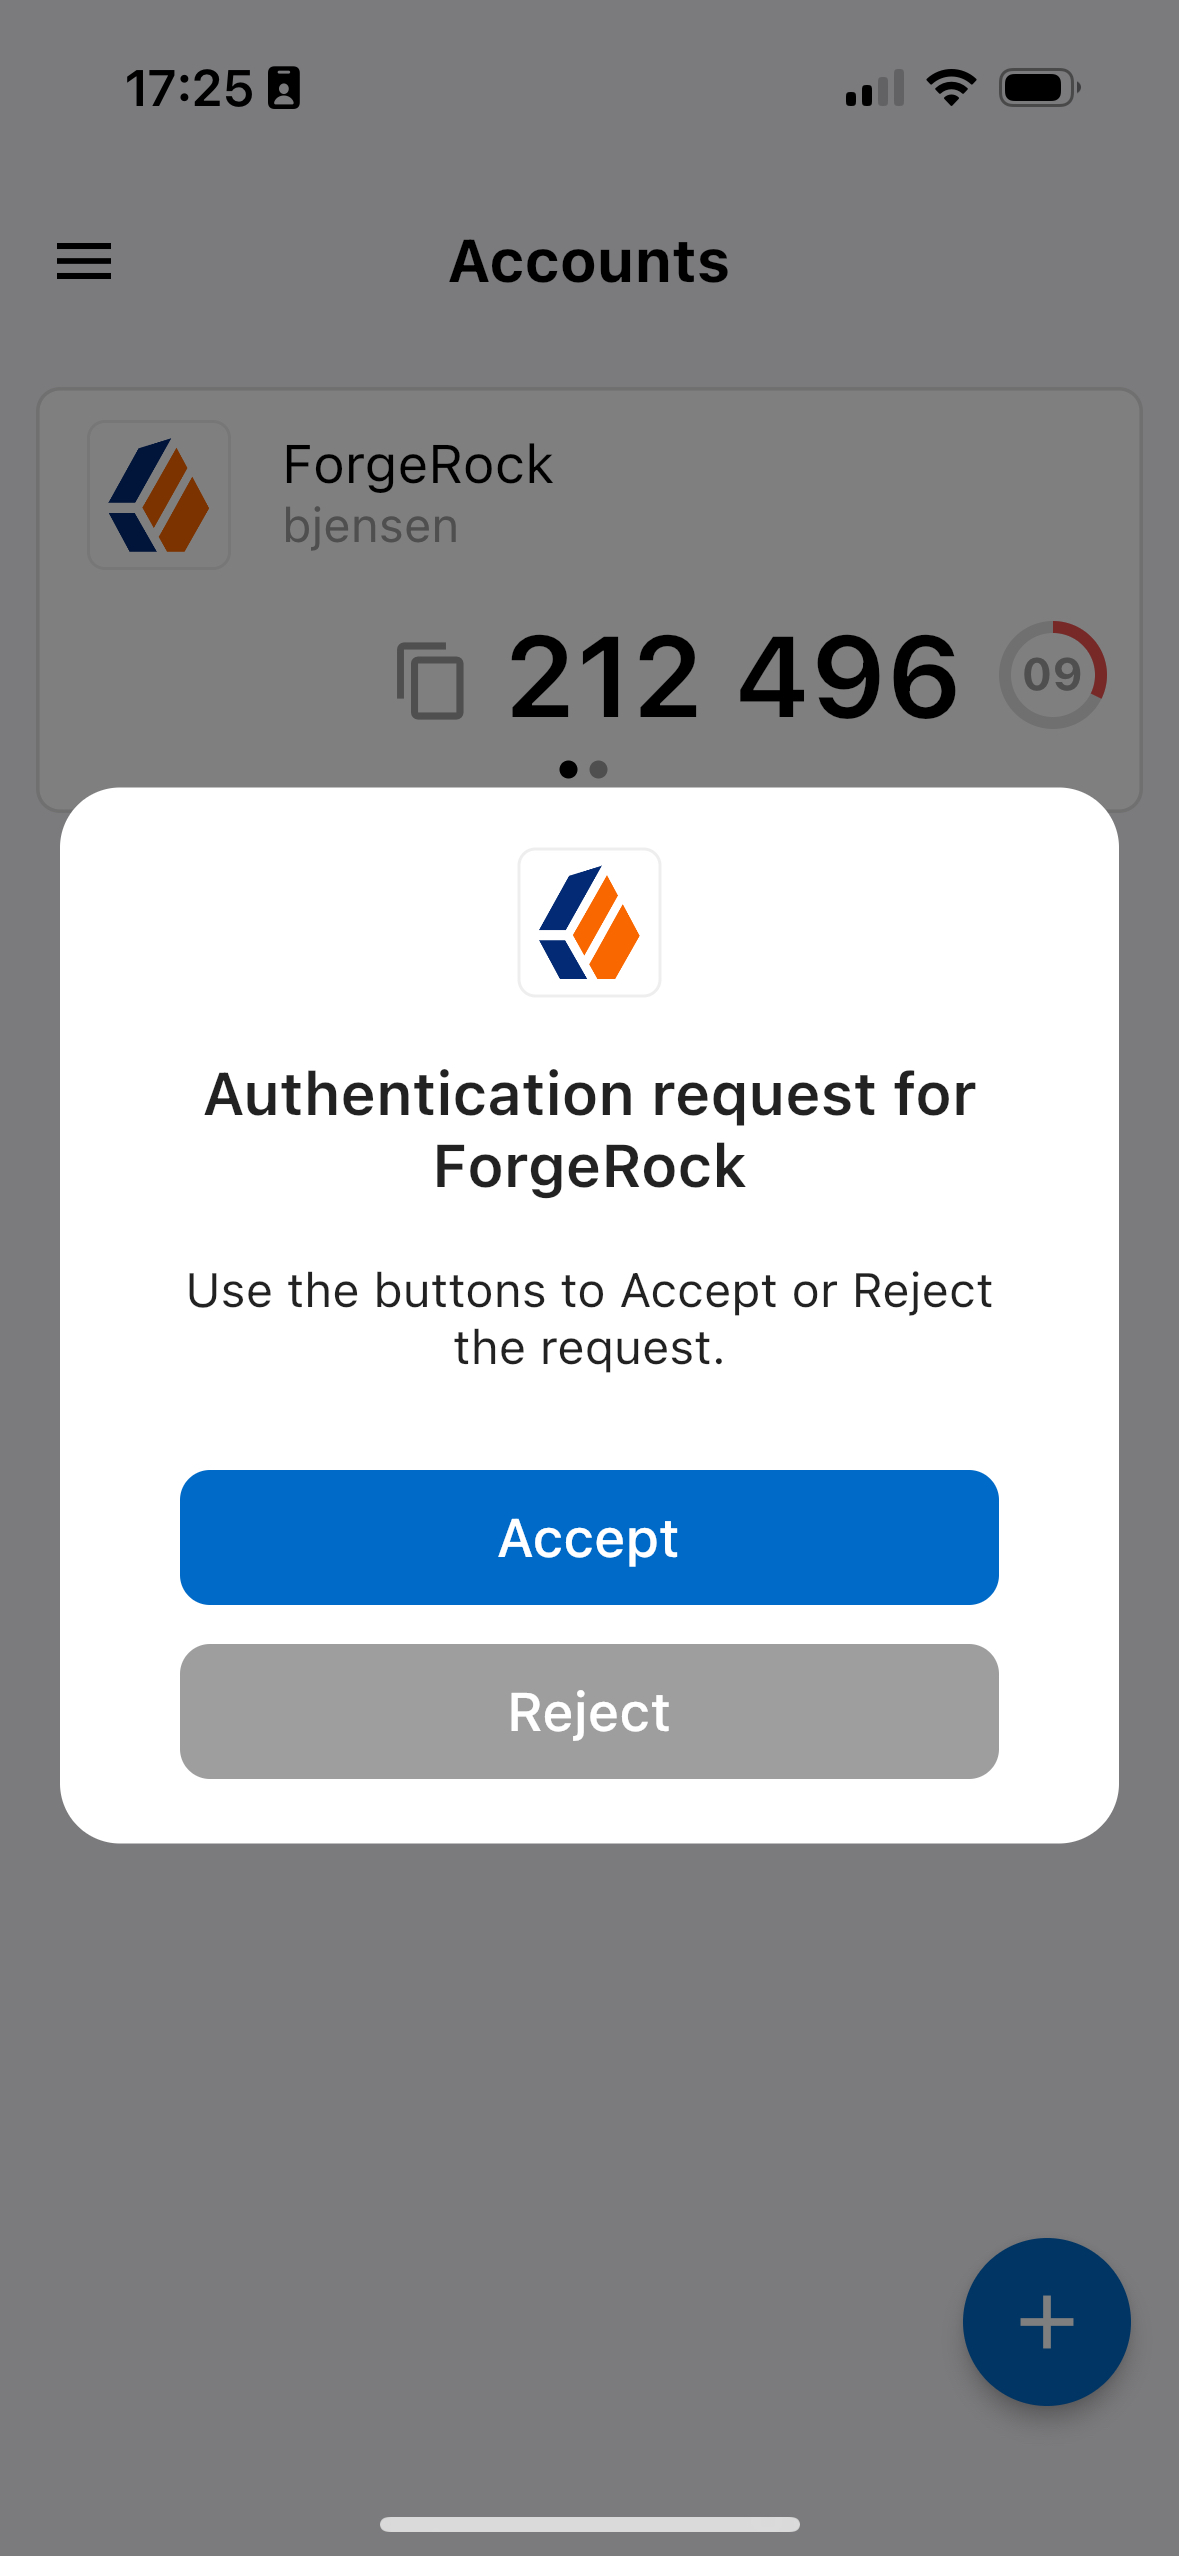
The Push Sender node sends a push notification to their registered device.
-
The Push Wait node pauses authentication for five seconds. During this time, the user can respond to the push notification on their device using an authenticator app.
If the user exits the Push Wait node, they’re directed to the Recovery Code Collector Decision node, where they can enter a recovery code to authenticate.
Configure the Exit Message property in the Push Wait node with a message, such as Lost phone? Use a recovery codefor situations like this.A Retry Limit Decision node allows three attempts to enter a recovery code before failing the authentication.
-
The Push Result Verifier node verifies the user’s response:
-
If the user responds positively, they’re authenticated successfully and logged in.
-
If the user responds negatively, authentication fails.
-
If the push notification expires, the Push Sender node sends a new push notification.
Use a Retry Limit Decision node to constrain the number of times a new code is sent. -
If the user hasn’t yet responded, the flow loops back a step and the Push Wait node pauses authentication for another 5 seconds.
-
If the user doesn’t have a registered device:
-
The MFA Registration Options node presents the user with the following options:
- Register Device
-
The flow continues to the Push Registration node, which displays a QR code for the user to scan with their authenticator app.
- Get the App
-
Displayed only if the node is configured to display Get Authenticator App. The flow continues to the Get Authenticator App node, which displays links to download the authenticator app.
- Skip this step
-
Displayed only if the node is configured to allow users to skip registration. In this example, skipping is linked to the
Successoutcome. However, you could provide an alternative authentication flow using an Inner Tree Evaluator node for example. - Opt-out
-
Displayed only if the node is configured to allow users to skip registration. Evaluation continues to the Opt-out Multi-Factor Authentication node, which updates the user’s profile to skip MFA with push in the future. In this example, after updating the profile, the flow continues to the
Successoutcome.
-
The user registers the device with the Push Registration node.
After registration, the Recovery Code Display node displays the recovery codes to the user and the flow returns to the Push Sender node to continue push authentication.
|
To manage push devices, the user must log in using either the device or a recovery code. Find more information in Manage devices for MFA. |
Availability
| Product | Available? |
|---|---|
PingOne Advanced Identity Cloud |
Yes |
PingAM (self-managed) |
Yes |
Ping Advanced Identity Software (self-managed) |
Yes |
Authenticators
The push-related nodes integrate with the PingID mobile app and the ForgeRock Authenticator app for Android and iOS.
Third-party authenticator apps aren’t compatible with the push notification functionality.
Inputs
-
This node requires the
realmandusernameproperties in the incoming node state.Implement a Platform Username node earlier in the journey.
-
This node can read the device location from the incoming node state if it exists.
The device location only exists when a Device Profile Collector node is implemented earlier in the journey with the Collect Device Location option selected.
Dependencies
You must configure the Push Notification service for the realm to use this node. Optionally, also configure the ForgeRock Authenticator (Push) service.
Find more information in Push authentication journeys.
Find information on provisioning the credentials used by the service in How To Configure Service Credentials (Push Auth, Docker) in Backstage.
Configuration
| Property | Usage | ||
|---|---|---|---|
Message Timeout |
The number of milliseconds that the push notification message remains valid. The Push Result Verifier node rejects responses to push messages that have timed out. Default: |
||
User Message |
(Optional) Add a custom, localized message to send to the user. You can use the following variables in the Value field:
Add instructions
Leave blank to use the default message. Default: |
||
Remove 'skip' option |
Select this option to make push authentication mandatory.
The When disabled, the user can skip push authentication if required. |
||
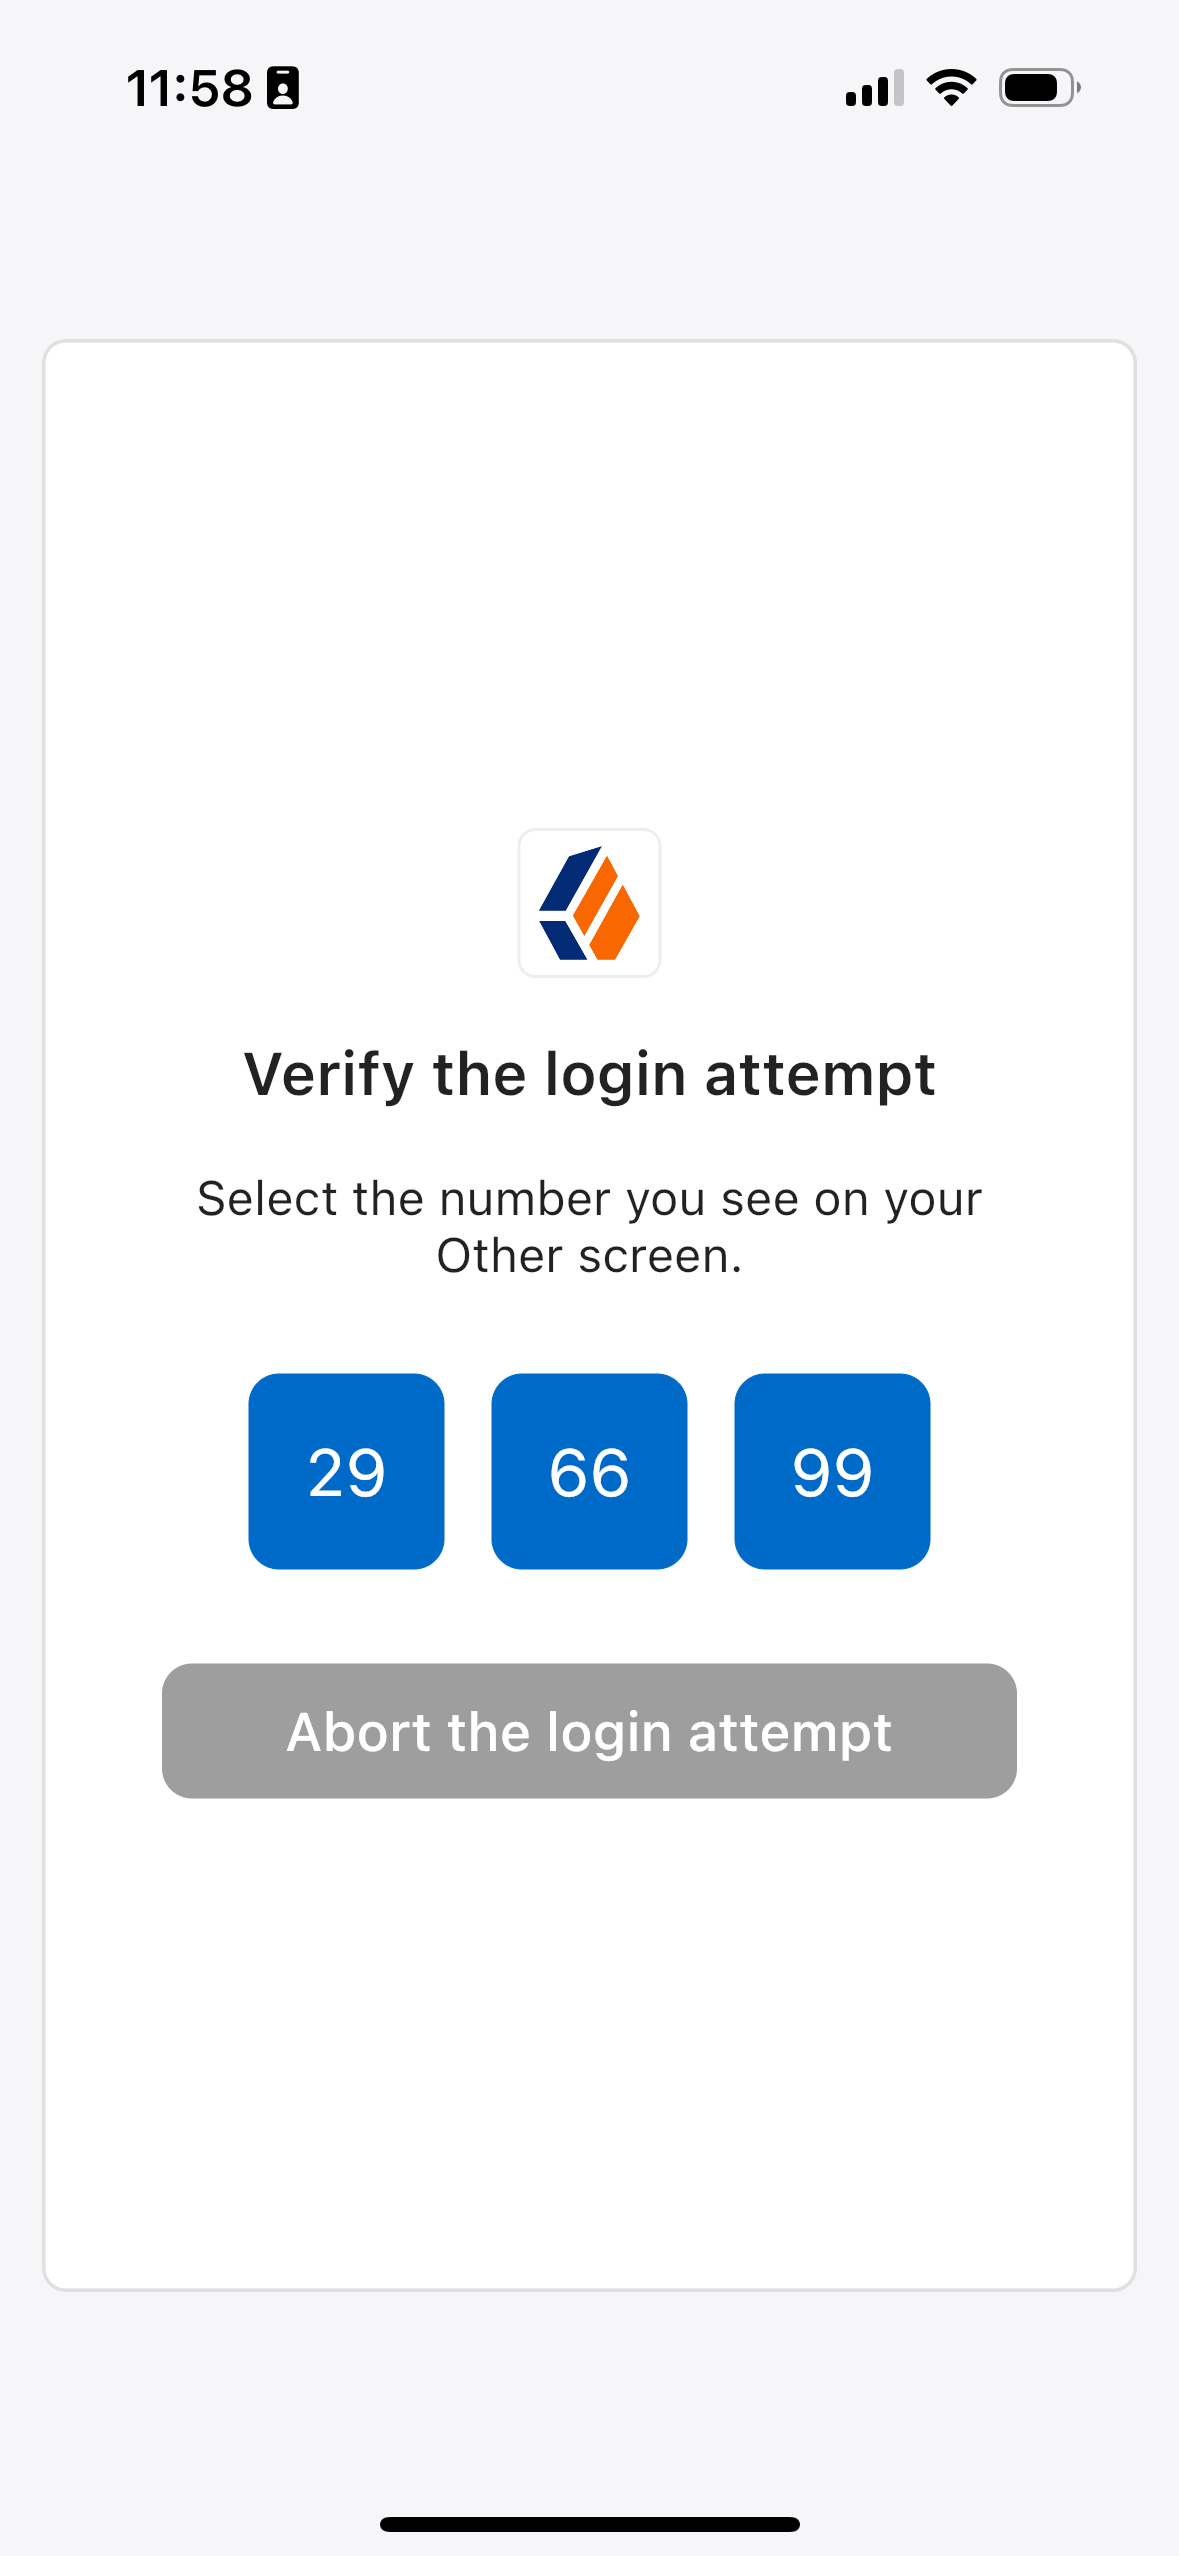
Share Context Info |
Select this option to include context data such as Context data example:Authenticator apps can display this additional information to the end user to help them verify that the request is genuine and initiated by them. For example: 
To include the |
||
Custom Payload Attributes |
(Optional) Enter the names of the shared state objects to include in the message payload sent to the client. Enter each name separately and press Enter to add it. The size of the payload mustn’t exceed 3 Kb. |
||
Push Type |
Select the type of push authentication the user must perform on their device to continue the journey. Possible values are:
|
||
Capture failure |
Select this option to store the failure reason in the |

(1) Specify a
locale that Java supports, such as en-gb. Otherwise, the node throws a configuration exception with an Invalid locale provided message.
Outputs
-
The node adds a unique ID to identify the push notification request to the
pushMessageIdshared state attribute. -
If the outcome is
Not Registered, this node sets"mfaMethod": "push"in the shared state. -
If the node fails to send the push notification and Capture failure is enabled, the node adds the failure reason to a property named
PushAuthFailureReasonin the shared state. Other nodes can read this property later in the journey, if required.Possible failure reasons are:
-
MISSING_USERNAME -
SENDER_ALREADY_USED -
CTS_ERROR -
TRANSMISSION_FAILURE
-