[Optional] Step 4. Configuring your app to use native SDK libraries
Optionally, you can use an IdP’s native SDK libraries to handle social sign-on directly rather than redirecting the user in a web browser.
This can provide a smoother, more integrated experience for your users than the redirect method.
|
If an IdP’s native SDK libraries are not included in your app then the Ping (ForgeRock) SDKs fall back to use a browser redirect for social sign-on. |
The Ping (ForgeRock) SDK for iOS supports implementing the following native libraries:
Implementing the Sign-in with Apple native SDK
To use Apple’s native SDK in your iOS app, you must complete the following tasks:
Step 1. Add Sign-in with Apple SDK for iOS dependencies
To use Apple’s native SDK in your iOS app you must add the PingExternalIdPApple module to your client application. When added the Ping (ForgeRock) SDK for iOS knows to use native libraries for Apple, rather than using a redirect.
To add the PingExternalIdPApple module to your client application:
-
In Xcode, select your project, and navigate to Targets > General > Frameworks, Libraries, and Embedded Content.
-
Click Add items.
-
Select
PingExternalIdPApple.frameworkand then click Add.The result resembles the following:
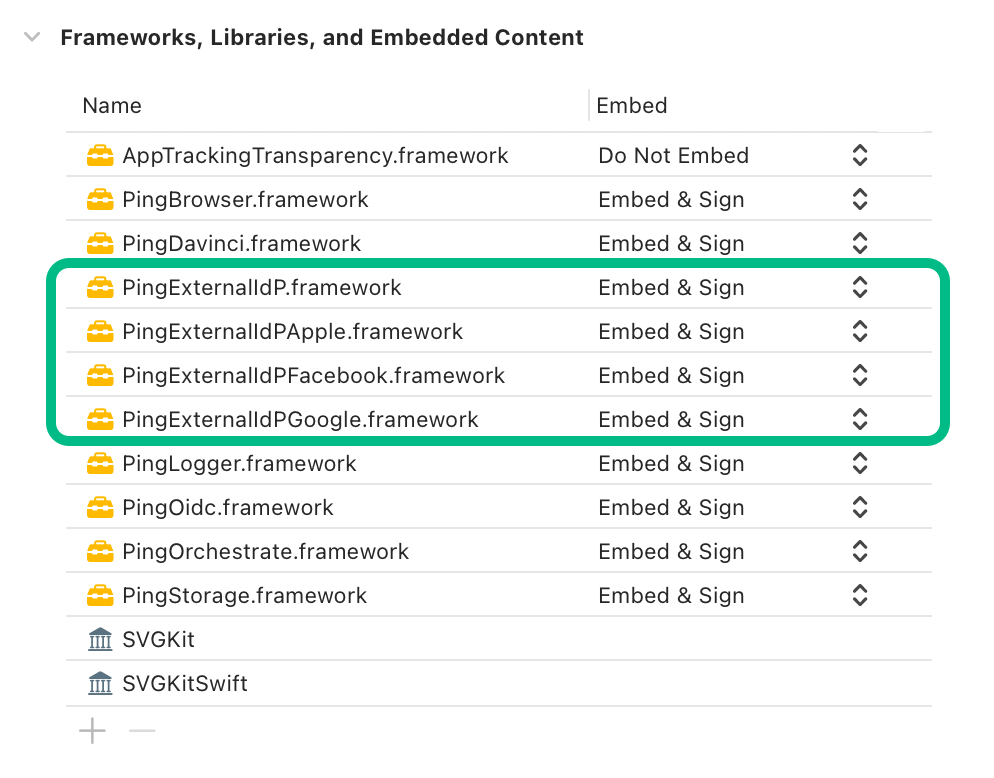 Figure 1. Adding native IdP dependencies to an iOS project
Step 2. Add the Sign-in with Apple capability to your client app
To add the Sign-in with Apple capability to your client application:
-
In Xcode, select your project, and navigate to Targets > Signing & Capabilities.
-
Click Capability, and then double click Sign in with Apple.
The result resembles the following:
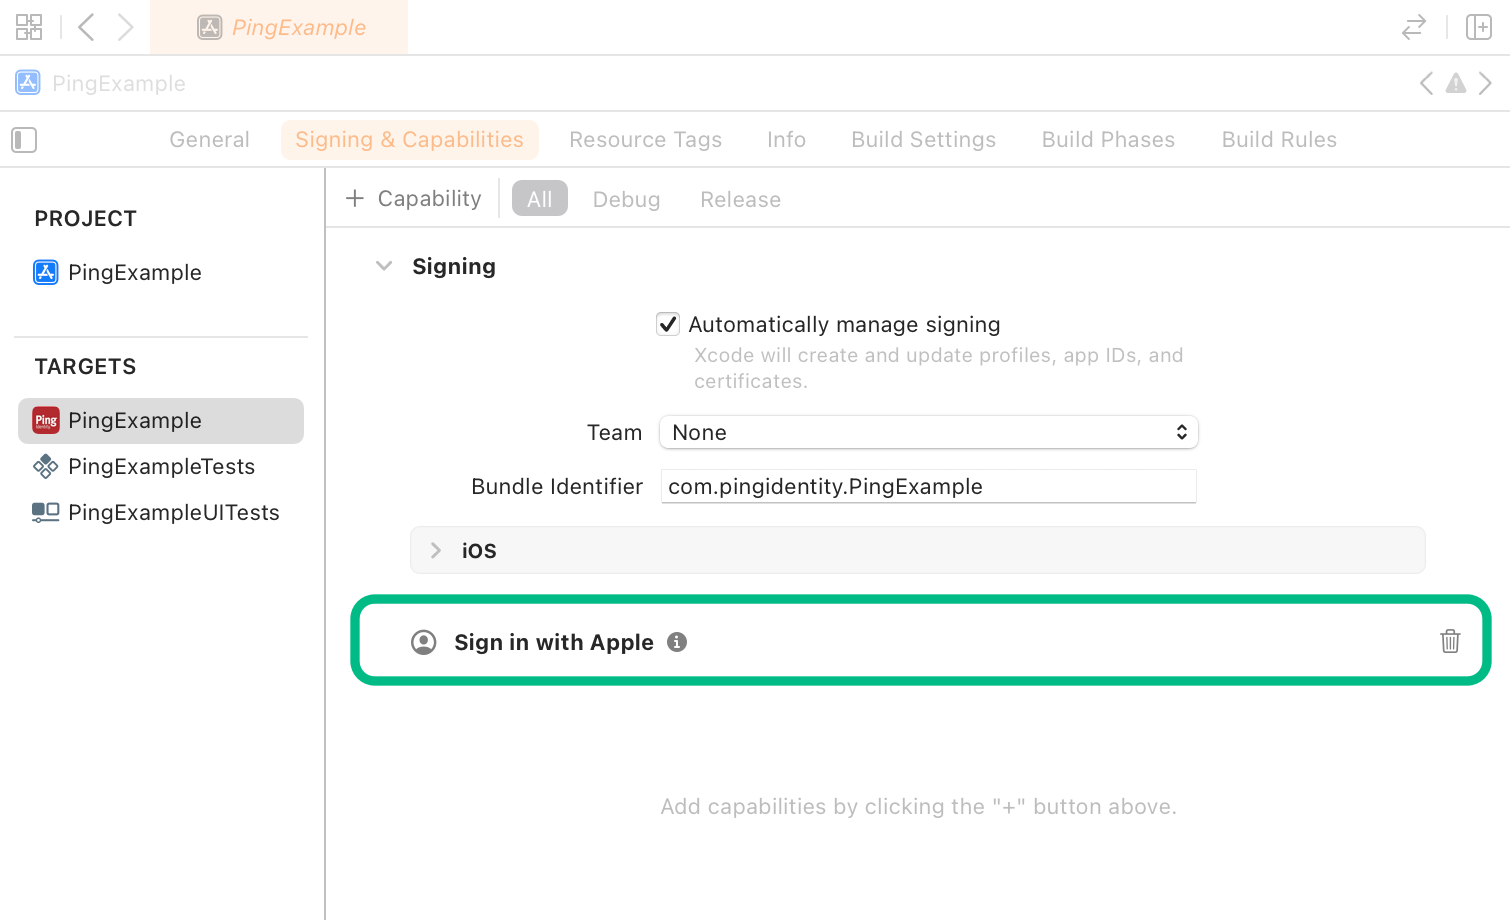 Figure 2. Adding capabilities to an iOS project
Implementing the Facebook native sign-in SDK
To use Facebook’s native SDK in your iOS app, you must complete the following tasks:
Step 1. Add Facebook SDK for iOS dependencies
To use Facebook’s native SDK in your iOS app you must add the PingExternalIdPFacebook module to your client application. When added the Ping (ForgeRock) SDK for iOS knows to use its embedded native libraries for Apple, rather than using a redirect.
To add the PingExternalIdPFacebook module to your client application:
-
In Xcode, select your project, and navigate to Targets > General > Frameworks, Libraries, and Embedded Content.
-
Click Add items.
-
Select
PingExternalIdPFacebook.frameworkand then click Add.The result resembles the following:
Figure 3. Adding native IdP dependencies to an iOS project
Step 2. Connect your client iOS app to your Facebook App ID
When using the native Facebook SDK to perform social sign-on you must configure the client app with details of your app profile in Facebook.
To connect your client app with the app profile in Facebook:
-
Navigate to your project’s
Infoproperty list. -
Add the following property list strings, with values from the application you created in the Meta Developer site.
- FacebookAppID
-
Click the App ID label in the header bar of the Meta Developer site for your app to copy the value.
- FacebookClientToken
-
In the Meta Developer site for your app, navigate to App Settings > Advanced > Security, and copy the Client token value.
Do not use the App secret value found in App settings > Basic in your client applications.
- FacebookDisplayName
-
The name the client app displays when authenticating users.
The result resembles the following:
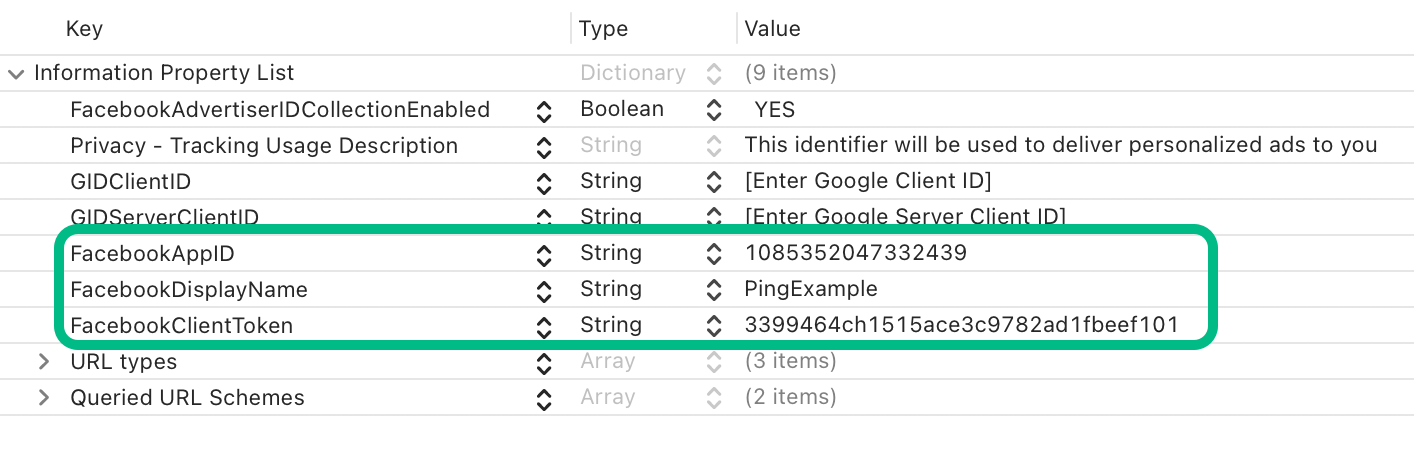 Figure 4. Configuring Facebook social sign-on properties in Xcode
Learn more in Facebook Login for iOS - Quickstart in the Meta Developers documentation.
Step 3. Update your Facebook App ID to allow your client app to connect
You need to allow your client iOS app to connect to your Facebook App ID.
To allow your client app to connect, update your Facebook app in the Meta Developer console by adding the bundle ID of your client app:
-
In the Meta for Developers console, select your app, and then navigate to App Settings > Basic.
-
If your app does not yet have a section for iOS apps, click Add platform, select iOS, and then click Next.
-
In the iOS section, in the Bundle ID field, enter the bundle identifier of your client app.
For example,
com.pingidentity.PingExample.To locate your bundle identifier in Xcode, navigate to Targets > Signing & Capabilities.
-
Save your changes.
Step 4. Associate Facebook redirect URIs with your client app
You must configure your app to respond to the redirect URI Facebook uses to return to your client app.
To add the redirect URI to your iOS app:
-
In Xcode, select your application and then navigate to Targets > Info > URL Types.
-
In the URL Types section, click Add items.
-
In URL Schemes, enter the string
fb, followed by the app ID.For example,
fb1085352047332439On the Meta developers site for your Facebook client you can obtain the information to enter in your iOS client app’s
info.plistfile.On the site, select your app and navigate to App settings > Basic > iOS, then click Quick Start.
Step 5. Add URL handling code to your client app
After associating your client app with redirect URIs in the previous step, you must now add code that handles being opened after social sign-in.
Add the following code to the main application entry point:
-
Open your project’s main application entry point, for example
ContentView. -
Add the following code to the
bodyvariable to call the Ping (ForgeRock) SDK-provided request handlers for Facebook and Google:WindowGroup { ContentView().onOpenURL { url in let handled = GoogleRequestHandler.handleOpenURL(UIApplication.shared, url: url, options: nil) if !handled { FacebookRequestHandler.handleOpenURL(UIApplication.shared, url: url, options: nil) } } }The code handles URLs from both Google and Facebook clients.
Edit the code if you only use one.
Implementing the Sign in with Google native SDK
To use Google’s native SDK in your iOS app, you must complete the following tasks:
Step 1. Add Google SDK for iOS dependencies
To use Google’s native SDK in your iOS app you must add the PingExternalIdPGoogle module to your client application. When added the Ping (ForgeRock) SDK for iOS knows to use native libraries for Apple, rather than using a redirect.
To add the PingExternalIdPGoogle module to your client application:
-
In Xcode, select your project, and navigate to Targets > General > Frameworks, Libraries, and Embedded Content.
-
Click Add items.
-
Select
PingExternalIdPGoogle.frameworkand then click Add.The result resembles the following:
Figure 5. Adding native IdP dependencies to an iOS project
Step 2. Create an iOS-specific client profile in Google
When using the native Google SDK for social sign-on, your client app communicates directly with Google, as well as with your PingOne server. You will already have one client app created in Google that your PingOne server uses.
You must create a set of iOS-specific credentials in Google so your client app can connect directly, as follows:
-
In a browser, navigate to the Google’s API Dashboard.
-
In the left navigation, click Credentials.
-
Click CREATE CREDENTIALS, and from the drop-down list, select
OAuth client ID. -
In the Application Type drop-down list, select
iOS. -
In the Name field, enter a name for your app.
-
In the Bundle ID field, enter the bundle identifier of your app.
For example,
com.pingidentity.PingExample.To locate your bundle identifier in Xcode, navigate to Targets > Signing & Capabilities.
-
Click Create.
-
Select the client you just created from the list to view the details.
The result will resemble the following:
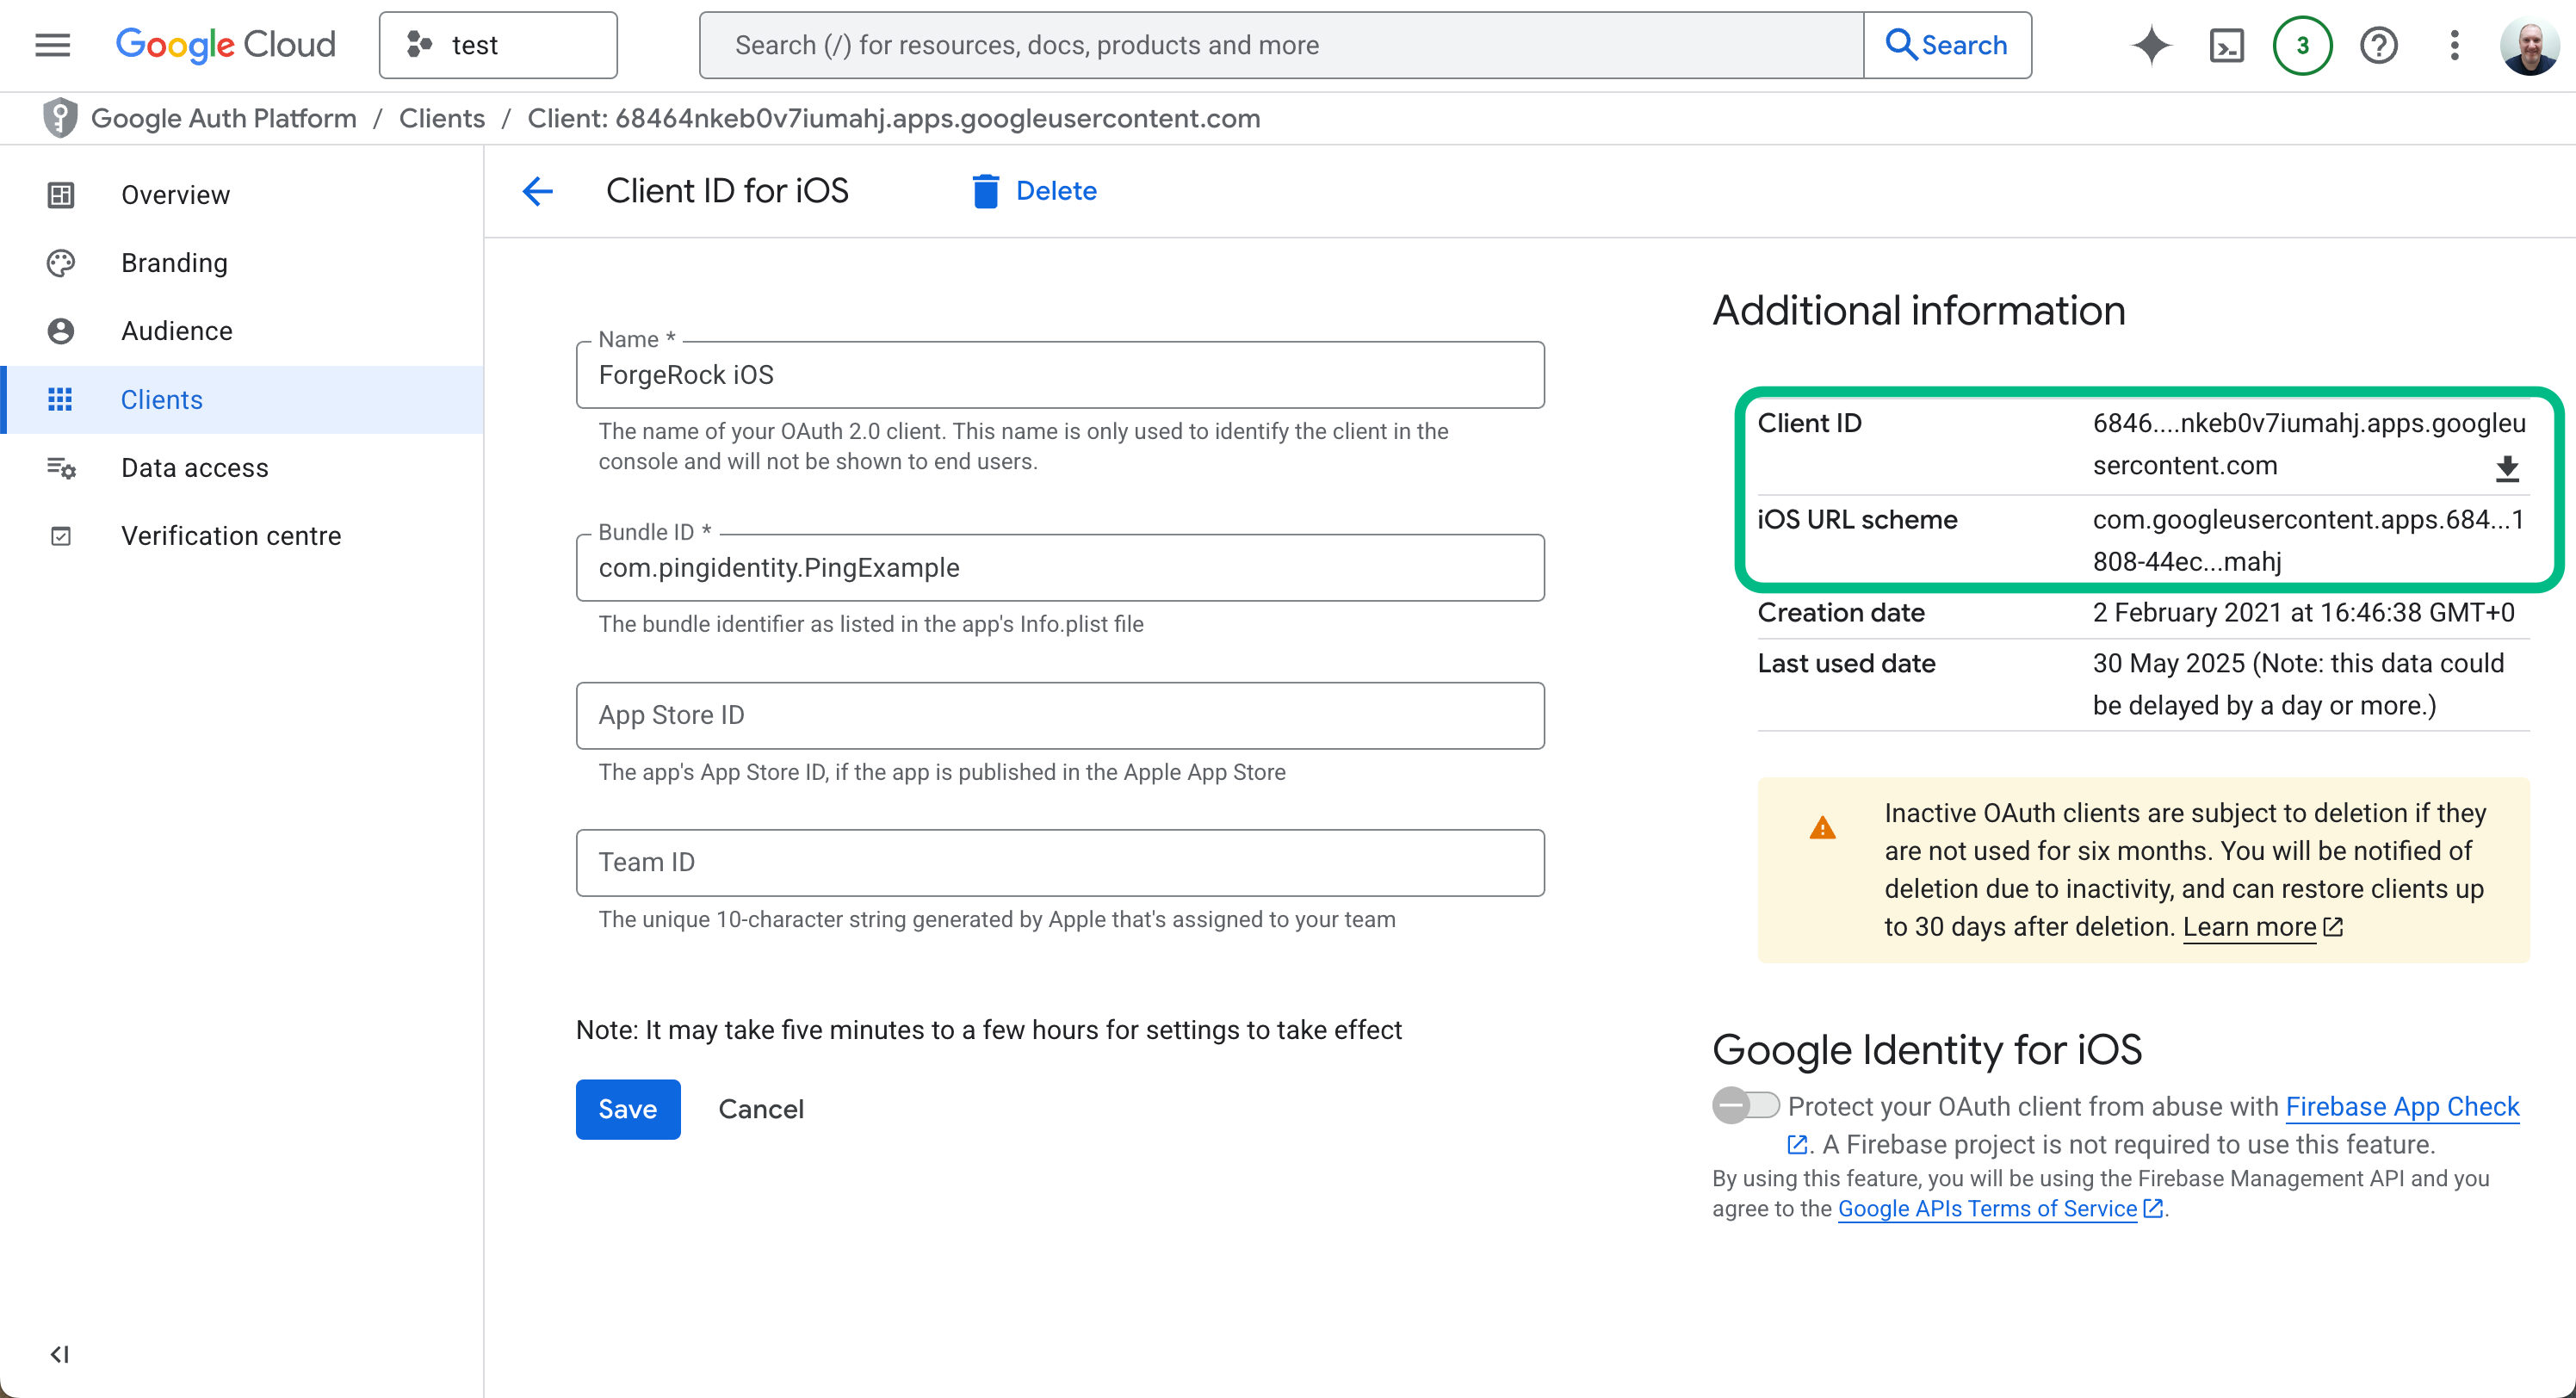 Figure 6. Configuring a client in Google for iOS
 -
Make a note of the Client ID and iOS URL scheme values, as you need to use these in your client application.
Step 3. Connect your client iOS app to your Google client profiles
You need to configure your iOS client app with the details of the iOS-specific client profile you created in Google, so that it can connect and authorize users.
You also need to configure your client with the ID of the client you created so that your PingOne server can communicate with Google.
This allows tokens granted to your client application by the iOS-specific client profile can also be used and introspected by your PingOne server, as the tokens will have both client IDs in the audience parameter.
To connect your app to the two clients you created in Google:
-
Navigate to your project’s
Infoproperty list. -
Add the following property list strings:
- GIDClientID
-
Specify the client ID of the iOS-specific client you created in Google.
- GIDServerClientID
-
Specify the client ID of the web application client you created in Google.
The result resembles the following:
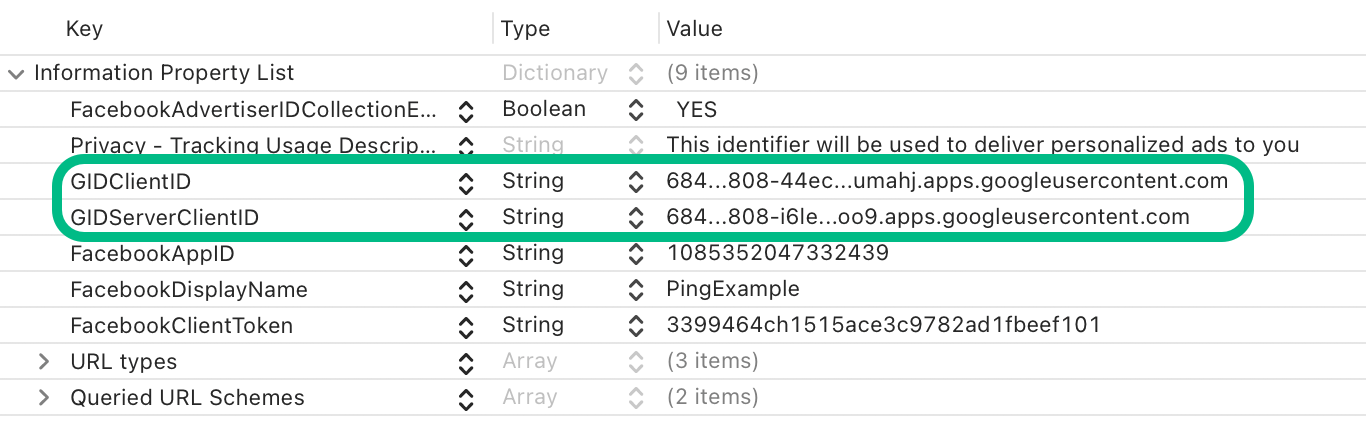 Figure 7. Configuring Google social sign-on properties in Xcode
Step 4. Associate Google redirect URIs with your client app
You must configure your app to respond to the redirect URI Google uses to return to your client app.
To add the redirect URI to your iOS app:
-
In Xcode, select your application and then navigate to Targets > Info > URL Types.
-
In the URL Types section, click Add items.
-
In URL Schemes, enter the iOS URL scheme value from your iOS-specific client ID in Google.
For example,
com.googleusercontent.apps.6846…mahjTo find your redirect URI, sign in to the Google Auth Platform console, and click Clients.
Select your iOS-specific client, and copy the value of iOS URL scheme.
Step 5. Add URL handling code to your client app
After associating your client app with redirect URIs in the previous step, you must now add code that handles being opened after social sign-in.
Add the following code to the main application entry point:
-
Open your project’s main application entry point, for example
ContentView. -
Add the following code to the
bodyvariable to call the Ping (ForgeRock) SDK-provided request handlers for Facebook and Google:WindowGroup { ContentView().onOpenURL { url in let handled = GoogleRequestHandler.handleOpenURL(UIApplication.shared, url: url, options: nil) if !handled { FacebookRequestHandler.handleOpenURL(UIApplication.shared, url: url, options: nil) } } }The code handles URLs from both Google and Facebook clients.
Edit the code if you only use one.