Before you begin
To complete this tutorial, refer to the prerequisites in this section.
The tutorial also requires a configured server.
Compatibility
- PingOne
-
-
Your PingOne instance must have DaVinci enabled.
-
Only PingOne External IdPs are supported.
-
Identity providers configured using a DaVinci Service Connector are not supported.
-
-
Overview
The high-level tasks you’ll complete in this section configure PingOne to perform social sign-on, and allow the DaVinci Client to step through the configured flows.
The Ping (ForgeRock) SDKs defaults to using a browser redirect method when encountering social sign-on nodes. This mode is the simplest to configure, and supports all of the IdPs that PingOne itself supports.
In this mode PingOne interacts with the IdP to authenticate users on your app’s behalf, and then redirects back to your app to continue the flow. This makes the overall configuration simpler, as your app only communicates with PingOne, not individual IdPs.
Optionally, you can choose to use the embedded SDKs of supported IdPs for Android and iOS apps. In this mode your app communicates directly with the supported IdP via its SDK. This requires additional configuration in the IdP and in your client application. These additional steps are covered in a later step for each platform.
Connecting external identity providers in PingOne
In this section, you configure PingOne with details about the social login identity providers you want to integrate into your client apps.
The Ping (ForgeRock) SDKs are compatible with any OpenID Connect 1.0-compliant Identity Provider, such as those available by default in PingOne.
|
You must configure the identity provider as a PingOne External IdP. Learn more in External IdPs . Identity providers configured by using a DaVinci Service Connector are not supported. |
Ping Identity has tested the steps in this tutorial with the Identity Providers listed below. Select a provider to view the PingOne documentation with instructions on how to configure an external IdP in PingOne:
Configuring DaVinci Flows for social sign-on
After connecting your chosen external identity providers to PingOne, the next step is to configure a DaVinci flow to display buttons on your login pages so that users can choose to authenticate using the external IdP.
The Ping (ForgeRock) SDKs support two options for adding social sign-on to your DaVinci flows. Choose one of the following options:
Option A. Configuring DaVinci Forms for social sign-on
DaVinci Forms is a drag-and-drop form builder that allows you to create custom forms without having to write HTML.
|
You do not need to configure a form if you have chosen Option B: Configuring the HTTP Connector for social sign-on |
Complete the following steps to integrate external IdPs with PingOne using DaVinci Forms.
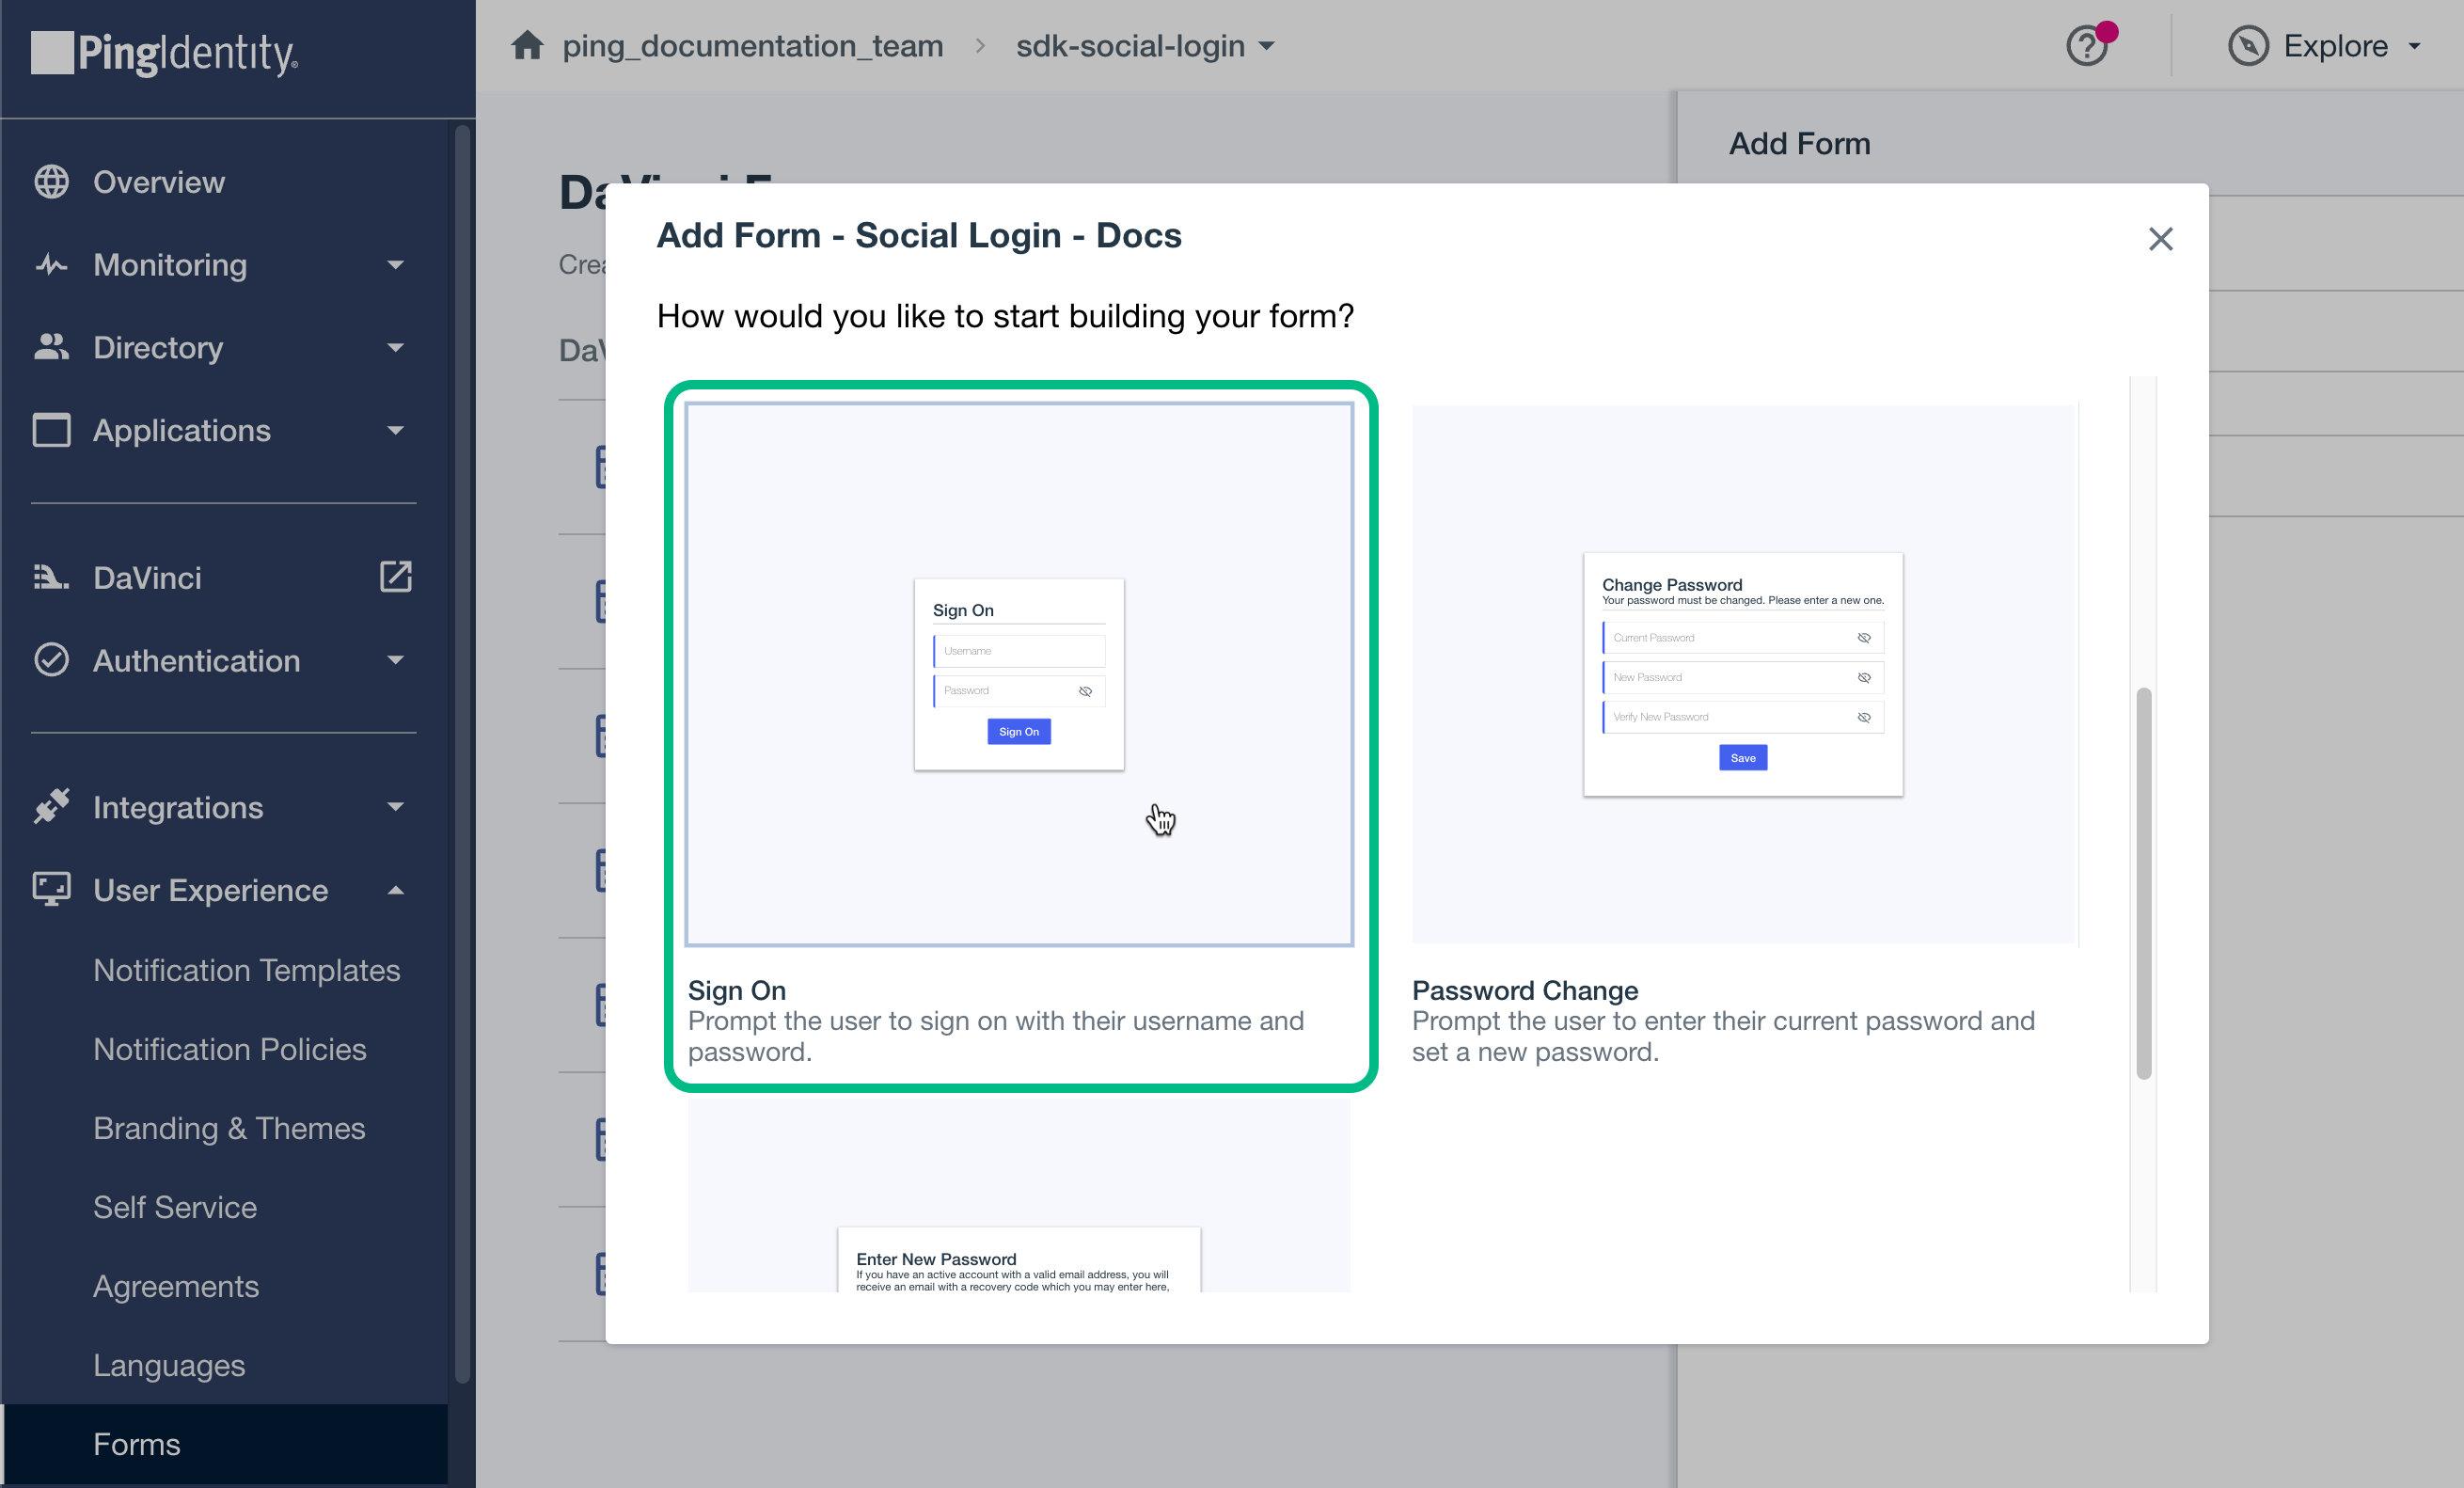
Creating a DaVinci Form
-
Create a form to display your selected external identity providers.
PingOne includes a number of prebuilt templates that you can modify as required.
-
To add external identity providers to the form:
-
From the Toolbox tab, drag a Social Login field onto the form for each external identity provider you want to display.
-
In PingOne External Identity Provider, select the external IdP you created earlier. For example, Google.
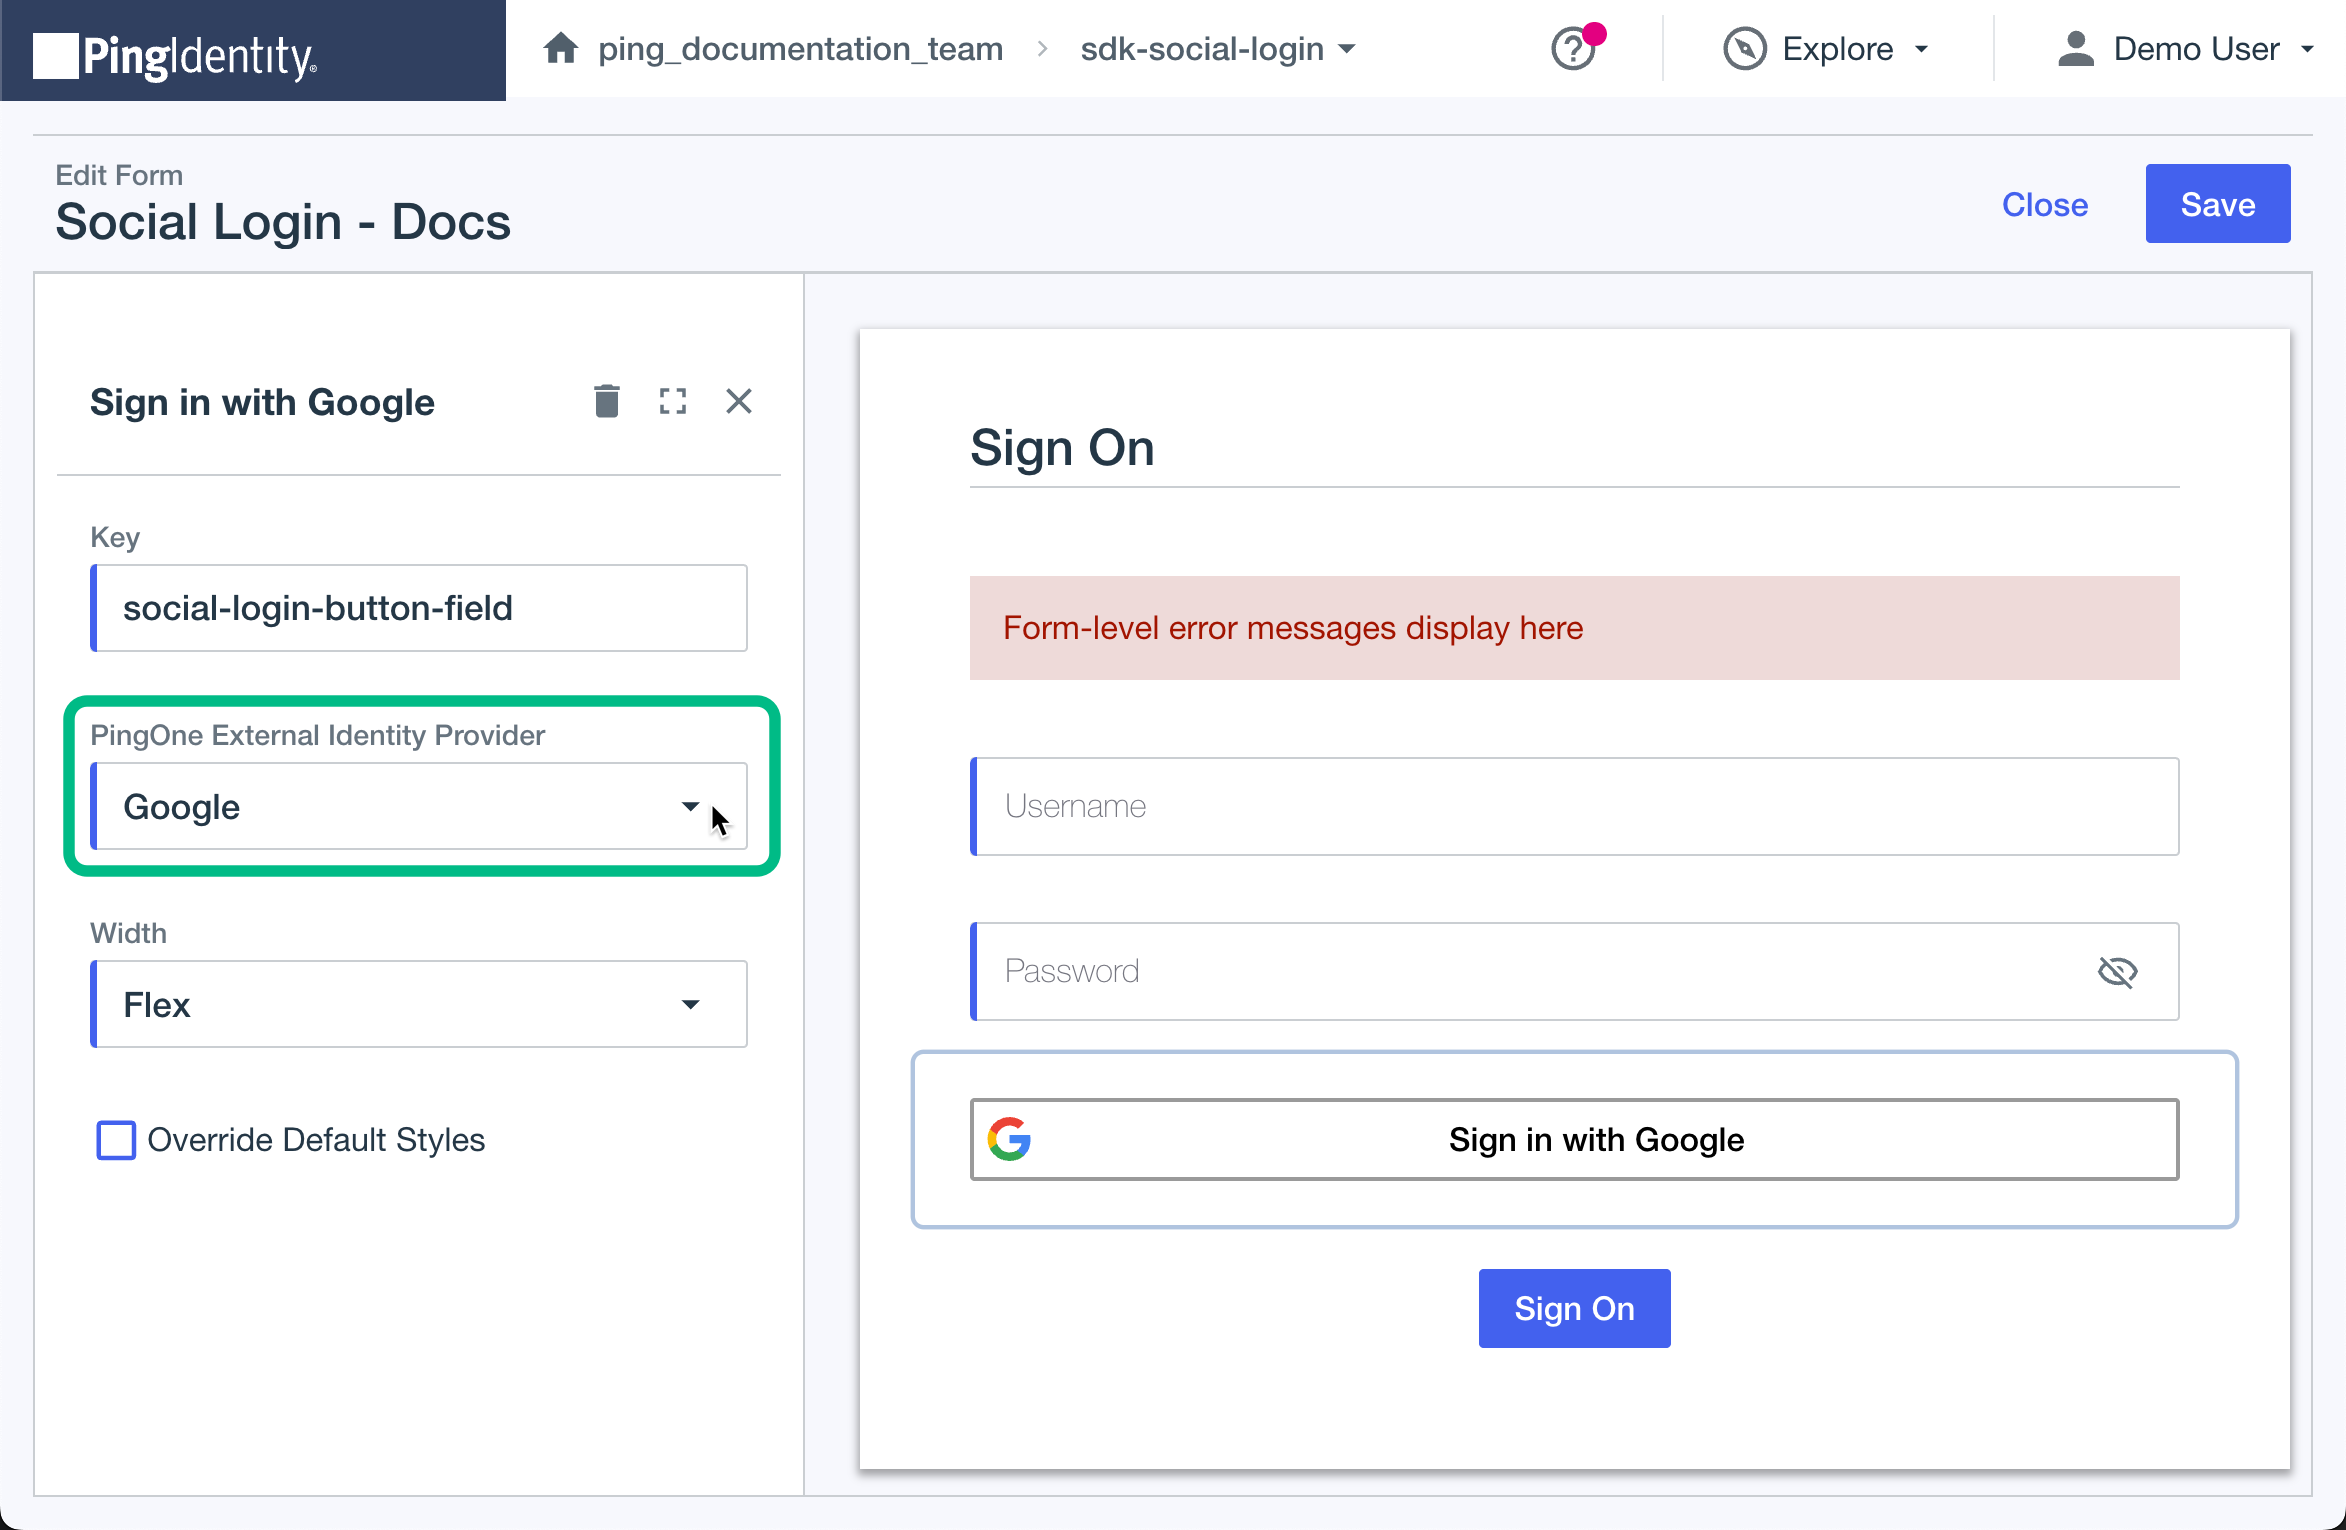 Figure 2. Configuring a Social Login field to use Google as the external IdP.
-
-
Save your changes.
Learn more in Creating a form in the PingOne documentation.
Adding a form to a DaVinci flow
When you have added your external identity providers to your form, you must now include it as part of your DaVinci flow.
-
Add the form you created for external IdPs to a flow by using the PingOne Forms connector.
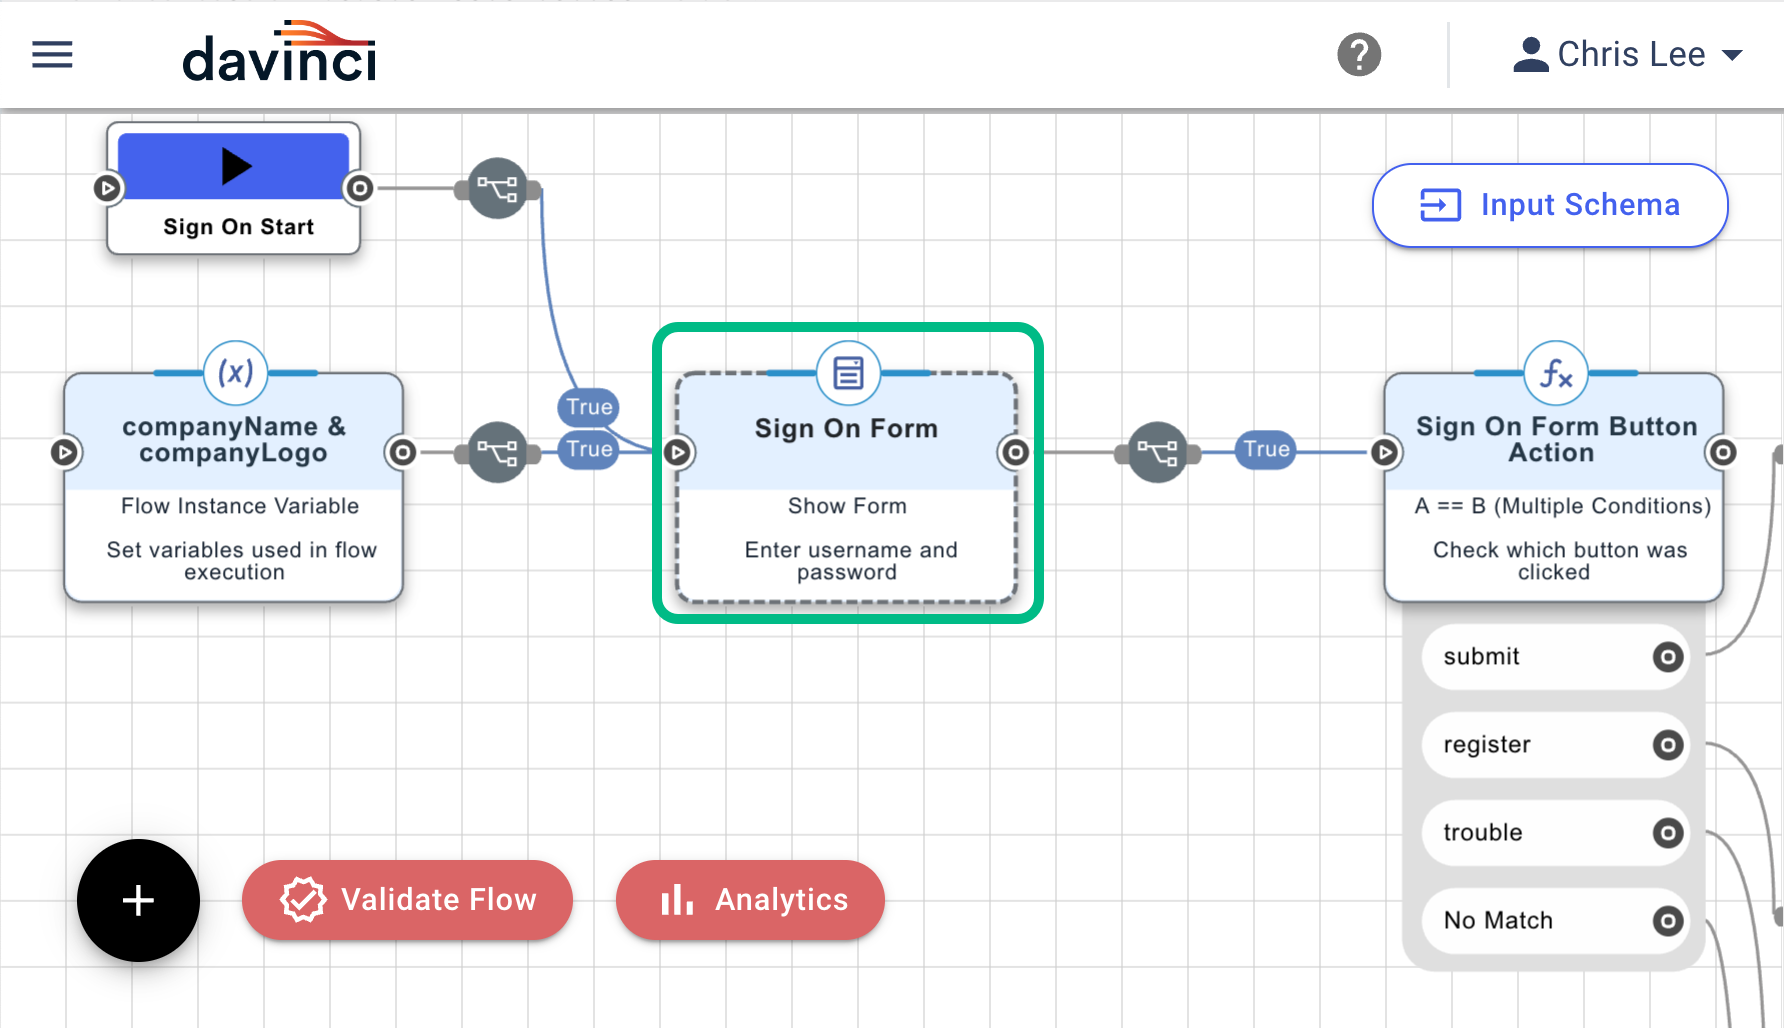 Figure 3. Example of a Forms Connector in a DaVinci flow.
 -
To ensure the server can redirect back to an Android or iOS mobile app you must add a custom URI scheme.
This is not required if you are only implementing a JavaScript client Select the PingOne Forms connector you just added, click the General tab, and in Application Return URL, enter a custom URI scheme for redirecting users to your client app after social sign-on.
If you are implementing Android or iOS clients for this tutorial, use
myapp://example.com.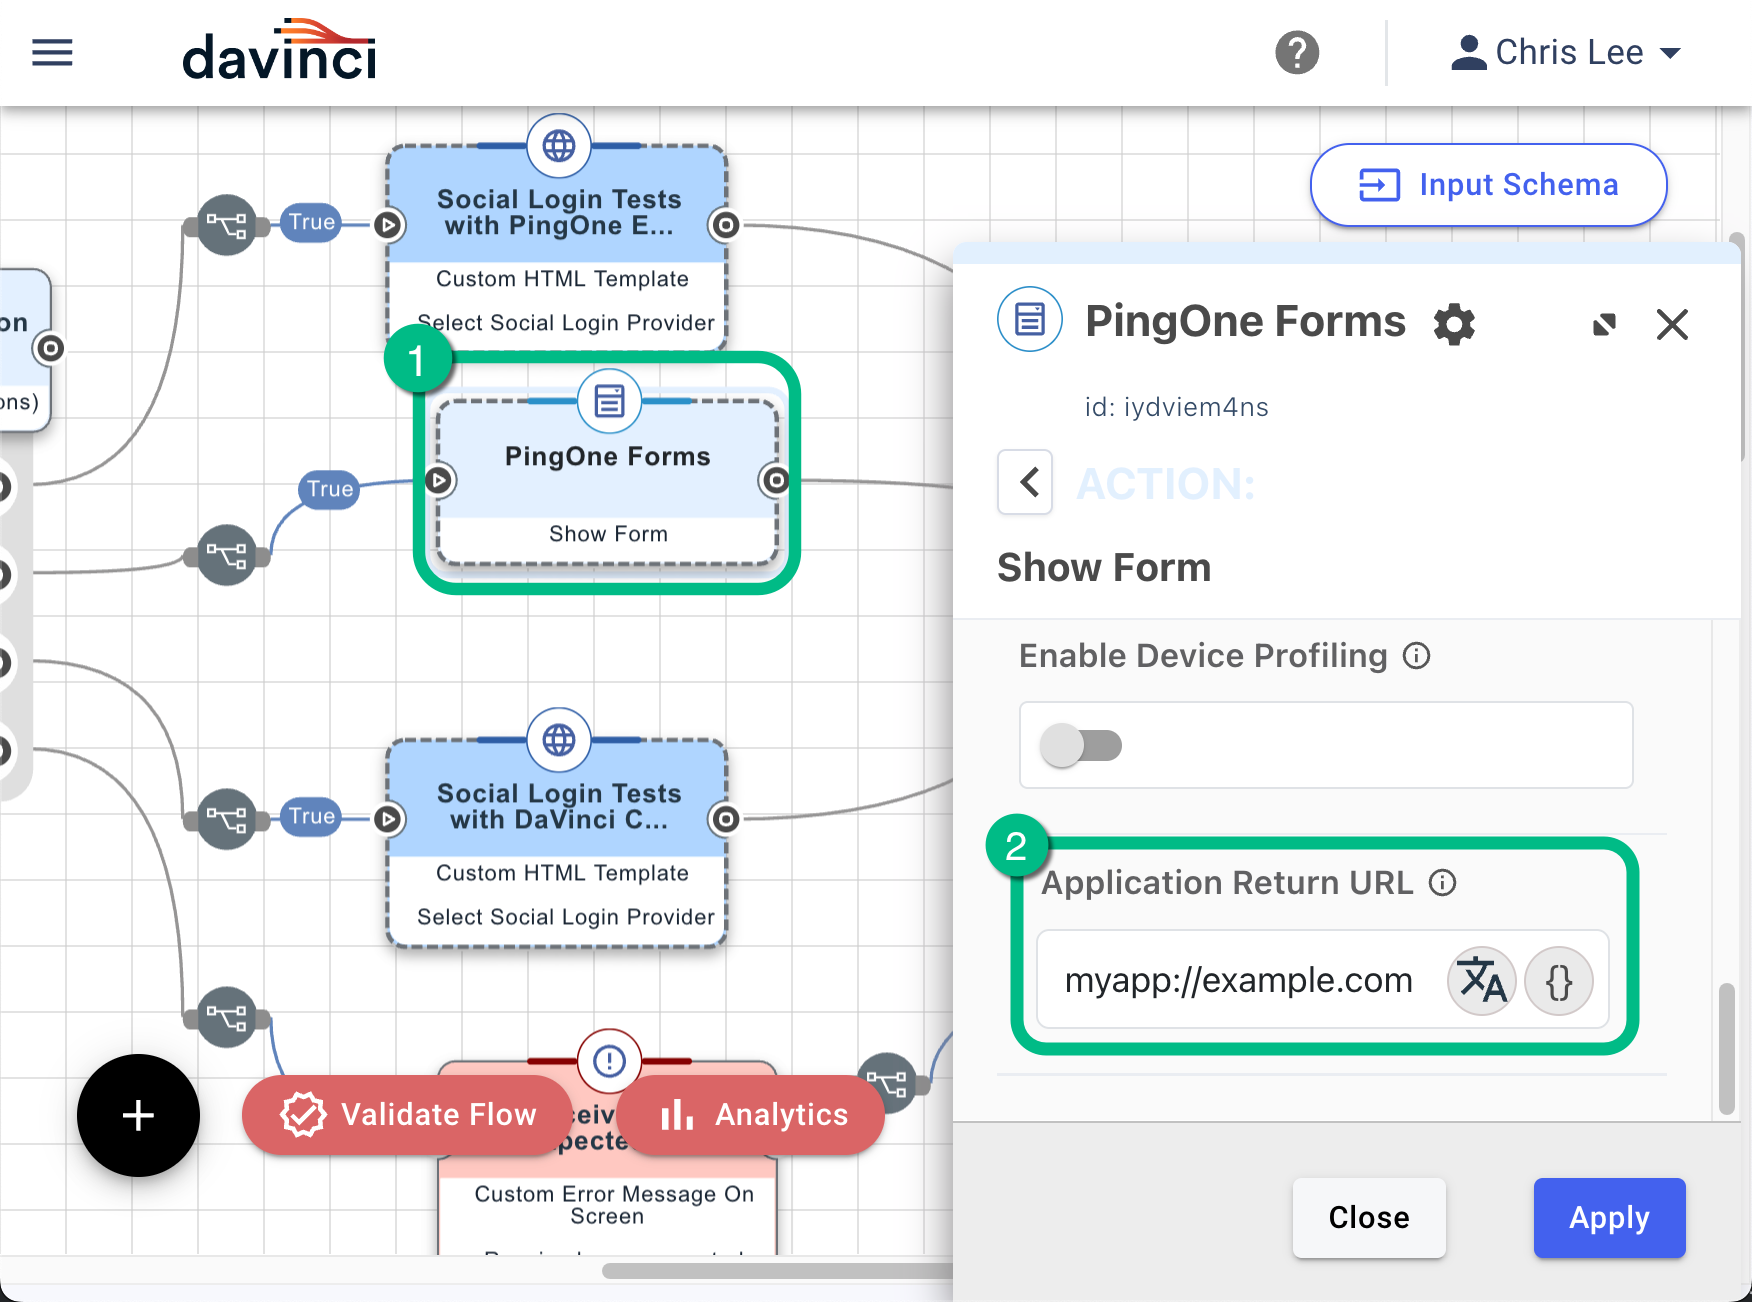 Figure 4. Configuring a return URL in the PingOne Form Connector.
 -
Apply your changes.
You can now proceed to Configuring a DaVinci flow to be launched by the Ping (ForgeRock) SDKs.
Option B: Configuring the HTTP Connector for social sign-on
This powerful and versatile connector lets you show custom HTML pages in your DaVinci orchestration flows.
|
You do not need to configure the HTTP Connector if you have chosen Option A. Configuring DaVinci Forms for social sign-on |
Complete the following steps to integrate external IdPs with PingOne by adding the HTTP Connector to a DaVinci flow.
Adding the HTTP Connector to a DaVinci flow
-
You must add the HTTP connector to your DaVinci flow so that it can display your custom HTML sign-on page.
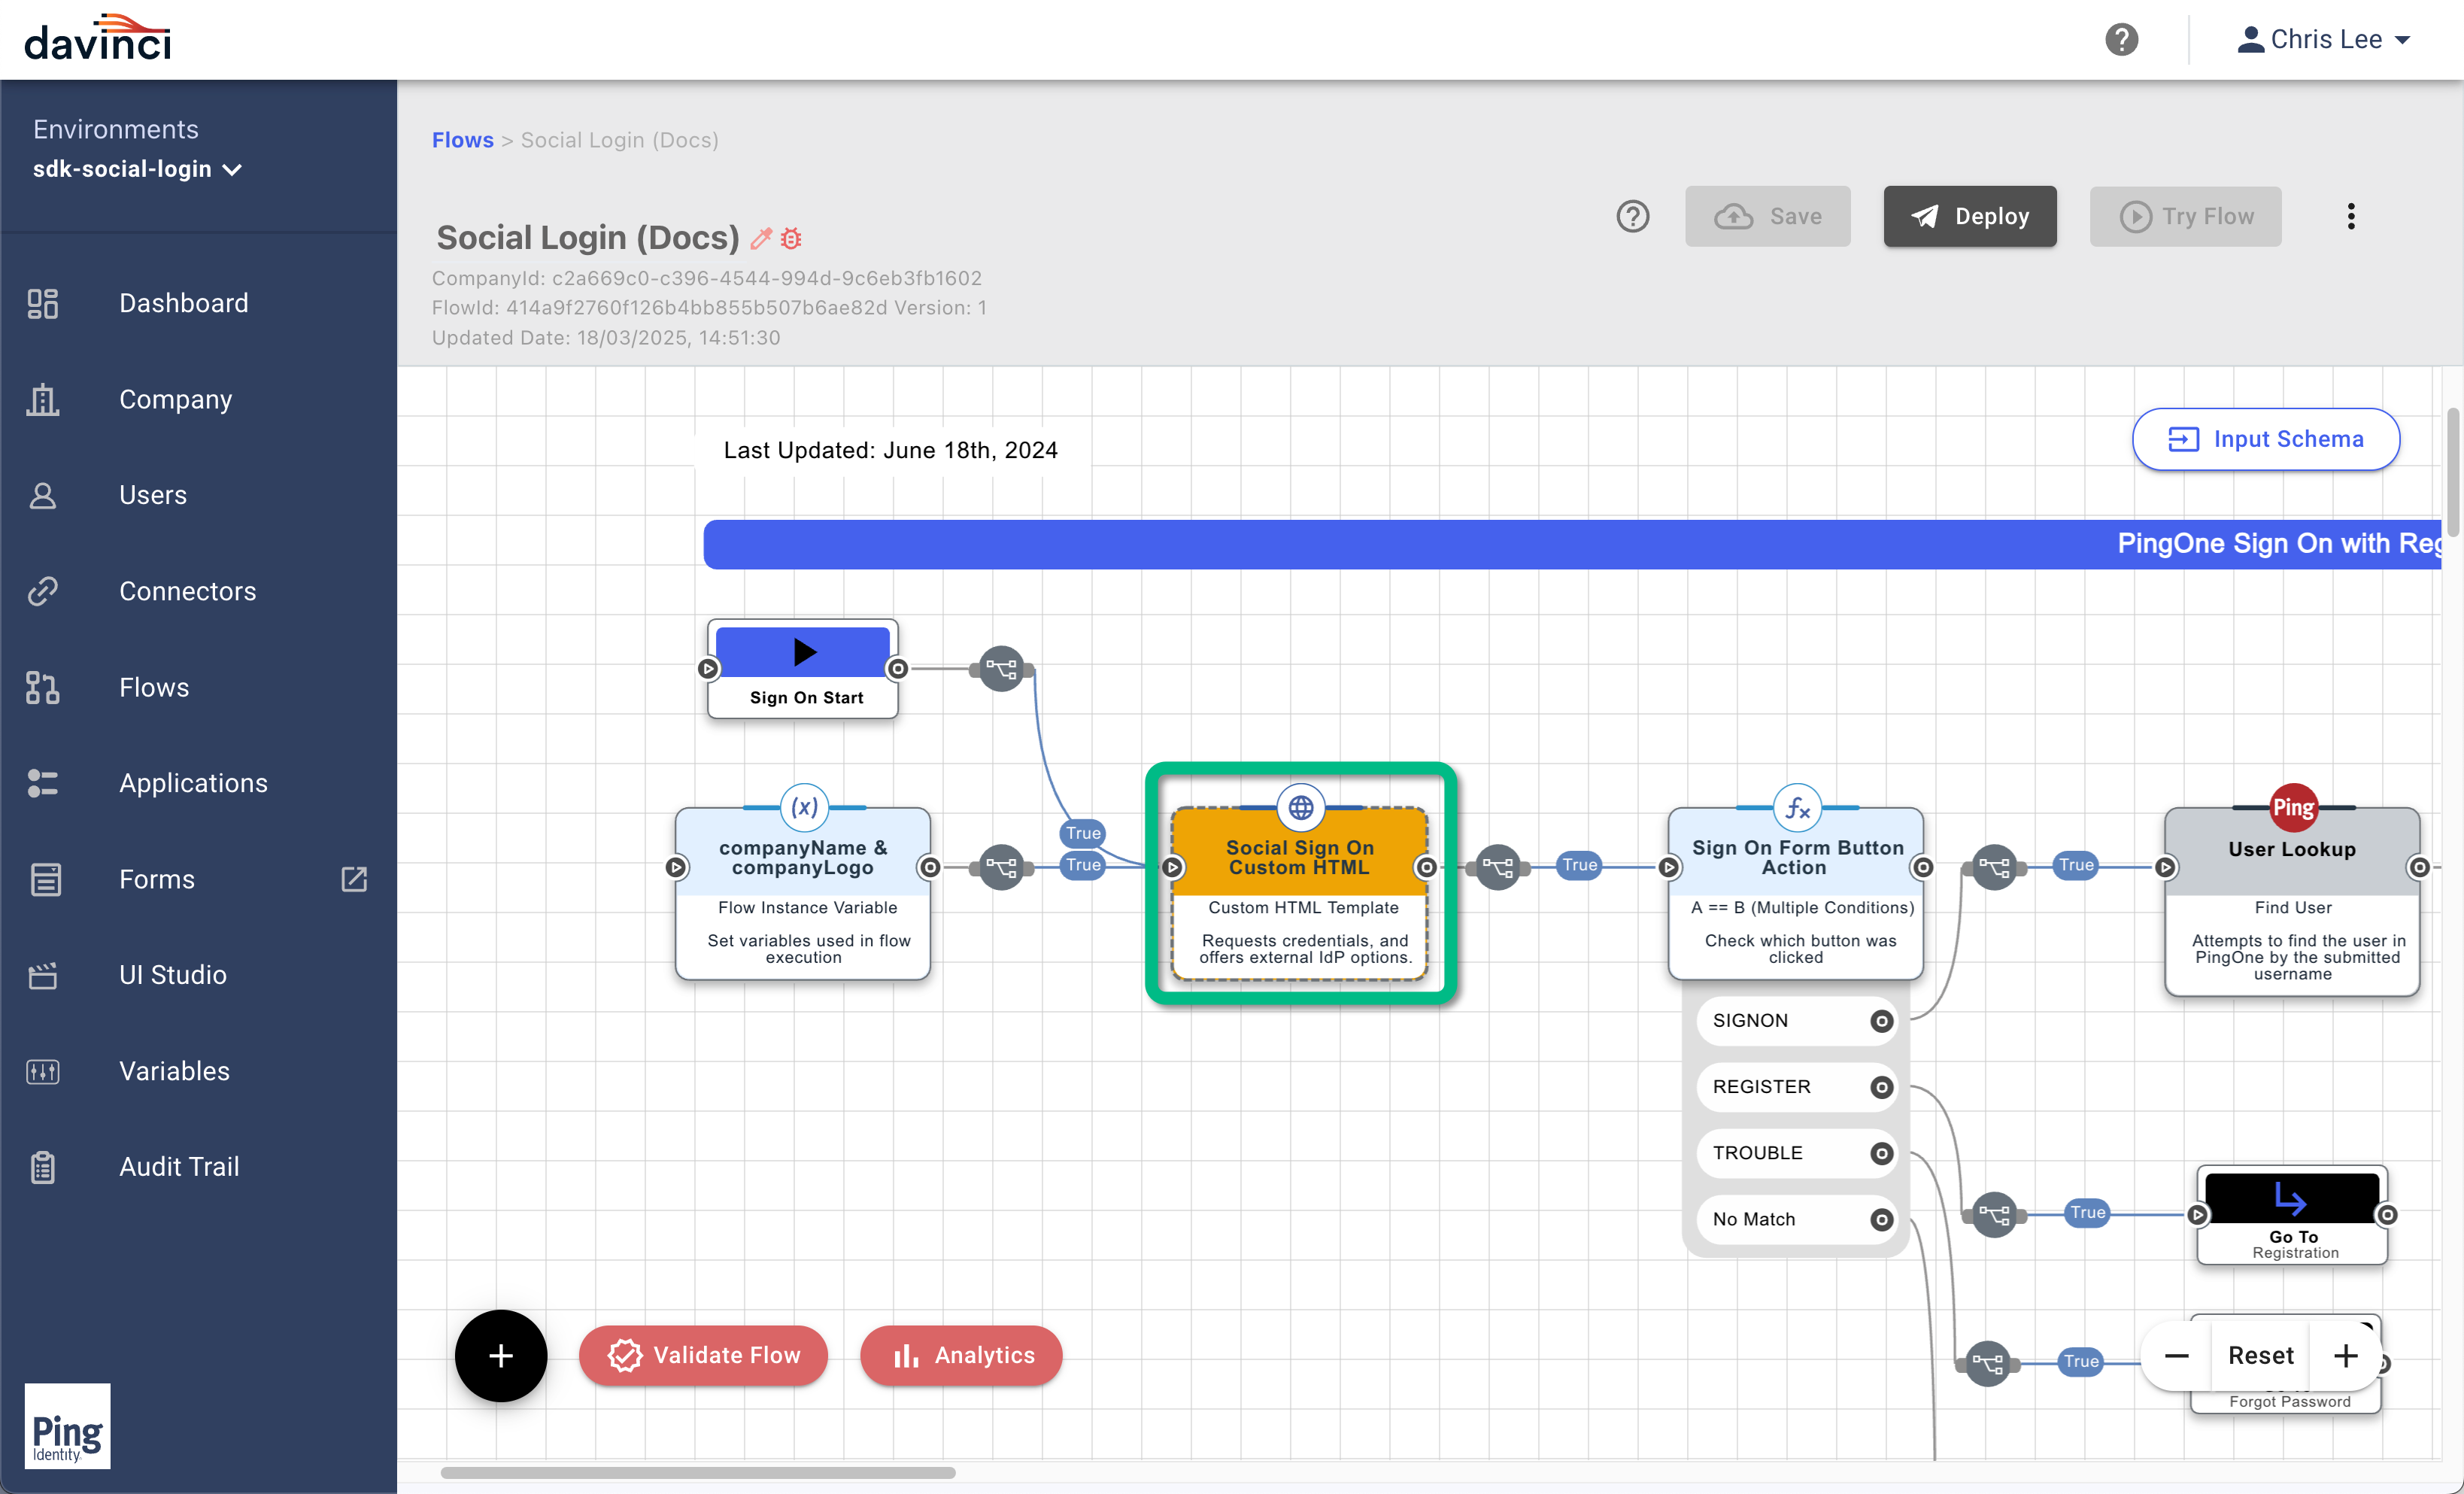 Figure 5. An HTTP connector added to a DaVinci flow.
To learn more, refer to Adding a connector.
Building a custom HTML sign-on page
With the HTTP Collector in place in the flow, you can now add custom HTML to display the sign-on page.
-
Select the HTTP Connector you added to your DaVinci flow, and add custom HTML to display a sign-on form.
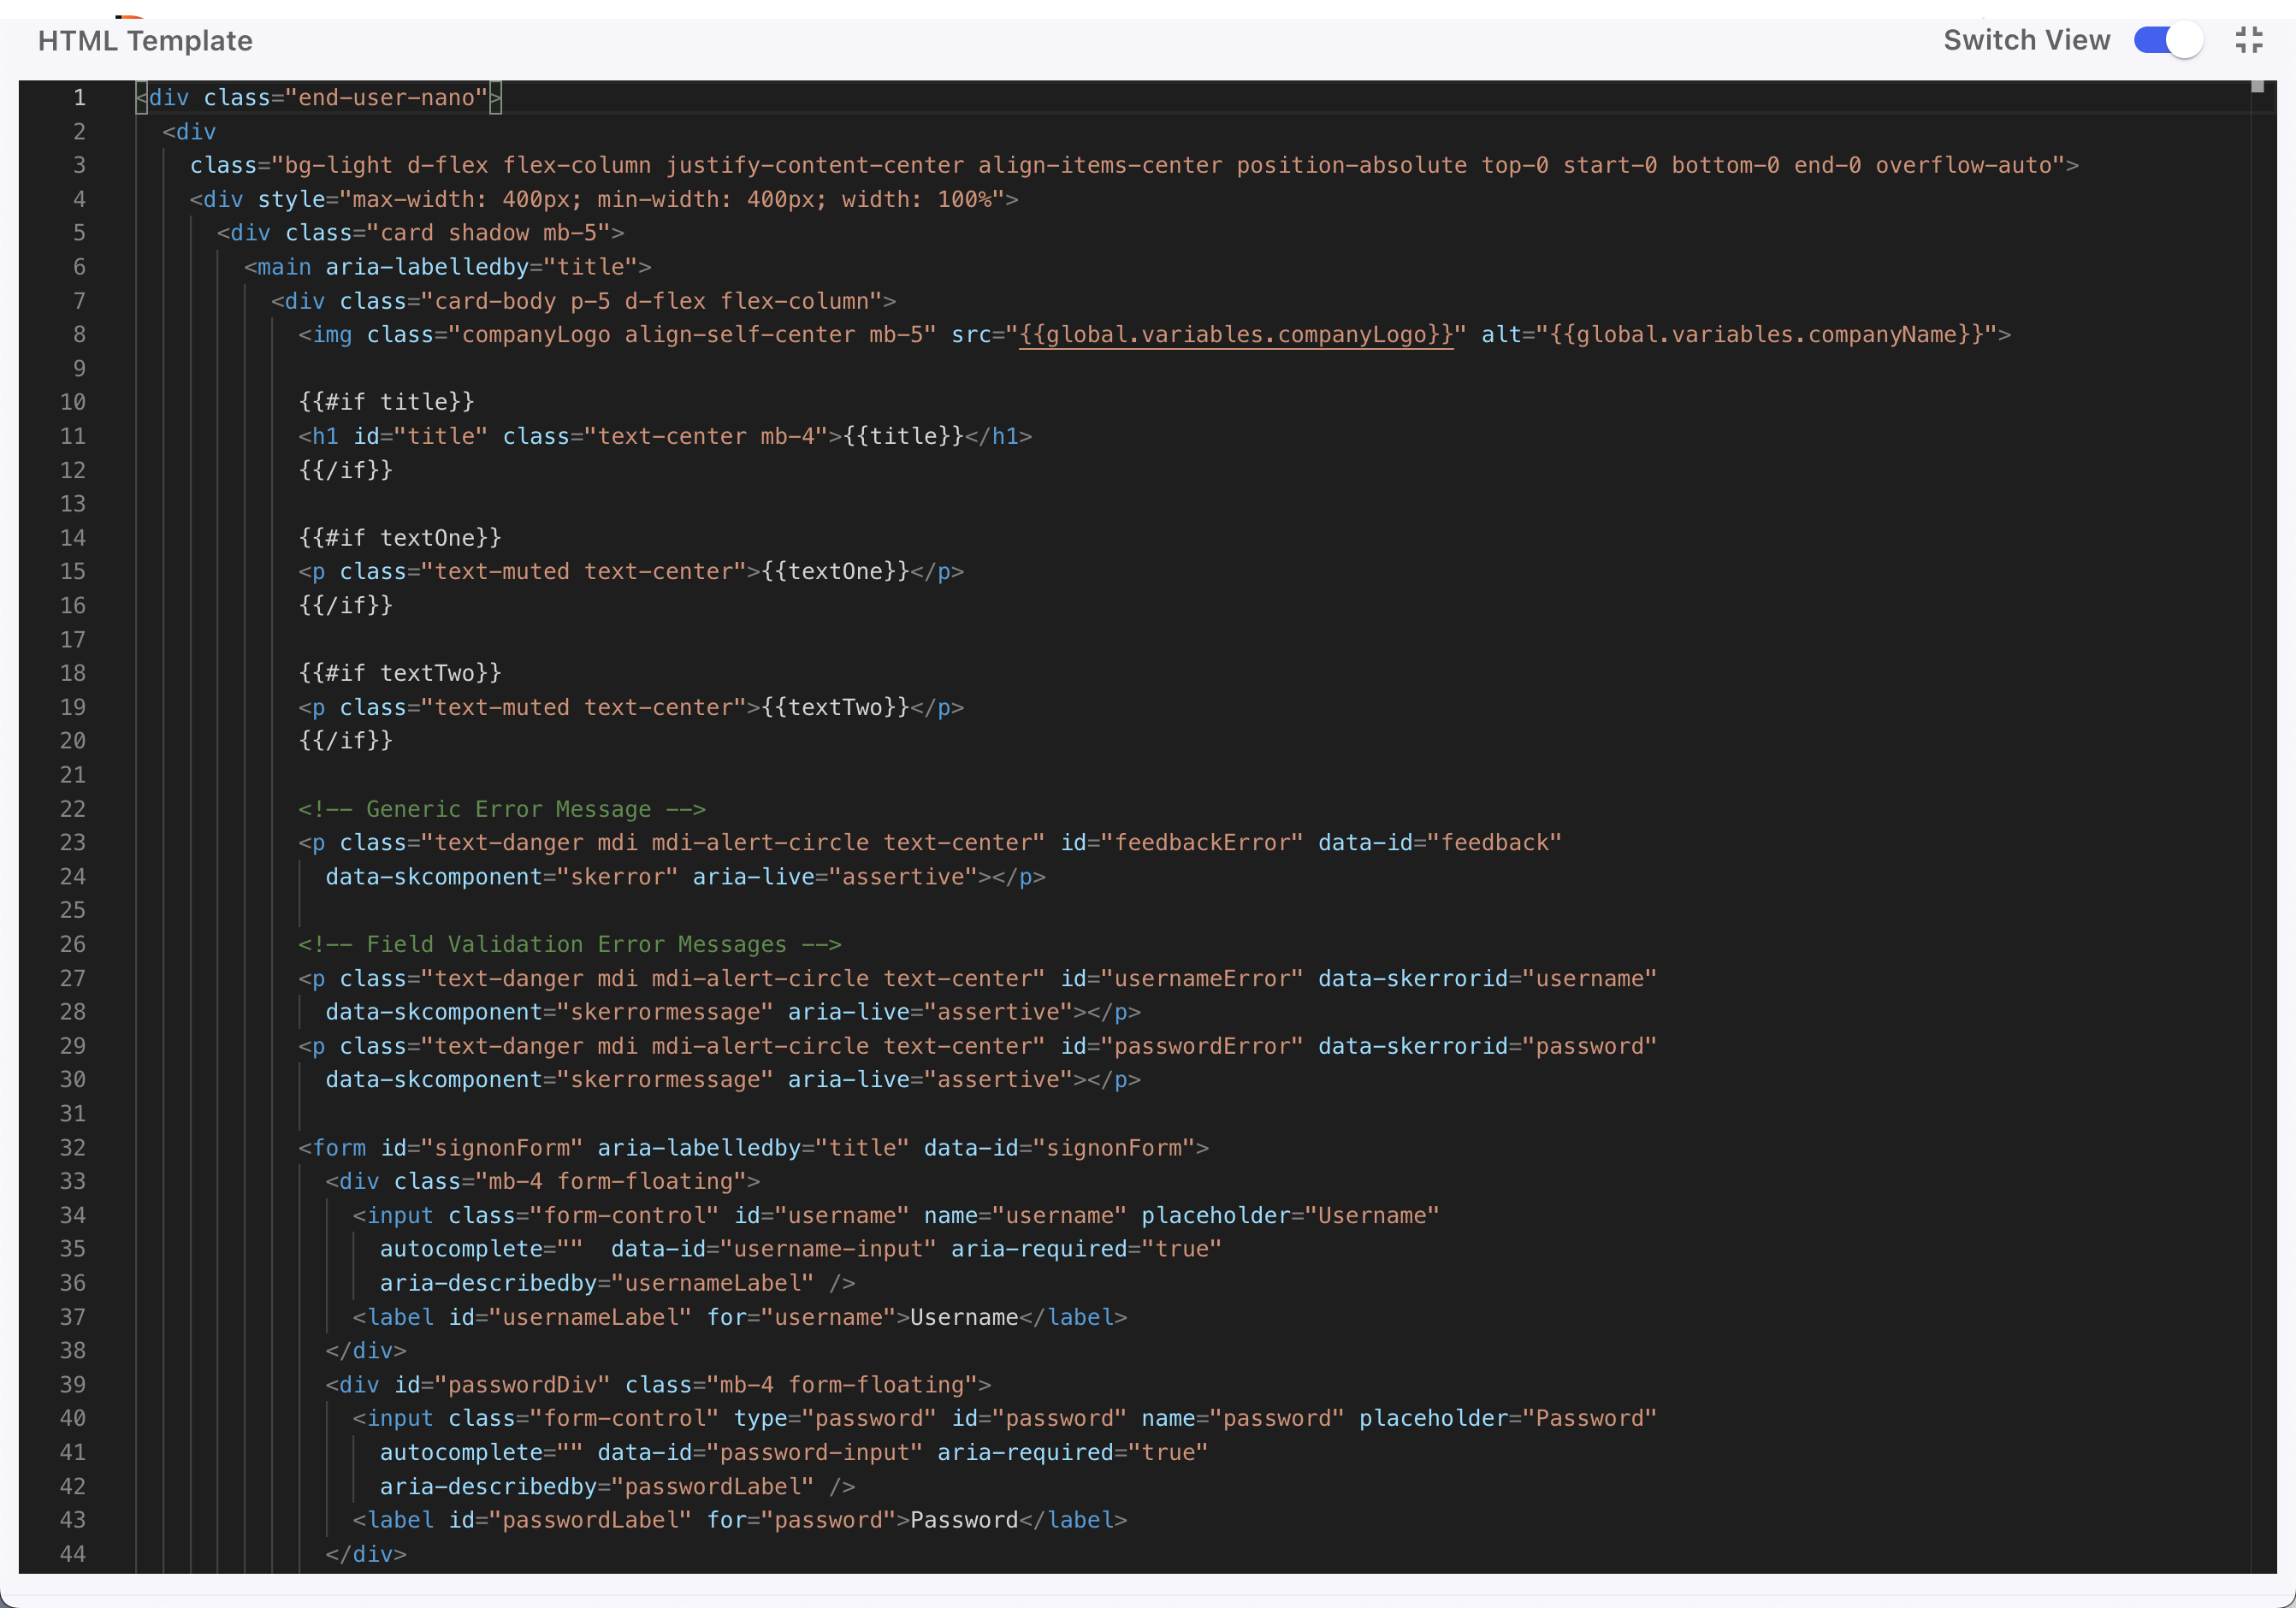 Figure 6. Example custom HTML form in an HTTP connector.
To learn more about adding custom HTML, refer to Building a custom page.
-
Add an skIDP component to your custom HTML for each external IdP option you want to display.
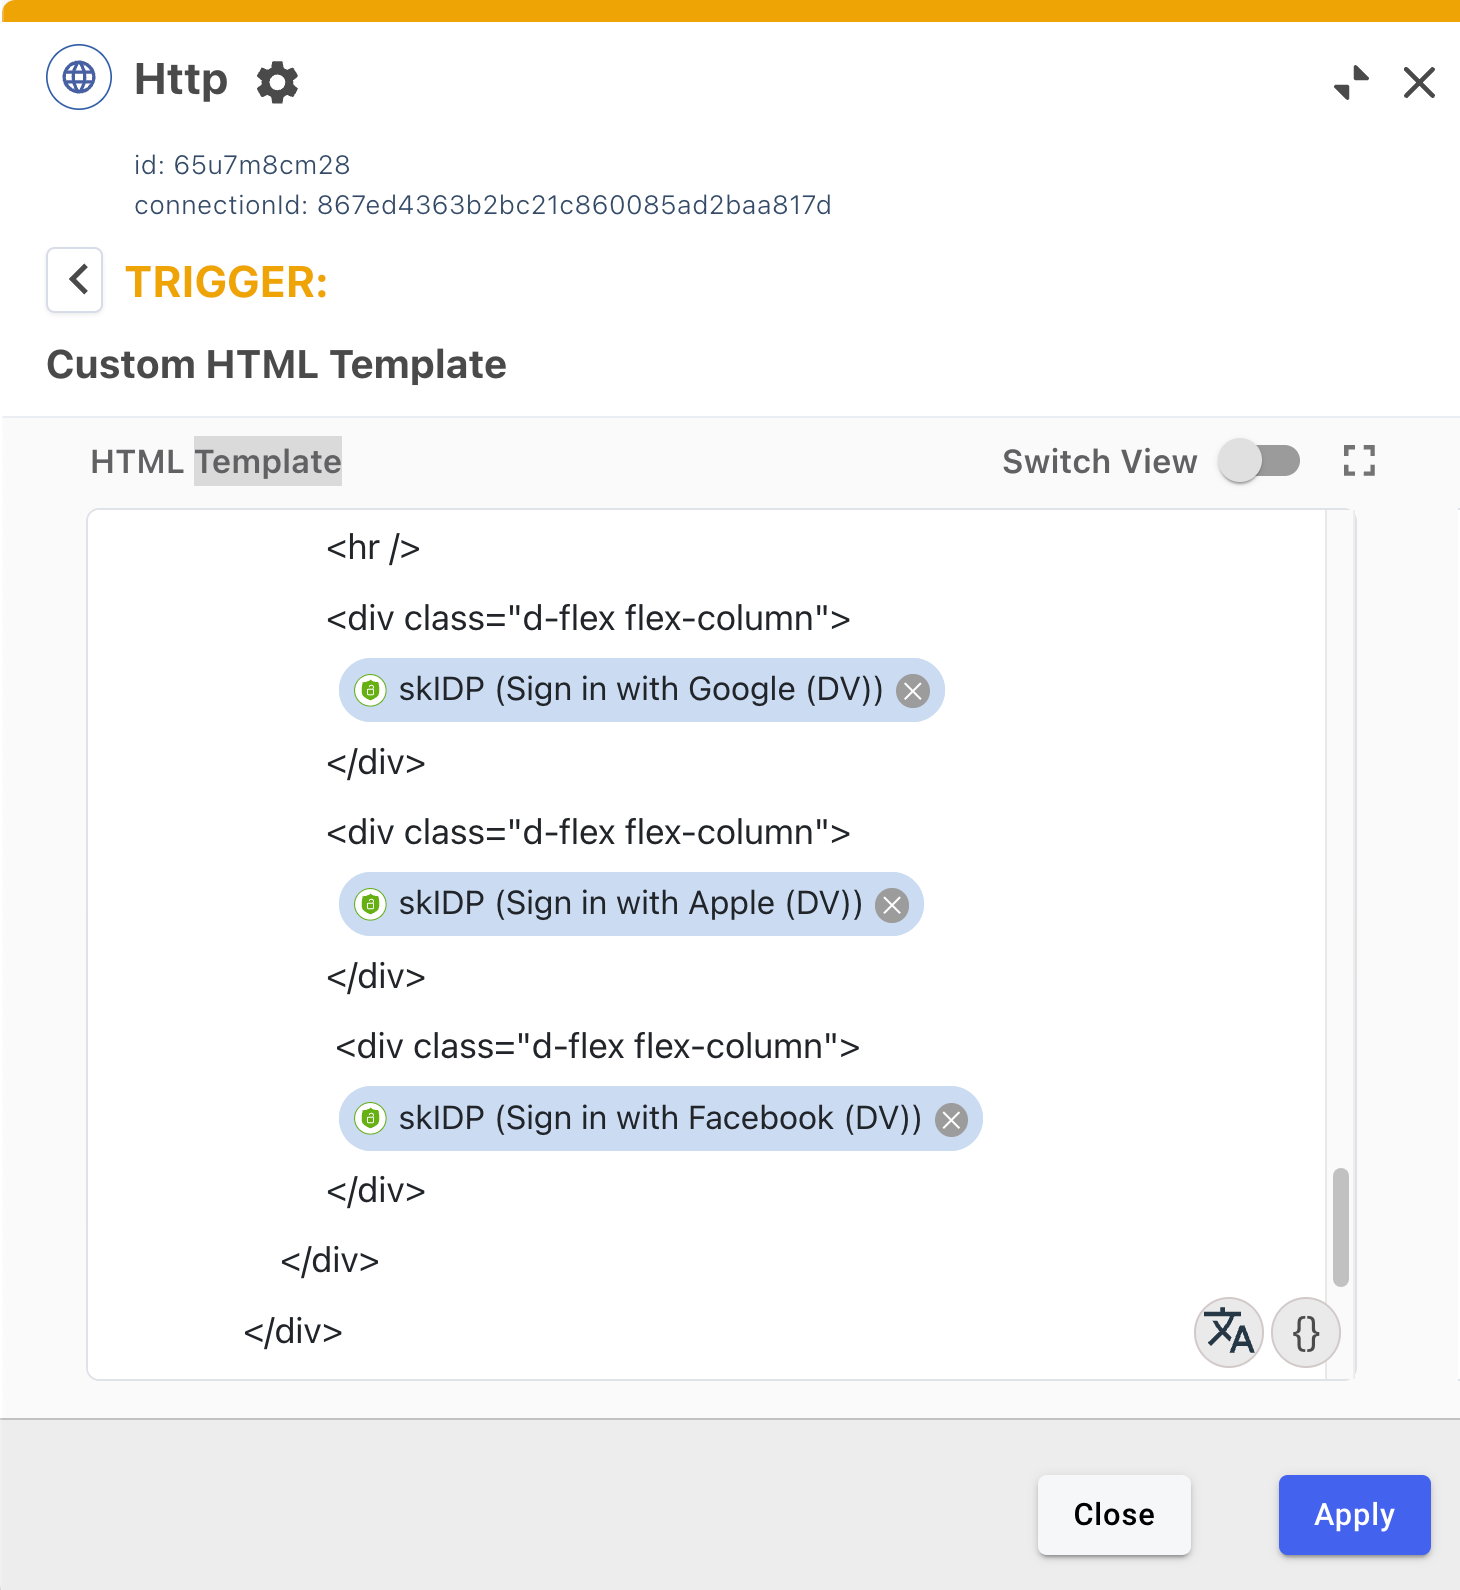 Figure 7. An HTTP connector with custom HTML showing three skIDP components.
To learn more, refer to Adding SK-Components to a connector.
-
Configure the skIDP component to use an external IdP:
-
In the HTML Template field, select an skIDP component to view the Update Component modal.
-
Select the Identity Provider tab.
-
In Identity Provider Connector, select
PingOne Authentication. -
In PingOne External Identity Provider, select one of the external IdPs you configured earlier.
-
Enable Link with PingOne User.
Failure to enable this option causes errors when attempting to use the flow with the Ping (ForgeRock) SDKs.
-
To ensure the server can redirect back to an Android or iOS mobile app you must add a custom URI scheme.
This is not required if you are only implementing a JavaScript client In Application Return to Url, enter a custom URI scheme for redirecting users to your client app after social sign-on.
If you are implementing Android or iOS clients for this tutorial, use
myapp://example.com.
The result will resemble the following:
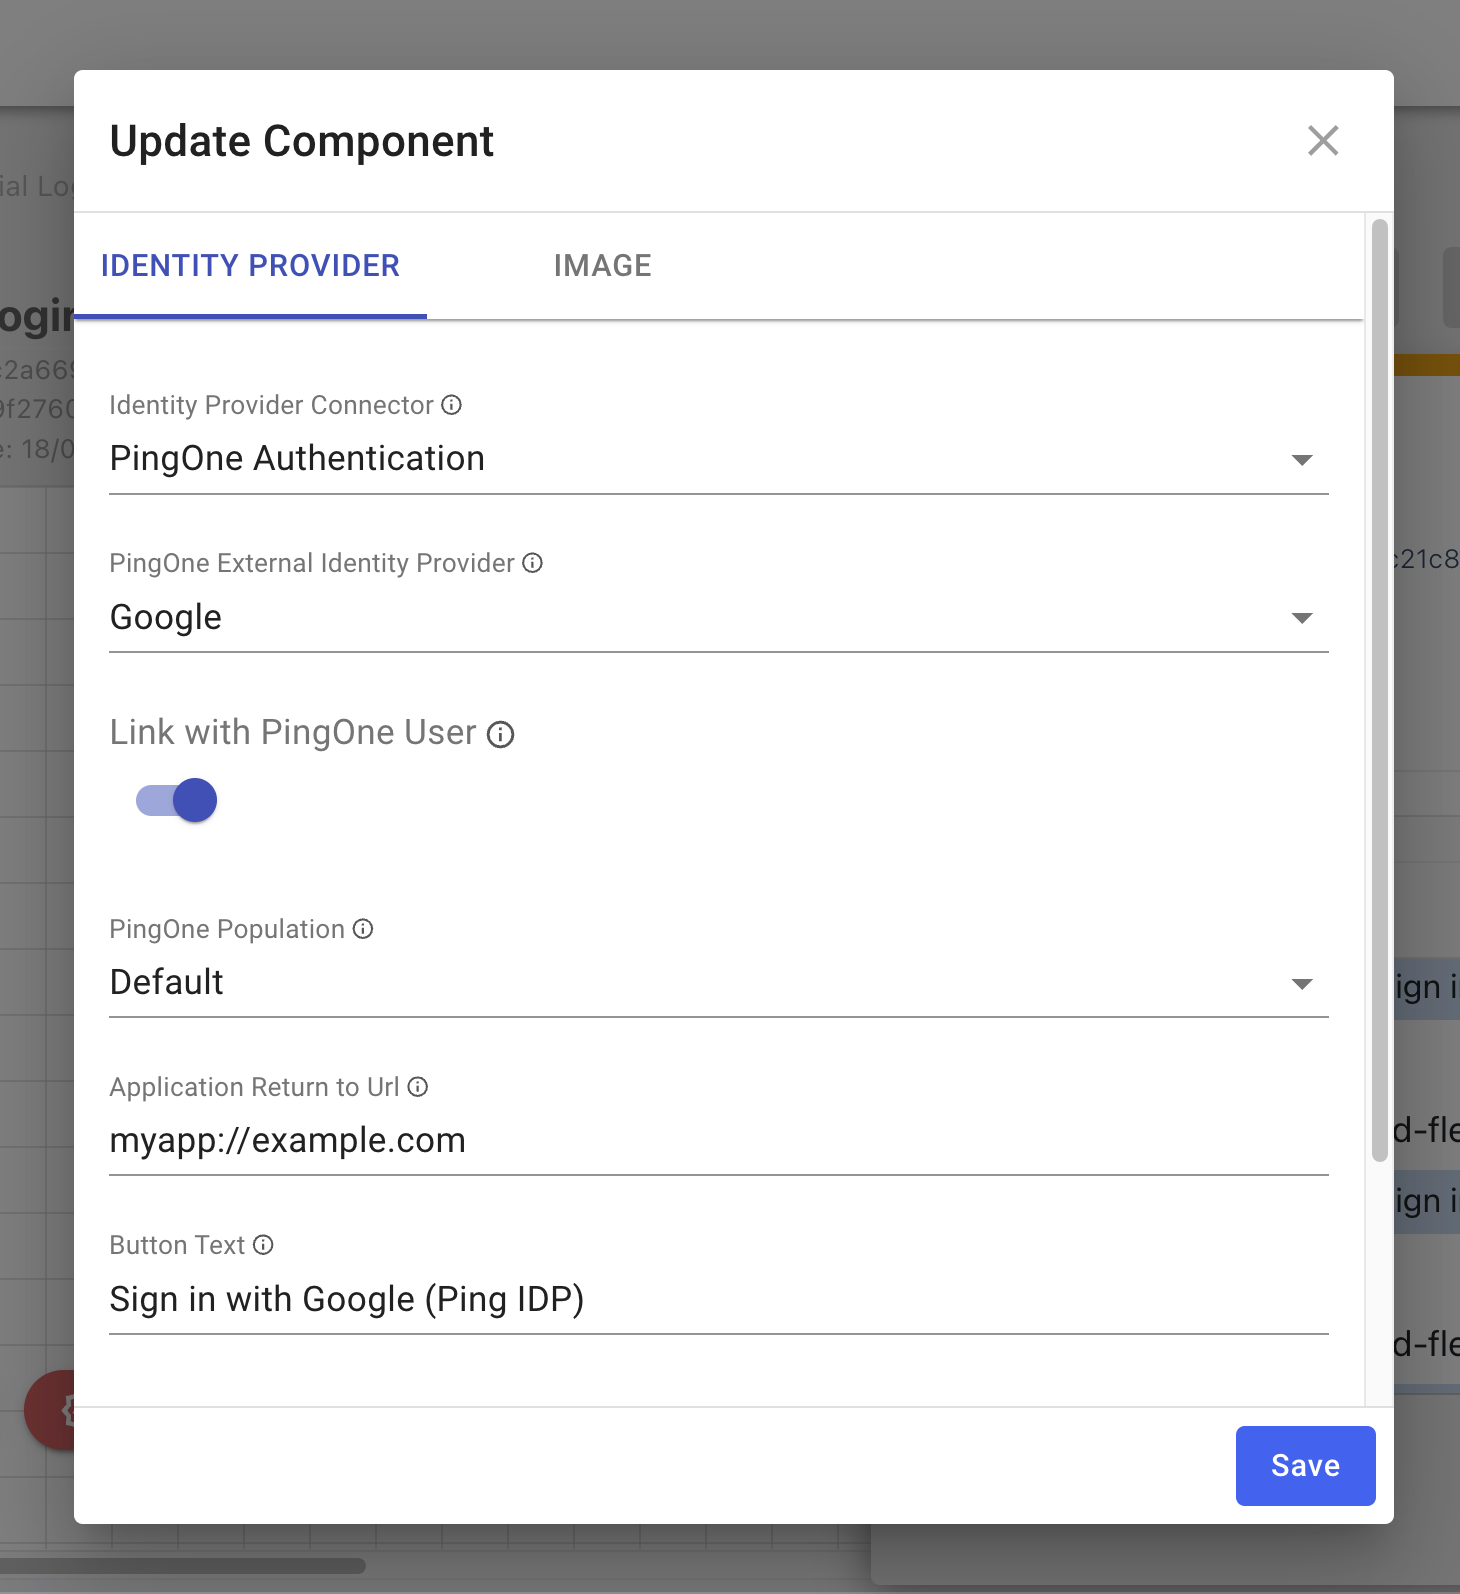 Figure 8. Configuring an skIDP component in an HTTP connector.
 -
-
Save your changes.
You can now proceed to Configuring a DaVinci flow to be launched by the Ping (ForgeRock) SDKs.
Configuring a DaVinci flow to be launched by the Ping (ForgeRock) SDKs
Now that your DaVinci flow is configured to display your selected external IdPs you must configure PingOne so that you can launch the flow by using the Ping (ForgeRock) SDKs.
This involves performing the following high-level steps:
-
Checking that your DaVinci flow uses only compatible connectors and fields.
-
Creating an application in DaVinci to connect PingOne to the DaVinci flow.
-
Creating an application in PingOne that the Ping (ForgeRock) SDKs can connect to and access the DaVinci application and its PingOne Flow Policy.
Complete the steps in Launching a flow with a Ping SDK in the DaVinci documentation.
|
Configuring redirects to JavaScript client apps
If you are developing a JavaScript client application you must configure the application you create in PingOne to redirect users back to your app after authentication. In the application you created in PingOne, configure the Redirect URIs field on the Configuration tab with the URL of your JavaScript client app. 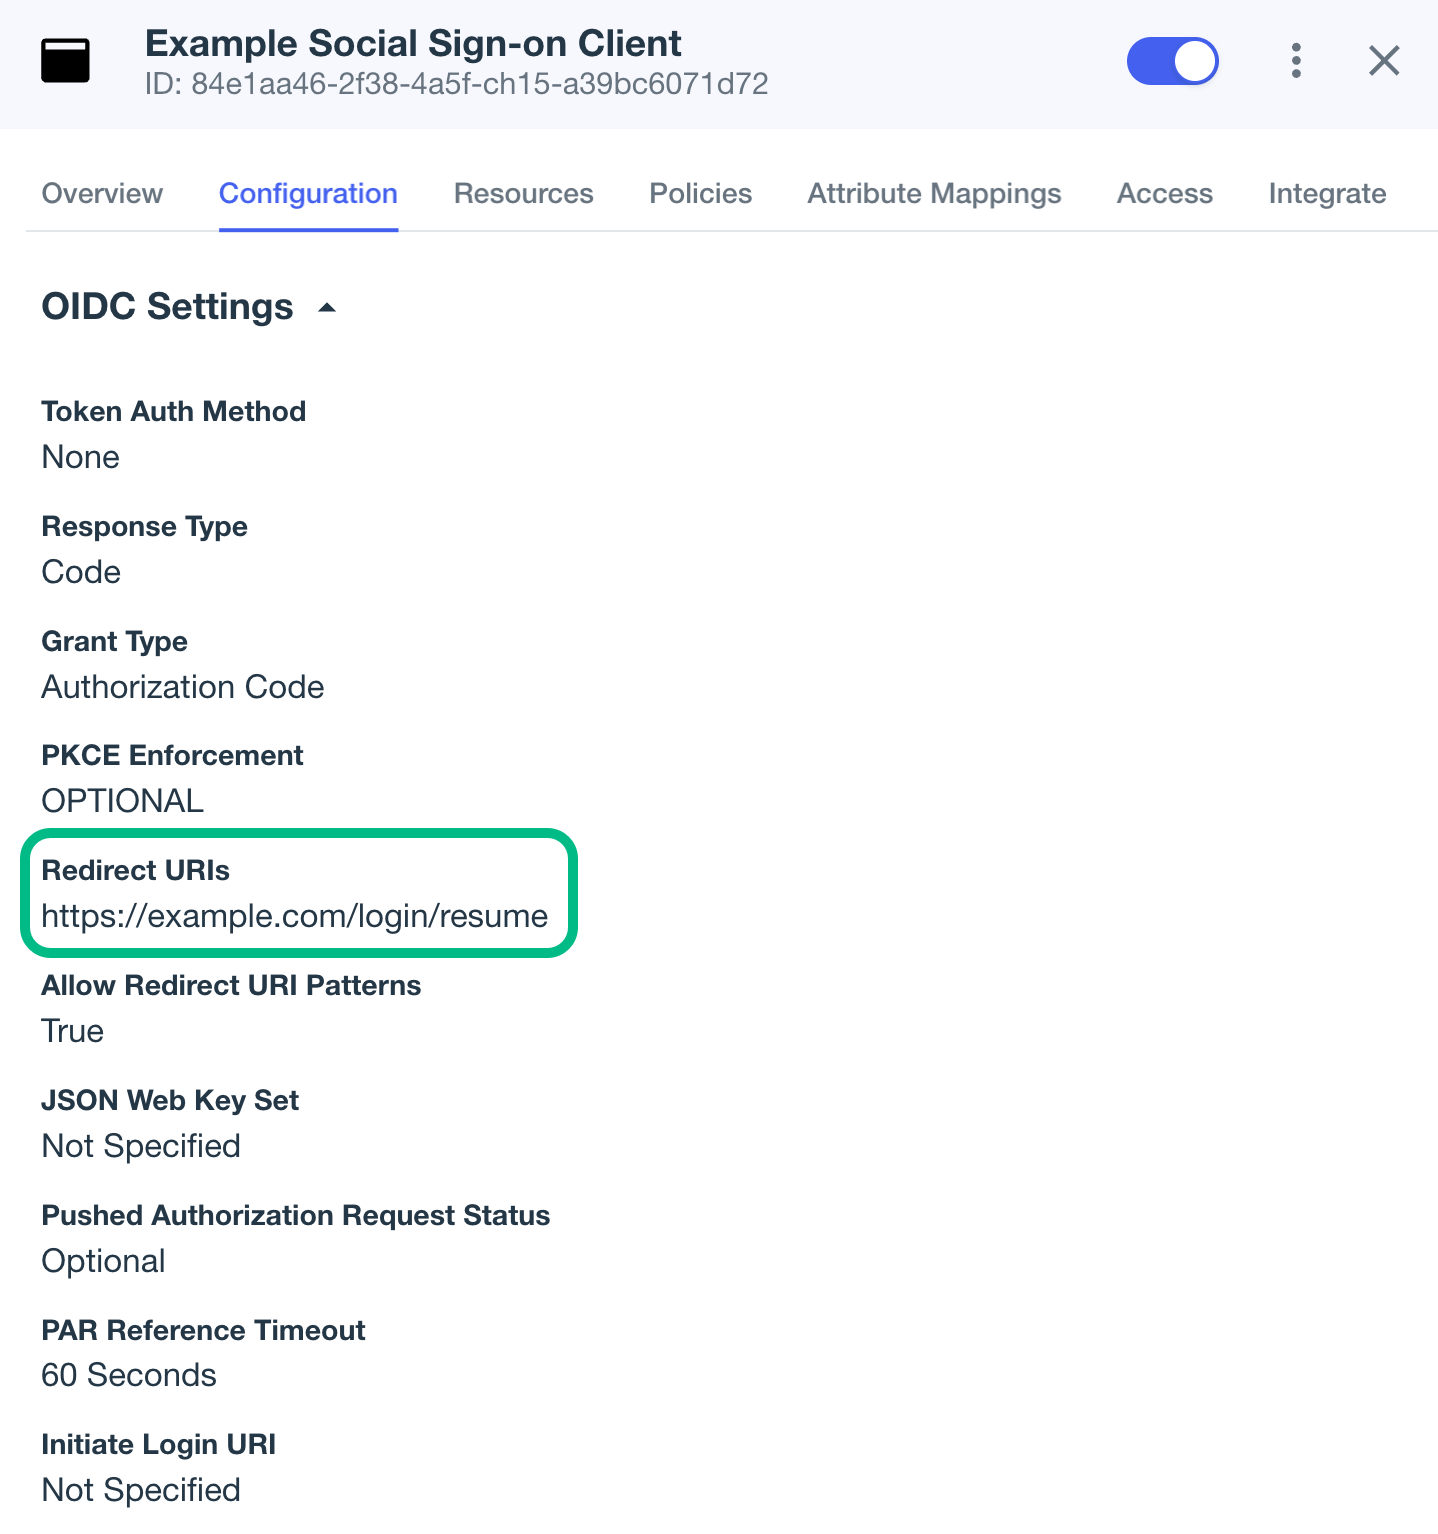
Figure 9. Configuring redirect URIs in PingOne
We recommend your app has a dedicated route to handle users returning from an external IdP. For example, This helps to prevent redirect loops in your apps, and makes handling social sign-on simpler. |
Next Steps
In this section you completed the following tasks:
-
Added client credentials in your IdPs so that your app and server can connect
-
Configured PingOne with the details of the client credentials you created in the IdPs
-
Added relevant IdP nodes to a DaVinci flow
-
If you are developing an Android or iOS app, you added redirect URI values to the flow to return users after authentication.
-
-
Created an application in PingOne so that the Ping (ForgeRock) SDKs can connect
-
If you are developing a JavaScript app, you added redirect URI values to this application to return users after authentication.
-
You can now proceed to configuring your client apps to step through the DaVinci flows and perform social sign-on: