[Optional] Step 4. Configuring your app to use native SDK libraries
Optionally, you can use an IdP’s native SDK libraries to handle social sign-on directly rather than redirecting the user in a web browser.
This can provide a smoother, more integrated experience for your users than the redirect method.
|
If an IdP’s native SDK libraries are not included in your app then the Ping (ForgeRock) SDKs fall back to use a browser redirect for social sign-on. |
The Ping (ForgeRock) SDK for Android supports implementing the following native libraries:
Implementing the Facebook native sign-in SDK
To use Facebook’s native SDK in your Android app, you must complete the following tasks:
Step 1. Add Facebook SDK for Android dependencies
-
In addition to the Ping (ForgeRock) SDKs dependencies, add Facebook’s SDK library to the
dependenciessection of yourbuild.gradle.ktsfile:// Facebook native sign-on SDK for Android implementation("com.facebook.android:facebook-login:18.0.3")
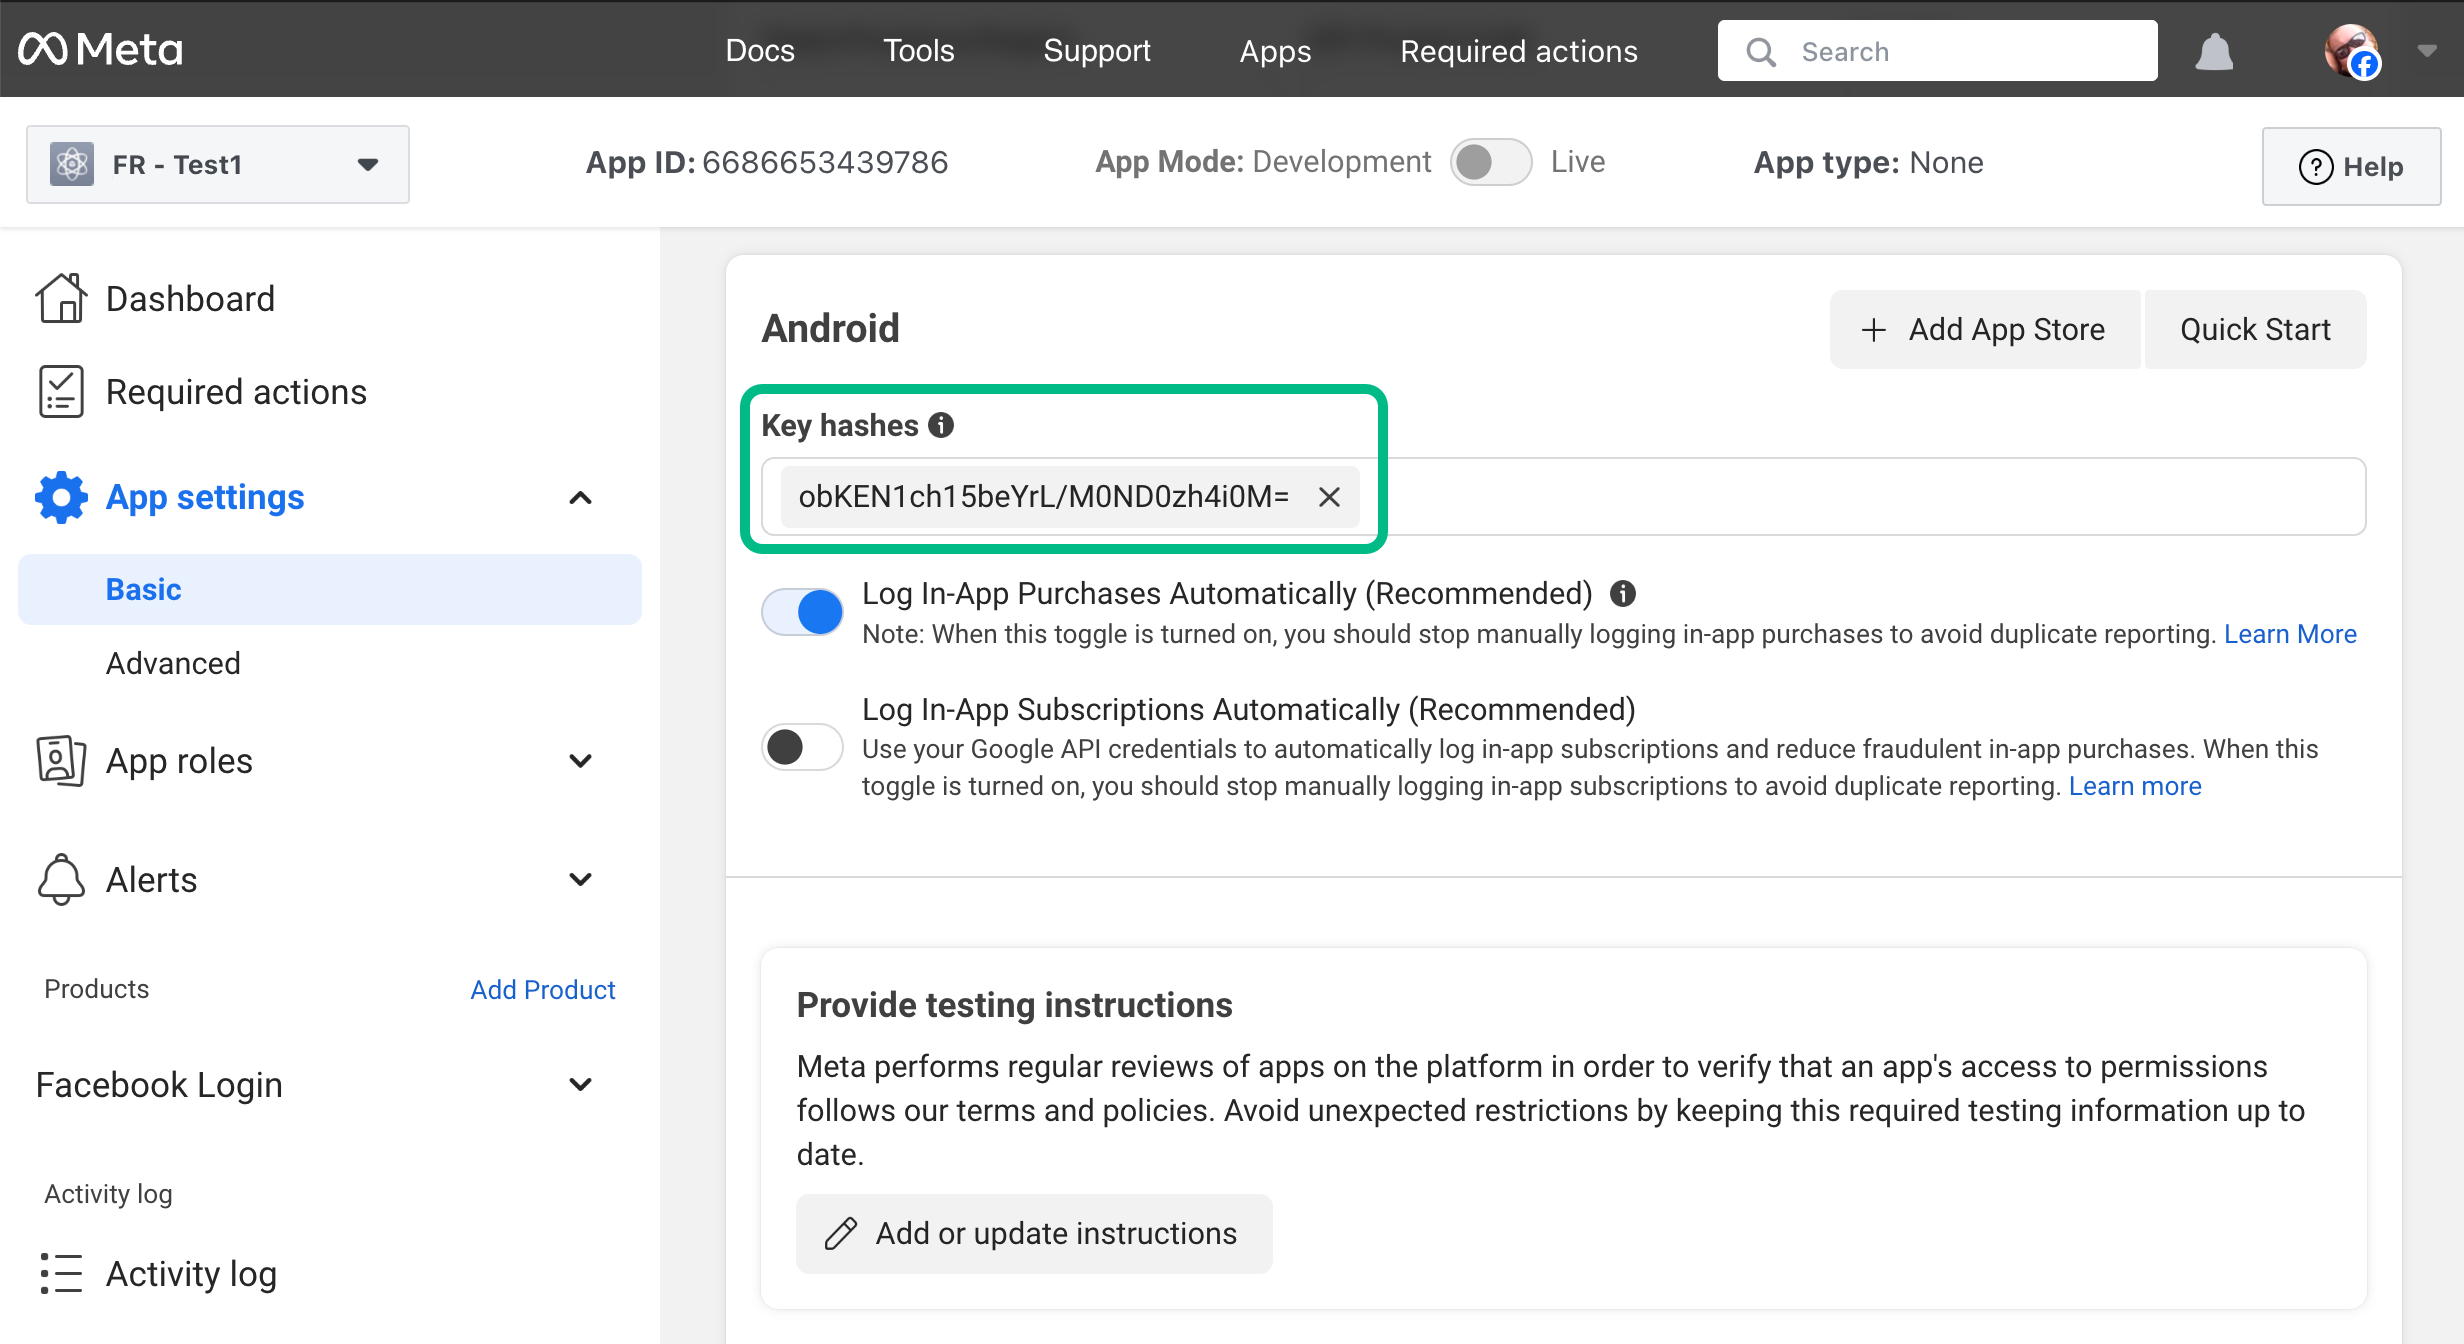
Step 2. Update your Facebook App ID with Android certificate fingerprints
You need to associate your Android app with your Facebook App ID. You can update your existing Facebook App ID in the Meta Developer console by adding the certificate fingerprints of your signing certificates.
-
In the Meta for Developers console, select your app, and then navigate to App Settings > Basic.
-
In the Android section, in the certificate fingerprints field, enter the 28-character hash of your project’s signing certificates.
You should add both debug and production hashes.
If you self-sign your app, use the following command in a terminal window in the root of your Android project to generate the hash:
keytool -exportcert -alias key-alias -keystore path-to-debug-or-production-keystore | openssl sha1 -binary | openssl base64You can get the values for key-alias and path-to-debug-or-production-keystore from the
signingConfigsobject in your project’sbuild.gradle.ktsfile:signingConfigs { getByName("debug") { storeFile = file("../debug.jks") storePassword = "android" keyAlias = "androiddebugkey" keyPassword = "android" } }The result will resemble the following:
Learn more in Create a Development Key Hash and Create a Release Key Hash in the Facebook SDK for Android documentation.
Step 3. Update your Android app with Facebook App ID details
-
In Android Studio, open your
/app/src/main/AndroidManifest.xmlfile, and add the following within the<application>element:<meta-data android:name="com.facebook.sdk.ApplicationId" android:value="{{app_id}}" /> <meta-data android:name="com.facebook.sdk.ClientToken" android:value="{{client_token}}" /> <activity android:name="com.facebook.CustomTabActivity" android:exported="true"> <intent-filter> <action android:name="android.intent.action.VIEW"/> <category android:name="android.intent.category.DEFAULT"/> <category android:name="android.intent.category.BROWSABLE"/> <data android:scheme="{{redirect_uri}}"/> </intent-filter> </activity>Replace the placeholders with values from the application you created in the Meta Developer site.
- {{app_id}}
-
Click the App ID label in the header bar of the Meta Developer site for your app to copy the value.
Add your application ID to both the
facebook_app_idandfb_login_protocol_schemeproperties. - {{client_token}}
-
In the Meta Developer site for your app, navigate to App Settings > Advanced > Security, and copy the Client token value.
Do not use the App secret value found in App settings > Basic in your client applications.
- {{redirect_uri}}
-
Click the App ID label in the header bar of the Meta Developer site for your app to copy the value.
Prefix the value with the string
fbto create the custom URI Facebook uses to redirect users to your Android app.For example,
fb1085352047332439
The result resembles the following:
<manifest>
  <application>
    ...
    <meta-data
        android:name="com.facebook.sdk.ApplicationId"
        android:value="1085352047332439" />
    <meta-data
        android:name="com.facebook.sdk.ClientToken"
        android:value="3399464ch1515ace3c9782ad1fbeef101" />

    <activity
            android:name="com.facebook.CustomTabActivity"
            android:exported="true">
        <intent-filter>
            <action android:name="android.intent.action.VIEW"/>
            <category android:name="android.intent.category.DEFAULT"/>
            <category android:name="android.intent.category.BROWSABLE"/>
            <data android:scheme="fb1085352047332439"/>
        </intent-filter>
    </activity>
    ...
  </application>
</manifest>
Learn more in Facebook Login for Android - Quickstart in the Meta Developers documentation.
Implementing the Sign in with Google native SDK
To use the Sign in with Google native SDK in your Android app, complete the following tasks:
Step 1. Add Sign in with Google dependencies
-
In addition to the core Ping (ForgeRock) SDK for Android dependencies, add Google’s SDK libraries to the
dependenciessection of yourbuild.gradle.ktsfile:// Google native sign-on SDK for Android implementation("com.google.android.libraries.identity.googleid:googleid:1.1.1") // Needed by Android 13 and earlier implementation("androidx.credentials:credentials-play-services-auth:1.5.0")If your application will only support Android 14 and later you can remove the
credentials-play-services-authdependency.Only apps running on Android 13 and earlier require that dependency to support social sign-on.
Step 2. Create Android-specific client credentials in Google
You Android app needs to be able to communicate directly with Google to authenticate users with its SDK. To enable this communication you must create Android-specific credentials in the Google API Dashboard.
Using the Google SDK in your Android apps creates an embedded user experience, and you do not have to configure additional redirects back to your app.
Instead, associate your app with the Android-specific credentials you create by adding your Android app’s certificate fingerprints:
-
In a browser, navigate to the Google API Dashboard.
-
In the left navigation, click Credentials.
-
Click CREATE CREDENTIALS, and from the drop-down list, select
OAuth client ID. -
In the Application Type drop-down list, select
Android. -
In the Name field, enter a name for your app.
-
In the Package name field, enter the package name of your app.
For example,
com.pingidentity.samples.app. -
In the SHA-1 certificate fingerprint field, enter the SHA-1 fingerprint of your project’s signing certificate.
If you self-sign your app, use the following command in a terminal window to get the fingerprint:
keytool -keystore path-to-debug-or-production-keystore -list -vLearn more in Authenticating Your Client in the Google Play Store documentation.
The result will resemble the following:
 Figure 1. Configuring a client ID for Android apps in Google Cloud
 -
Click Create.
|
You do not need to configure your Android app or the PingOne server with the details of this client ID. The certificate fingerprint associates your app with the client ID. |