Configure an iOS app for social sign on
Perform the following steps to configure an iOS app for social sign on using PingOne.
Step 1. Add the dependencies
You must add the davinci and external-idp modules to your project. You can use either Cocoapods or Swift Package Manager (SPM) to add the dependencies.
You can use CocoaPods or the Swift Package Manager to add the PingOne Protect dependencies to your iOS project.
Add dependencies using CocoaPods
-
If you do not already have CocoaPods, install the latest version.
-
If you do not already have a Podfile, in a terminal window, run the following command to create a new Podfile:
pod init
-
Add the following lines to your Podfile:
pod 'PingDavinci'
pod 'External-idp'
-
Run the following command to install pods:
pod install
Add dependencies using Swift Package Manager
-
With your project open in Xcode, select File > Add Package Dependencies.
-
In the search bar, enter the Ping SDK for iOS repository URL:
https://github.com/ForgeRock/ping-ios-sdk. -
Select the
ping-ios-sdkpackage, and then click Add Package. -
In the Choose Package Products dialog, ensure that the
PingDavinciandPingExternalIdplibraries are added to your target project. -
Click Add Package.
-
In your project, import the library:
import PingDavinci
import PingExternalIdp
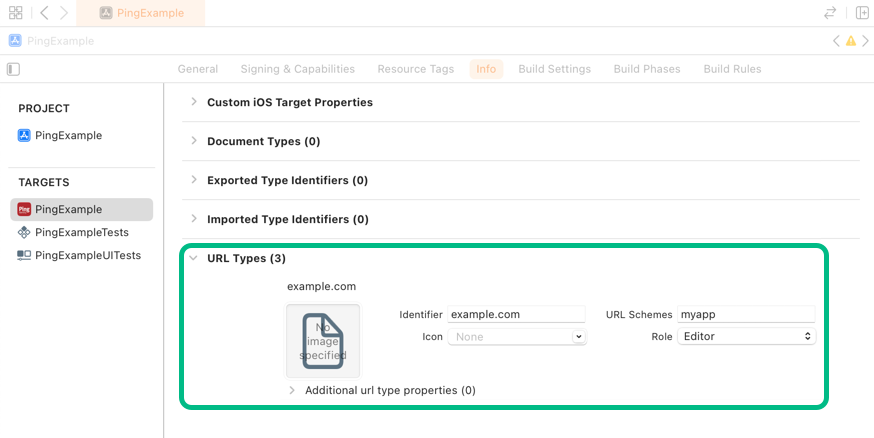
Step 2. Handle the redirect scheme
You must configure your iOS app to open when the server redirects the user to the custom URI scheme you entered when setting up PingOne.
For this tutorial, the custom URI scheme is myapp://example.com.
To configure your app to open when using the custom URI scheme:
-
In Xcode, in the Project Navigator, double-click your application to open the Project pane.
-
On the Info tab, in the URL Types panel, configure your custom URL scheme:
Step 3. Handling IdpCollector nodes
Your app must handle the IdpCollector node type that DaVinci sends when a user attempts to authenticate using an external IdP.
When encountering an IdpCollector node type, call idpCollector.authorize() to launch an in-app browser and begin authentication with the external IdP:
public class SocialButtonViewModel: ObservableObject {
    @Published public var isComplete: Bool = false
    public let idpCollector: IdpCollector

    public init(idpCollector: IdpCollector) {
        self.idpCollector = idpCollector
    }

    public func startSocialAuthentication() async → Result<Bool, IdpExceptions> {
        return await idpCollector.authorize()
    }

    public func socialButtonText() → some View {
        let bgColor: Color
        switch idpCollector.idpType {
        case "APPLE":
            bgColor = Color.appleButtonBackground
        case "GOOGLE":
            bgColor = Color.googleButtonBackground
        case "FACEBOOK":
            bgColor = Color.facebookButtonBackground
        default:
            bgColor = Color.themeButtonBackground
        }
        let text = Text(idpCollector.label)
            .font(.headline)
            .foregroundColor(.white)
            .padding()
            .frame(width: 300, height: 50)
            .background(bgColor)
            .cornerRadius(15.0)

        return text
    }
}
The idpCollector.authorize() method returns a Success result when authentication with the external IdP completes successfully. If not, it returns Failure and IdpExceptions, which shows the root cause of the issue.
Task {
    let result = await socialButtonViewModel.startSocialAuthentication()
    switch result {
    case .success(_):
        onNext(true)
    case .failure(let error): //<- Exception
        onStart()
    }
}
The result resembles the following: