DaVinci Client for DaVinci Flows
Introducing the DaVinci client for DaVinci flows
The DaVinci clients provide powerful orchestration capabilities with PingOne DaVinci. They enable you to consume DaVinci flows to meet your use cases, all while providing a native Android or iOS, or a single-page app JavaScript experience.
You have complete control of your UI, so you can create the tailored experience you desire for your end users, all while leaving the DaVinci client to do the heavy lifting of communication between your app and your DaVinci flows.
Dynamically Updating of DaVinci Flows
The DaVinci client works with PingOne DaVinci server-driven orchestration. This means that as long as you don’t hardcode UI elements in your application, and you appropriately handle the collector types, then you can update your DaVinci flow without needing to update your app or redeploy to the app stores.
This saves time and enables you to control your application orchestration experience without unnecessary burden.
Flow collectors
DaVinci sends requests to the DaVinci client from UI-related connectors. This enables you to step through each piece of information, and gather information from your end users appropriately.
For example, if you created a DaVinci flow to register a user, and you used the HTTP Connector - Custom HTML Template capability:
-
First name, last name, and email address would be sent as the
TextCollectortype to your app, and you would determine the way in which you represented this field in your UI. -
The password field would be sent as the
PasswordCollectortype. -
Once the flow completes, PingOne sends back the necessary tokens, and the DaVinci client automatically stores, retrieves, and refreshes tokens as needed.
Compatibility
Supported operating systems and browsers
Select a platform below to view the supported operating systems and browsers.
-
Android
-
iOS
-
JavaScript / Login Widget
The Ping SDK for Android supports the following versions of the Android operating system:
| Release | API Levels | Released |
|---|---|---|
Android 15 |
35 |
September, 2024 |
Android 14 |
34 |
October, 2023 |
Android 13 |
33 |
March, 2022 |
Android 12 |
31, 32 |
October, 2021 |
Android 11 |
30 |
September, 2020 |
Android 10 |
29 |
September, 2019 |
Android 9 (Pie) |
28 |
August, 2018 |
|
We are updating how we determine which Android versions form our support policy for the Ping SDK for Android. From March 1st, 2025, the support policy is as follows:
|
Supported browsers on Android
-
Chrome - Two most recent major versions.
The Ping SDK for iOS supports the following versions of the iOS operating system:
| Release | Released |
|---|---|
iOS 18 |
September, 2024 |
iOS 17 |
September, 2023 |
iOS 16 |
September, 2022 |
|
We are updating how we determine which iOS versions form our support policy for the Ping SDK for iOS. From March 1st, 2025, the support policy is as follows:
|
Supported browsers on iOS
-
Safari - Two most recent major versions.
The Ping SDK for JavaScript, and the Ping (ForgeRock) Login Widget support the desktop and mobile browsers listed below.
Minimum supported Desktop browser versions
-
Chrome 83
-
Firefox 77
-
Safari 13
-
Microsoft Edge 83 (Chromium)
Supported Mobile browsers
-
iOS (Safari) - Two most recent major versions of the operating system.
-
Android (Chrome) - Two most recent major versions of the operating system.
Supported PingOne fields and collectors
The DaVinci clients support the following connectors and capabilities:
-
PingOne Forms Connector
-
Show Form capability
-
-
HTTP Connector
-
Custom HTML capability
-
-
PingOne Form Connector fields
-
HTTP Connector fields
Field ( |
Description |
DaVinci module |
||
|---|---|---|---|---|
Android |
iOS |
JavaScript |
||
Text Input ( |
Collects a single text string. |
✅ 1.1.0 |
✅ 1.1.0 |
✅ 1.1.0 |
Password ( |
Collects a single text string that cannot be read from the screen. |
✅ 1.1.0 |
✅ 1.1.0 |
✅ 1.1.0 |
Dropdown ( |
Collects a value from a dropdown containing one or more text strings. |
✅ 1.1.0 |
✅ 1.1.0 |
✅ 1.1.0 |
Combobox ( |
Collects a value from a dropdown containing one or more text strings, the user can enter their own text string. |
✅ 1.1.0 |
✅ 1.1.0 |
✅ 1.1.0 |
Radio Button List ( |
Collects a value from one or radio buttons. |
✅ 1.1.0 |
✅ 1.1.0 |
✅ 1.1.0 |
Checkbox List ( |
Collects the value of one or more checkboxes. |
✅ 1.1.0 |
✅ 1.1.0 |
✅ 1.1.0 |
Field ( |
Description |
DaVinci module |
||
|---|---|---|---|---|
Android |
iOS |
JavaScript |
||
Flow Button ( |
Presents a customized button. |
✅ 1.1.0 |
✅ 1.1.0 |
✅ 1.1.0 |
Flow Link ( |
Presents a customized link. |
✅ 1.1.0 |
✅ 1.1.0 |
✅ 1.1.0 |
Translatable Rich Text ( |
Presents rich text that you can translate into multiple languages. |
✅ 1.1.0 |
✅ 1.1.0 |
✅ 1.1.0 |
Social Login ( |
Presents a button to allow users to authenticate using an external identity provider, such as Apple, Facebook, or Google. |
✅ 1.1.0 |
✅ 1.1.0 |
✅ 1.1.0 |
Field ( |
Description |
DaVinci module |
||
|---|---|---|---|---|
Android |
iOS |
JavaScript |
||
Text field ( |
Collects a single text string. |
✅ 1.0.0 |
✅ 1.0.0 |
✅ 1.0.0 |
Password field ( |
Collects a single text string that cannot be read from the screen. |
✅ 1.0.0 |
✅ 1.0.0 |
✅ 1.0.0 |
Submit Button ( |
Sends the collected data to PingOne to continue the DaVinci flow. |
✅ 1.0.0 |
✅ 1.0.0 |
✅ 1.0.0 |
Flow Button ( |
Triggers an alternative flow without sending the data collected so far to PingOne. |
✅ 1.0.0 |
✅ 1.0.0 |
✅ 1.0.0 |
Label ( |
Display a read-only text label. |
✅ 1.1.0 |
✅ 1.1.0 |
✅ 1.1.0 |
Radio / Dropdown ( |
Collects a single value from a choice of multiple options. |
✅ 1.1.0 |
✅ 1.1.0 |
✅ 1.1.0 |
SK-Component ( |
Description |
DaVinci module |
||
|---|---|---|---|---|
Android |
iOS |
JavaScript |
||
skIDP ( |
Presents a button to allow users to authenticate using an external identity provider, such as Apple, Facebook, or Google. |
✅ 1.1.0 |
✅ 1.1.0 |
✅ 1.1.0 |
Unsupported features:
Verify that your flow does not depend on any unsupported elements:
- SKPolling components
-
SKPolling components cannot be processed by the SDK and should not be included.
- Images
-
Images included in the flow cannot be passed to the SDK.
Default DaVinci client headers
The DaVinci clients send a number of header values to the server with every outgoing request.
These headers can help you identify the client in your flows and help you correlate actions to a transaction in DaVinci audit logs. You can also use these values to alter the course of a DaVinci flow.
The default headers the DaVinci client always include are as follows:
x-requested-with-
Identifies that the request comes from an app built with the Ping DaVinci client.
Default value:
ping-sdk x-requested-platform-
Identifies the platform the DaVinci client is running on.
Default values:
Platform Value Android
androidiOS
iosJavaScript
javascript interactionId-
Returns the
interactionIdvalue provided by the server to help trace the transaction in server audit logs and dashboards.Example value:
18484499-c551-4d99-c415-b01c79bedb47 interactionToken-
Returns the
interactionTokenvalue provided by the server to help trace the transaction in server audit logs and dashboards.Example value:
437783552aa3a5a8f0041028d5b8dac2d72f7e7ebd7f88a966fb690402f6571b964c3df8897cbe542e62721070b3f6fcc946f4dd2bc80b9df332d39657fcaaad4651884093a786910d6f1337bd8dda17b4fca48e8fa481469ce0df1f676e46d1a6fc30577d910010d4a2530f2d02e69f436d610992c79fcb0ca87131d0df3f9a
Getting started with the DaVinci client
Discover how to get started with the DaVinci client, including the following topics:
Getting started with the DaVinci client for Android
Configure DaVinci client for Android properties to connect to PingOne and step through an associated DaVinci flow.
Installing and importing the DaVinci client
To use the DaVinci client for Android, add the relevant dependencies to your project:
-
In the Project tree view of your Android Studio project, open the
Gradle Scripts/build.gradle.ktsfile for the DaVinci module. -
In the
dependenciessection, add the following:implementation("com.pingidentity.sdks:davinci:1.1.0")Example of thedependenciessection after editing:dependencies { val composeBom = platform(libs.androidx.compose.bom) implementation(composeBom) // DaVinci client implementation("com.pingidentity.sdks:davinci:1.1.0") ... implementation(libs.androidx.core.ktx) implementation(libs.androidx.appcompat) implementation(libs.material) }
Configuring the DaVinci client
Configure DaVinci client for Android properties to connect to PingOne and step through an associated DaVinci flow.
The following shows an example DaVinci client configuration, using the underlying Oidc module:
import com.pingidentity.davinci.DaVinci
import com.pingidentity.davinci.module.Oidc

val daVinci = DaVinci {
    module(Oidc) {
        clientId = "6c7eb89a-66e9-ab12-cd34-eeaf795650b2"
        discoveryEndpoint = "https://auth.pingone.com/3072206d-c6ce-ch15-m0nd-f87e972c7cc3/" +
            "as/.well-known/openid-configuration"
        scopes = mutableSetOf("openid", "profile", "email", "address", "revoke")
        redirectUri = "org.forgerock.demo://oauth2redirect"
        additionalParameters = mapOf("customKey" to "customValue")
    }
}
For information on the properties available, refer to Configure DaVinci client for Android properties.
Stepping through DaVinci flows
To authenticate your users the DaVinci client for Android must start the flow, and step through each node.
|
For information on which connectors and fields the DaVinci client supports, refer to Compatibility. |
Starting a DaVinci flow
To start a DaVinci flow, call the start() method:
val node = daVinci.start()Determining DaVinci flow node type
Each step of the flow returns one of four node types:
ContinueNode-
This type indicates there is input required from the client. The
nodeobject for this type contains acollectorobject, which describes the information it requires from the client.Learn more in Handling DaVinci flow collectors in continue nodes.
SuccessNode-
This type indicates the flow is complete, and authentication was successful.
Learn more in Handling DaVinci flow success nodes.
ErrorNode-
This type indicates an error in the data sent to the server. For example, an email address in an incorrect format, or a password that does not meet complexity requirements.
You can correct the error and resubmit to continue the flow.
Learn more in Handling DaVinci flow error nodes.
FailureNode-
This type indicates that the flow could not be completed and must be restarted. This can be caused by a server error, or a timeout.
Learn more in Handling DaVinci flow failure nodes.
You can use the helper functions to determine which node type the server has returned:
node type.when (node) {
is ContinueNode -> {}
is ErrorNode -> {}
is FailureNode -> {}
is SuccessNode -> {}
}Handling DaVinci flow collectors in continue nodes
The ContinueNode type contains collectors. These collectors define what information or action to request from the user, or client device.
There are specific collector types. For example there are TextCollector and PasswordCollector types.
To complete a DaVinci flow we recommend that you implement a component for each connector type you will encounter in the flow. Then you can iterate through the flow and handle each collector as you encounter it.
ContinueNodenode.collectors.forEach {
when(it) {
is TextCollector → it.value = "My First Name"
is PasswordCollector → it.value = "My Password"
is SubmitCollector → it.value = "click me"
is FlowCollector → it.value = "Forgot Password"
}
}Continuing a DaVinci flow
After collecting the data for a node you can proceed to the next node in the flow by calling the next() method on your current node object.
next()val next = node.next()|
You do not need to pass any parameters into the |
The server responds with a new node object, just like when starting a flow initially.
Loop again through conditional checks on the new node’s type to render the appropriate UI or take the appropriate action.
Handling DaVinci flow error nodes
DaVinci flows return the ErrorNode type when it receives data that is incorrect, but you can fix the data and resubmit. For example, an email value submitted in an invalid format or a new password that is too short.
You can retrieve the error message by using node.message(), and the raw JSON response with node.input.
val node = daVinci.start() // Start the flow

//Determine the Node Type
when (node) {
    is ContinueNode -> {}
    is ErrorNode -> {
        node.message() // Retrieve the cause of the error
    }
    is FailureNode -> {}
    is SuccessNode -> {}
}|
This is different than a |
You can retain a reference to the node you submit in case the next node you receive is an ErrorNode type. If so, you can re-render the previous form, and inject the error information from the new ErrorNode node.
After the user revises the data call next() as you did before.
Handling DaVinci flow failure nodes
DaVinci flows return the FailureNode type if there has been an issue that prevents the flow from continuing. For example, the flow times out or suffers a server error.
You can retrieve the cause of the failure by using node.cause(), which is a Throwable object.
FailureNode typeval node = daVinci.start() // Start the flow
//Determine the Node Type
when (node) {
is ContinueNode -> {}
is ErrorNode -> {}
is FailureNode -> {
node.cause() // Retrieve the error message
}
is SuccessNode -> {}
}You should offer to restart the flow on receipt of a FailureNode type.
Handling DaVinci flow success nodes
DaVinci flows return the SuccessNode type when the user completes the flow and PingOne issues them a session.
To retrieve the existing session, you can use the following code:
SuccessNode typeval user: User? = daVinci.user()
user?.let {
it.accessToken()
it.revoke()
it.userinfo()
it.logout()
}Leverage Jetpack Compose
The following shows how you could use the DaVinci client with Jetpack Compose:
// Define State that listen by the View
var state = MutableStateFlow<Node>(Empty)

//Start the DaVinci flow
val next = daVinci.start()

// Update the state
state.update {
    next
}

fun next(node: ContinueNode) {
    viewModelScope.launch {
        val next = node.next()
        state.update {
            next
        }
    }
}when (val node = state.node) {
is ContinueNode -> {}
is ErrorNode -> {}
is FailureNode -> {}
is SuccessNode -> {}
}Getting started with the DaVinci client for iOS
Configure DaVinci client module for iOS properties to connect to PingOne and step through an associated DaVinci flow.
Installing and importing the DaVinci client
To use the DaVinci client for iOS, use Swift Package Manager (SPM) to add the dependencies to your project:
You can install this by using SPM (Swift Package Manager) on the generated iOS project.
-
In Xcode, select your project and navigate to Package Dependencies.
-
Click the sign, and add the Ping SDK for iOS repository,
https://github.com/ForgeRock/forgerock-ios-sdk.git. -
Add the
davincilibrary to the project.
Configuring the DaVinci client
Configure DaVinci client for iOS properties to connect to PingOne and step through an associated DaVinci flow.
The following shows an example DaVinci client configuration, using the underlying Oidc module:
let daVinci = DaVinci.createDaVinci { config in
    // Oidc as module
    config.module(OidcModule.config) { oidcValue in
        oidcValue.clientId = "6c7eb89a-66e9-ab12-cd34-eeaf795650b2"
        oidcValue.discoveryEndpoint = "https://auth.pingone.com/3072206d-c6ce-ch15-m0nd-f87e972c7cc3/as/.well-known/openid-configuration"
        oidcValue.scopes = ["openid", "profile", "email", "address", "revoke"]
        oidcValue.redirectUri = "org.forgerock.demo://oauth2redirect"
        oidcValue.additionalParameters = ["customKey":"customValue"]
    }
}
For information on the properties available, refer to Configure DaVinci client for iOS properties.
Stepping through DaVinci flows
To authenticate your users the DaVinci client for iOS must start the flow, and step through each node.
|
For information on which connectors and fields the DaVinci client supports, refer to Compatibility. |
Starting a DaVinci flow
To start a DaVinci flow, call the start() method:
var node = await daVinci.start()Determining DaVinci flow node type
Each step of the flow returns one of four node types:
ContinueNode-
This type indicates there is input required from the client. The
nodeobject for this type contains acollectorobject, which describes the information it requires from the client.Learn more in Handling DaVinci flow collectors in continue nodes.
SuccessNode-
This type indicates the flow is complete, and authentication was successful.
Learn more in Handling DaVinci flow success nodes.
ErrorNode-
This type indicates an error in the data sent to the server. For example, an email address in an incorrect format, or a password that does not meet complexity requirements.
You can correct the error and resubmit to continue the flow.
Learn more in Handling DaVinci flow error nodes.
FailureNode-
This type indicates that the flow could not be completed and must be restarted. This can be caused by a server error, or a timeout.
Learn more in Handling DaVinci flow failure nodes.
You can use the helper functions to determine which node type the server has returned:
node type.switch (node) {
case is ContinueNode: do {}
case is ErrorNode: do {}
case is FailureNode: do {}
case is SuccessNode: do {}
}Handling DaVinci flow collectors in continue nodes
The ContinueNode type contains collectors. These collectors define what information or action to request from the user, or client device.
There are specific collector types. For example there are TextCollector and PasswordCollector types.
To complete a DaVinci flow we recommend that you implement a component for each connector type you will encounter in the flow. Then you can iterate through the flow and handle each collector as you encounter it.
ContinueNodenode.collectors.forEach { item in
switch(item) {
case is TextCollector:
(item as! TextCollector).value = "My First Name"
case is PasswordCollector:
(item as! PasswordCollector).value = "My Password"
case is SubmitCollector:
(item as! SubmitCollector).value = "click me"
case is FlowCollector:
(item as! FlowCollector).value = "Forgot Password"
}
}Continuing a DaVinci flow
After collecting the data for a node you can proceed to the next node in the flow by calling the next() method on your current node object.
next()let next = node.next()|
You do not need to pass any parameters into the |
The server responds with a new node object, just like when starting a flow initially.
Loop again through conditional checks on the new node’s type to render the appropriate UI or take the appropriate action.
Handling DaVinci flow error nodes
DaVinci flows return the ErrorNode type when it receives data that is incorrect, but you can fix the data and resubmit. For example, an email value submitted in an invalid format or a new password that is too short.
You can retrieve the error message by using node.message(), and the raw JSON response with node.input.
let node = await daVinci.start() //Start the flow

//Determine the Node Type
switch (node) {
  case is ContinueNode: do {}
  case is FailureNode: do {}
  case is ErrorNode:
      (node as! ErrorNode).message //Retrieve the error message
  case is SuccessNode: do {}
}|
This is different than a |
You can retain a reference to the node you submit in case the next node you receive is an ErrorNode type. If so, you can re-render the previous form, and inject the error information from the new ErrorNode node.
After the user revises the data call next() as you did before.
Handling DaVinci flow failure nodes
DaVinci flows return the FailureNode type if there has been an issue that prevents the flow from continuing. For example, the flow times out or suffers a server error.
You can retrieve the cause of the failure by using node.cause(), which is an Error instance.
FailureNode typelet node = await daVinci.start() //Start the flow
//Determine the Node Type
switch (node) {
case is ContinueNode: do {}
case is FailureNode:
(node as! FailureNode).cause //Retrieve the cause of the Failure
case is ErrorNode: do {}
case is SuccessNode: do {}
}You should offer to restart the flow on receipt of a FailureNode type.
Handling DaVinci flow success nodes
DaVinci flows return the SuccessNode type when the user completes the flow and PingOne issues them a session.
To retrieve the existing session, you can use the following code:
SuccessNode typelet user: User? = await daVinci.user()
_ = await user?.token()
await user?.revoke()
_ = await user?.userinfo(cache: false)
await user?.logout()Leverage SwiftUI
The following shows how you could use the DaVinci client with SwiftUI:
//Define State that listen by the View

@Published var state: Node = EmptyNode()

//Start the DaVinci flow
let next = await daVinci.start()

//Update the state
state = next

func next(node: ContinueNode) {
   val next = await node.next()
   state = next

}if let node = state.node {
switch node {
case is ContinueNode:
// Handle ContinueNode case
break
case is ErrorNode:
// Handle Error case
break
case is FailureNode:
// Handle Failure case
break
case is SuccessNode:
// Handle Success case
break
default:
break
}
}Getting started with the DaVinci client for JavaScript
Configure DaVinci client properties to connect to PingOne and step through an associated DaVinci flow.
Installing and importing the DaVinci client
To install and import the DaVinci client:
-
Install the DaVinci client into your JavaScript apps using
npm:Install the DaVinci clientnpm install @forgerock/davinci-client -
Import the DaVinci client as a named import:
Import the DaVinci clientimport { davinci } from '@forgerock/davinci-client';
Configuring the DaVinci client
Configure DaVinci client for JavaScript properties to connect to PingOne and step through an associated DaVinci flow.
The following shows a full DaVinci client configuration:
import { davinci } from '@forgerock/davinci';

const davinciClient = await davinci({
  config: {
    clientId: '6c7eb89a-66e9-ab12-cd34-eeaf795650b2',
    serverConfig: {
      wellknown: 'https://auth.pingone.com/3072206d-c6ce-ch15-m0nd-f87e972c7cc3/as/.well-known/openid-configuration',
      timeout: 3000,
    },
    scope: 'openid profile email address revoke',
    responseType: 'code',
  },
});
For information on the properties available, refer to Configure DaVinci client for JavaScript properties.
Stepping through DaVinci flows
To authenticate your users the Ping SDK for JavaScript DaVinci client must start the flow, and step through each node.
|
For information on which connectors and fields the DaVinci client supports, refer to Compatibility. |
Starting a DaVinci flow
To start a DaVinci flow, call the start() method on your new client object:
let node = await davinciClient.start();Adding custom parameters
When starting a DaVinci client you can add additional key-pair parameters. The DaVinci client will append these parameters as query strings to the initial OAuth 2.0 call to the /authorize endpoint.
|
You can access these additional OAuth 2.0 parameters in your DaVinci flows by using the Learn more in Referencing PingOne data in the flow. |
To add parameters when starting the client, create an object of the key-value pairs and pass it as a query parameter to the start() function:
const query = {
  customKey: 'customValue'
}

let node = await davinciClient.start(query);|
You can add any parameters to the request as required. For example, you could add |
Determining DaVinci flow node type
Each step of the flow returns one of four node types:
continue-
This type indicates there is input required from the client. The
nodeobject for this type contains a list ofcollectorobjects, which describe the information it requires from the client.Learn more in Handling DaVinci flow collectors in continue nodes.
success-
This type indicates the flow is complete, and authentication was successful.
Learn more in Handling DaVinci flow success nodes.
error-
This type indicates an error in the data sent to the server. For example, an email address in an incorrect format, or a password that does not meet complexity requirements.
You can correct the error and resubmit to continue the flow.
Learn more in Handling DaVinci flow error nodes.
failure-
This type indicates that the flow could not be completed and must be restarted. This can be caused by a server error, or a timeout.
Learn more in Handling DaVinci flow failure nodes.
Use node.status to determine which node type the server has returned:
node.status propertylet node = await davinciClient.start();
switch (node.status) {
case 'continue':
return renderContinue();
case 'success':
return renderSuccess();
case 'error':
return renderError();
default: // Handle 'failure' node type
return renderFailure();
}Handling DaVinci flow collectors in continue nodes
The continue node type contains a list of collector objects. These collectors define what information or action to request from the user, or browser.
There are two categories of collector:
SingleValueCollector-
A request for a single value, such as a username or password string.
Show the interface for
SingleValueCollectorexport interface SingleValueCollector { category: 'SingleValueCollector'; type: SingleValueCollectorTypes; id: string; name: string; input: { key: string; value: string | number | boolean; type: string; }; output: { key: string; label: string; type: string; value: string; }; } ActionCollector-
Represents an action the user can take, such as a button or a link they can select. For example, a link that jumps to a password recovery section of a flow.
Show the interface for
ActionCollectorexport interface ActionCollector { category: 'ActionCollector'; type: ActionCollectorTypes; id: string; name: string; output: { key: string; label: string; type: string; url?: string; }; }
Within each category of collector there are specific collector types. For example, in the SingleValueCollector category there are TextCollector and PasswordCollector types.
To complete a DaVinci flow we recommend that you implement a component for each connector type you will encounter in the flow. Then you can iterate through the flow and handle each collector as you encounter it.
Example 1. TextCollector
This example shows how to update a collector with a value gathered from your user.
Pass both a collector and updater object into a component that renders the appropriate user interface, captures the user’s input, and then updates the collector, ready to return to the server.
TextCollector mappingconst collectors = davinciClient.getCollectors();
collectors.map((collector) => {
if (collector.type === 'TextCollector') {
renderTextCollector(collector, davinciClient.update(collector));
}
});|
Mutating the The internal data the client stores is immutable and can only be updated using the provided APIs, not through property assignment. |
Your renderTextCollector would resemble the following:
TextCollector updater componentfunction renderTextCollector(collector, updater) {
// ... component logic
function onClick(event) {
updater(event.target.value);
}
// render code
}Example 2. FlowCollector
This example shows how change from the current flow to an alternate flow, such as a reset password or registration flow.
To switch flows, call the flow method on the davinciClient passing the key property to identify the new flow.
FlowCollector mappingconst collectors = davinciClient.getCollectors();
collectors.map((collector) => {
if (collector.type === 'FlowCollector') {
renderFlowCollector(collector, davinciClient.flow(collector));
}
});This returns a function you can call when the user interacts with it.
flowCollector componentfunction renderFlowCollector(collector, startFlow) {
// ... component logic
function onClick(event) {
startFlow();
}
// render code
}Example 3. SubmitCollector
This example shows how submit the current node and its collected values back to the server. The collection of the data is already complete so an updater component is not required. This collector only renders the button for the user to submit the collected data.
SubmitCollector mappingconst collectors = davinciClient.getCollectors();
collectors.map((collector) => {
if (collector.type === 'SubmitCollector') {
renderSubmitCollector(
collector, // This is the only argument you will need to pass
);
}
});Continuing a DaVinci flow
After collecting the data for a node you can proceed to the next node in the flow by calling the next() method on your DaVinci client object.
This can be the result of a user clicking on the button rendered from the SubmitCollector, from the submit event of an HTML form, or by programmatically triggering the submission in the application layer.
next()let nextStep = davinciClient.next();|
You do not need to pass any parameters into the |
The server responds with a new node object, just like when starting a flow initially.
Loop again through conditional checks on the new node’s type to render the appropriate UI or take the appropriate action.
Handling DaVinci flow error nodes
DaVinci flows return the error node type when it receives data that is incorrect, but you can fix the data and resubmit. For example, an email value submitted in an invalid format or a new password that is too short.
This is different than a failure node type which you cannot resubmit and instead you must restart the entire flow.
You can retain a reference to the node you submit in case the next node you receive is an error type. If so, you can re-render the previous form, and inject the error information from the new error node.
After the user revises the data call next() as you did before.
Handling DaVinci flow failure nodes
DaVinci flows return the failure node type if there has been an issue that prevents the flow from continuing. For example, the flow times out or suffers an HTTP 500 server error.
You should offer to restart the flow on receipt of a failure node type.
failure node typeconst node = await davinciClient.next();
if (node.status === 'failure') {
const error = davinciClient.getError();
renderError(error);
// ... user clicks button to restart flow
const freshNode = davinciClient.start();
}Handling DaVinci flow success nodes
DaVinci flows return the success node type when the user completes the flow and PingOne issues them a session.
On receipt of a success node type you should use the OAuth 2.0 authorization Code and state properties from the node and use them to obtain an access token on behalf of the user.
To obtain an access token, leverage the Ping SDK for JavaScript.
// ... other imports
import { davinci } from '@forgerock/davinci-client';
import { Config, TokenManager } from '@forgerock/javascript-sdk';

// ... other config or initialization code

// This Config.set accepts the same config schema as the davinci function
Config.set(config);

const node = await davinciClient.next();

if (node.status === 'success') {
  const clientInfo = davinciClient.getClient();

  const code = clientInfo.authorization?.code || '';
  const state = clientInfo.authorization?.state || '';

  const tokens = await TokenManager.getTokens({
    query: {
      code, state
    }
  });

  // user now has session and OIDC tokens
}
Configure DaVinci client properties
The Ping SDKs are designed to be flexible and can be customized to suit many different situations.
Learn more about configuring and customizing the Ping SDKs in the sections below:
Configure DaVinci client properties
You need to configure certain settings so that the DaVinci client can connect to your PingOne instance to step through your DaVinci flows and authenticate your users.
The method you use to configure these settings depends on which platform you are using.
Configure DaVinci client for Android properties
Configure DaVinci client for Android properties to connect to PingOne and step through an associated DaVinci flow.
Create an instance of the DaVinci object and use the underlying Oidc module to set configuration properties.
The following properties are available for configuring the DaVinci client for Android:
| Property | Description | Required? | ||
|---|---|---|---|---|
|
Your PingOne server’s Example:
|
Yes |
||
|
The For example, |
Yes |
||
|
A set of scopes to request when performing an OAuth 2.0 authorization flow. For example, |
Yes |
||
|
The
For example, |
Yes |
||
|
A timeout, in seconds, for each request that communicates with the server. Default is |
No |
||
|
Request which flow the PingOne server uses by adding an Authentication Context Class Reference (ACR) parameter. Enter a single DaVinci policy by using its flow policy ID. Example:
|
No |
||
|
Add additional key-pair parameters as query strings to the initial OAuth 2.0 call to the For example,
|
No |
Example
The following shows an example DaVinci client configuration, using the underlying Oidc module:
import com.pingidentity.davinci.DaVinci
import com.pingidentity.davinci.module.Oidc

val daVinci = DaVinci {
    module(Oidc) {
        clientId = "6c7eb89a-66e9-ab12-cd34-eeaf795650b2"
        discoveryEndpoint = "https://auth.pingone.com/3072206d-c6ce-ch15-m0nd-f87e972c7cc3/" +
            "as/.well-known/openid-configuration"
        scopes = mutableSetOf("openid", "profile", "email", "address", "revoke")
        redirectUri = "org.forgerock.demo://oauth2redirect"
        additionalParameters = mapOf("customKey" to "customValue")
    }
}
Configure DaVinci client for iOS properties
Configure DaVinci client module for iOS properties to connect to PingOne and step through an associated DaVinci flow.
Create an instance of the DaVinci class by passing configuration to the createDaVinci method. This uses the underlying Oidc module to set configuration properties.
The following properties are available for configuring the DaVinci client for iOS:
| Property | Description | Required? | ||
|---|---|---|---|---|
|
Your PingOne server’s Example:
|
Yes |
||
|
The For example, |
Yes |
||
|
A set of scopes to request when performing an OAuth 2.0 authorization flow. For example, |
Yes |
||
|
The
For example, |
Yes |
||
|
A timeout, in seconds, for each request that communicates with the server. Default is |
No |
||
|
Request which flow the PingOne server uses by adding an Authentication Context Class Reference (ACR) parameter. Enter a single DaVinci policy by using its flow policy ID. Example:
|
No |
||
|
Add additional key-pair parameters as query strings to the initial OAuth 2.0 call to the For example,
|
No |
Example
The following shows an example DaVinci client configuration, using the underlying Oidc module:
let daVinci = DaVinci.createDaVinci { config in
    // Oidc as module
    config.module(OidcModule.config) { oidcValue in
        oidcValue.clientId = "6c7eb89a-66e9-ab12-cd34-eeaf795650b2"
        oidcValue.discoveryEndpoint = "https://auth.pingone.com/3072206d-c6ce-ch15-m0nd-f87e972c7cc3/as/.well-known/openid-configuration"
        oidcValue.scopes = ["openid", "profile", "email", "address", "revoke"]
        oidcValue.redirectUri = "org.forgerock.demo://oauth2redirect"
        oidcValue.additionalParameters = ["customKey":"customValue"]
    }
}
Configure DaVinci client for JavaScript properties
Configure DaVinci client properties to connect to PingOne and step through an associated DaVinci flow.
Pass a config object into davinci to initialize a client with the required connection properties.
The following properties are available for configuring the DaVinci client for JavaScript:
| Property | Description | Required? |
|---|---|---|
|
An interface for configuring how the SDK contacts the PingAM instance. Contains |
Yes |
|
Your PingOne server’s Example:
|
Yes |
|
A timeout, in milliseconds, for each request that communicates with your server. For example, for 30 seconds specify Defaults to |
No |
|
The For example, |
Yes |
|
A list of scopes to request when performing an OAuth 2.0 authorization flow, separated by spaces. For example, |
No |
|
The type of OAuth 2.0 flow to use, either Defaults to |
No |
Example
The following shows a full DaVinci client configuration:
import { davinci } from '@forgerock/davinci';

const davinciClient = await davinci({
  config: {
    clientId: '6c7eb89a-66e9-ab12-cd34-eeaf795650b2',
    serverConfig: {
      wellknown: 'https://auth.pingone.com/3072206d-c6ce-ch15-m0nd-f87e972c7cc3/as/.well-known/openid-configuration',
      timeout: 3000,
    },
    scope: 'openid profile email address revoke',
    responseType: 'code',
  },
});
Localizing the user interface
You can leverage the languages feature in PingOne to localize your client applications for different audiences.
The DaVinci clients automatically send the preferred languages configured in the browser or mobile device to PingOne so that it can return the appropriate language.
Accept-Language header[Ping SDK 1.1.0] ⬆
Request URL: https://auth.pingone.com/c2a6...1602/as/authorize?response_mode=pi.flow&client_id=85ff...6791&response_type=code&scope=openid&redirect_uri=http://localhost:5829&code_challenge=m8BD...rhPM&code_challenge_method=S256
Request Method: GET
Request Headers: [
"x-requested-platform": "ios",
"Content-Type": "application/json",
"x-requested-with": "ping-sdk",
"Accept-Language": "en-GB, en;q=0.9"
]
Request Timeout: 15.0You can also override the configured settings directly in your code if required.
Before you begin
You must configure PingOne to support multiple languages that your client apps can use:
-
In PingOne, enable the built-in languages you want to support.
Learn more in Enabling or disabling a language.
You can also add your own languages and regions.
Learn more in Adding a language.
-
Ensure your language has the required localized strings for your clients to use.
Learn more in Modifying translatable keys.
You can also add your own keys to a language for use in your client applications.
Learn more in Adding a custom key for DaVinci.
-
Add your localized strings to your chosen implementation:
- PingOne forms
-
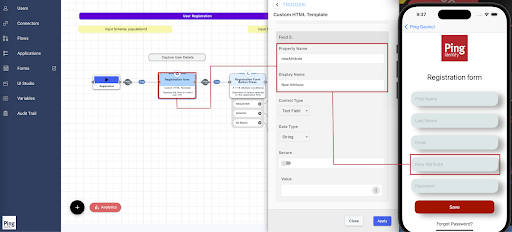
Update the fields in your PingOne forms to use translatable keys.
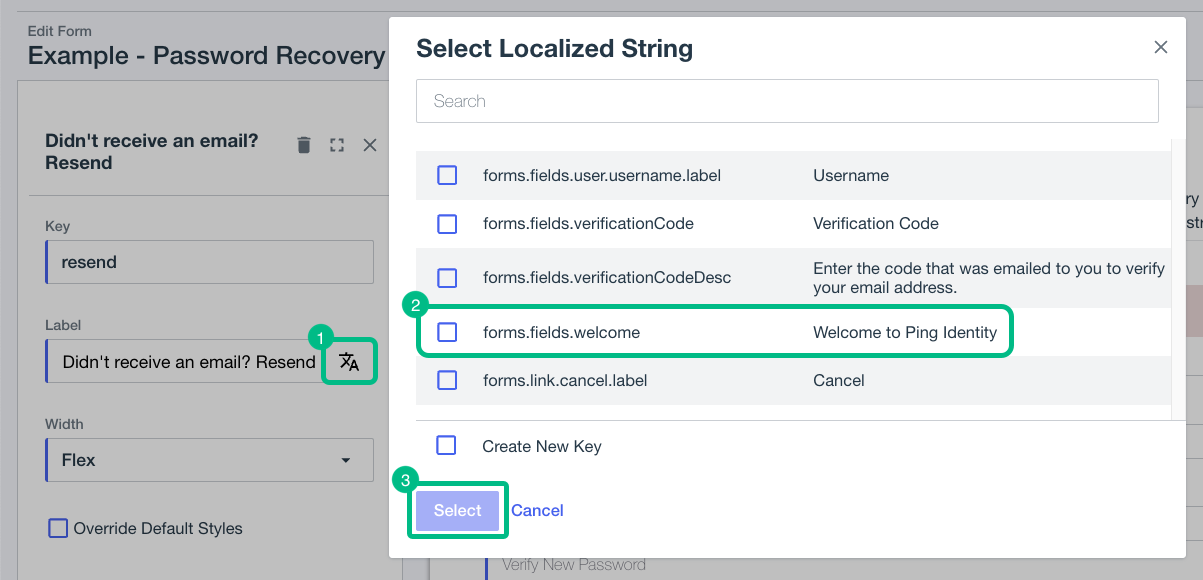 Figure 3. Adding localized strings to a PingOne form
Learn more in Using translatable keys.
- Custom HTTP Connector
-
Update the Output Fields in your custom HTML to use your localized strings.
Adding localized strings to a custom HTTP connector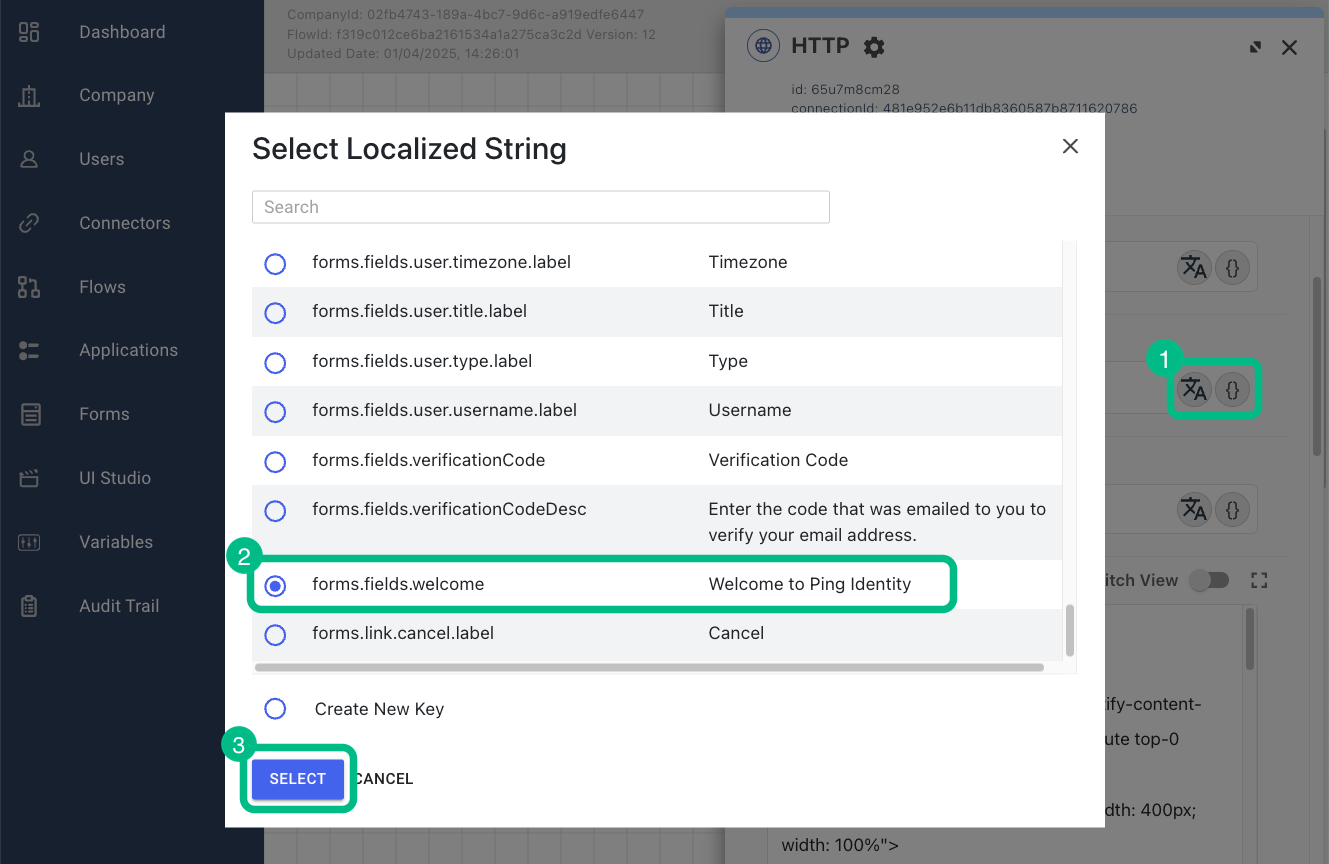
Learn more in HTTP Connector.
Configuring a DaVinci client to send the language header
The DaVinci clients automatically send the Accept-Language header when making requests to the PingOne server. This header includes each of the languages configured on the client device or in the browser, and maintains the order of preference.
The DaVinci client for Android and iOS also add generic versions of sub-dialects configured on the device, to make it more likely that PingOne can fall back to a similar language if the specific sub-dialect is unavailable.
For example, configuring English (British) (en-GB) as a preferred languages causes the DaVinci client to also send English (en) as a fallback option:
"Accept-Language": "en-GB, en;q=0.9"Overriding the automatically-added languages
You can override the default behavior of automatically sending configured languages.
-
DaVinci client for Android
-
DaVinci client for iOS
-
DaVinci client for JavaScript
To provide your own values for the Accept-Language header, use the CustomHeader module.
Add the module to your DaVinci configuration as follows:
CustomHeader module to override default language behaviorimport com.pingidentity.davinci.DaVinci
import com.pingidentity.davinci.module.Oidc
import com.pingidentity.davinci.module.CustomHeader
val daVinci = DaVinci {
module(Oidc) {
clientId = "6c7eb89a-66e9-ab12-cd34-eeaf795650b2"
discoveryEndpoint = "https://auth.pingone.com/3072206d-c6ce-ch15-m0nd-f87e972c7cc3/as/.well-known/openid-configuration"
scopes = mutableSetOf("openid", "profile", "email", "address", "revoke")
redirectUri = "org.forgerock.demo://oauth2redirect"
additionalParameters = mapOf("customKey" to "customValue")
}
// Add French as the preferred language, before default options
module(CustomHeader, priority = 5, mode = OverrideMode.APPEND) {
header(name = "Accept-Language", value = "fr")
}
}priority-
Default behavior of the DaVinci client is provided by a number of built-in modules. These modules all run with a
priorityvalue of10.-
To run your module before the default modules ensure your module has a
priorityvalue less than the default of10. -
To run your module after the default modules, set the
prioriyvalue to greater than10.
-
mode-
You can choose how the
CustomHeadermodule applies the modification by using themodeparameter:OverrideMode.APPEND-
The DaVinci client combines any additional parameters you provide with any parameters the default behavior adds.
The order is determined by the
priorityorder of the modules. OverrideMode.OVERRIDE-
Any additional parameters you provide replace any parameters the default behavior would have added.
To provide your own values for the Accept-Language header, use the CustomHeader module.
Add the module to your DaVinci configuration as follows:
CustomHeader module to override default language behaviorimport PingDavinci
public let davinci = DaVinci.createDaVinci { config in
let currentConfig = ConfigurationManager.shared.currentConfigurationViewModel
config.module(OidcModule.config) { oidcValue in
oidcValue.clientId = "6c7eb89a-66e9-ab12-cd34-eeaf795650b2"
oidcValue.scopes = ["openid", "profile", "email", "address", "revoke"]
oidcValue.redirectUri = "org.forgerock.demo://oauth2redirect"
oidcValue.discoveryEndpoint = "https://auth.pingone.com/3072206d-c6ce-ch15-m0nd-f87e972c7cc3/as/.well-known/openid-configuration"
}
// Add French as the preferred language, before default options
config.module(CustomHeader.config, priority: 5, mode: .append) { customHeaderValue in
customHeaderValue.header(name: "Accept-Language", value: "fr")
}
}priority-
Default behavior of the DaVinci client is provided by a number of built-in modules. These modules all run with a
priorityvalue of10.-
To run your module before the default modules ensure your module has a
priorityvalue less than the default of10. -
To run your module after the default modules, set the
prioriyvalue to greater than10.
-
mode-
You can choose how the
CustomHeadermodule applies the modification by using themodeparameter:.append-
The DaVinci client combines any additional parameters you provide with any parameters the default behavior adds.
The order is determined by the
priorityorder of the modules. .override-
Any additional parameters you provide replace any parameters the default behavior would have added.
To override the default browser behavior and provide your own values for the Accept-Language header, use the RequestMiddleware type.
Call your request middleware when creating the DaVinci client as follows:
CustomHeader module to override default language behaviorimport { davinci } from '@forgerock/davinci';
import type { RequestMiddleware } from '@forgerock/davinci-client/types';
const requestMiddleware: RequestMiddleware[] = [
(fetchArgs, action, next) => {
fetchArgs.headers?.set('Accept-Language', 'fr-FR, fr;q=0.9');
next();
},
];
const davinciClient = await davinci({
config: {
clientId: '6c7eb89a-66e9-ab12-cd34-eeaf795650b2',
serverConfig: {
wellknown: 'https://auth.pingone.com/3072206d-c6ce-ch15-m0nd-f87e972c7cc3/as/.well-known/openid-configuration',
timeout: 3000,
},
scope: 'openid profile email address revoke',
responseType: 'code',
},
requestMiddleware
});Ping SDK for PingOne DaVinci tutorials
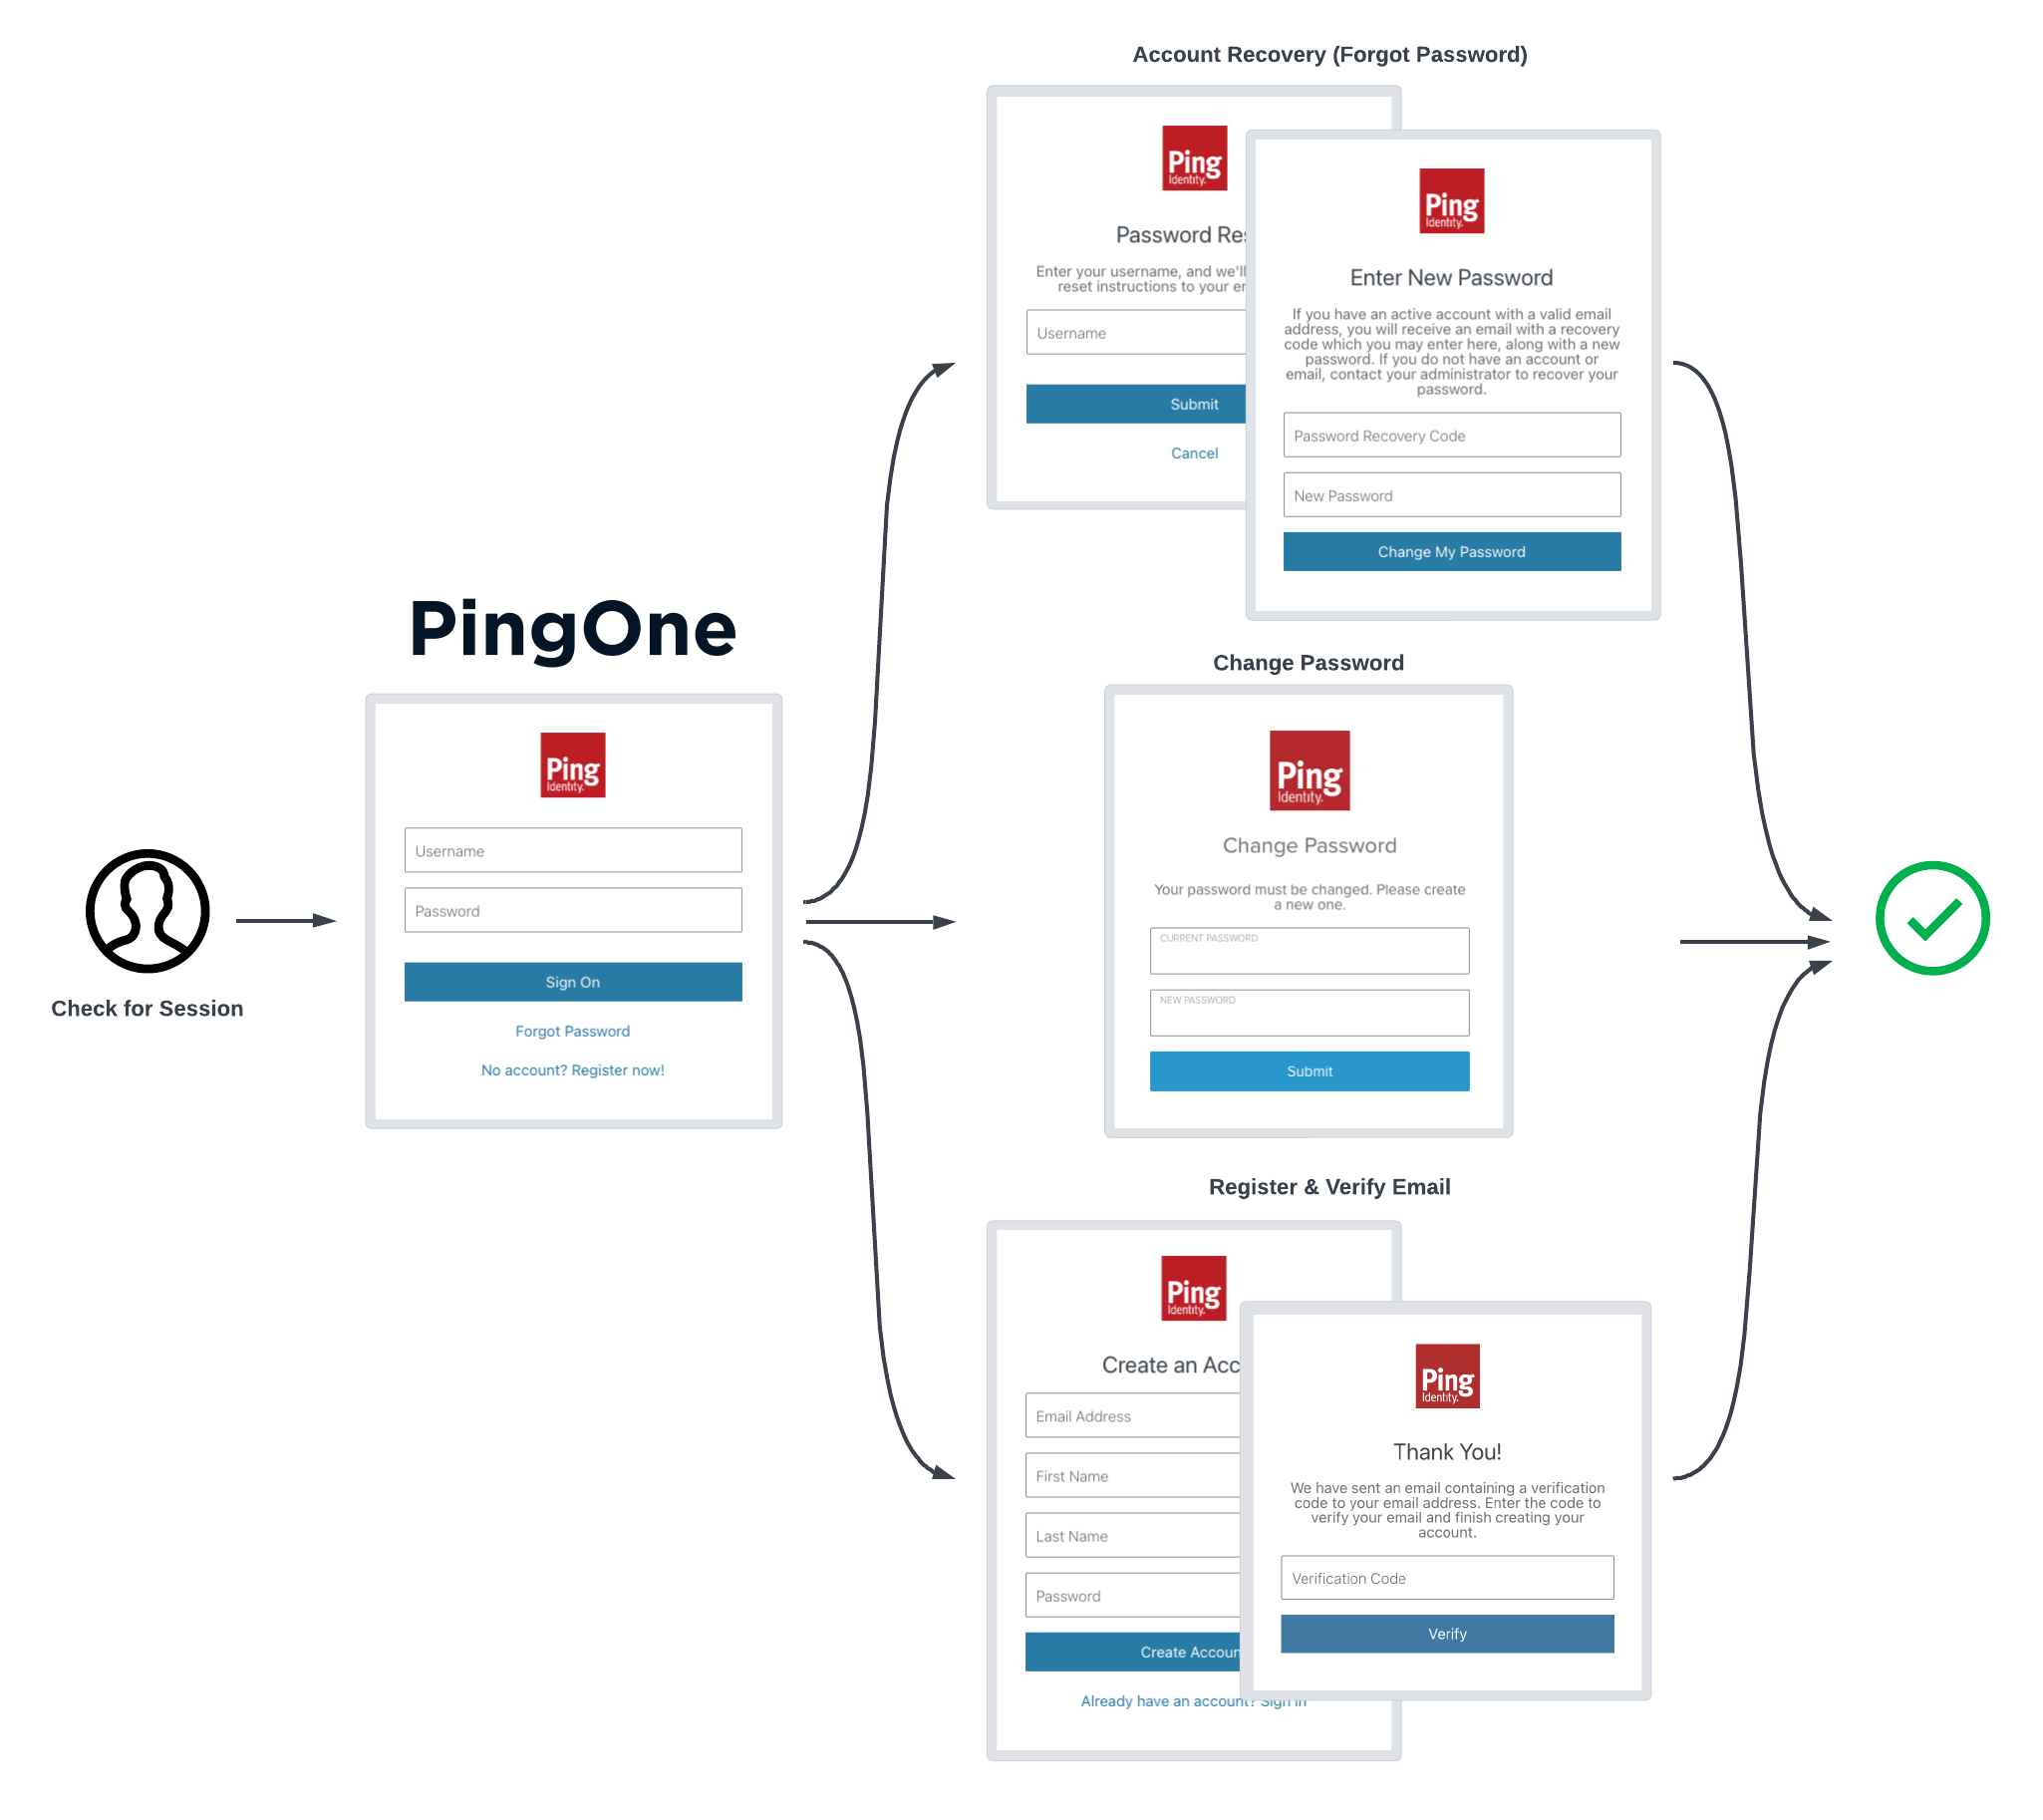
These tutorials walk you through updating a provided sample app so that it connects to a PingOne tenant to authenticate a user using a DaVinci flow, such as the PingOne sign-on with sessions flow.
This flow allows users to register, authenticate, and verify their email address with PingOne. It combines the PingOne Sign On and Password Reset flow, which allows users to reset or recover their passwords, with the PingOne Registration and Email Verification flow, which allows users to register and verify their email. In addition, this flow checks for an active user session before prompting for authentication.
The tutorials also support DaVinci flows that use the PingOne Forms connector.
|
Each tutorial provides a list of the supported capabilities and fields. Check that your flows use only supported fields before attempting to use them with the Ping SDKs. |
You will implement code that:
-
Configures the app with the connection settings for your PingOne instance.
-
Starts a DaVinci flow
-
Renders UI depending on the type of node encountered in the flow
-
Returns responses to each node encountered
-
Gets an access token for the user on completion of the flow
-
Gets the user’s details from PingOne, such as their full name and email address
-
Logs the user out of PingOne
To start, choose the platform to host your app:
DaVinci flow tutorial for Android
This tutorial walks you through updating a provided sample app so that it connects to a PingOne tenant to authenticate a user using the PingOne sign-on with sessions DaVinci flow.
This flow allows users to register, authenticate, and verify their email address with PingOne.
Before you begin
To successfully complete this tutorial refer to the prerequisites in this section.
The tutorial also requires a configured PingOne instance.
Compatibility
- PingOne
-
-
Your PingOne instance must have DaVinci enabled.
-
- DaVinci flows
-
Ensure your flows only use supported connectors, capabilities and fields for user interactions:
-
HTTP Connector
-
Custom HTML capability
View supported fields
HTTP Connector field and collector support Field (
Collector)Description
DaVinci module
Android
iOS
JavaScript
Text field
(
TextCollector)Collects a single text string.
✅
1.0.0
✅
1.0.0
✅
1.0.0
Password field
(
PasswordCollector)Collects a single text string that cannot be read from the screen.
✅
1.0.0
✅
1.0.0
✅
1.0.0
Submit Button
(
SubmitCollector)Sends the collected data to PingOne to continue the DaVinci flow.
✅
1.0.0
✅
1.0.0
✅
1.0.0
Flow Button
(
FlowCollector)Triggers an alternative flow without sending the data collected so far to PingOne.
✅
1.0.0
✅
1.0.0
✅
1.0.0
Label
(
LabelCollector)Display a read-only text label.
✅
1.1.0
✅
1.1.0
✅
1.1.0
Radio / Dropdown
(
SingleSelectCollector)Collects a single value from a choice of multiple options.
✅
1.1.0
✅
1.1.0
✅
1.1.0
HTTP Connector SK-Component support SK-Component (
Collector)Description
DaVinci module
Android
iOS
JavaScript
skIDP
(
IdpCollector)Presents a button to allow users to authenticate using an external identity provider, such as Apple, Facebook, or Google.
✅
1.1.0
✅
1.1.0
✅
1.1.0
View unsupported features
Verify that your flow does not depend on any unsupported elements:
- SKPolling components
-
SKPolling components cannot be processed by the SDK and should not be included.
- Images
-
Images included in the flow cannot be passed to the SDK.
For example, the PingOne sign-on with sessions DaVinci flow.
-
-
PingOne Form Connector
-
Show Form capability
View supported fields
Custom Fields support Field (
Collector)Description
DaVinci module
Android
iOS
JavaScript
Text Input
(
TextCollector)Collects a single text string.
✅
1.1.0
✅
1.1.0
✅
1.1.0
Password
(
PasswordCollector)Collects a single text string that cannot be read from the screen.
✅
1.1.0
✅
1.1.0
✅
1.1.0
Dropdown
(
SingleSelectCollector)Collects a value from a dropdown containing one or more text strings.
✅
1.1.0
✅
1.1.0
✅
1.1.0
Combobox
(
MultiSelectCollector)Collects a value from a dropdown containing one or more text strings, the user can enter their own text string.
✅
1.1.0
✅
1.1.0
✅
1.1.0
Radio Button List
(
SingleSelectCollector)Collects a value from one or radio buttons.
✅
1.1.0
✅
1.1.0
✅
1.1.0
Checkbox List
(
MultiSelectCollector)Collects the value of one or more checkboxes.
✅
1.1.0
✅
1.1.0
✅
1.1.0
Toolbox support Field (
Collector)Description
DaVinci module
Android
iOS
JavaScript
Flow Button
(
FlowCollector)Presents a customized button.
✅
1.1.0
✅
1.1.0
✅
1.1.0
Flow Link
(
FlowCollector)Presents a customized link.
✅
1.1.0
✅
1.1.0
✅
1.1.0
Translatable Rich Text
(
TextCollector)Presents rich text that you can translate into multiple languages.
✅
1.1.0
✅
1.1.0
✅
1.1.0
Social Login
(
IdpCollector)Presents a button to allow users to authenticate using an external identity provider, such as Apple, Facebook, or Google.
✅
1.1.0
✅
1.1.0
✅
1.1.0
-
- Android
-
This sample requires at least Android API 23 (Android 6.0)
- Java
-
This sample requires at least Java 8 (v1.8).
Prerequisites
- Android Studio
-
Download and install Android Studio, which is available for many popular operating systems.
- An Android emulator or physical device
-
To try the quick start application as you develop it, you need an Android device. To add a virtual, emulated Android device to Android Studio, refer to Create and manage virtual devices, on the Android Developers website.
Server configuration
You must configure your PingOne instance for use with the DaVinci client.
Ask your PingOne administrator to complete the following tasks:
-
Configure a DaVinci flow
-
Create a DaVinci application
-
Configure PingOne for DaVinci flow invocation
To learn how to complete these steps, refer to Launching a flow with a Ping SDK in the PingOne DaVinci documentation.
Step 1. Download the samples
To start this tutorial, you need to download the ForgeRock SDK sample apps repo, which contains the projects you will use.
-
In a web browser, navigate to the SDK Sample Apps repository.
-
Download the source code using one of the following methods:
- Download a ZIP file
-
-
Click Code, and then click Download ZIP.
-
Extract the contents of the downloaded ZIP file to a suitable location.
-
- Use a Git-compatible tool to clone the repo locally
-
-
Click Code, and then copy the HTTPS URL.
-
Use the URL to clone the repository to a suitable location.
For example, from the command-line you could run:
-
The result of these steps is a local folder named sdk-sample-apps.
Step 2. Configure the sample app
In this section you open the sample project in Android Studio, and view the integration points in the TODO pane.
You’ll visit each integration point in the sample app to understand how to complete a DaVinci flow, including handling the different nodes and their collectors, obtaining an access token and user information, and finally signing out of the session.
-
In Android Studio, click Open, navigate to the
sdk-sample-apps/android/kotlin-davincifolder that has the downloaded sample source code in, and then click Open.Android Studio opens and loads the DaVinci tutorial project.
-
In the Project pane, navigate to samples > app.
-
On the View menu, select Tool Windows, and then click TODO.
The sample code is annotated with
TODOcomments to help you locate the integration points, where code changes are required.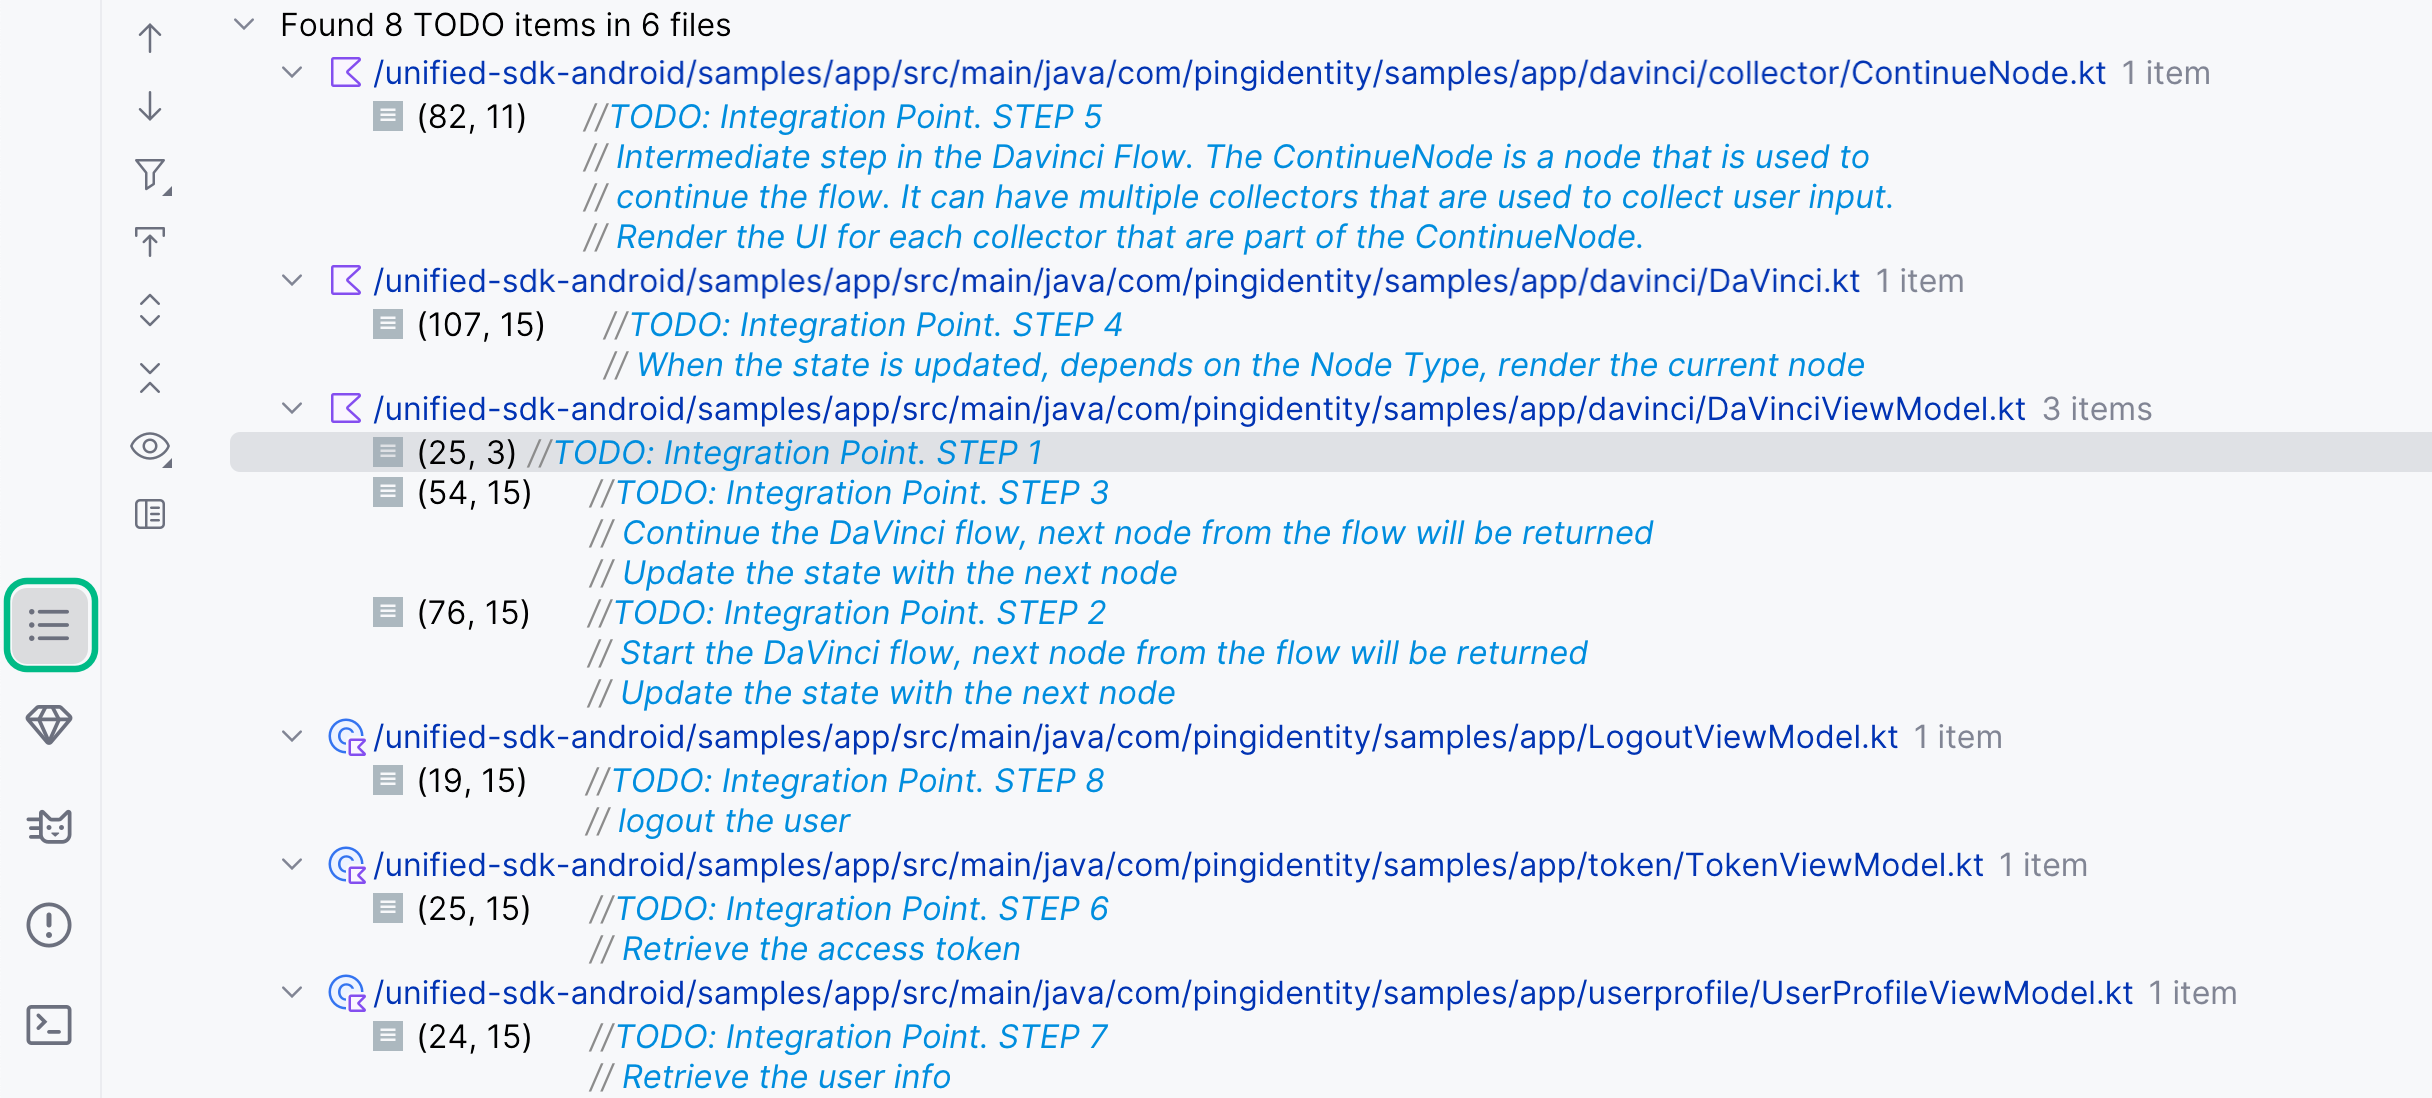 Figure 5. Integration points annotated with
TODOcomments -
In the TODO pane, double-click the STEP 1 line.
Android Studio opens
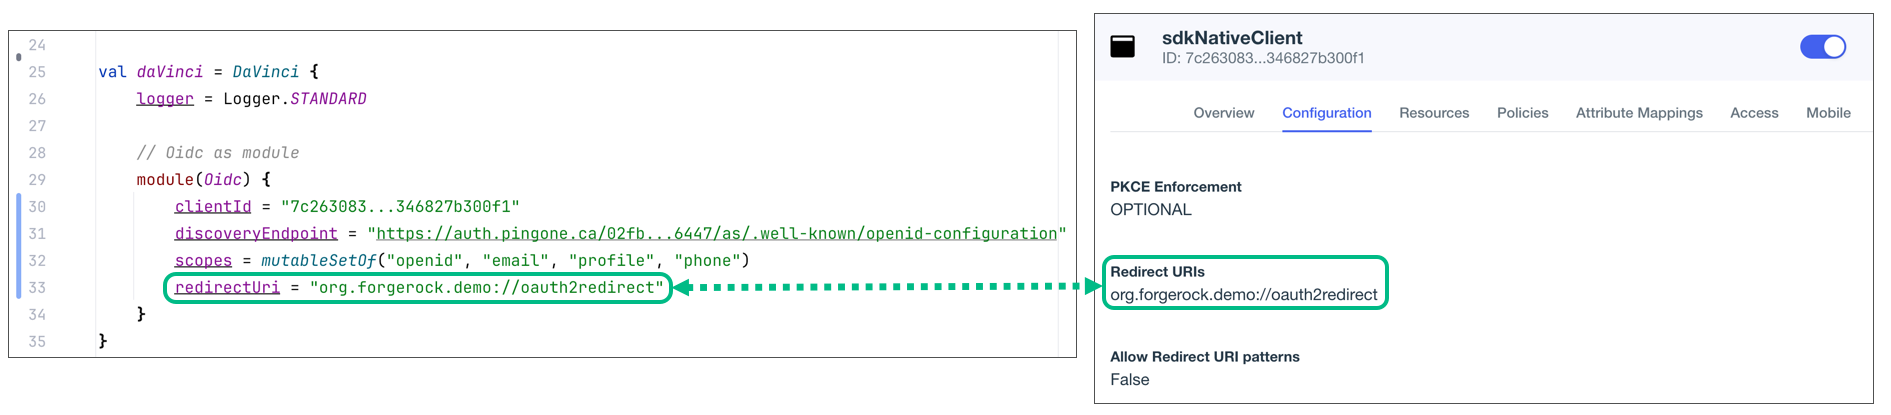
DaVinciViewModel.kt:DaVinciViewModel.kt//TODO: Integration Point. STEP 1 val daVinci = DaVinci { logger = Logger.STANDARD // Oidc as module module(Oidc) { clientId = "<Client ID>" discoveryEndpoint = "<Discovery Endpoint>" scopes = mutableSetOf("<scope1>", "<scope2>", "…") redirectUri = "<Redirect URI>" } }This snippet initializes the
DaVincimodule, and leverages the OpenID Connect (OIDC) module to configure the settings to connect to your PingOne instance.-
Replace <Client ID> with the ID of the client you are connecting to in PingOne.
Example:
clientId = "6c7eb89a-66e9-ab12-cd34-eeaf795650b2"Refer to Get configuration values from PingOne for instructions of where to find this value.
-
Replace <Discovery Endpoint> with the OIDC Discovery Endpoint value from the client you are connecting to in PingOne.
Example:
discoveryEndpoint = "https://auth.pingone.ca/3072206d-c6ce-ch15-m0nd-f87e972c7cc3/as/.well-known/openid-configuration"Refer to Get configuration values from PingOne for instructions of where to find this value.
-
In the
scopesproperty, add the scopes you want to assign users who complete authentication using the client.Example:
scopes = mutableSetOf("openid", "email", "profile") -
Replace <Redirect URI> with the application ID of your sample app, followed by
://oauth2redirect.Example:
redirectUri = "org.forgerock.demo://oauth2redirect"The
redirectUrivalue you use must exactly match one of the Redirect URIs value you enter in the native OAuth 2.0 application you created earlier. -
Optionally, delete the
TODOcomment to remove it from the list.
The result resembles the following:
DaVinciViewModel.ktval daVinci = DaVinci { logger = Logger.STANDARD // Oidc as module module(Oidc) { clientId = "6c7eb89a-66e9-ab12-cd34-eeaf795650b2" discoveryEndpoint = "https://auth.pingone.ca/3072206d-c6ce-ch15-m0nd-f87e972c7cc3/as/.well-known/openid-configuration" scopes = mutableSetOf("openid", "email", "profile") redirectUri = "org.forgerock.demo://oauth2redirect" } } -
-
In the TODO pane, double-click the STEP 2 line.
Android Studio opens
DaVinciViewModel.kt:DaVinciViewModel.kt//TODO: Integration Point. STEP 2 // Start the DaVinci flow, next node from the flow will be returned // Update the state with the next node /* val next = daVinci.start() state.update { it.copy(prev = next, node = next) } */This snippet calls
start()to start the DaVinci flow, and assigns the returned node to the variablenext.It also updates the app’s state to store the response as both
prevandnode.-
Uncomment the highlighted text.
-
Optionally, delete the
TODOcomment to remove it from the list.
-
-
In the TODO pane, double-click the STEP 3 line.
Android Studio opens
DaVinciViewModel.kt:DaVinciViewModel.kt//TODO: Integration Point. STEP 3 // Continue the DaVinci flow, next node from the flow will be returned // Update the state with the next node /* val next = current.next() state.update { it.copy(prev = current, node = next) } */This snippet calls
next()to continue the DaVinci flow, by proceeding to the next available node. It assigns the newly returned node to the variablenext.It also updates the app’s state to store the new response as
node, and the current node asprev.-
Uncomment the highlighted text.
-
Optionally, delete the
TODOcomment to remove it from the list.
-
-
In the TODO pane, double-click the STEP 4 line.
Android Studio opens
DaVinci.kt:DaVinci.kt//TODO: Integration Point. STEP 4 // Render the current node depending on its type /* when (val node = state.node) { is ContinueNode → { Render(node = node, onNodeUpdated, onStart) { onNext(node) } } is FailureNode → { Log.e("DaVinci", node.cause.message, node.cause) Render(node = node) } is ErrorNode → { Render(node) // Render the previous node if (state.prev is ContinueNode) { Render(node = state.prev, onNodeUpdated, onStart) { onNext(state.prev) } } } is SuccessNode → { LaunchedEffect(true) { onSuccess?.let { onSuccess() } } } else → {} } */This snippet watches for a change in state, and takes an action based on the ode type returned by DaVinci.
For example, if it is a
FailureNodelog an error message. If the node is aContinueNodethat continues the flow, call the render function to display the necessary fields on the screen.-
Uncomment the highlighted text.
-
Optionally, delete the
TODOcomment to remove it from the list.
-
-
In the TODO pane, double-click the STEP 5 line.
Android Studio opens
ContinueNode.kt:ContinueNode.kt//TODO: Integration Point. STEP 5 // Intermediate step in the Davinci Flow. The ContinueNode is a node that is used to // continue the flow. It can have multiple collectors that are used to collect user input. // Render the UI for each collector that are part of the ContinueNode. /* continueNode.collectors.forEach { when (it) { is FlowCollector → { hasAction = true FlowButton(it, onNext) } is PasswordCollector → { Password(it, onNodeUpdated) } is SubmitCollector → { hasAction = true SubmitButton(it, onNext) } is TextCollector → Text(it, onNodeUpdated) } } */This snippet handles the various collectors that are returned by the current node.
Loop through all of the collectors in the node and render an appropriate field in your app.
For example, this snippet handles text and password fields, and two types of button, a submit and a flow type.
-
Uncomment the highlighted text.
-
Optionally, delete the
TODOcomment to remove it from the list.
-
-
In the TODO pane, double-click the STEP 6 line.
Android Studio opens
TokenViewModel.kt:TokenViewModel.kt//TODO: Integration Point. STEP 6 // Retrieve the access token /* User.user()?.let { when (val result = it.token()) { is Failure → { state.update { it.copy(token = null, error = result.value) } } is Success → { state.update { it.copy(token = result.value, error = null) } } } } ?: run { state.update { it.copy(token = null, error = null) } } */This snippet gets called when the flow reaches a
SuccessNodeand gets an access token on behalf of the authenticated user.-
Uncomment the highlighted text.
-
Optionally, delete the
TODOcomment to remove it from the list.
-
-
In the TODO pane, double-click the STEP 7 line.
Android Studio opens
UserProfileViewModel.kt:UserProfileViewModel.kt//TODO: Integration Point. STEP 7 // Retrieve the user info /* User.user()?.let { user → when (val result = user.userinfo(false)) { is Result.Failure → state.update { s → s.copy(user = null, error = result.value) } is Result.Success → state.update { s → s.copy(user = result.value, error = null) } } } */This snippet gets the user’s info from DaVinci, for example their preferred name for display within the sample app.
-
Uncomment the highlighted text.
-
Optionally, delete the
TODOcomment to remove it from the list.
-
-
In the TODO pane, double-click the STEP 8 line.
Android Studio opens
LogoutViewModel.kt:LogoutViewModel.kt//TODO: Integration Point. STEP 8 // logout the user /* User.user()?.logout() */This snippet calls the
logout()function on theUserobject to sign the user out of the app, and end their session in DaVinci.-
Uncomment the highlighted text.
-
Optionally, delete the
TODOcomment to remove it from the list.
-
Step 3. Test the app
In the following procedure, you run the sample app that you configured in the previous step.
-
Add or connect a device to Android Studio.
Learn more about devices in Android Studio in the Android Developer documentation:
-
On the Run menu, click Run 'samples.app'.
Android Studio starts the sample application on the simulated or connected device.
The app automatically starts the DaVinci flow:
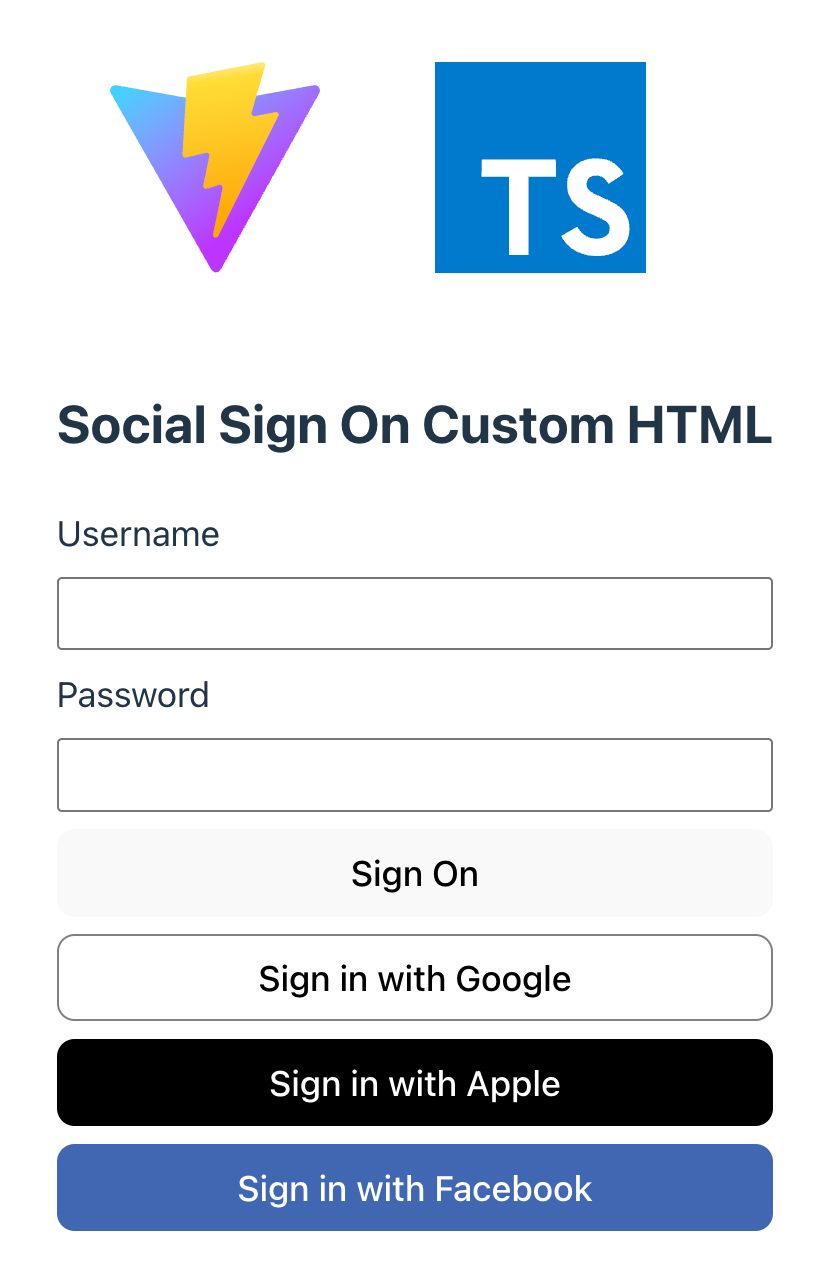
 Figure 6. The DaVinci sample app first screen with fields and buttons.
 -
Optionally, to register a new identity in PingOne, tap the No Account? Register now! link.
This link is an example of a FlowButton.The app displays the registration screen:
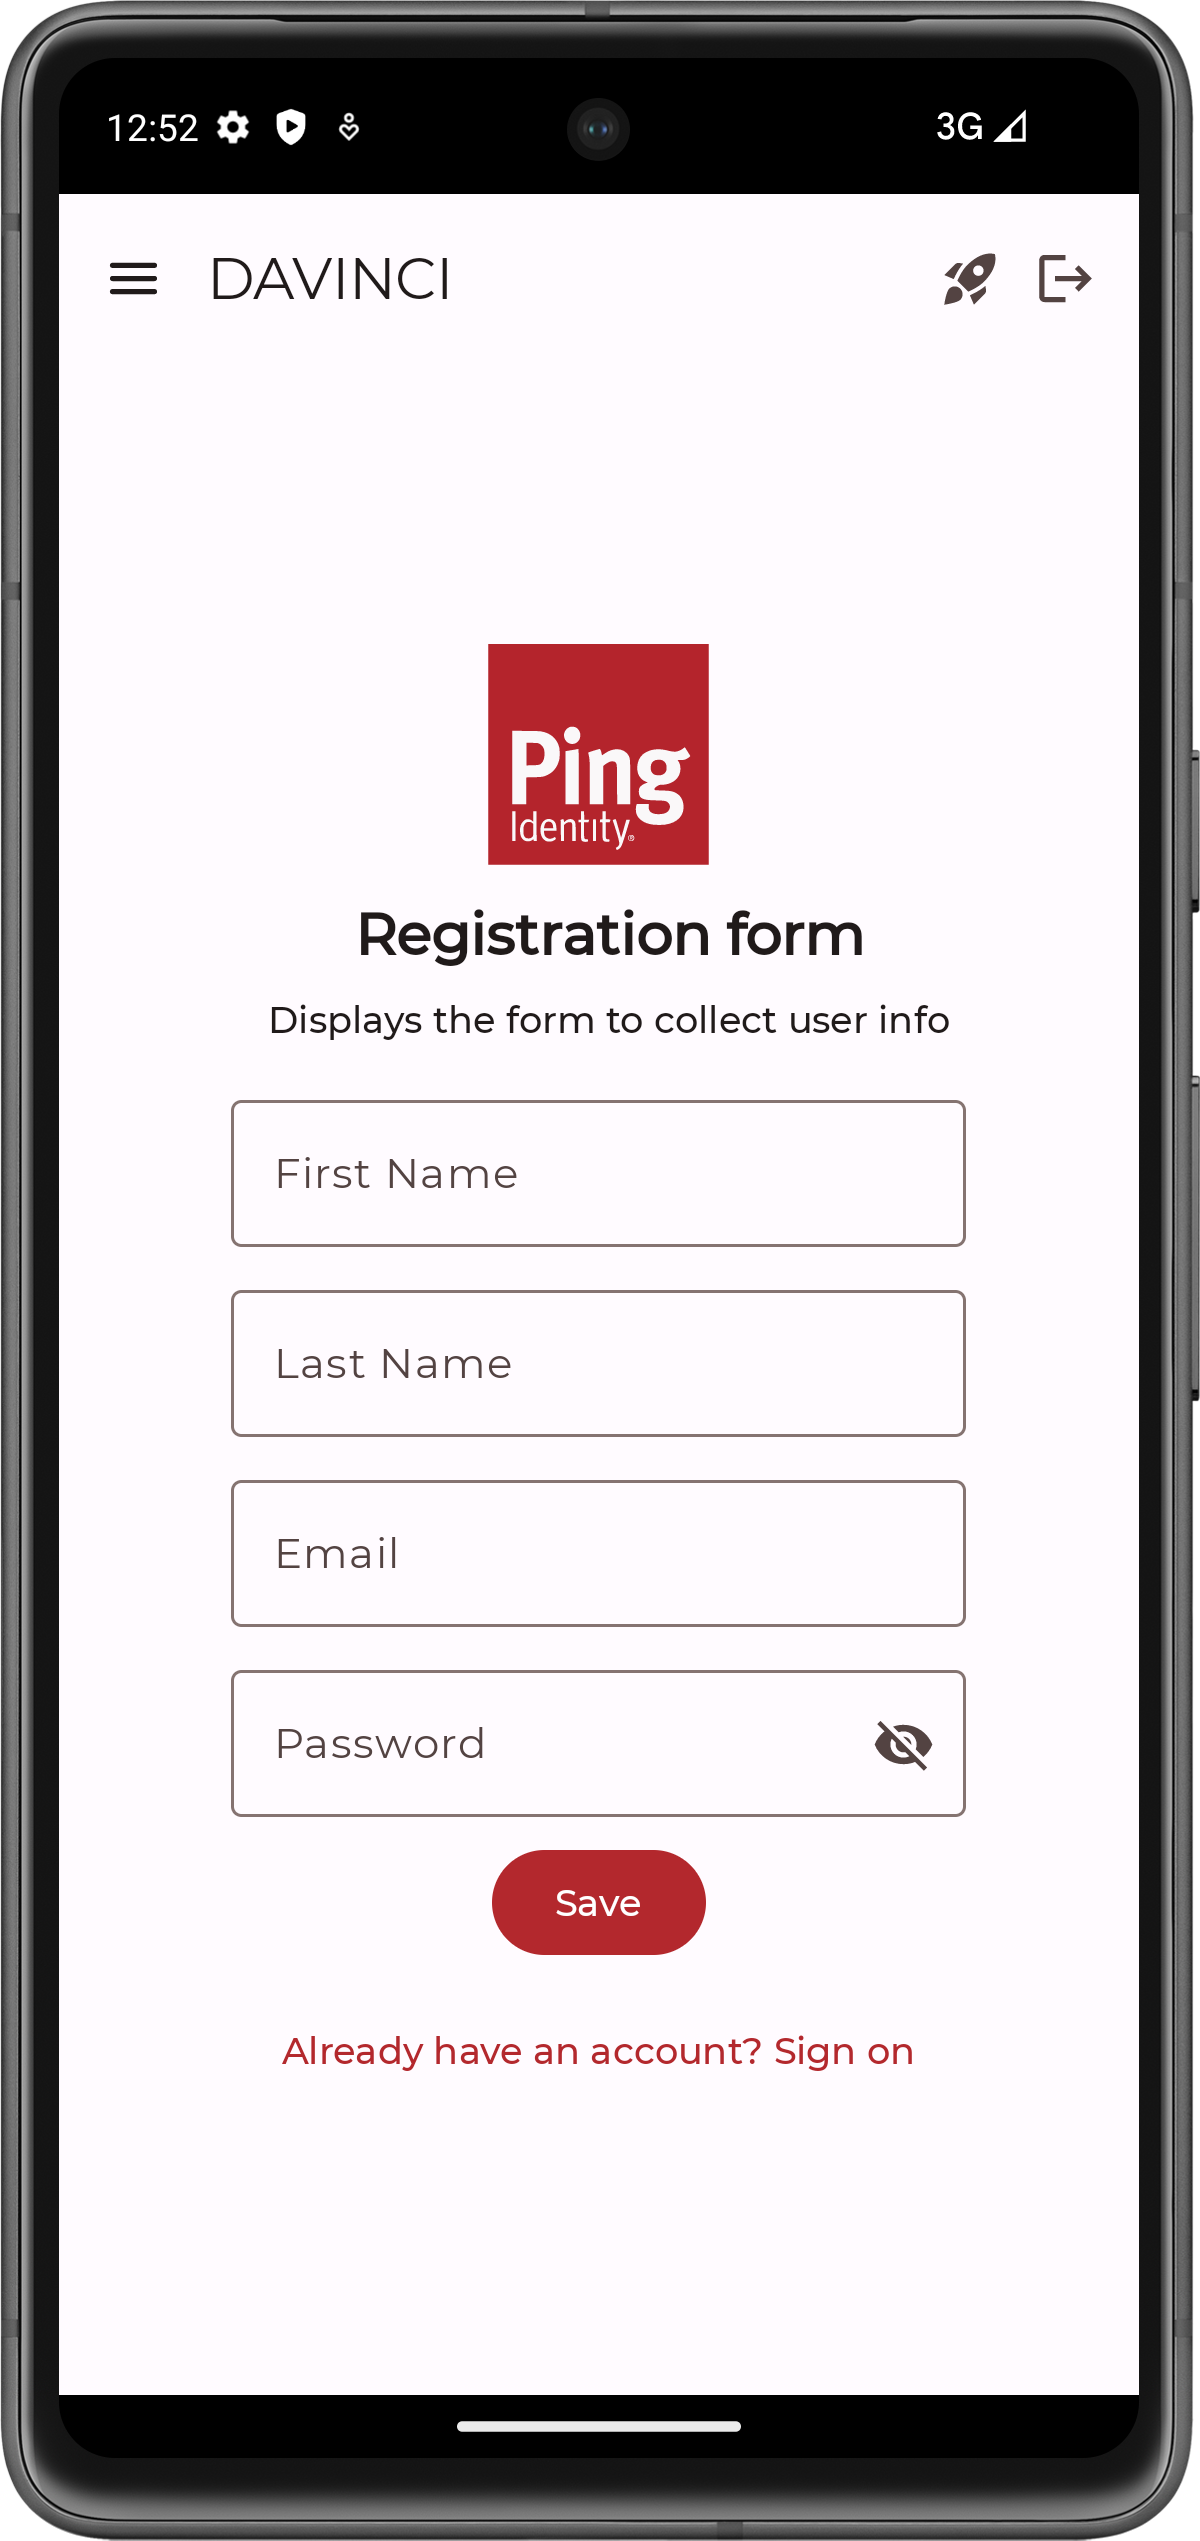 Figure 7. The DaVinci sample app registration screen.
-
Enter the details of the new identity, and then click Save.
The app creates the new identity in PingOne and returns to the sign on screen.
-
-
Enter the username and password of a PingOne identity, and then click Sign On.
The app sends the credentials to PingOne for validation, and on success displays the user’s info:
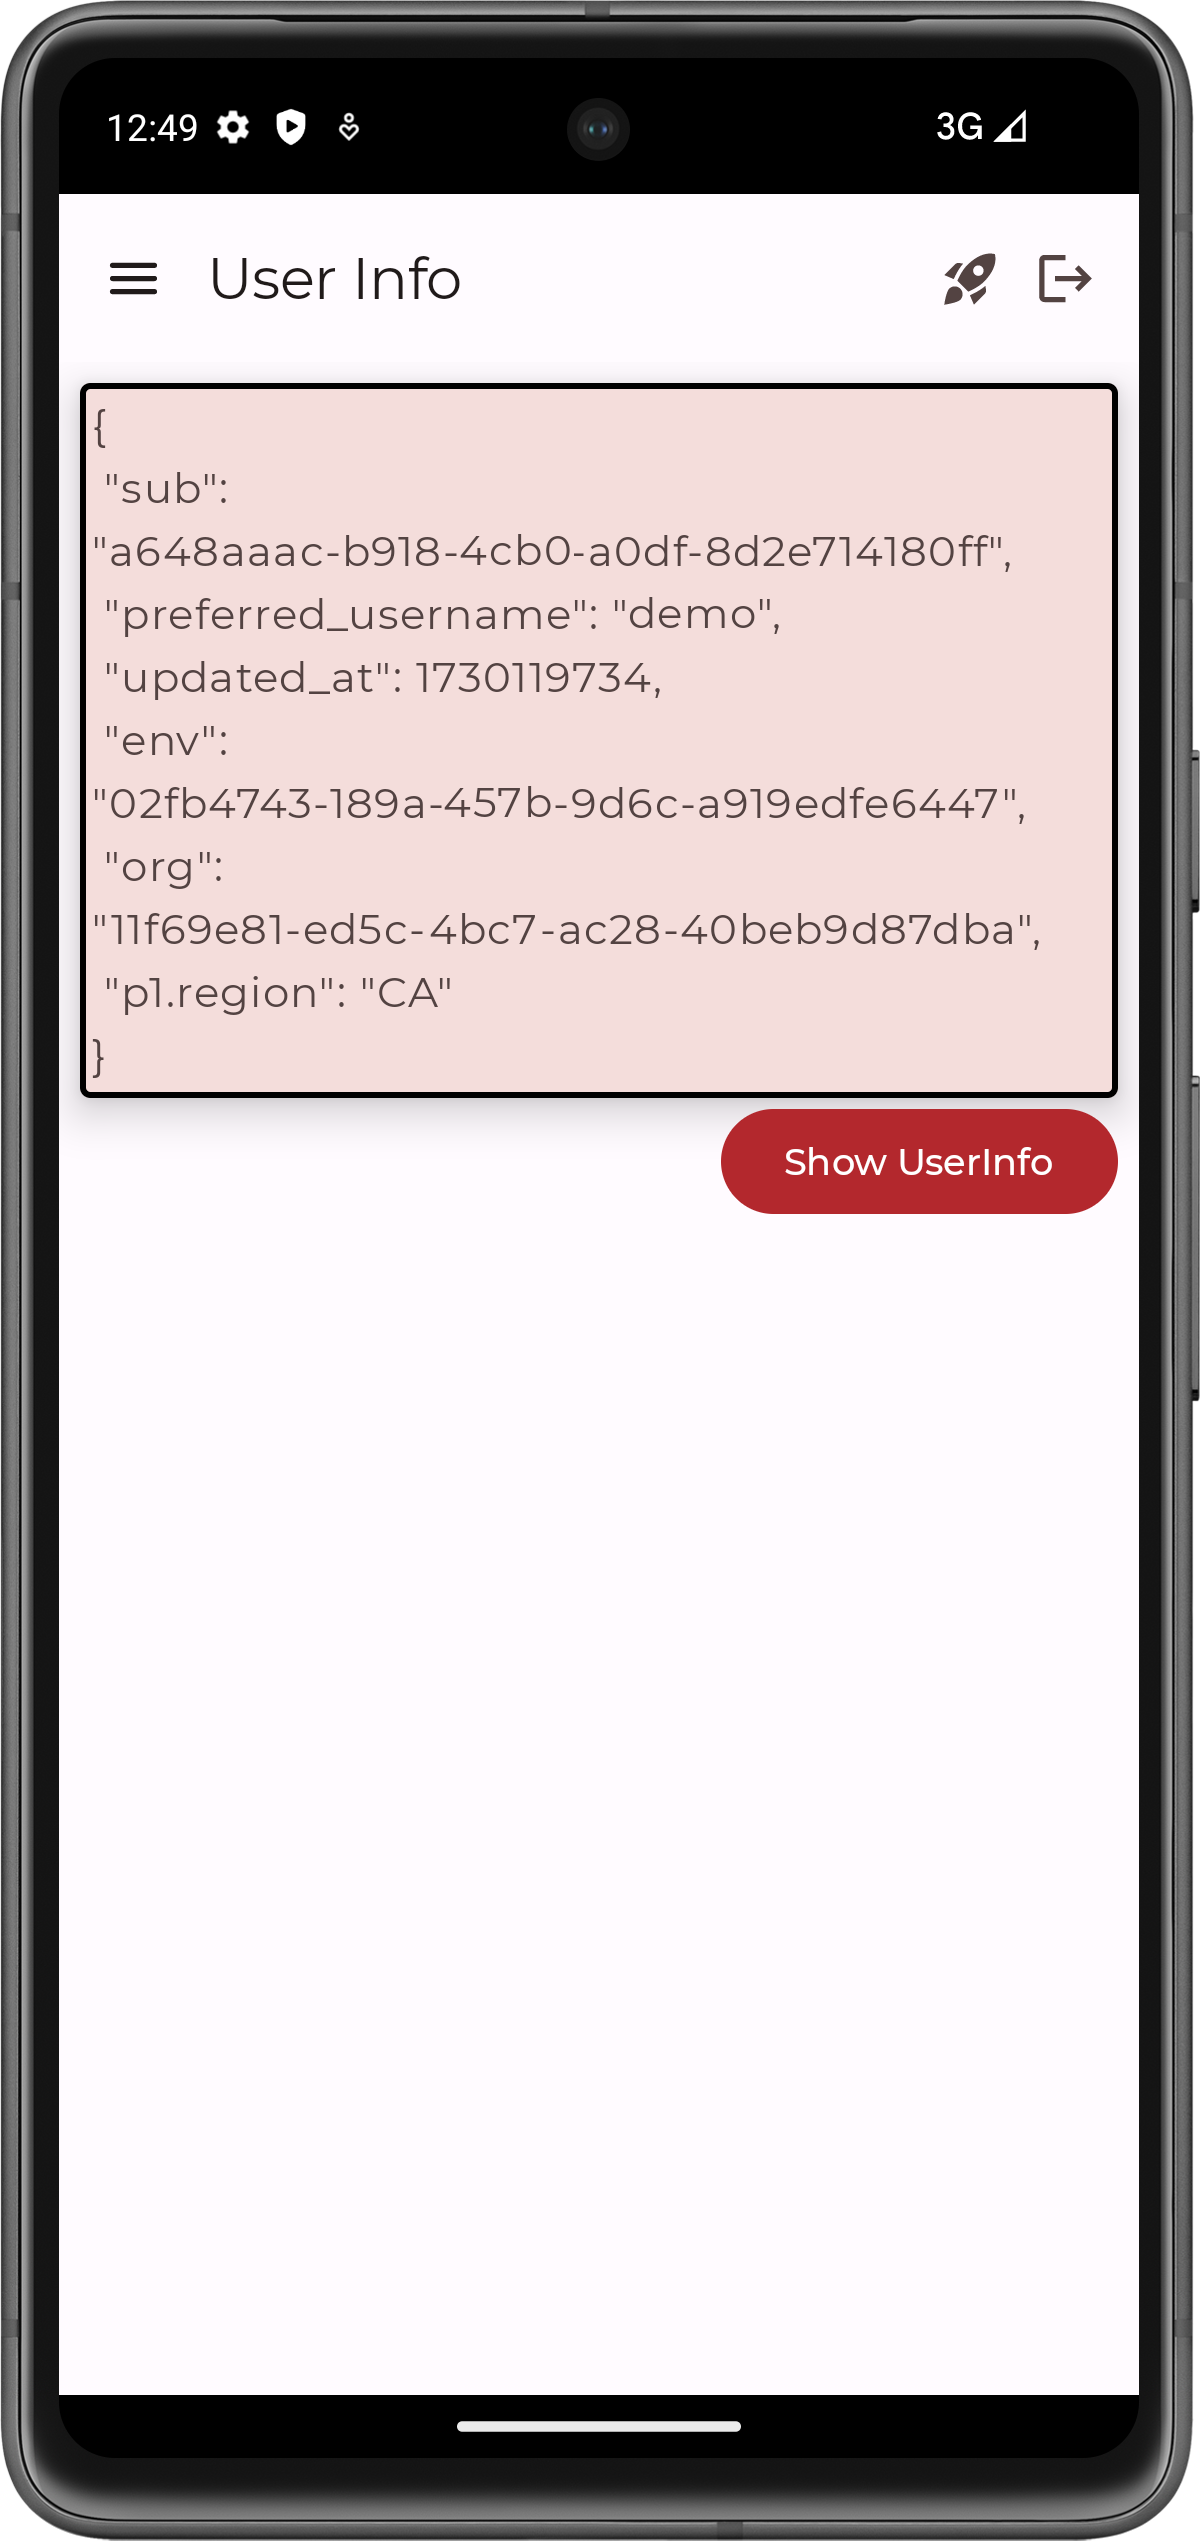 Figure 8. The DaVinci sample app displaying user info
 -
Tap the menu () icon, and then tap Show Token.
The app shows the access token obtained on behalf of the user.
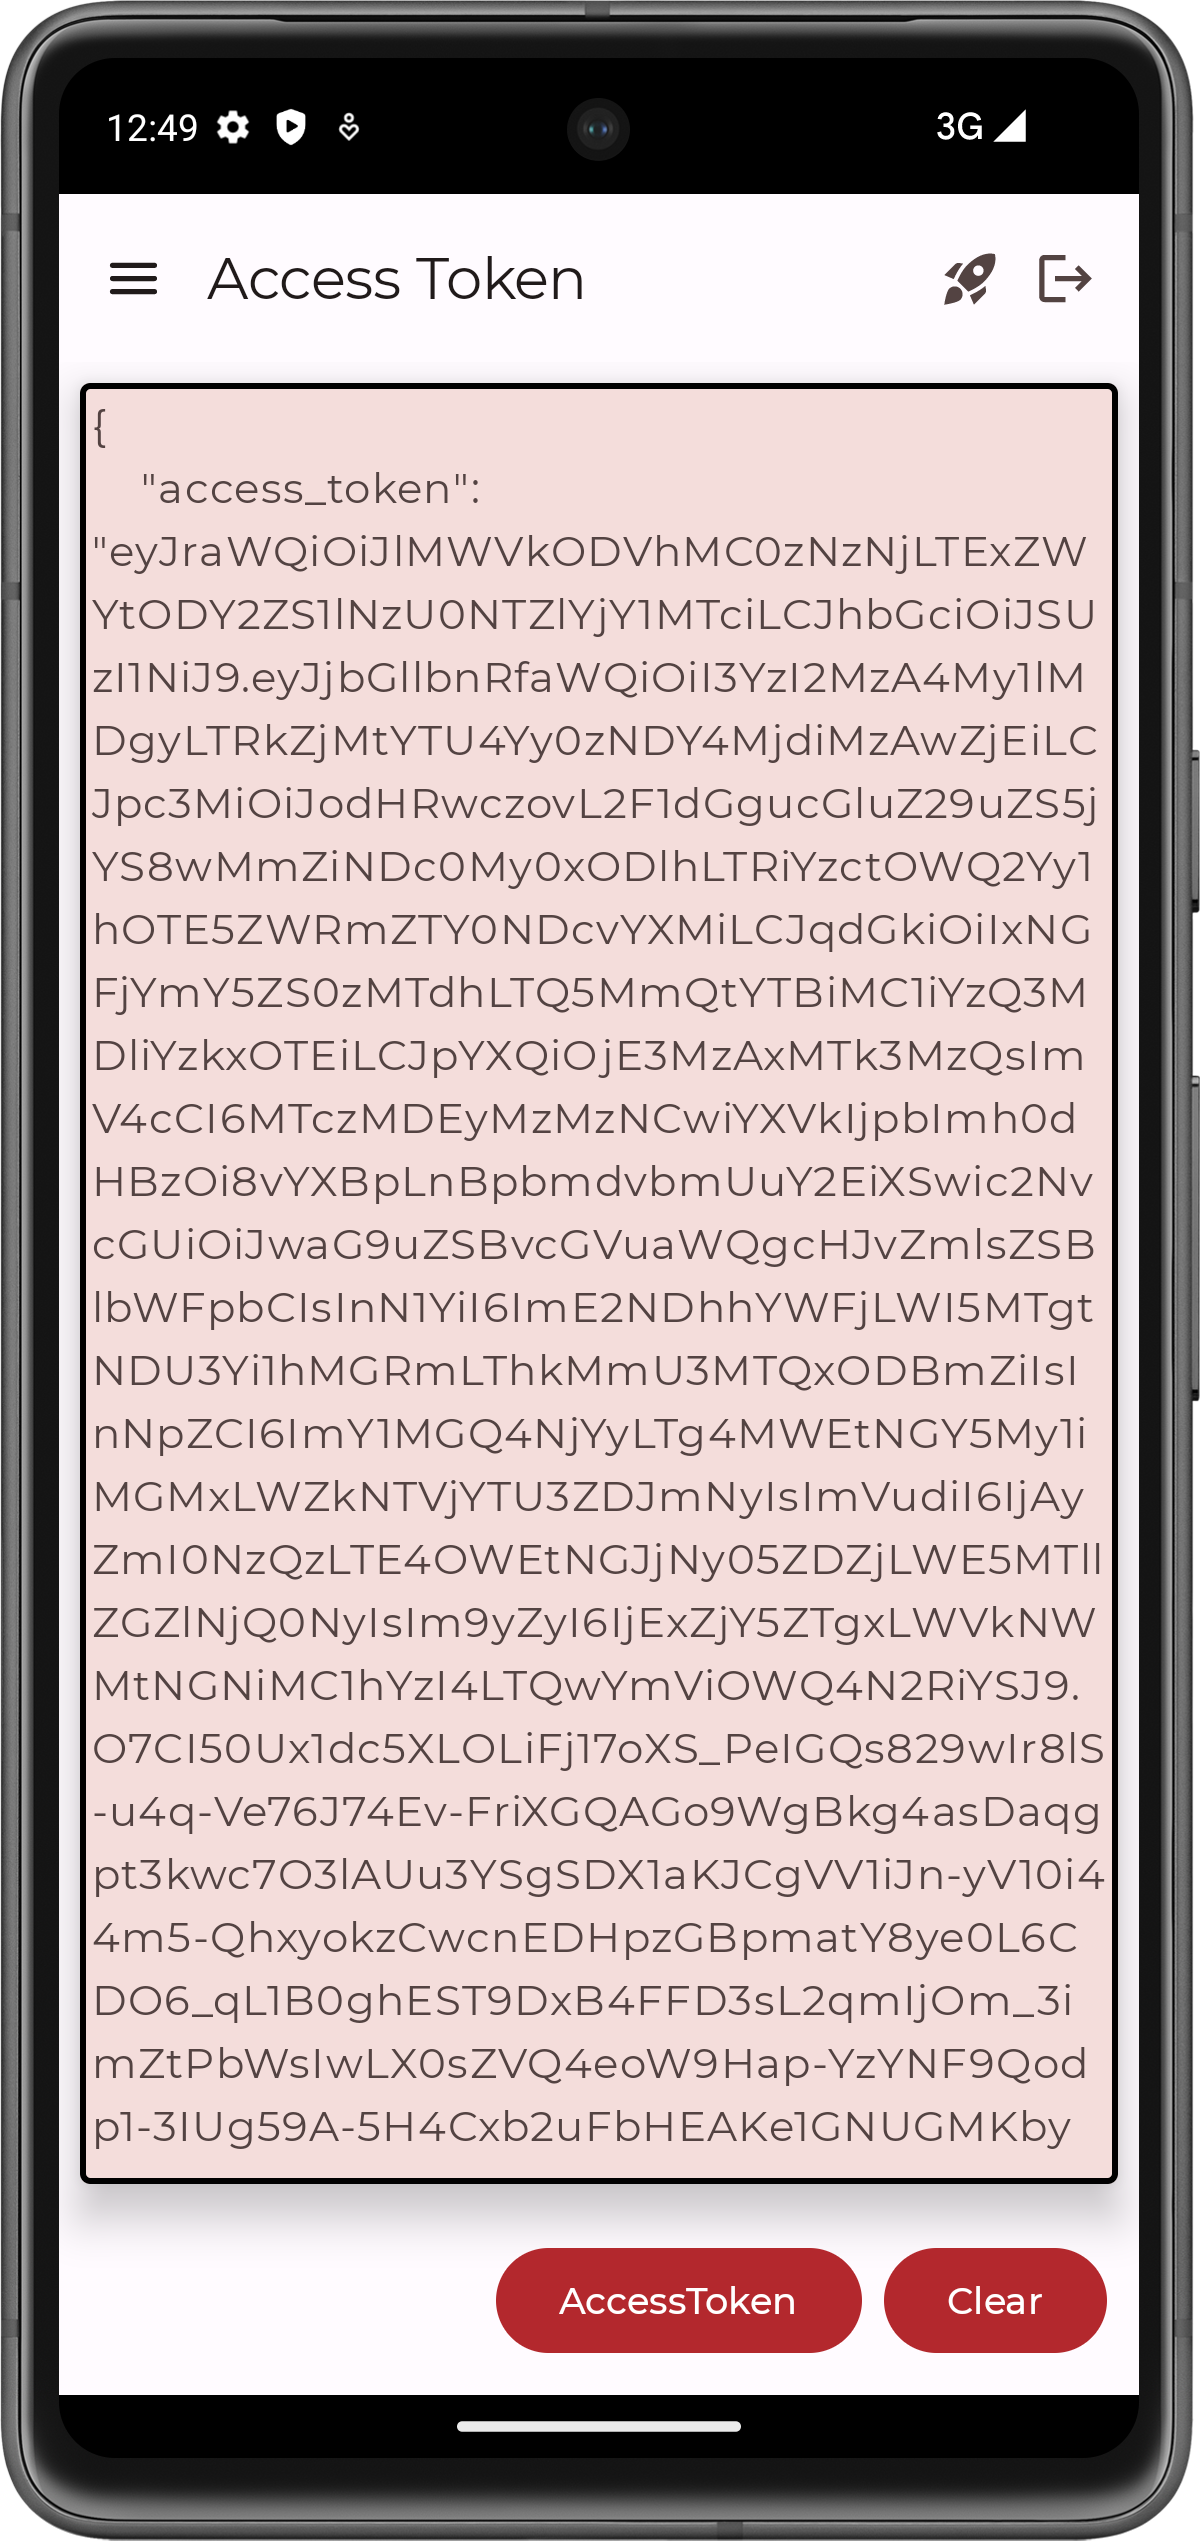 Figure 9. The DaVinci sample app displaying a user’s access token
 -
Tap the menu () icon, and then tap Logout.
The app revokes the existing tokens and ends the session in PingOne.
Troubleshooting
This section contains help if you encounter an issue running the sample code.
What can cause validation errors in the request?
When starting the app you might see an error message as follows:
The request could not be completed. One or more validation errors were in the request.
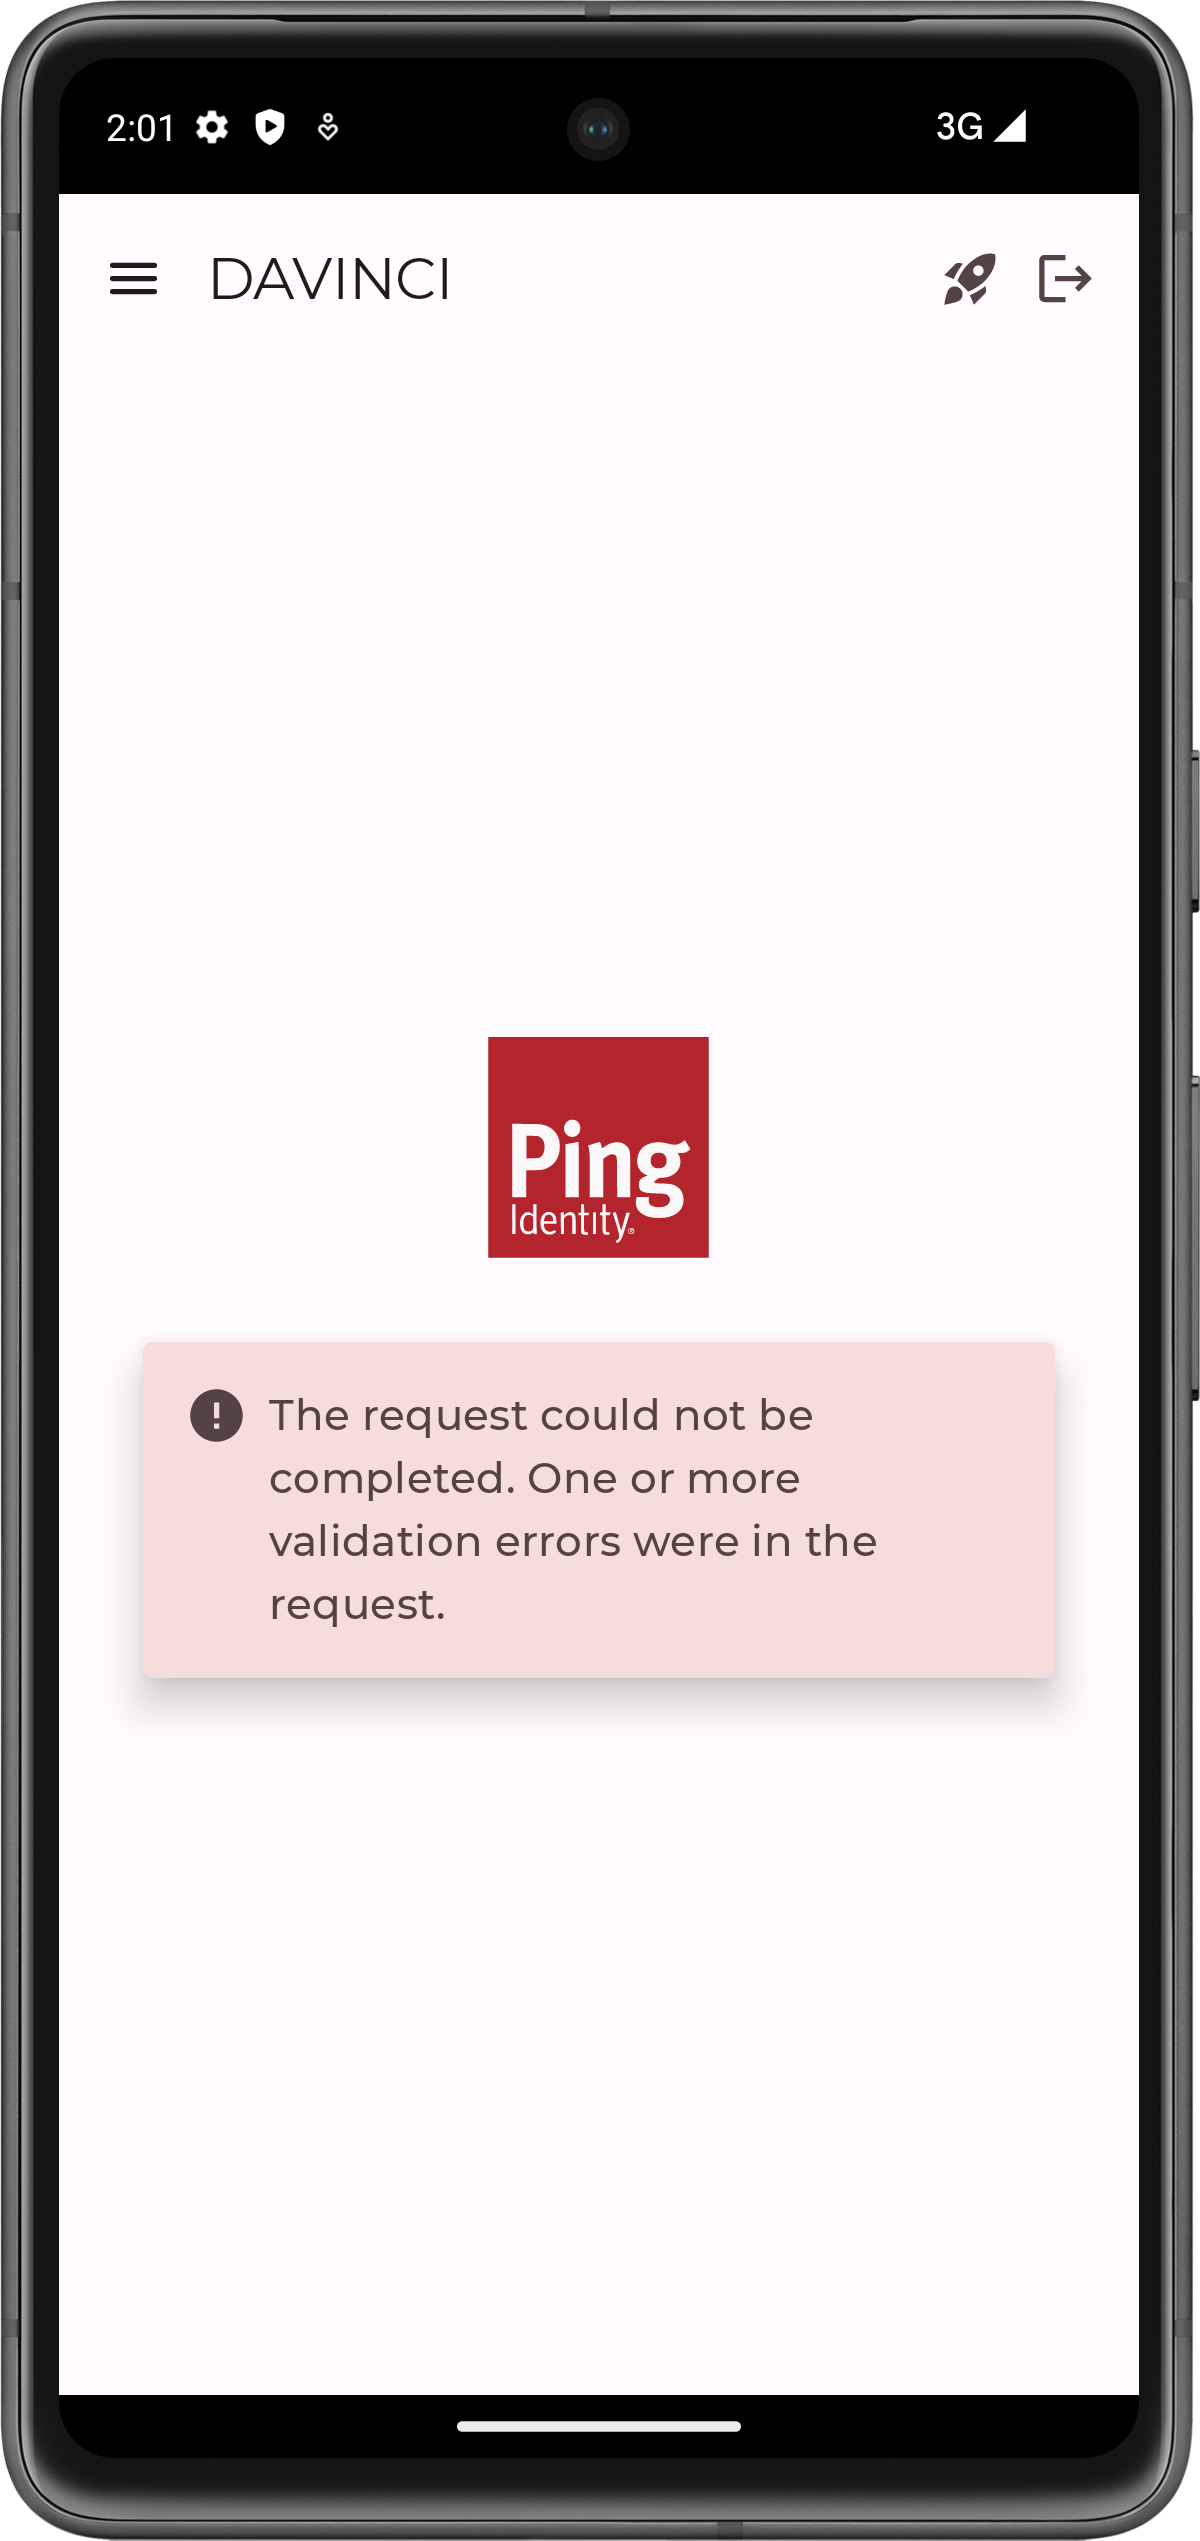
The Logcat pane in Android Studio often contains additional information about the error:
{
  "id" : "2a72bf00-5f20-4b78-a7d0-ad8d95e9b11b",
  "code" : "INVALID_DATA",
  "message" : "The request could not be completed. One or more validation errors were in the request.",
  "details" : [
    {
      "code" : "INVALID_VALUE",
      "target" : "redirect_uri",
      "message" : "Redirect URI mismatch"
    }
  ]
}
In this case the cause is Redirect URI mismatch.
Ensure that your redirectUri value in com/pingidentity/samples/app/davinci/DaVinciViewModel.kt exactly matches one of the values you entered in the Redirect URIs field in your OAuth 2.0 application in PingOne:
DaVinci flow tutorial for iOS
This tutorial walks you through updating a provided sample app so that it connects to a PingOne tenant to authenticate a user using the PingOne sign-on with sessions DaVinci flow.
This flow allows users to register, authenticate, and verify their email address with PingOne.
Before you begin
To successfully complete this tutorial refer to the prerequisites in this section.
The tutorial also requires a configured PingOne instance.
Compatibility
- PingOne
-
-
Your PingOne instance must have DaVinci enabled.
-
- DaVinci flows
-
Ensure your flows only use supported connectors, capabilities and fields for user interactions:
-
HTTP Connector
-
Custom HTML capability
View supported fields
HTTP Connector field and collector support Field (
Collector)Description
DaVinci module
Android
iOS
JavaScript
Text field
(
TextCollector)Collects a single text string.
✅
1.0.0
✅
1.0.0
✅
1.0.0
Password field
(
PasswordCollector)Collects a single text string that cannot be read from the screen.
✅
1.0.0
✅
1.0.0
✅
1.0.0
Submit Button
(
SubmitCollector)Sends the collected data to PingOne to continue the DaVinci flow.
✅
1.0.0
✅
1.0.0
✅
1.0.0
Flow Button
(
FlowCollector)Triggers an alternative flow without sending the data collected so far to PingOne.
✅
1.0.0
✅
1.0.0
✅
1.0.0
Label
(
LabelCollector)Display a read-only text label.
✅
1.1.0
✅
1.1.0
✅
1.1.0
Radio / Dropdown
(
SingleSelectCollector)Collects a single value from a choice of multiple options.
✅
1.1.0
✅
1.1.0
✅
1.1.0
HTTP Connector SK-Component support SK-Component (
Collector)Description
DaVinci module
Android
iOS
JavaScript
skIDP
(
IdpCollector)Presents a button to allow users to authenticate using an external identity provider, such as Apple, Facebook, or Google.
✅
1.1.0
✅
1.1.0
✅
1.1.0
View unsupported features
Verify that your flow does not depend on any unsupported elements:
- SKPolling components
-
SKPolling components cannot be processed by the SDK and should not be included.
- Images
-
Images included in the flow cannot be passed to the SDK.
For example, the PingOne sign-on with sessions DaVinci flow.
-
-
PingOne Form Connector
-
Show Form capability
View supported fields
Custom Fields support Field (
Collector)Description
DaVinci module
Android
iOS
JavaScript
Text Input
(
TextCollector)Collects a single text string.
✅
1.1.0
✅
1.1.0
✅
1.1.0
Password
(
PasswordCollector)Collects a single text string that cannot be read from the screen.
✅
1.1.0
✅
1.1.0
✅
1.1.0
Dropdown
(
SingleSelectCollector)Collects a value from a dropdown containing one or more text strings.
✅
1.1.0
✅
1.1.0
✅
1.1.0
Combobox
(
MultiSelectCollector)Collects a value from a dropdown containing one or more text strings, the user can enter their own text string.
✅
1.1.0
✅
1.1.0
✅
1.1.0
Radio Button List
(
SingleSelectCollector)Collects a value from one or radio buttons.
✅
1.1.0
✅
1.1.0
✅
1.1.0
Checkbox List
(
MultiSelectCollector)Collects the value of one or more checkboxes.
✅
1.1.0
✅
1.1.0
✅
1.1.0
Toolbox support Field (
Collector)Description
DaVinci module
Android
iOS
JavaScript
Flow Button
(
FlowCollector)Presents a customized button.
✅
1.1.0
✅
1.1.0
✅
1.1.0
Flow Link
(
FlowCollector)Presents a customized link.
✅
1.1.0
✅
1.1.0
✅
1.1.0
Translatable Rich Text
(
TextCollector)Presents rich text that you can translate into multiple languages.
✅
1.1.0
✅
1.1.0
✅
1.1.0
Social Login
(
IdpCollector)Presents a button to allow users to authenticate using an external identity provider, such as Apple, Facebook, or Google.
✅
1.1.0
✅
1.1.0
✅
1.1.0
-
- iOS
-
This sample app is compatible with iOS 12 and later.
Prerequisites
- Xcode
-
You can download the latest version for free from https://developer.apple.com/xcode/.
Server configuration
You must configure your PingOne instance for use with the DaVinci client.
Ask your PingOne administrator to complete the following tasks:
-
Configure a DaVinci flow
-
Create a DaVinci application
-
Configure PingOne for DaVinci flow invocation
To learn how to complete these steps, refer to Launching a flow with a Ping SDK in the PingOne DaVinci documentation.
Step 1. Download the samples
To start this tutorial, you need to download the ForgeRock SDK sample apps repo, which contains the projects you will use.
-
In a web browser, navigate to the SDK Sample Apps repository.
-
Download the source code using one of the following methods:
- Download a ZIP file
-
-
Click Code, and then click Download ZIP.
-
Extract the contents of the downloaded ZIP file to a suitable location.
-
- Use a Git-compatible tool to clone the repo locally
-
-
Click Code, and then copy the HTTPS URL.
-
Use the URL to clone the repository to a suitable location.
For example, from the command-line you could run:
-
The result of these steps is a local folder named sdk-sample-apps.
Step 2. Configure the sample app
In this section you open the sample project in Xcode, and view the integration points in the TODO pane.
You’ll visit each integration point in the sample app to understand how to complete a DaVinci flow, including handling the different nodes and their collectors, obtaining an access token and user information, and finally signing out of the session.
-
In Xcode, on the File menu, click Open.
-
Navigate to the
sdk-sample-appsfolder you cloned in the previous step, navigate toiOS>swiftui-davinci>Davinci.xcworkspace, and then click Open.Xcode opens and loads the DaVinci tutorial project.
-
Open
DavinciViewModeland locate theDaVinci.createDaVincicall:TheDaVinci.createDaVincicall inDavinciViewModelpublic let davinci = DaVinci.createDaVinci { config in //TODO: Provide here the Server configuration. Add the PingOne server Discovery Endpoint and the OAuth 2.0 client details config.module(OidcModule.config) { oidcValue in oidcValue.clientId = "Client ID" oidcValue.scopes = ["scope1", "scope2", "scope3"] oidcValue.redirectUri = "Redirect URI" oidcValue.discoveryEndpoint = "Discovery Endpoint" } }This snippet initializes the
DaVincimodule, and leverages the OpenID Connect (OIDC) module to configure the settings to connect to your PingOne instance.-
In the
oidcValue.clientIdproperty, enter the ID of the client you are connecting to in PingOne.Example:
clientId = "6c7eb89a-66e9-ab12-cd34-eeaf795650b2"Refer to Get configuration values from PingOne for instructions of where to find this value.
-
In the
oidcValue.scopesproperty, add the scopes you want to assign users who complete authentication using the client.Example:
scopes = mutableSetOf("openid", "email", "profile") -
In the
oidcValue.redirectUriproperty, enter the application ID of your sample app, followed by://oauth2redirect.Example:
redirectUri = "org.forgerock.demo://oauth2redirect"The
redirectUrivalue you use must exactly match one of the Redirect URIs value you enter in the native OAuth 2.0 application you created earlier. -
In the
oidcValue.discoveryEndpointproperty, enter the OIDC Discovery Endpoint value from the client you are connecting to in PingOne.Example:
discoveryEndpoint = "https://auth.pingone.ca/3072206d-c6ce-ch15-m0nd-f87e972c7cc3/as/.well-known/openid-configuration"Refer to Get configuration values from PingOne for instructions of where to find this value.
-
Optionally, delete the
TODOcomment to remove it from the list.
The result resembles the following:
DavinciViewModelpublic let davinci = DaVinci.createDaVinci { config in //TODO: Provide here the Server configuration. Add the PingOne server Discovery Endpoint and the OAuth2.0 client details config.module(OidcModule.config) { oidcValue in oidcValue.clientId = "6c7eb89a-66e9-ab12-cd34-eeaf795650b2" oidcValue.scopes = ["openid", "email", "profile"] oidcValue.redirectUri = "org.forgerock.demo://oauth2redirect" oidcValue.discoveryEndpoint = "https://auth.pingone.ca/3072206d-c6ce-ch15-m0nd-f87e972c7cc3/as/.well-known/openid-configuration" } } -
Step 3. Test the app
In the following procedure, you run the sample app that you configured in the previous step. The app performs a centralized login on your PingOne instance.
Log in as a demo user
-
In Xcode, select .
Xcode launches the sample app in the iPhone simulator.
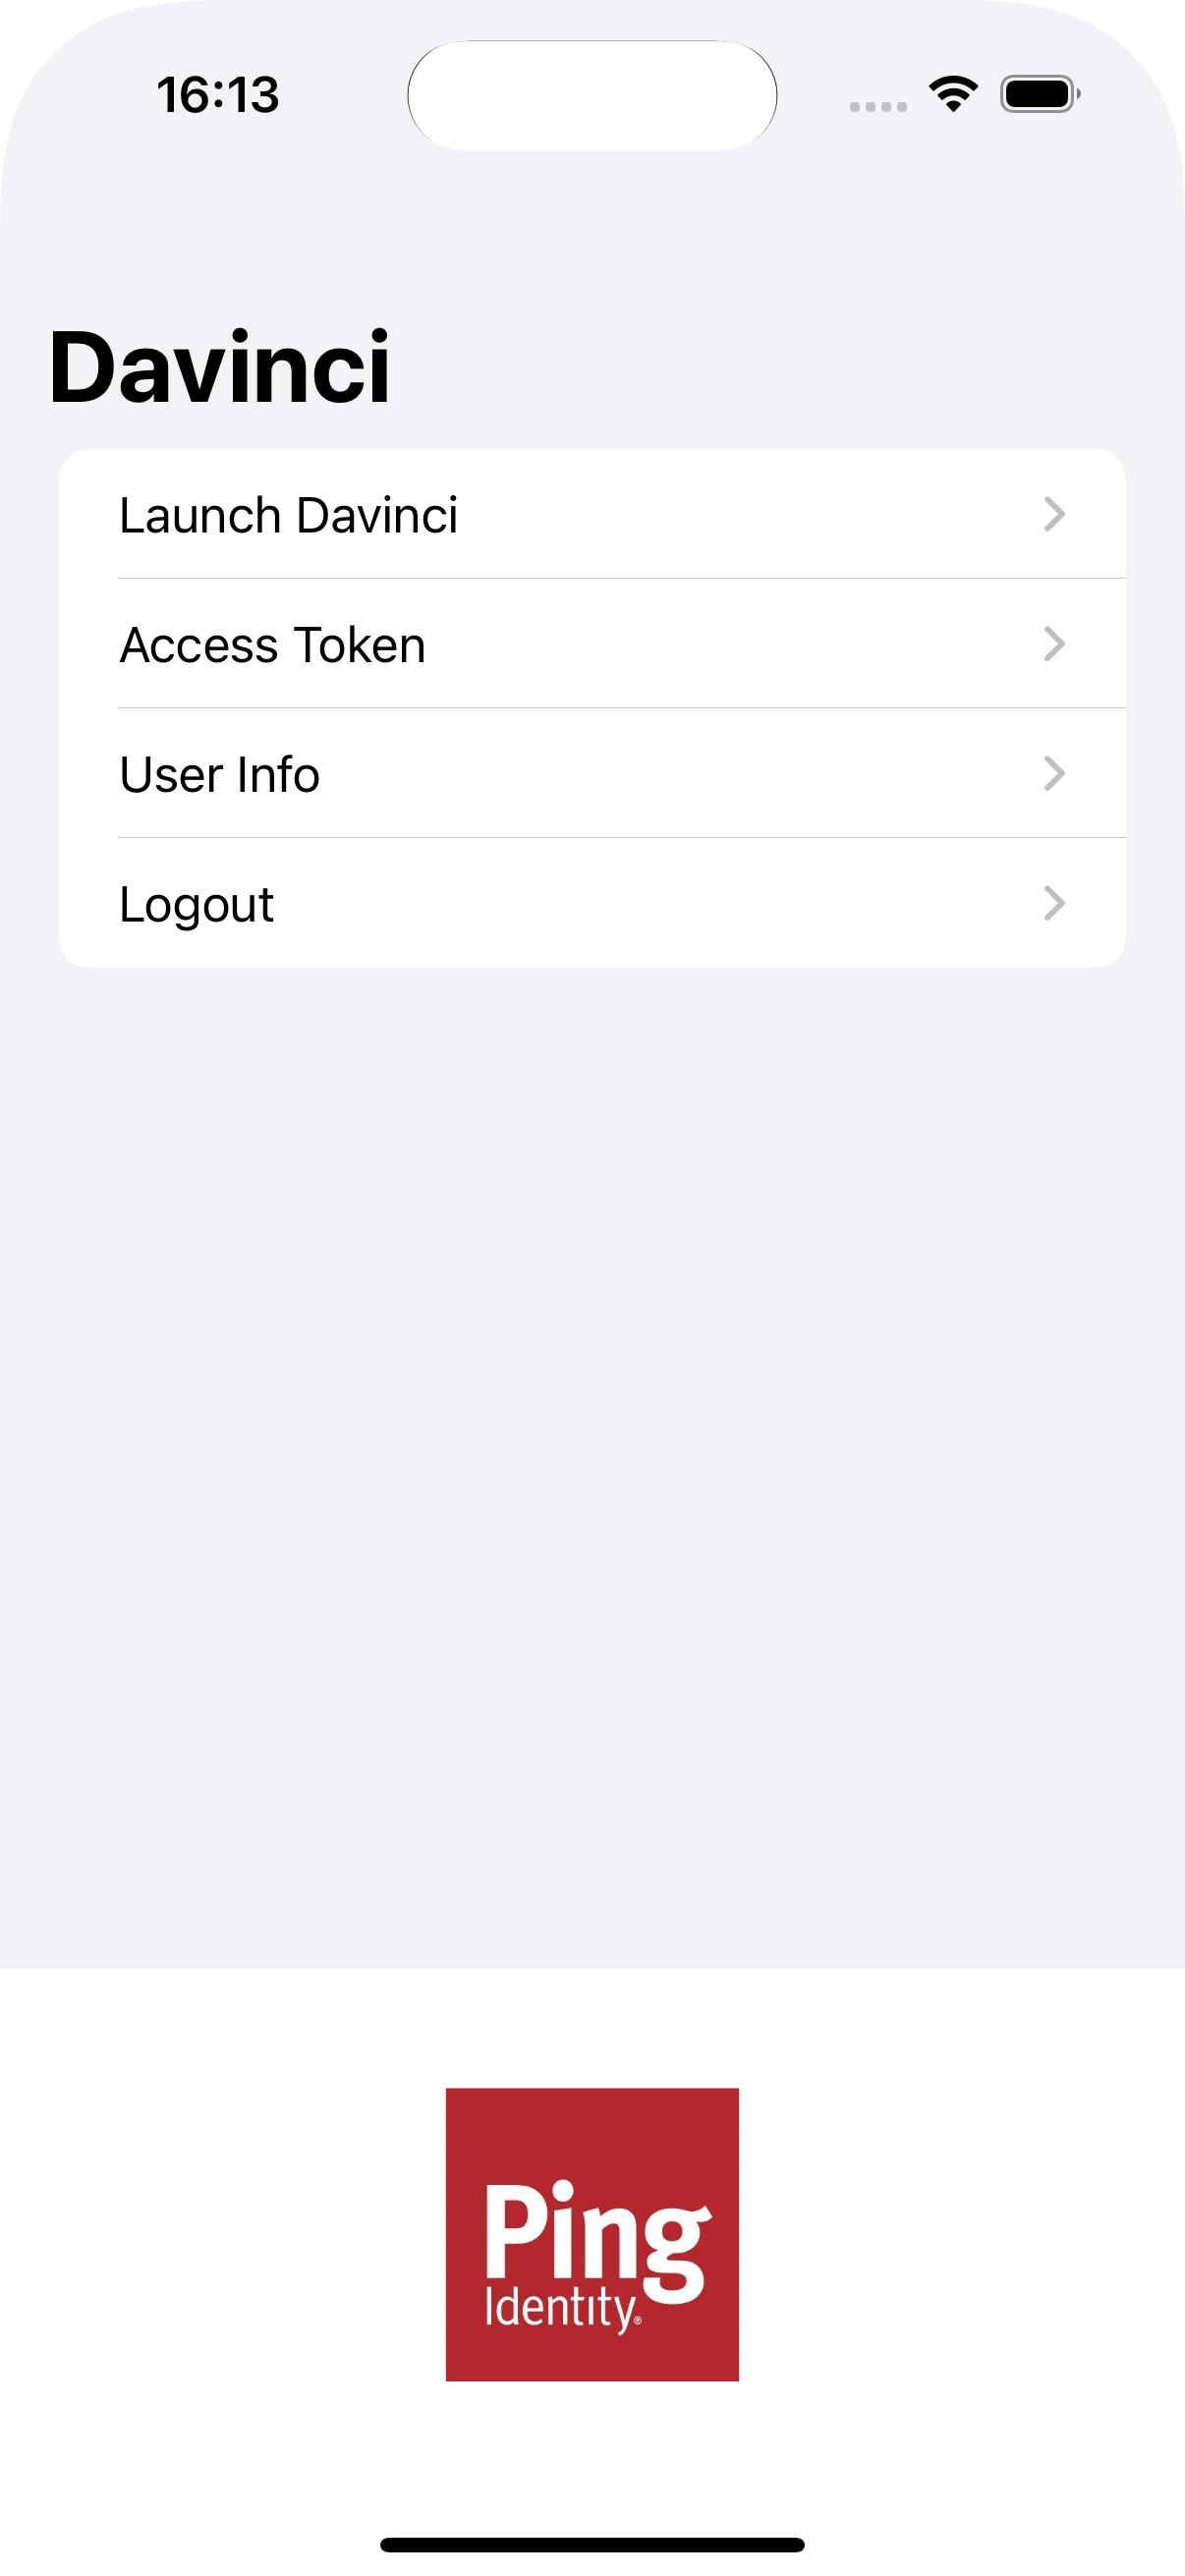 Figure 12. The iOS DaVinci sample main menu
 -
In the sample app on the iPhone simulator, tap Launch Davinci.
The sample app launches the DaVinci flow configured in the OAuth 2.0 profile.
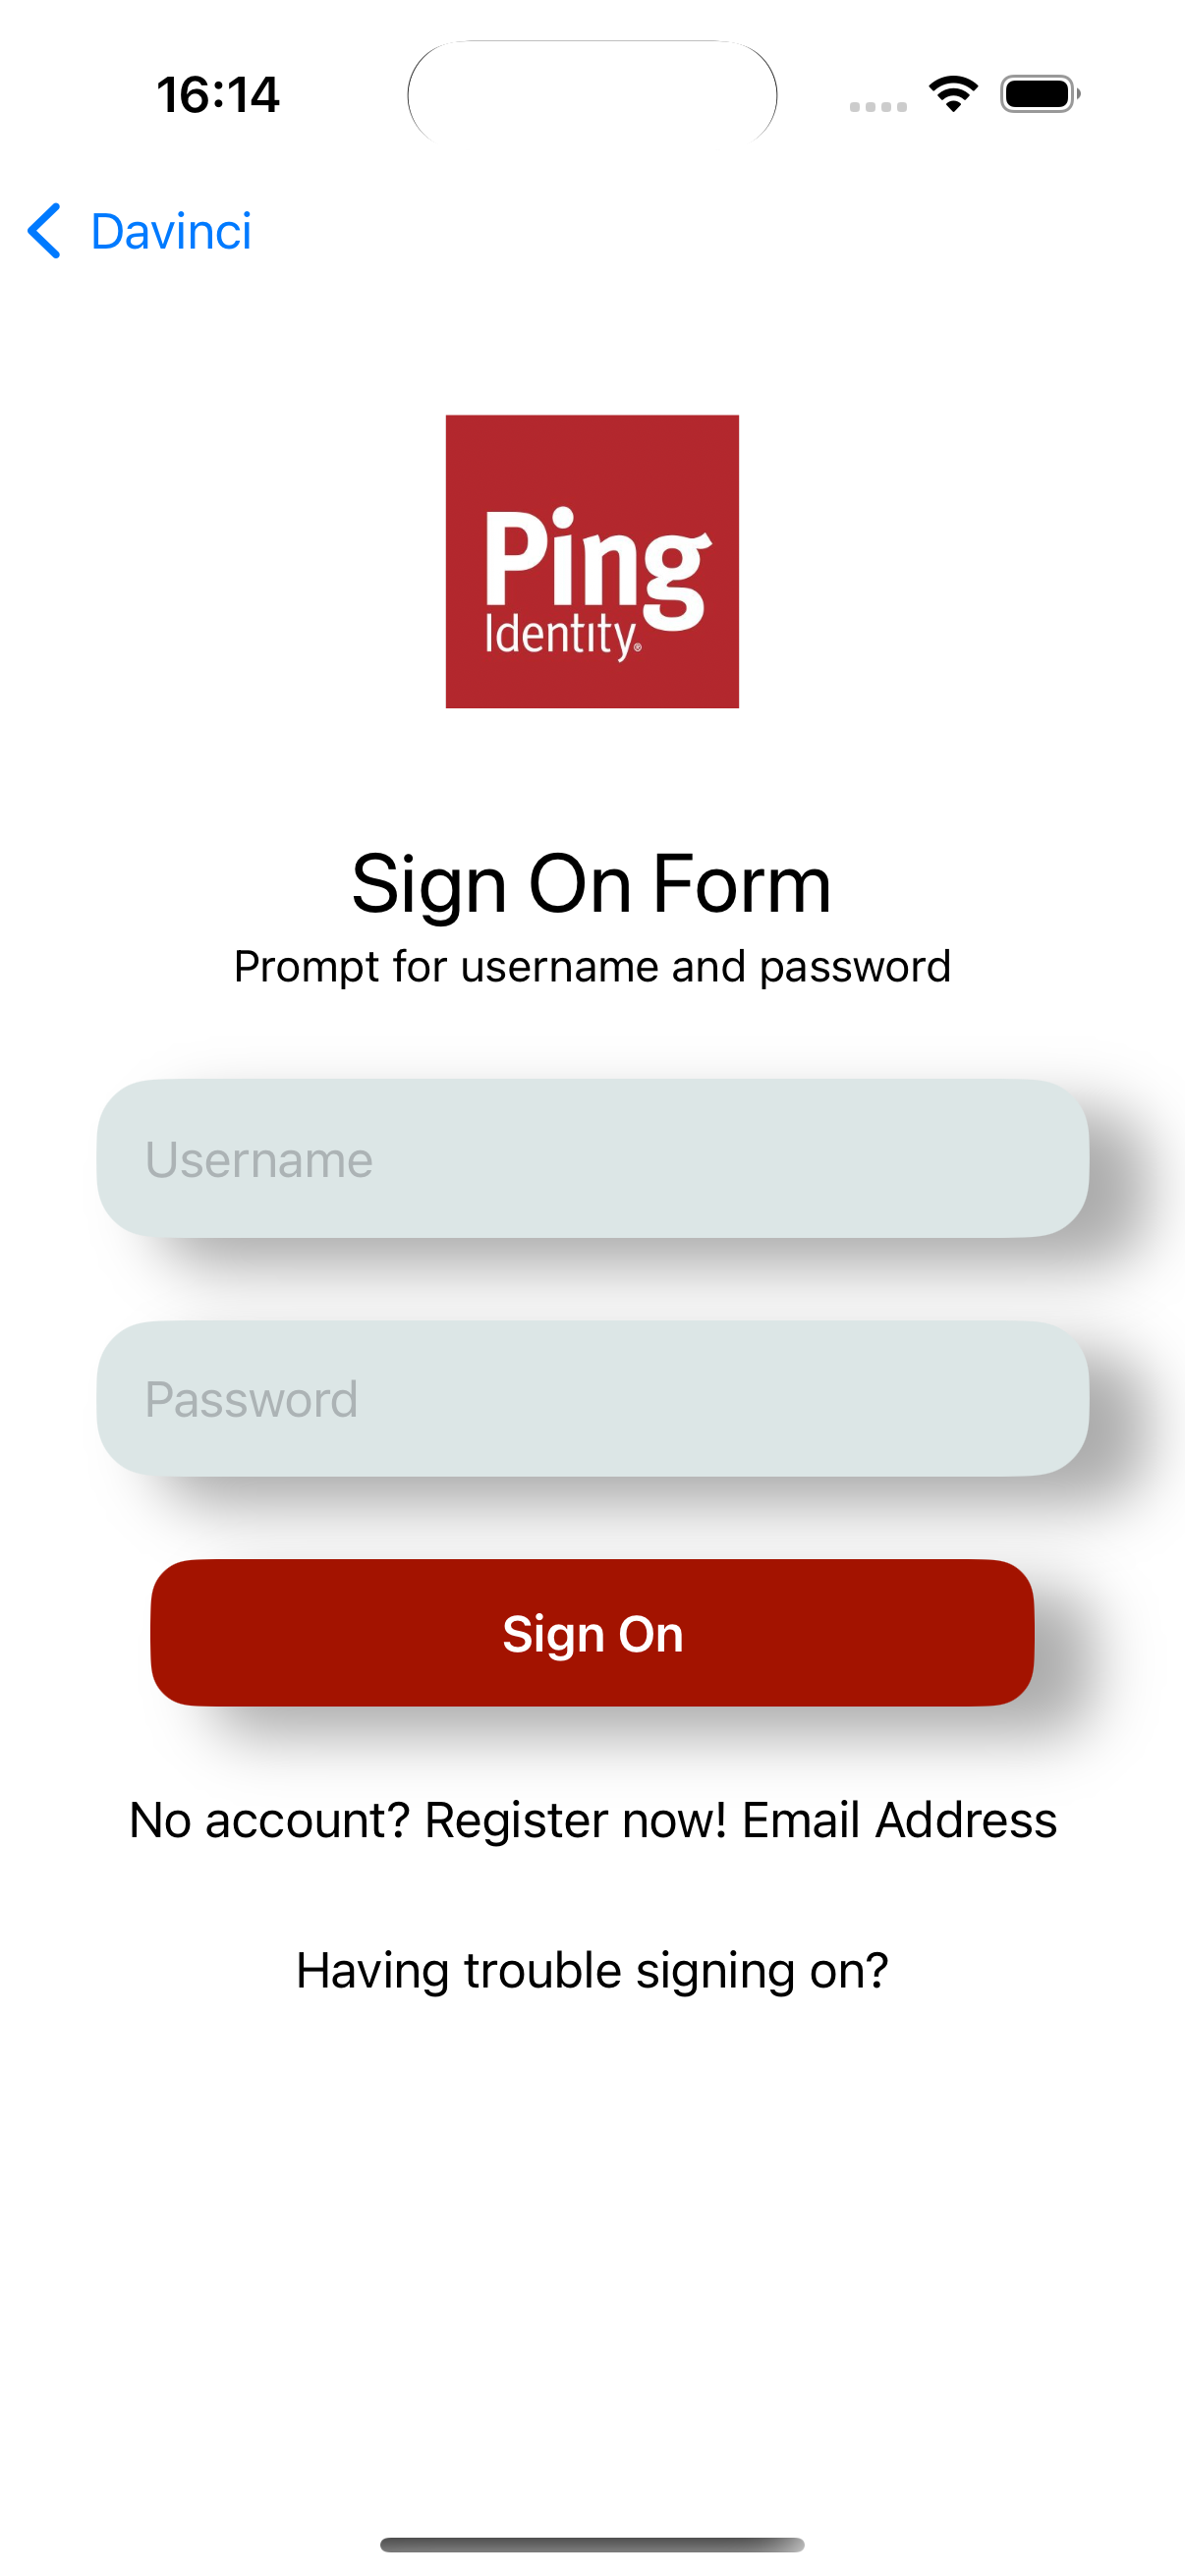 Figure 13. The DaVinci sample app first screen with fields and buttons.
 -
Optionally, to register a new identity in PingOne:
-
Tap the No Account? Register now! link.
This link is an example of a FlowButton.The app displays the registration screen:
 Figure 14. The DaVinci sample app registration screen.
 -
Enter the details of the new identity, and then click Save.
The app creates the new identity in PingOne and returns to the sign on screen.
-
-
Sign on as a demo user:
-
Name:
demo -
Password:
Ch4ng3it!
If authentication is successful, the application displays the tokens issued by PingOne.
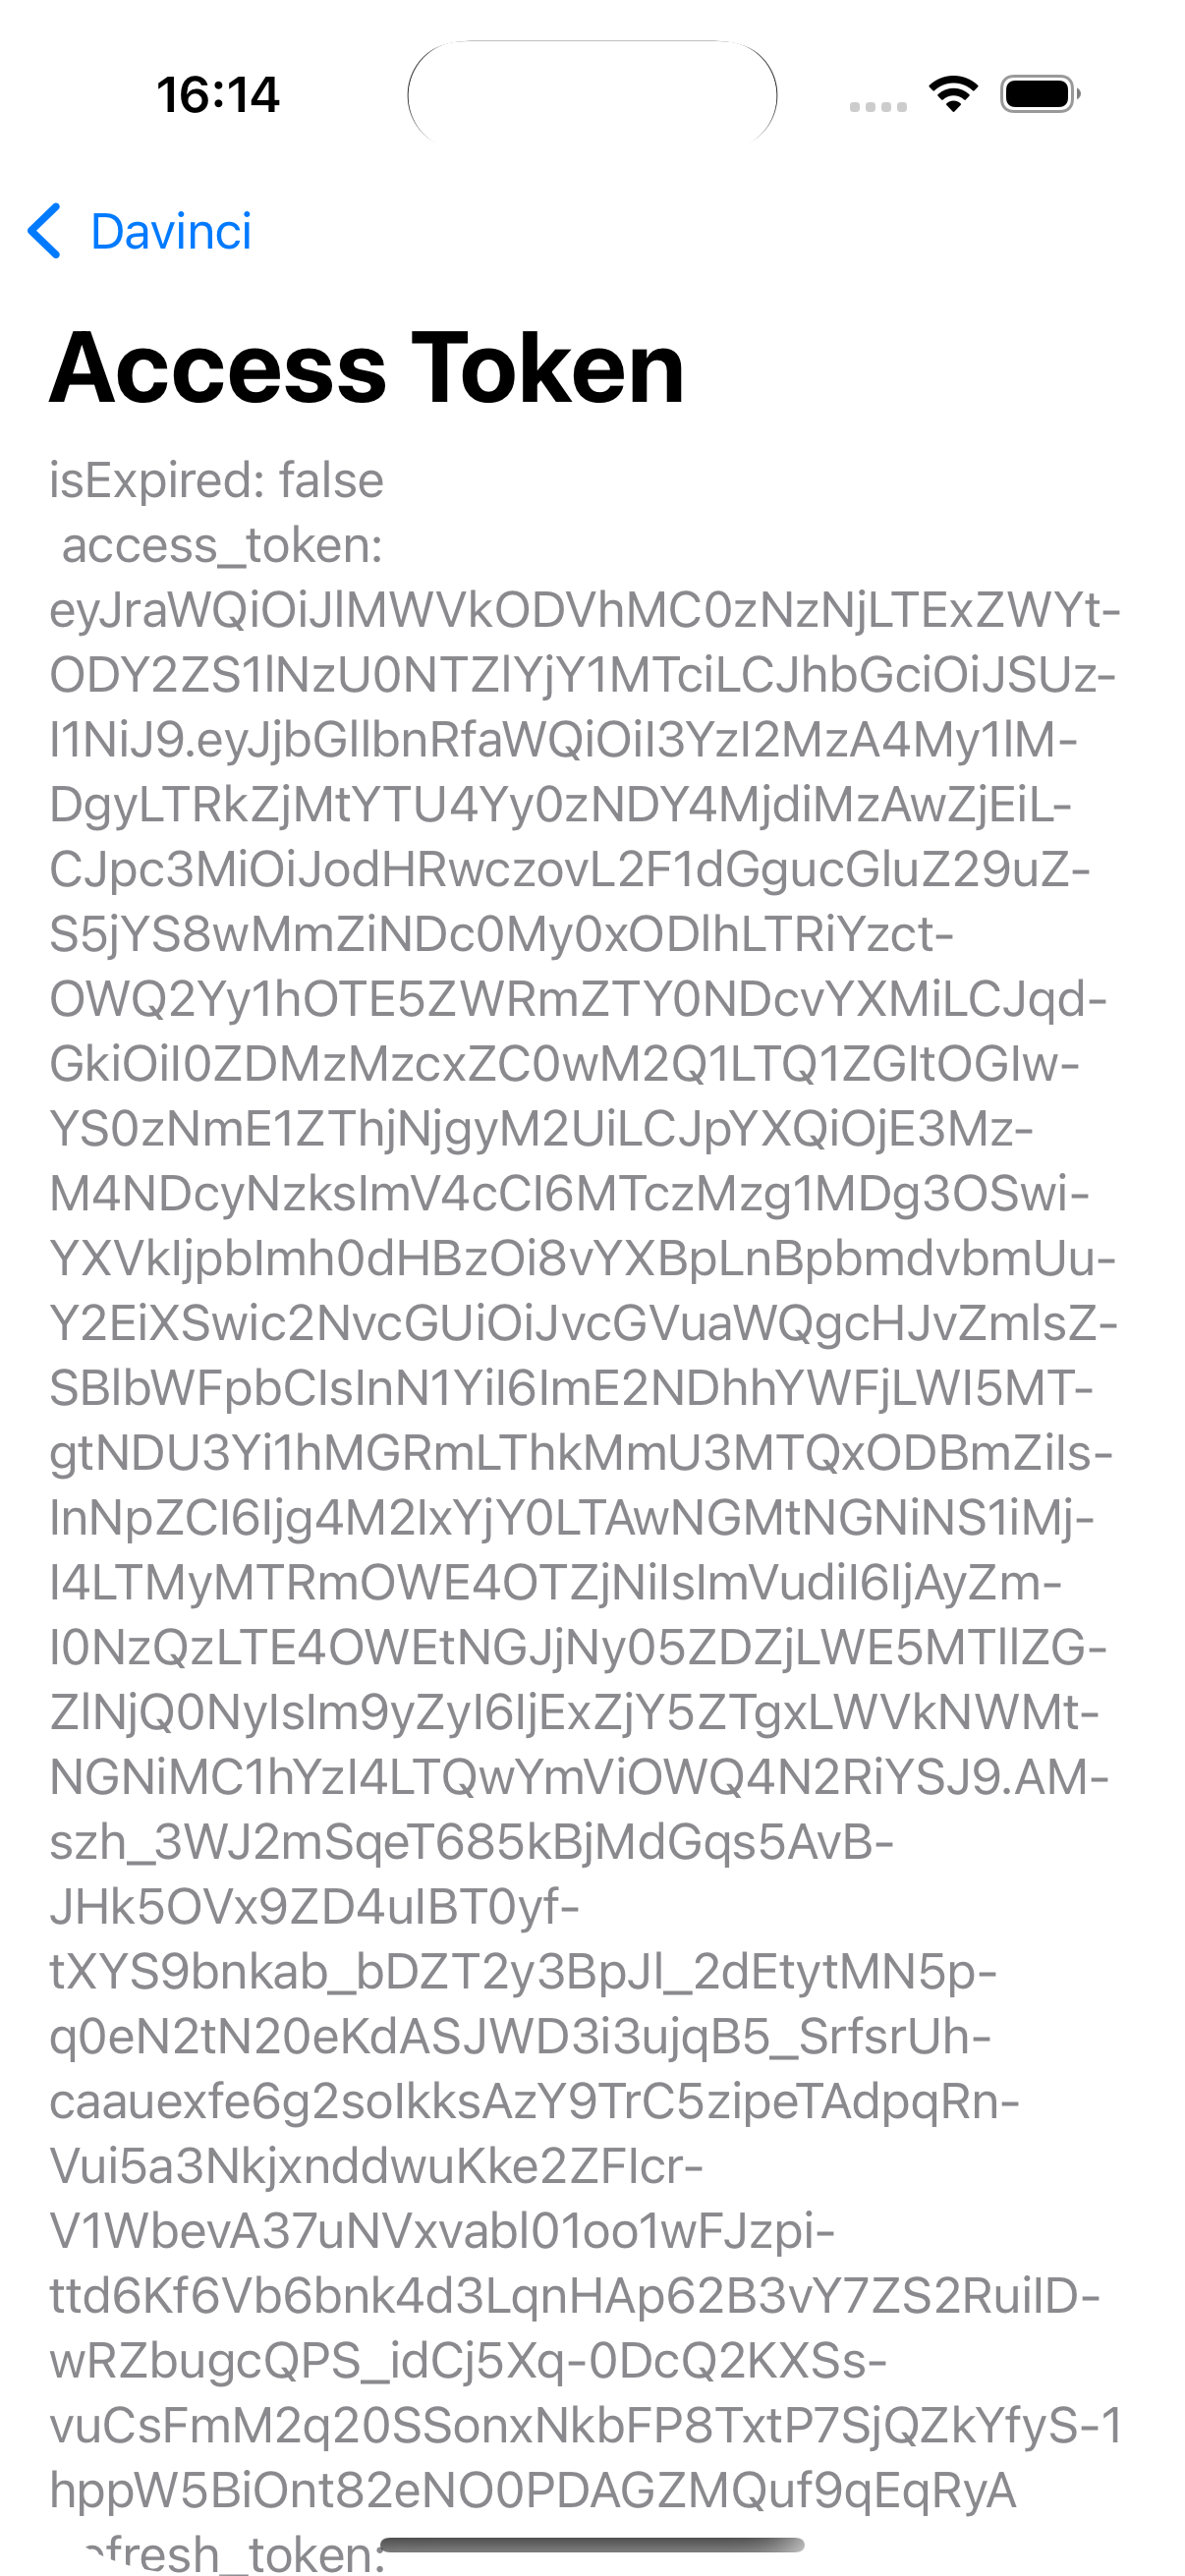 Figure 15. The token issues by the DaVinci flow
 -
-
Tap Davinci to go back to the main menu, and then tap User Info.
The app retrieves the user’s info from the
/userinfoendpoint and displays it on screen: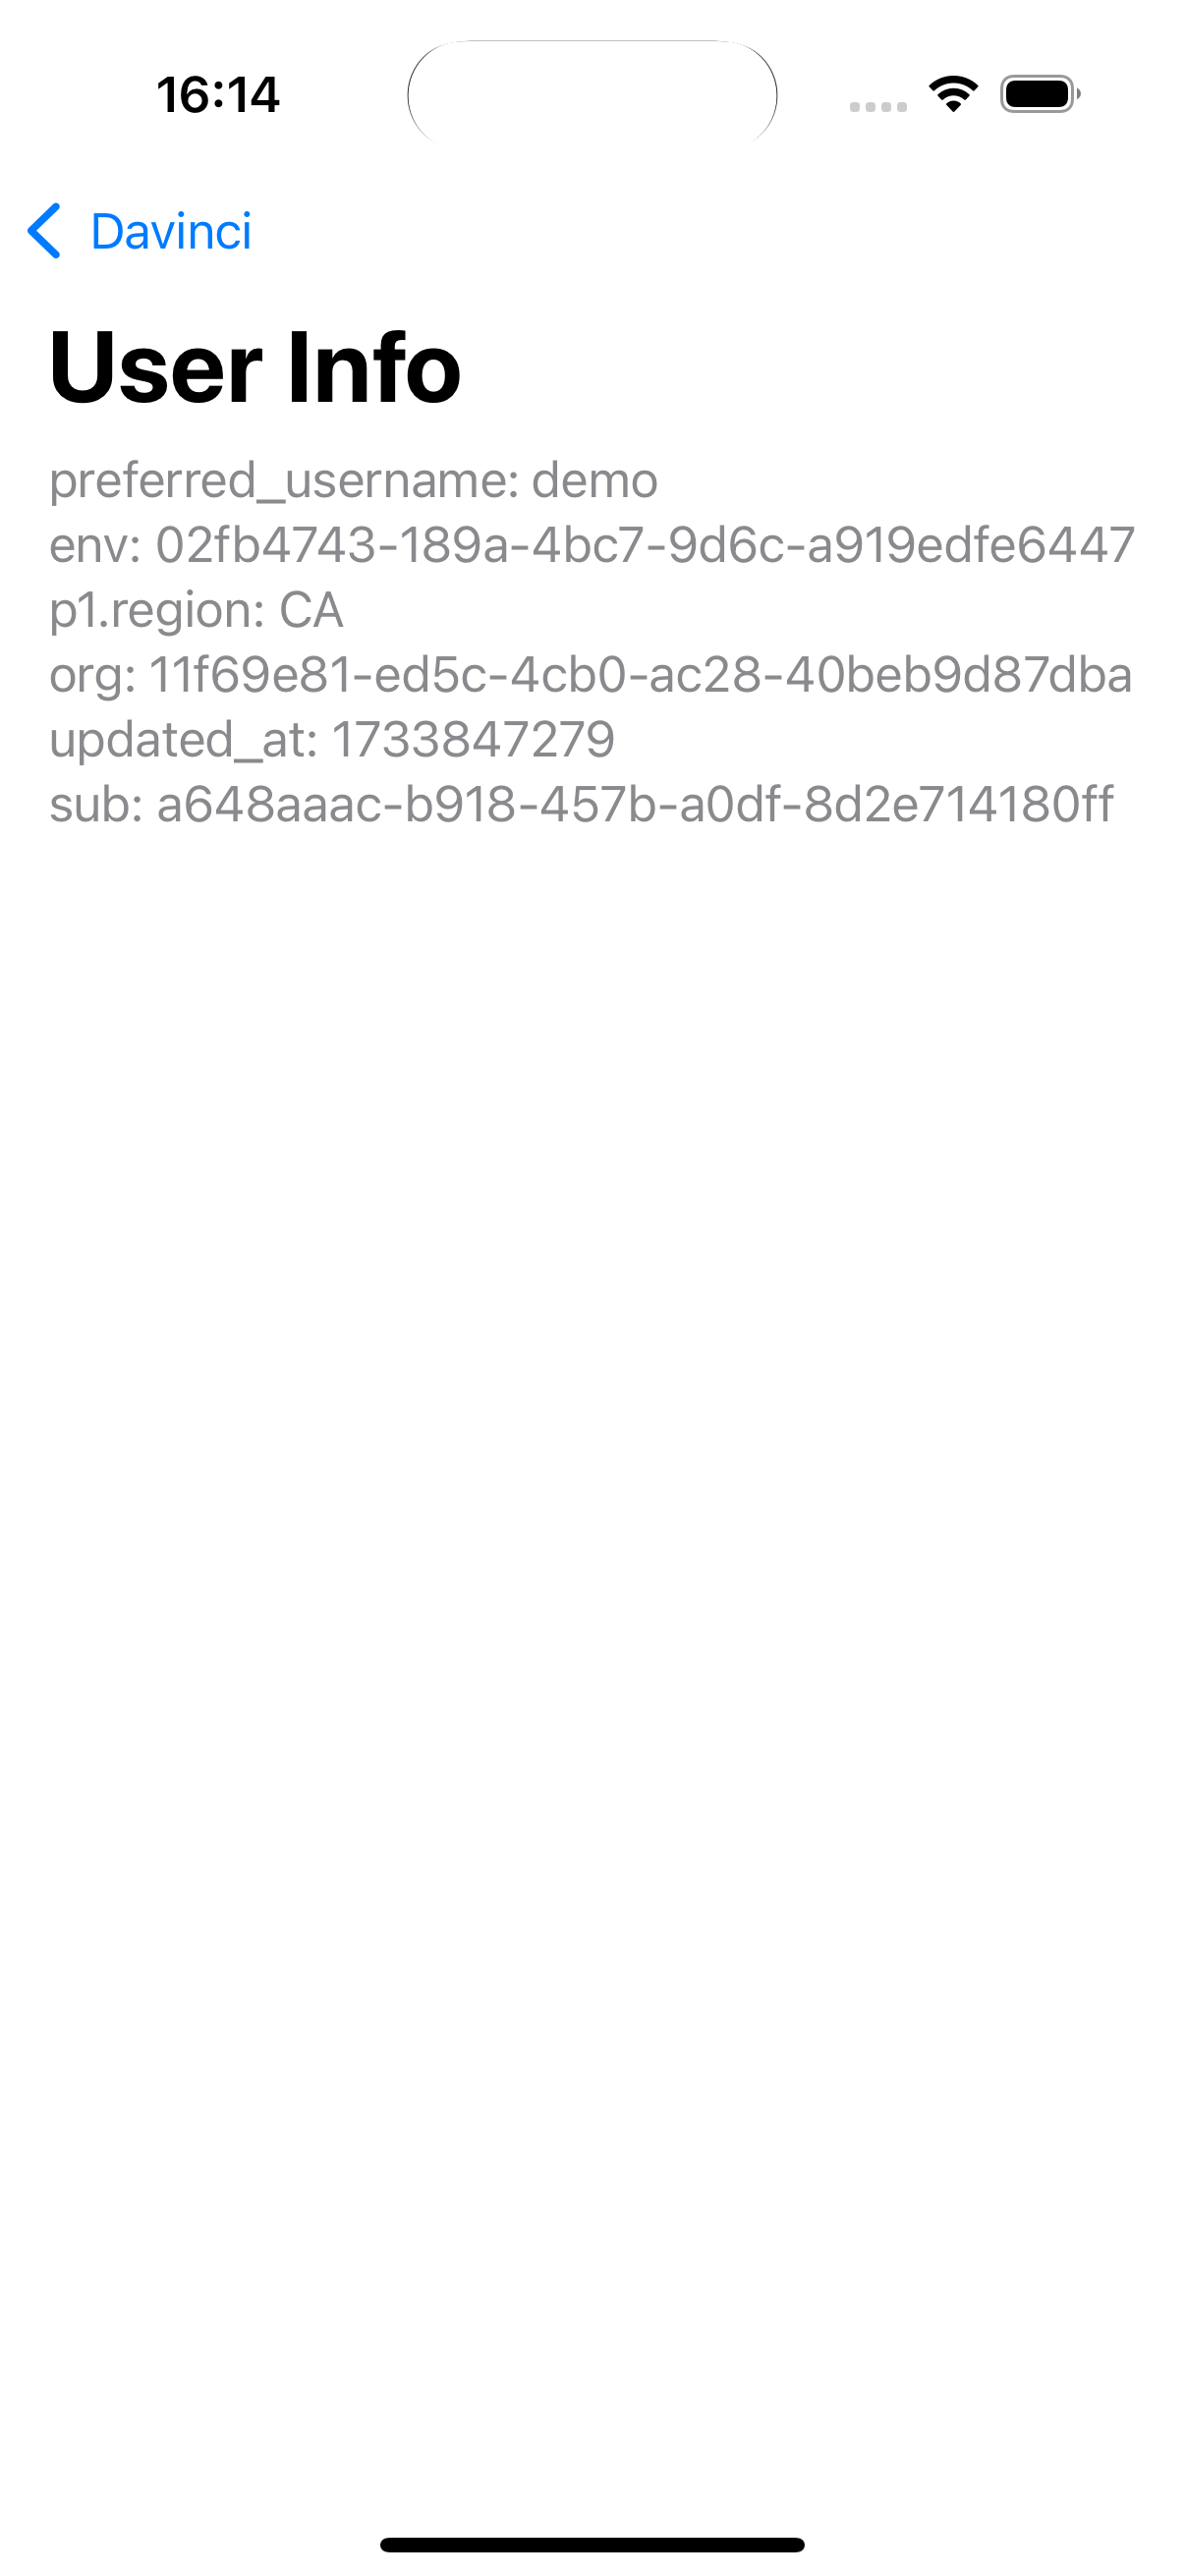 Figure 16. User info retrieved from PingOne
 -
Tap Davinci to go back to the main menu, and then tap Logout.
The sample app displays a logout button.
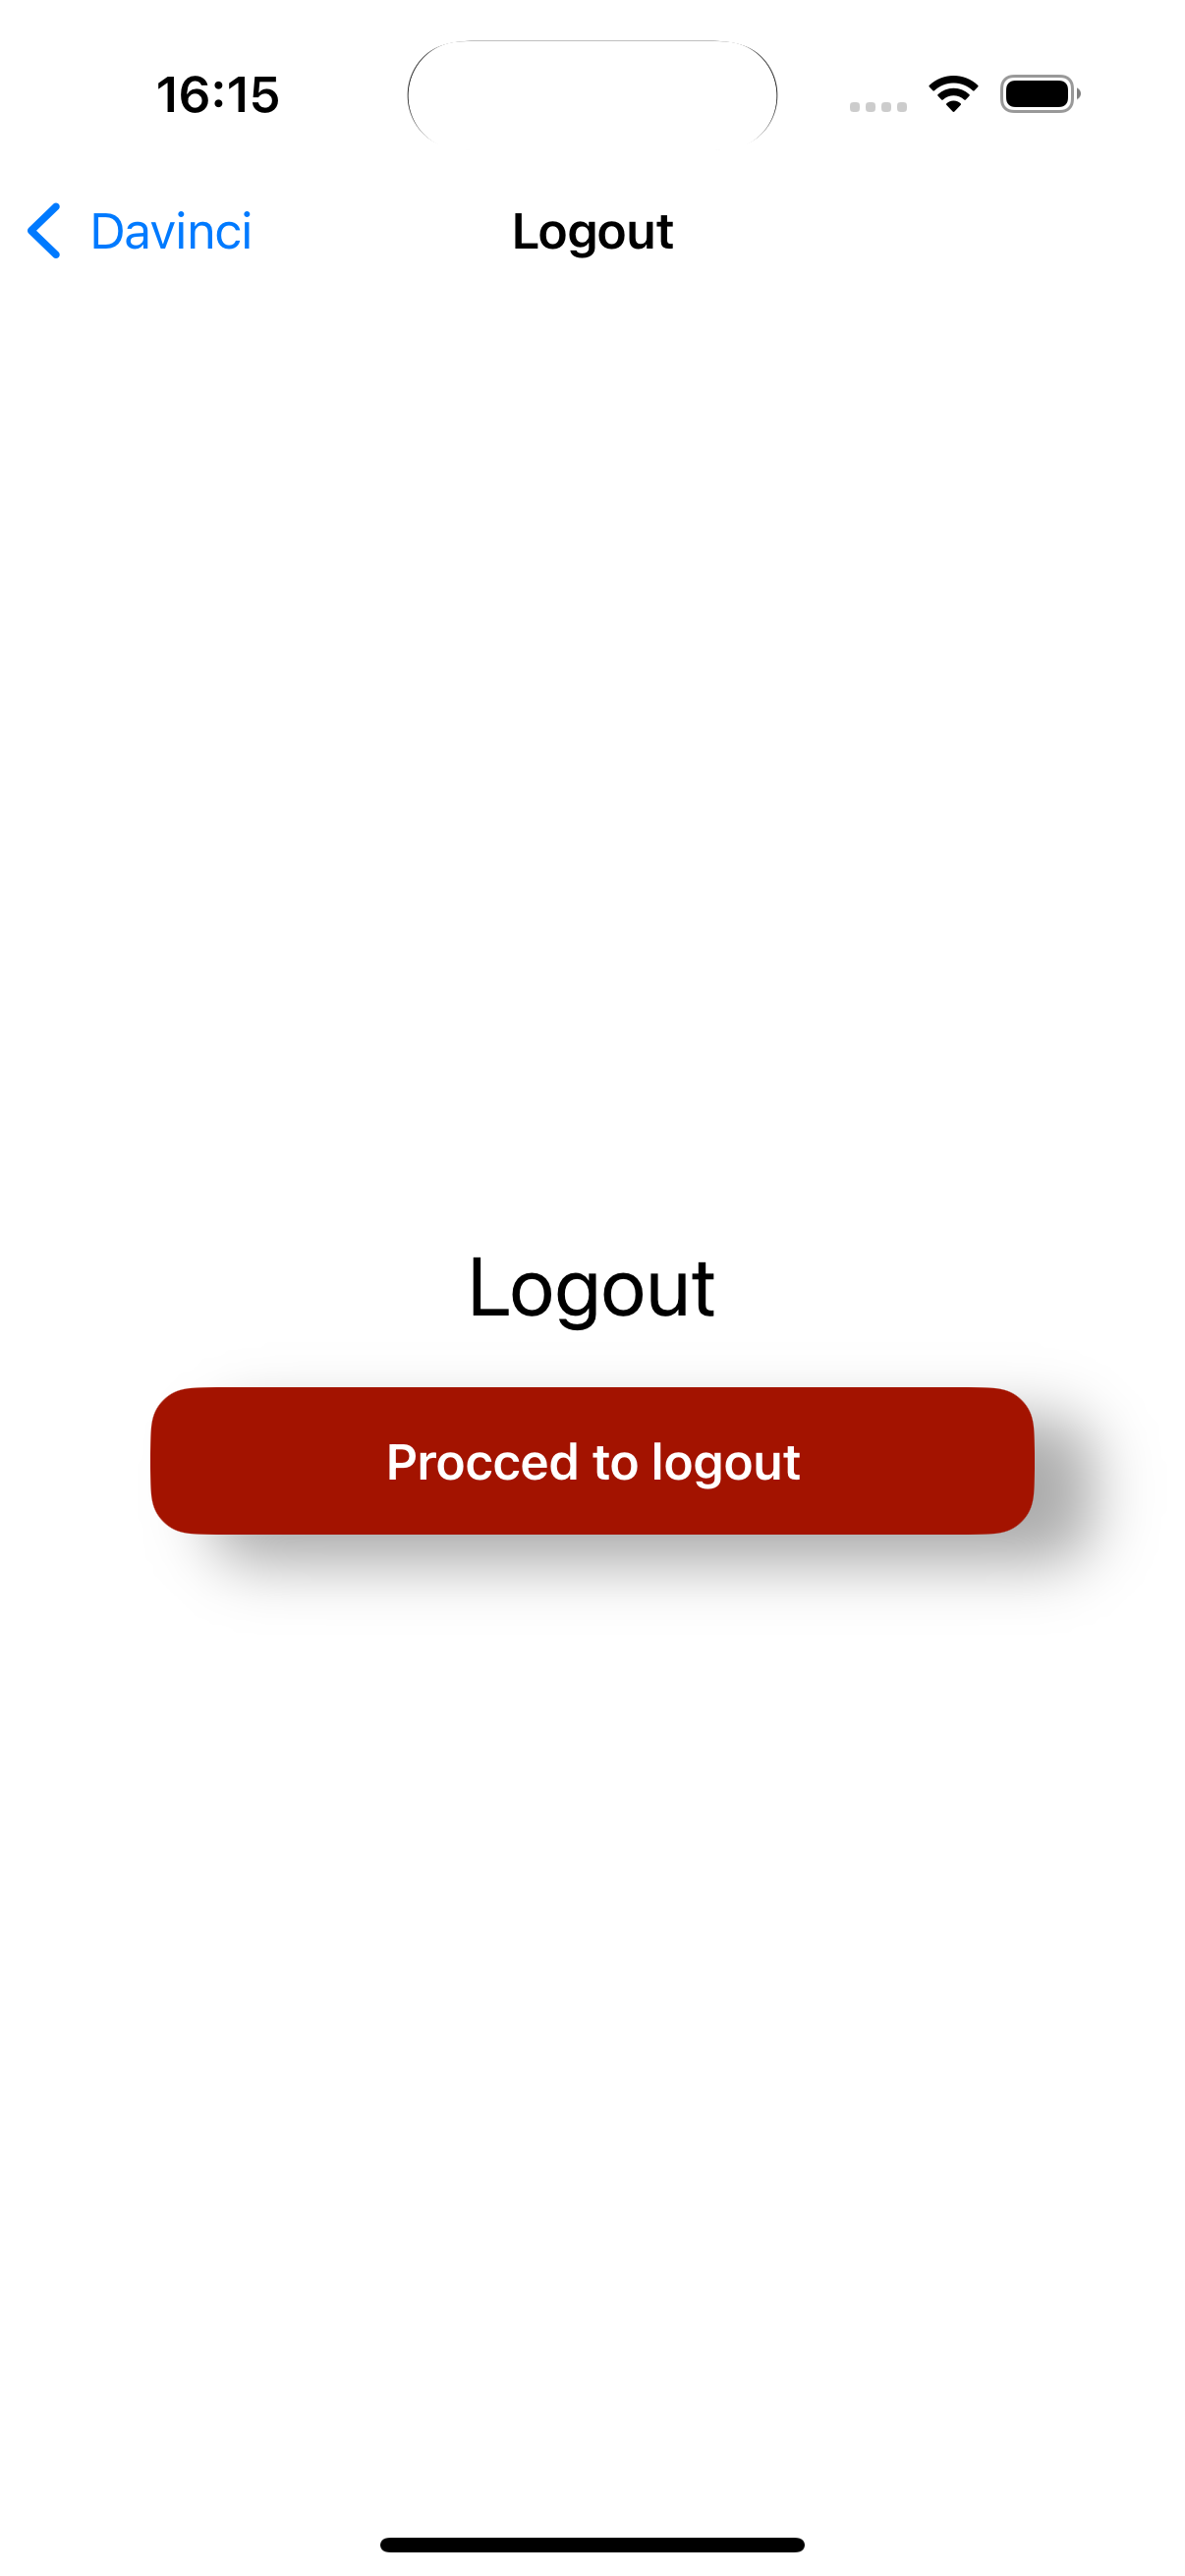 Figure 17. Logout button in the iOS sample app
 -
Tap Proceed to logout
The app revokes the existing tokens and ends the session in PingOne.
To verify the user is signed out:
-
In the PingOne administration console, navigate to Directory > Users.
-
Select the user you signed in as.
-
From the Sevices dropdown, select Authentication:
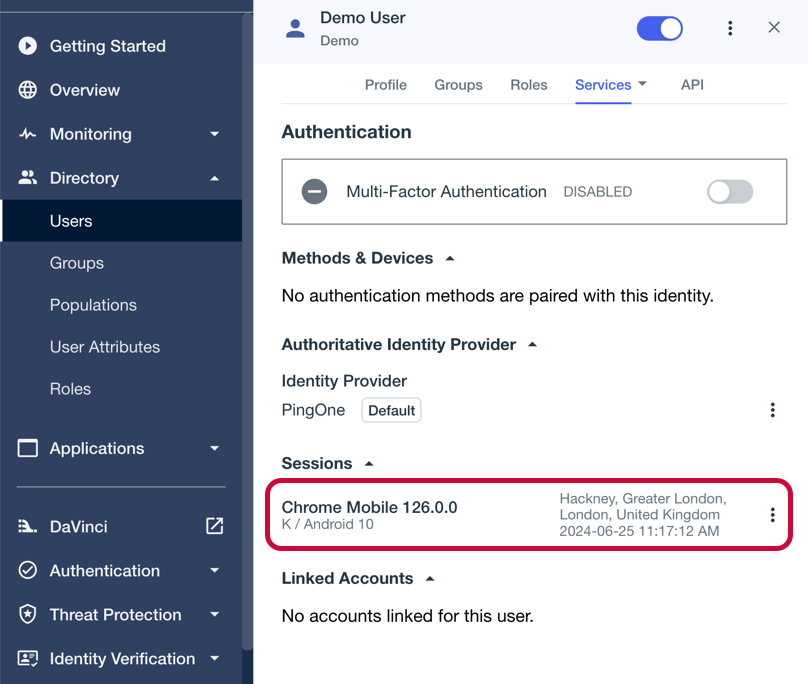 Figure 18. Checking a user’s sessions in PingOne.
The Sessions section displays any existing sessions the user has, and whether they originate from a mobile device.
-
DaVinci flow tutorial for JavaScript
This tutorial walks you through updating a provided sample app so that it connects to a PingOne tenant to authenticate a user using the PingOne sign-on with sessions DaVinci flow.
This flow allows users to register, authenticate, and verify their email address with PingOne.
Before you begin
To successfully complete this tutorial refer to the prerequisites in this section.
The tutorial also requires a configured server.
Compatibility
- PingOne
-
-
Your PingOne instance must have DaVinci enabled.
-
- DaVinci flows
-
Ensure your flows only use supported connectors, capabilities and fields for user interactions:
-
HTTP Connector
-
Custom HTML capability
View supported fields
HTTP Connector field and collector support Field (
Collector)Description
DaVinci module
Android
iOS
JavaScript
Text field
(
TextCollector)Collects a single text string.
✅
1.0.0
✅
1.0.0
✅
1.0.0
Password field
(
PasswordCollector)Collects a single text string that cannot be read from the screen.
✅
1.0.0
✅
1.0.0
✅
1.0.0
Submit Button
(
SubmitCollector)Sends the collected data to PingOne to continue the DaVinci flow.
✅
1.0.0
✅
1.0.0
✅
1.0.0
Flow Button
(
FlowCollector)Triggers an alternative flow without sending the data collected so far to PingOne.
✅
1.0.0
✅
1.0.0
✅
1.0.0
Label
(
LabelCollector)Display a read-only text label.
✅
1.1.0
✅
1.1.0
✅
1.1.0
Radio / Dropdown
(
SingleSelectCollector)Collects a single value from a choice of multiple options.
✅
1.1.0
✅
1.1.0
✅
1.1.0
HTTP Connector SK-Component support SK-Component (
Collector)Description
DaVinci module
Android
iOS
JavaScript
skIDP
(
IdpCollector)Presents a button to allow users to authenticate using an external identity provider, such as Apple, Facebook, or Google.
✅
1.1.0
✅
1.1.0
✅
1.1.0
View unsupported features
Verify that your flow does not depend on any unsupported elements:
- SKPolling components
-
SKPolling components cannot be processed by the SDK and should not be included.
- Images
-
Images included in the flow cannot be passed to the SDK.
For example, the PingOne sign-on with sessions DaVinci flow.
-
-
PingOne Form Connector
-
Show Form capability
View supported fields
Custom Fields support Field (
Collector)Description
DaVinci module
Android
iOS
JavaScript
Text Input
(
TextCollector)Collects a single text string.
✅
1.1.0
✅
1.1.0
✅
1.1.0
Password
(
PasswordCollector)Collects a single text string that cannot be read from the screen.
✅
1.1.0
✅
1.1.0
✅
1.1.0
Dropdown
(
SingleSelectCollector)Collects a value from a dropdown containing one or more text strings.
✅
1.1.0
✅
1.1.0
✅
1.1.0
Combobox
(
MultiSelectCollector)Collects a value from a dropdown containing one or more text strings, the user can enter their own text string.
✅
1.1.0
✅
1.1.0
✅
1.1.0
Radio Button List
(
SingleSelectCollector)Collects a value from one or radio buttons.
✅
1.1.0
✅
1.1.0
✅
1.1.0
Checkbox List
(
MultiSelectCollector)Collects the value of one or more checkboxes.
✅
1.1.0
✅
1.1.0
✅
1.1.0
Toolbox support Field (
Collector)Description
DaVinci module
Android
iOS
JavaScript
Flow Button
(
FlowCollector)Presents a customized button.
✅
1.1.0
✅
1.1.0
✅
1.1.0
Flow Link
(
FlowCollector)Presents a customized link.
✅
1.1.0
✅
1.1.0
✅
1.1.0
Translatable Rich Text
(
TextCollector)Presents rich text that you can translate into multiple languages.
✅
1.1.0
✅
1.1.0
✅
1.1.0
Social Login
(
IdpCollector)Presents a button to allow users to authenticate using an external identity provider, such as Apple, Facebook, or Google.
✅
1.1.0
✅
1.1.0
✅
1.1.0
-
Prerequisites
- Node and NPM
-
The SDK requires a minimum Node.js version of
18, and is tested on versions18and20. To get a supported version of Node.js, refer to the Node.js download page.You will also need
npmto build the code and run the samples.
Server configuration
You must configure your PingOne instance for use with the DaVinci client.
Ask your PingOne administrator to complete the following tasks:
-
Configure a DaVinci flow
-
Create a DaVinci application
-
Configure PingOne for DaVinci flow invocation
To learn how to complete these steps, refer to Launching a flow with a Ping SDK in the PingOne DaVinci documentation.
Step 1. Download the samples
To start this tutorial, you need to download the SDK sample apps repo, which contains the projects you will use.
-
In a web browser, navigate to the SDK Sample Apps repository.
-
Download the source code using one of the following methods:
- Download a ZIP file
-
-
Click Code, and then click Download ZIP.
-
Extract the contents of the downloaded ZIP file to a suitable location.
-
- Use a Git-compatible tool to clone the repo locally
-
-
Click Code, and then copy the HTTPS URL.
-
Use the URL to clone the repository to a suitable location.
For example, from the command-line you could run:
git clone https://github.com/ForgeRock/sdk-sample-apps.git
-
The result of these steps is a local folder named sdk-sample-apps.
Step 2. Install the dependencies
In the following procedure, you install the required modules and dependencies, including the Ping SDK for JavaScript.
-
In a terminal window, navigate to the
sdk-sample-apps/javascript/embedded-login-davincifolder. -
To install the required packages, enter the following:
npm installThe
npmtool downloads the required packages, and places them inside anode_modulesfolder.
Step 3. Configure connection properties
In this step, you configure the sample app to connect to the authentication tree/journey you created when setting up your server configuration.
-
Copy the
.env.examplefile in thesdk-sample-apps/javascript/embedded-login-davincifolder and save it with the name.envwithin this same directory. -
Open the
.envfile and edit the property values to match the settings you configured in previous steps:VITE_SCOPE=$SCOPE VITE_WEB_OAUTH_CLIENT=$WEB_OAUTH_CLIENT VITE_WELLKNOWN_URL=$WELLKNOWN_URL-
In the VITE_SCOPE property, enter the scopes you want to assign users who complete authentication using the client, separated by spaces.
Example:
VITE_SCOPE="openid profile email address" -
In VITE_WEB_OAUTH_CLIENT, property, enter the ID of the client you are connecting to in PingOne.
Example:
VITE_WEB_OAUTH_CLIENT="6c7eb89a-66e9-ab12-cd34-eeaf795650b2"Refer to Get configuration values from PingOne for instructions of where to find this value.
-
In the VITE_WELLKNOWN_URL property, enter the OIDC Discovery Endpoint value from the client you are connecting to in PingOne.
Example:
discoveryEndpoint = "https://auth.pingone.ca/3072206d-c6ce-ch15-m0nd-f87e972c7cc3/as/.well-known/openid-configuration"Refer to Get configuration values from PingOne for instructions of where to find this value.
The result resembles the following:
VITE_SCOPE="openid profile email address" VITE_WEB_OAUTH_CLIENT="sdkPublicClient" VITE_WELLKNOWN_URL="https://auth.pingone.ca/3072206d-c6ce-ch15-m0nd-f87e972c7cc3/as/.well-known/openid-configuration" -
Step 4. Test the app
In the following procedure, you run the sample app that you configured in the previous step. The sample connects to your server and walks through the authentication journey you created in an earlier step.
After successful authentication, the sample obtains an OAuth 2.0 access token and displays the related user information.
-
In a terminal window, navigate to the
sdk-sample-apps/javascript/embedded-login-davincifolder. -
Use
npmto run the sample:npm run dev -
In a web browser:
-
Ensure you are NOT currently logged into the PingOne instance.
If you are logged into the PingOne instance in the browser, the sample will not work.
Logout of the PingAM instance before you run the sample.
-
Navigate to the following URL:
http://localhost:5173A form appears with "Username" and "Password" fields:
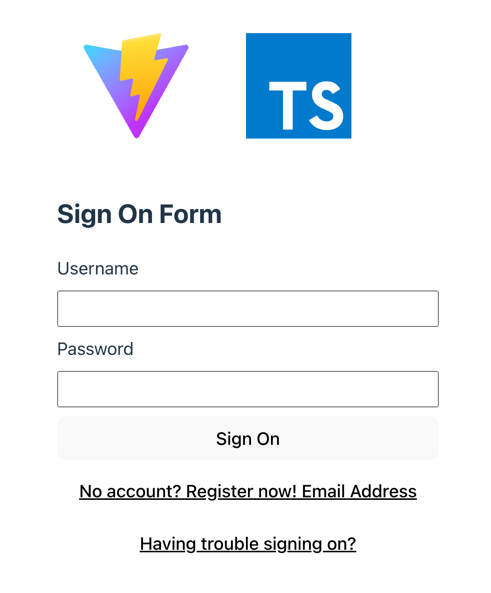 Figure 19. The login page of the JavaScript DaVinci client sample.
-
-
Optionally, to register a new identity in PingOne, tap the No Account? Register now! link.
This link is an example of a FlowButton.The app displays the registration screen:
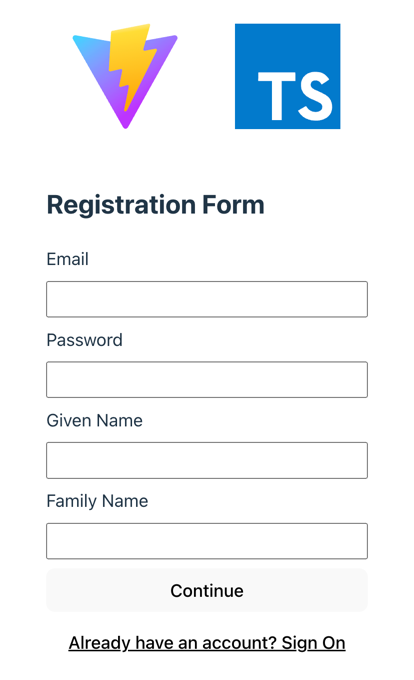 Figure 20. The DaVinci sample app registration screen.
-
Enter the details of the new identity, and then click Save.
The app creates the new identity in PingOne and returns to the sign on screen.
-
-
Enter the username and password of a PingOne identity, and then click Sign On.
The app sends the credentials to PingOne for validation, and on success displays the user’s session info:
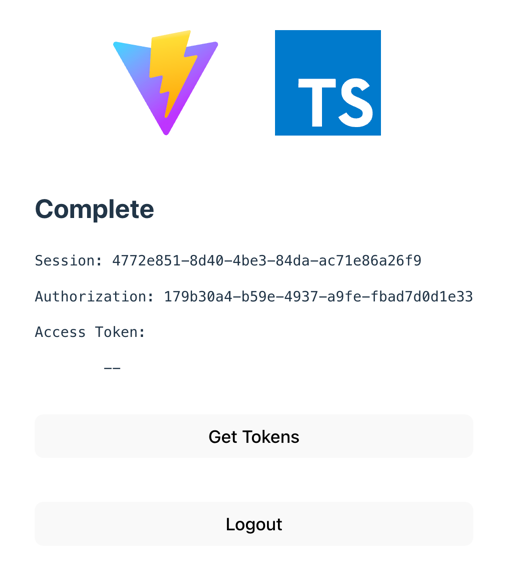 Figure 21. The DaVinci sample app displaying session info
 -
To get an access token for the user, click Get Tokens.
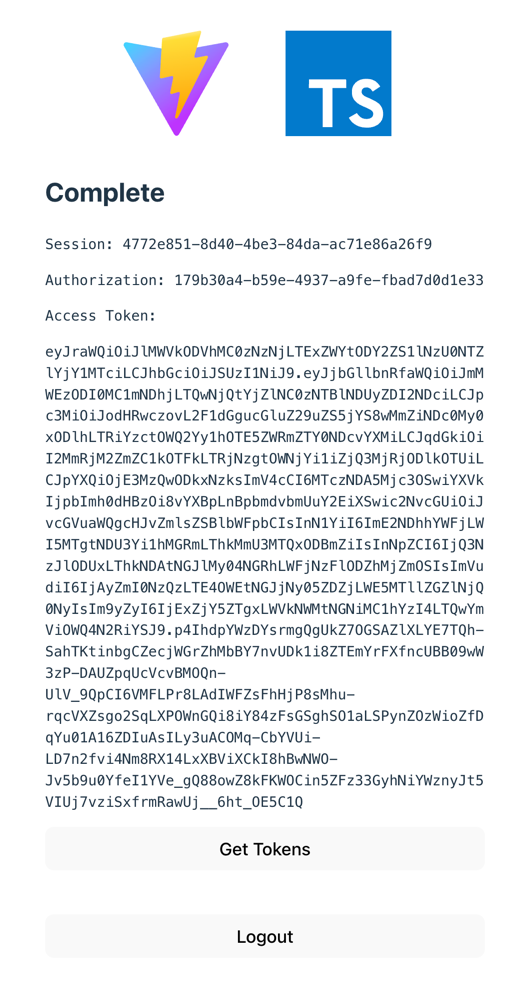 Figure 22. The DaVinci sample app displaying tokens
 -
To revoke the OAuth 2.0 token, click the Logout button.
The application calls the
/as/revokeendpoint to revoke the OAuth 2.0 token, and returns to the sign-in form.
Implement your use cases with the DaVinci client
The DaVinci client enables you to implement many authentication, registration, and self-service use cases into your mobile and web apps.
Visit the following pages for more information on implementing different use cases using the DaVinci client:
Applies to: Android | iOS | JavaScript
Add support for authenticating to your apps by using trusted Identity Providers (IdP), such as Apple, Facebook, and Google.
Set up social sign on with external IDPs
PingOne supports trusted Identity Providers (IdP), like Apple, Facebook, Google, and many others, providing authentication and identity verification on behalf of Ping Identity.
This is often referred to as social sign on or social authentication. These IdPs return the necessary user information for creating or validating accounts to your PingOne server.
The user is redirected from the client application to the IdP’s authorization server. Once on the IdP, the user authenticates, and provides the necessary consent required for sharing the information with PingOne. When the IdP authenticates your user, they are redirected back to your server to complete the flow. When PingOne completes the flow, it redirects the user to your app, where they are now signed on.
It’s common to offer these social login options in addition to traditional authentication with username and password, but they can be used alone.
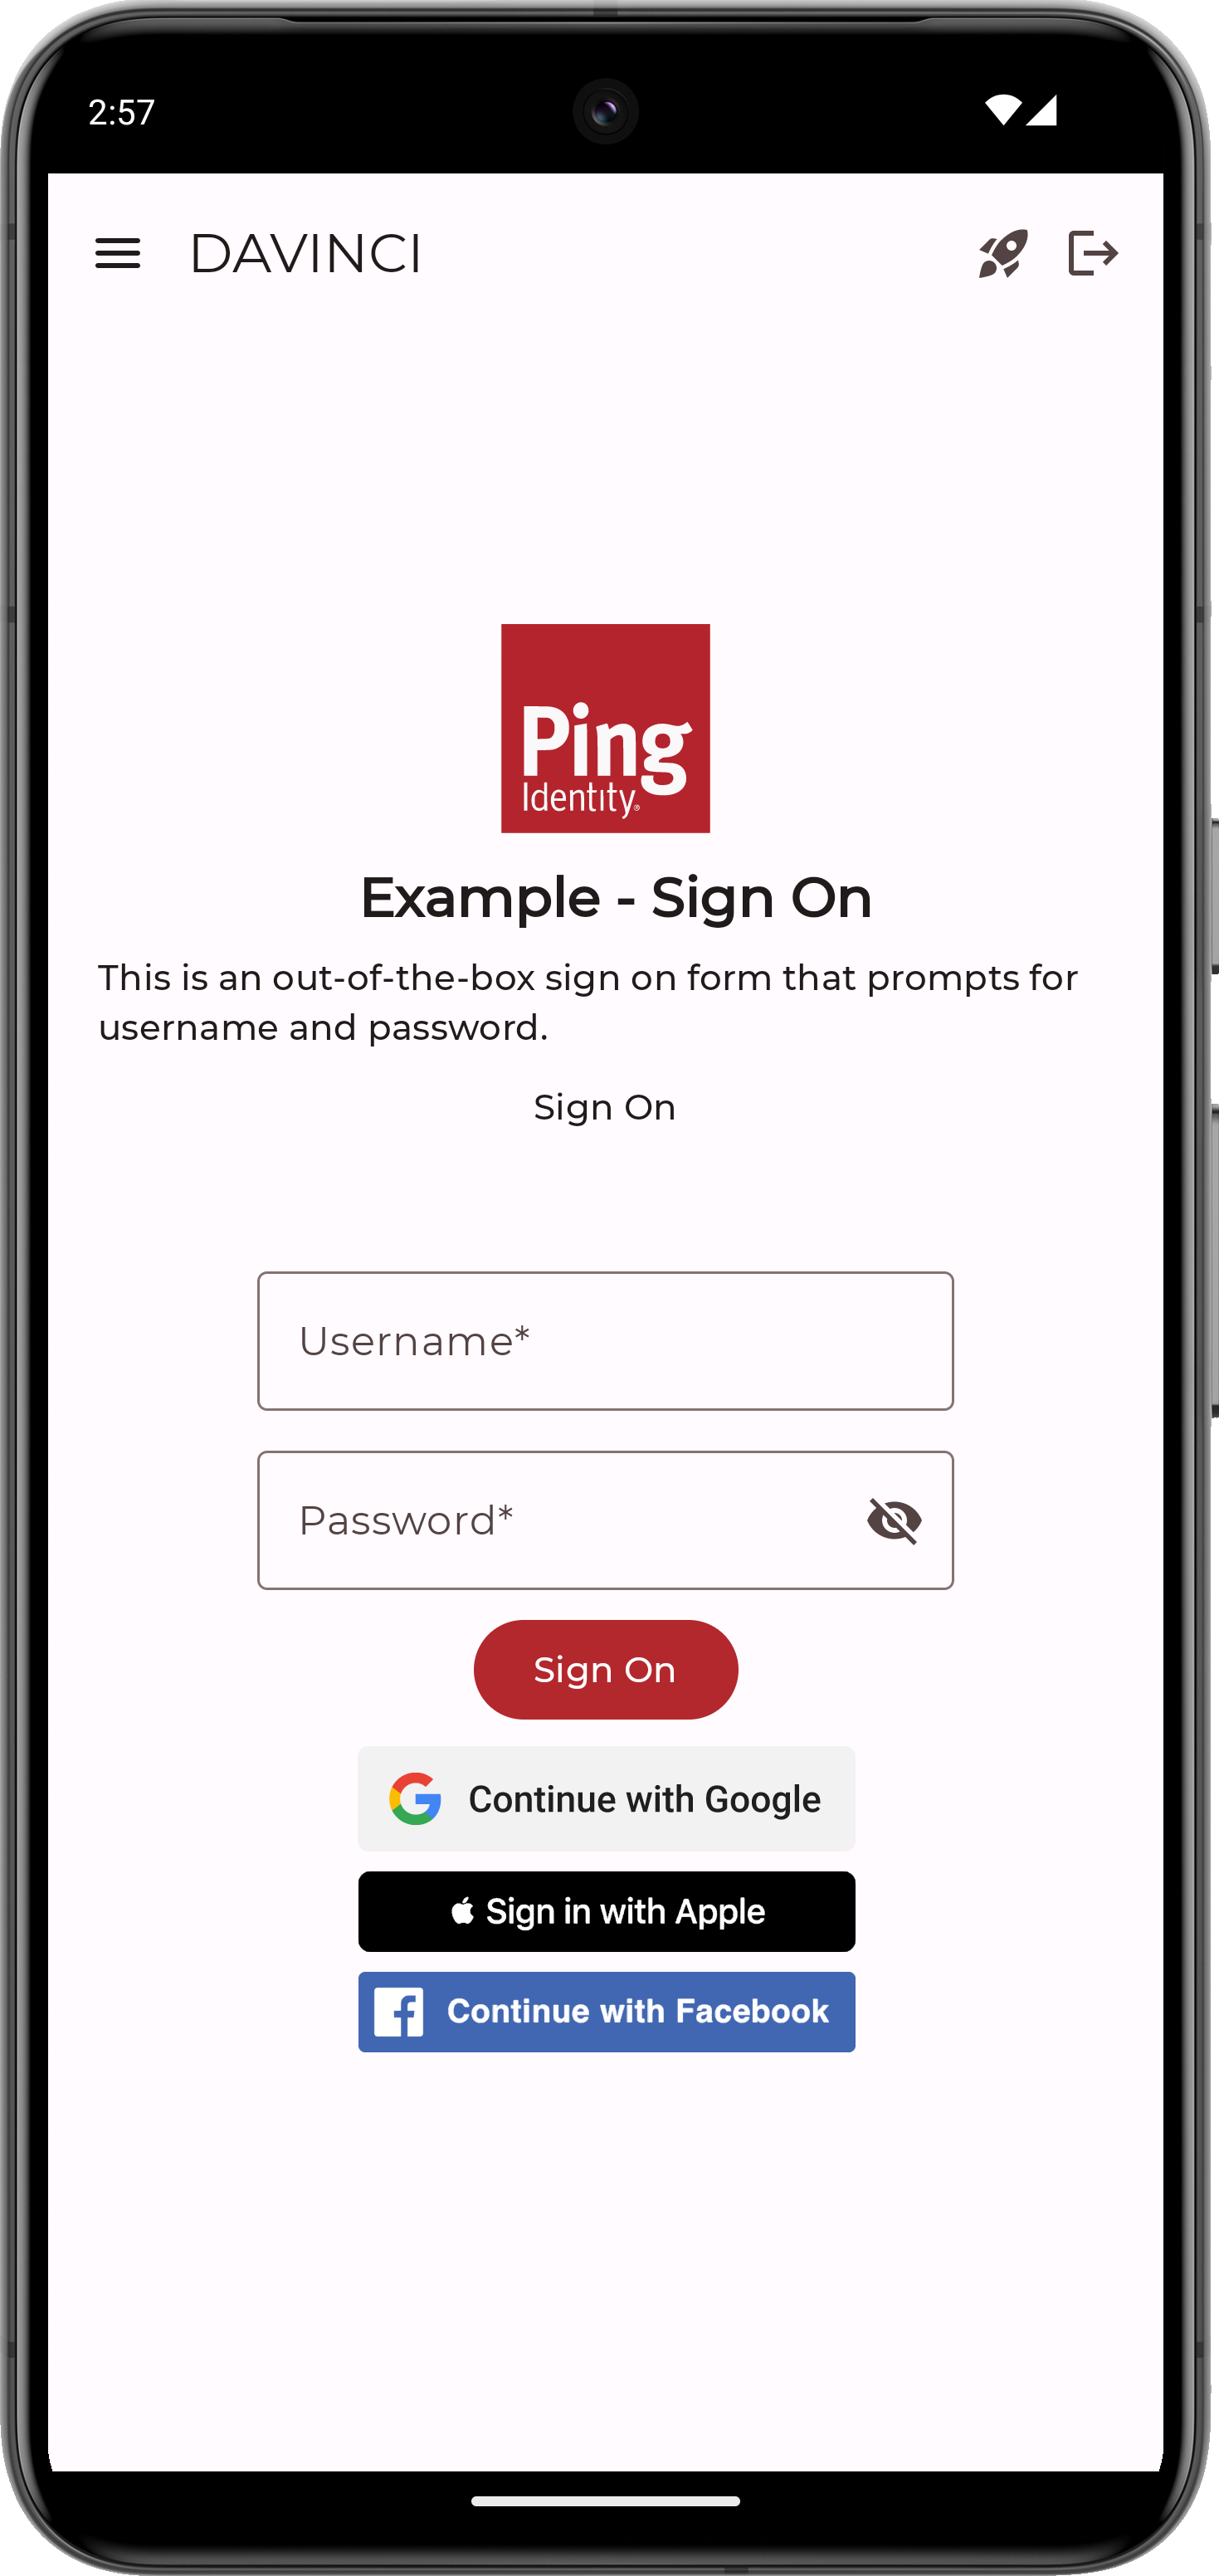
Steps
Complete the following steps to integrate social login into your client applications:
Before you begin
To complete this tutorial, refer to the prerequisites in this section.
The tutorial also requires a configured server.
Compatibility
- PingOne
-
-
Your PingOne instance must have DaVinci enabled.
-
Only PingOne External IdPs are supported.
-
Identity providers configured using a DaVinci Service Connector are not yet supported.
-
-
Connecting external identity providers in PingOne
In this section, you configure PingOne with details about the social login identity providers you want to integrate into your client apps.
The Ping SDKs are compatible with any OpenID Connect 1.0-compliant Identity Provider, such as those available by default in PingOne.
|
You must configure the identity provider as a PingOne External IdP. Learn more in External IdPs . Identity providers configured by using a DaVinci Service Connector are not yet supported. |
Ping Identity has tested the steps in this tutorial with the Identity Providers listed below. Select a provider to view the PingOne documentation with instructions on how to configure an external IdP in PingOne:
Configuring DaVinci Flows for social sign on
After connecting your chosen external identity providers to PingOne, the next step is to configure a DaVinci flow to display buttons on your login pages so that users can choose to authenticate using the external IdP.
The Ping SDKs support two options for adding social sign on to your DaVinci flows:
Option A. Configuring DaVinci Forms for social sign on
Complete the following steps to integrate external IdPs with PingOne using DaVinci Forms.
Creating a DaVinci Form
-
Create a form to display your selected external identity providers.
PingOne includes a number of prebuilt templates that you can modify as required.
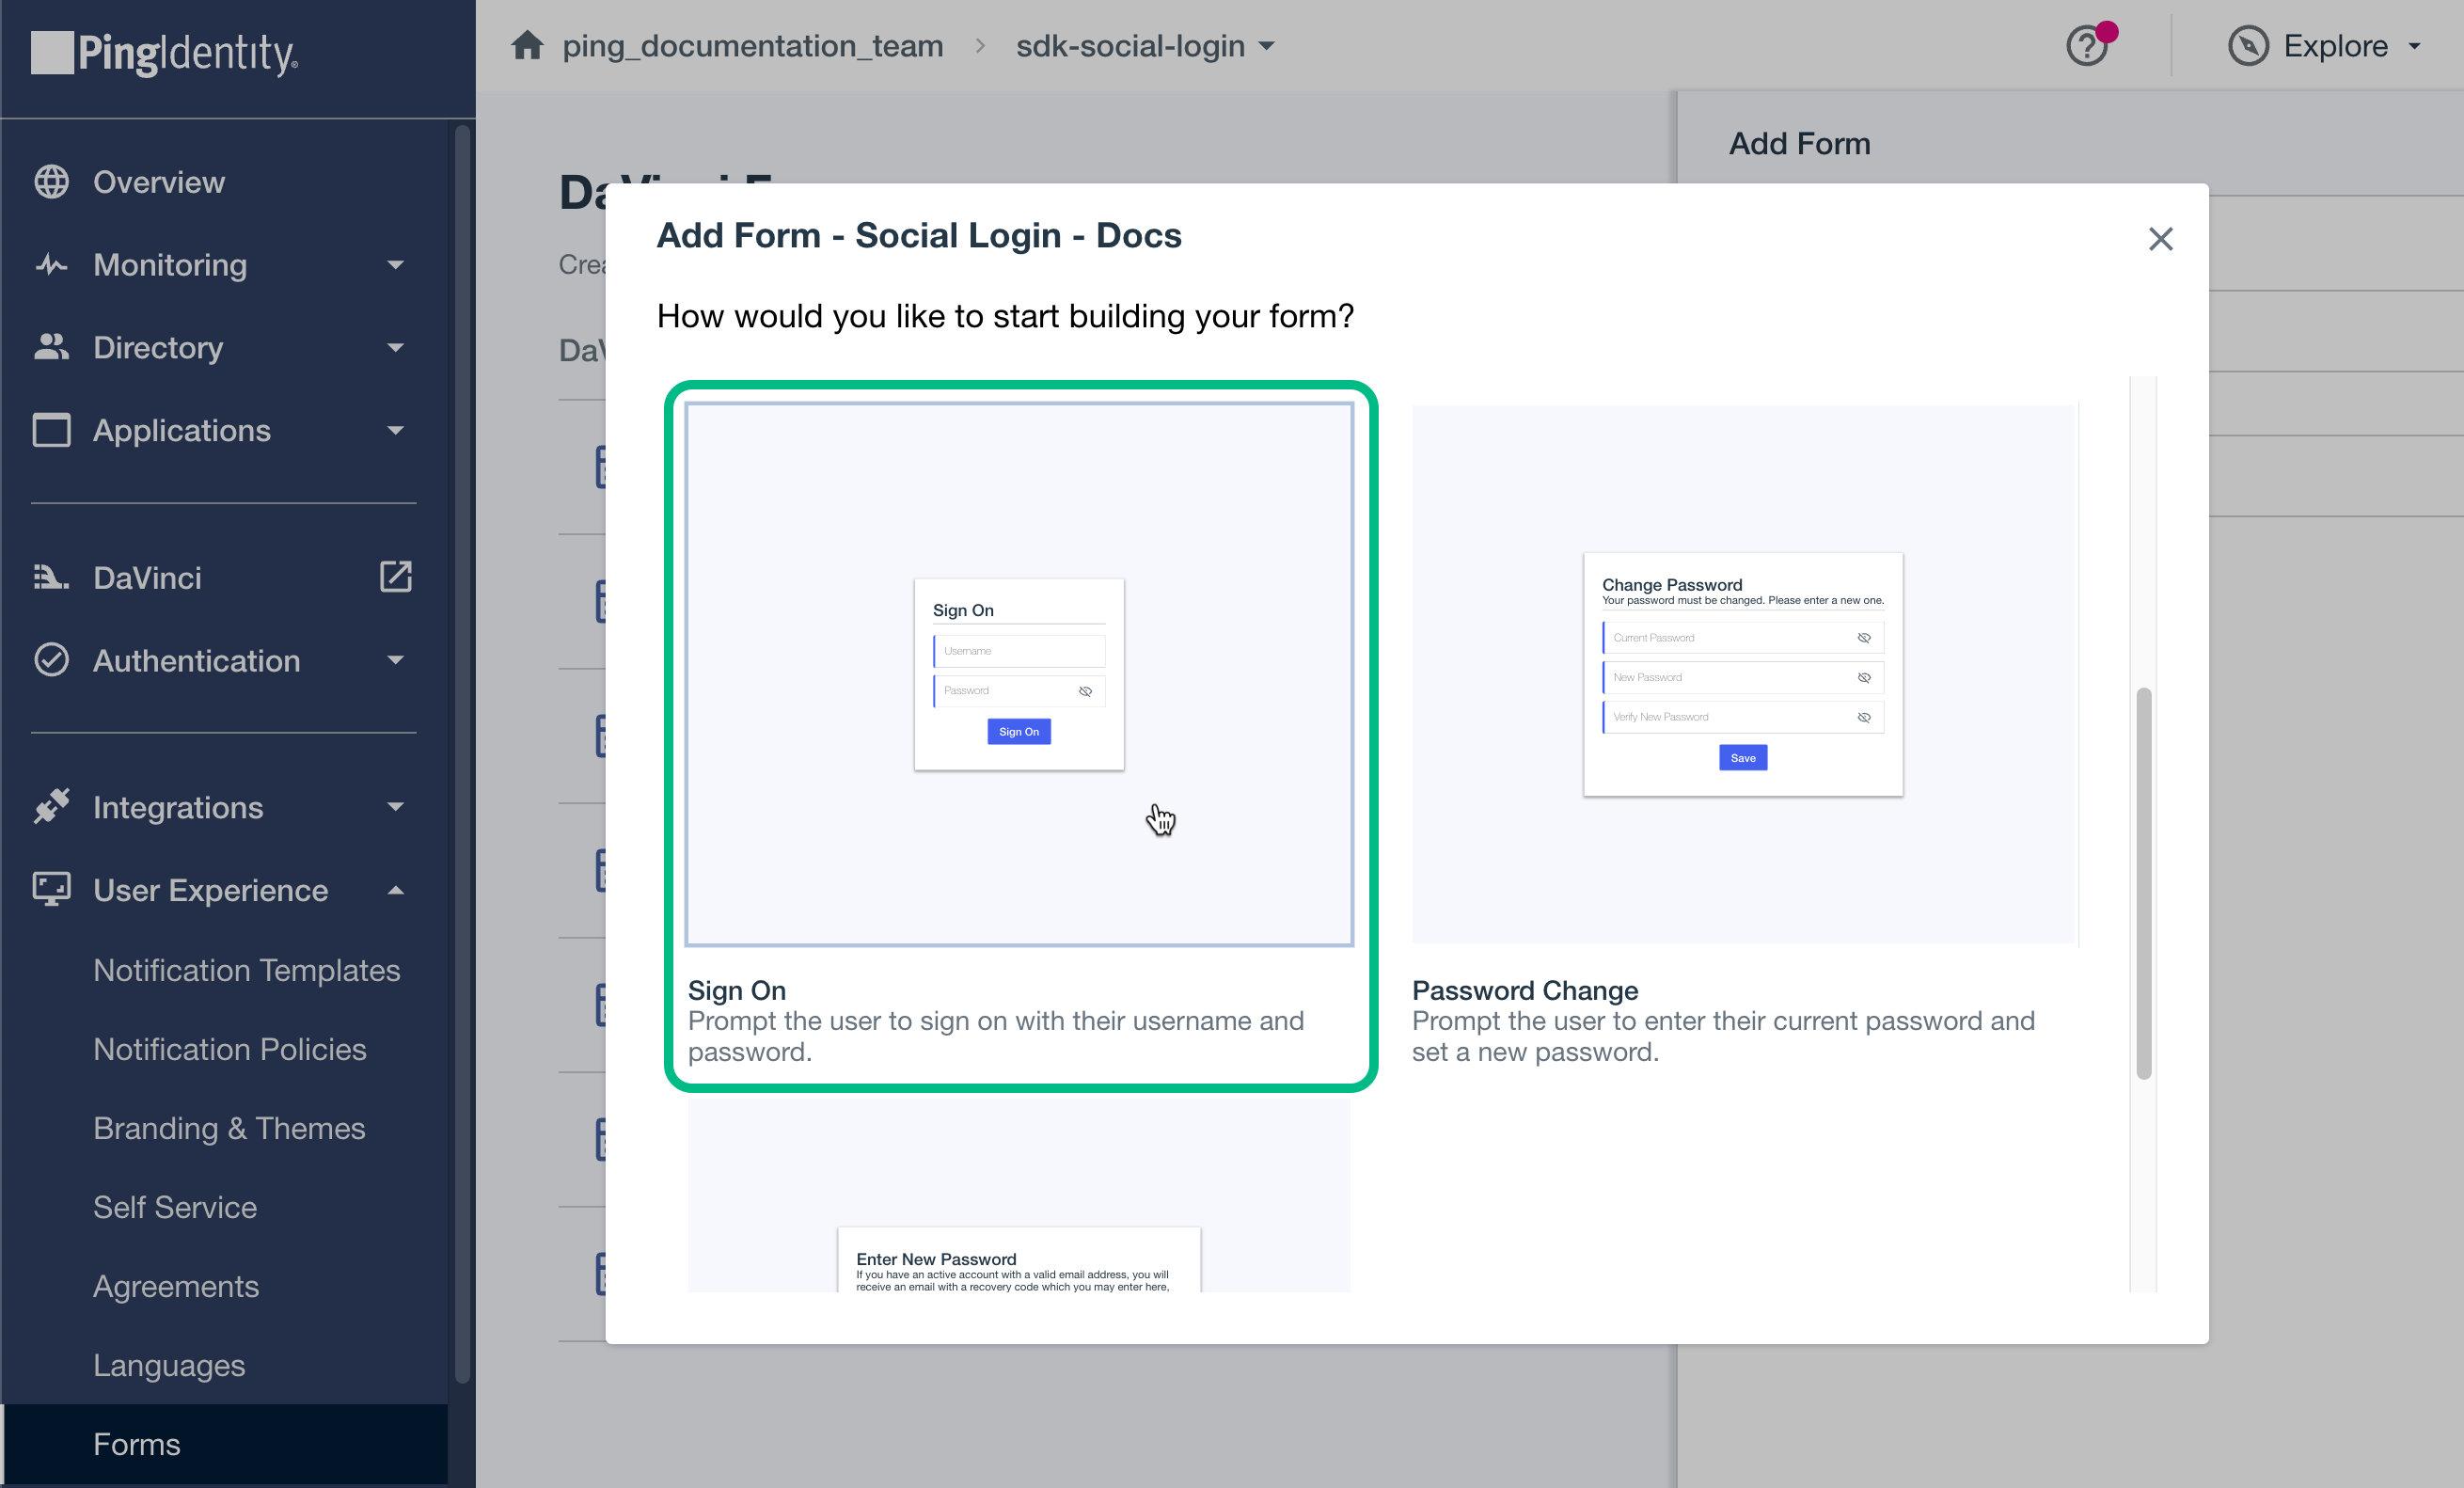
-
To add external identity providers to the form:
-
From the Toolbox tab, drag a Social Login field onto the form for each external identity provider you want to display.
-
In PingOne External Identity Provider, select the external IdP you created earlier. For example, Google.
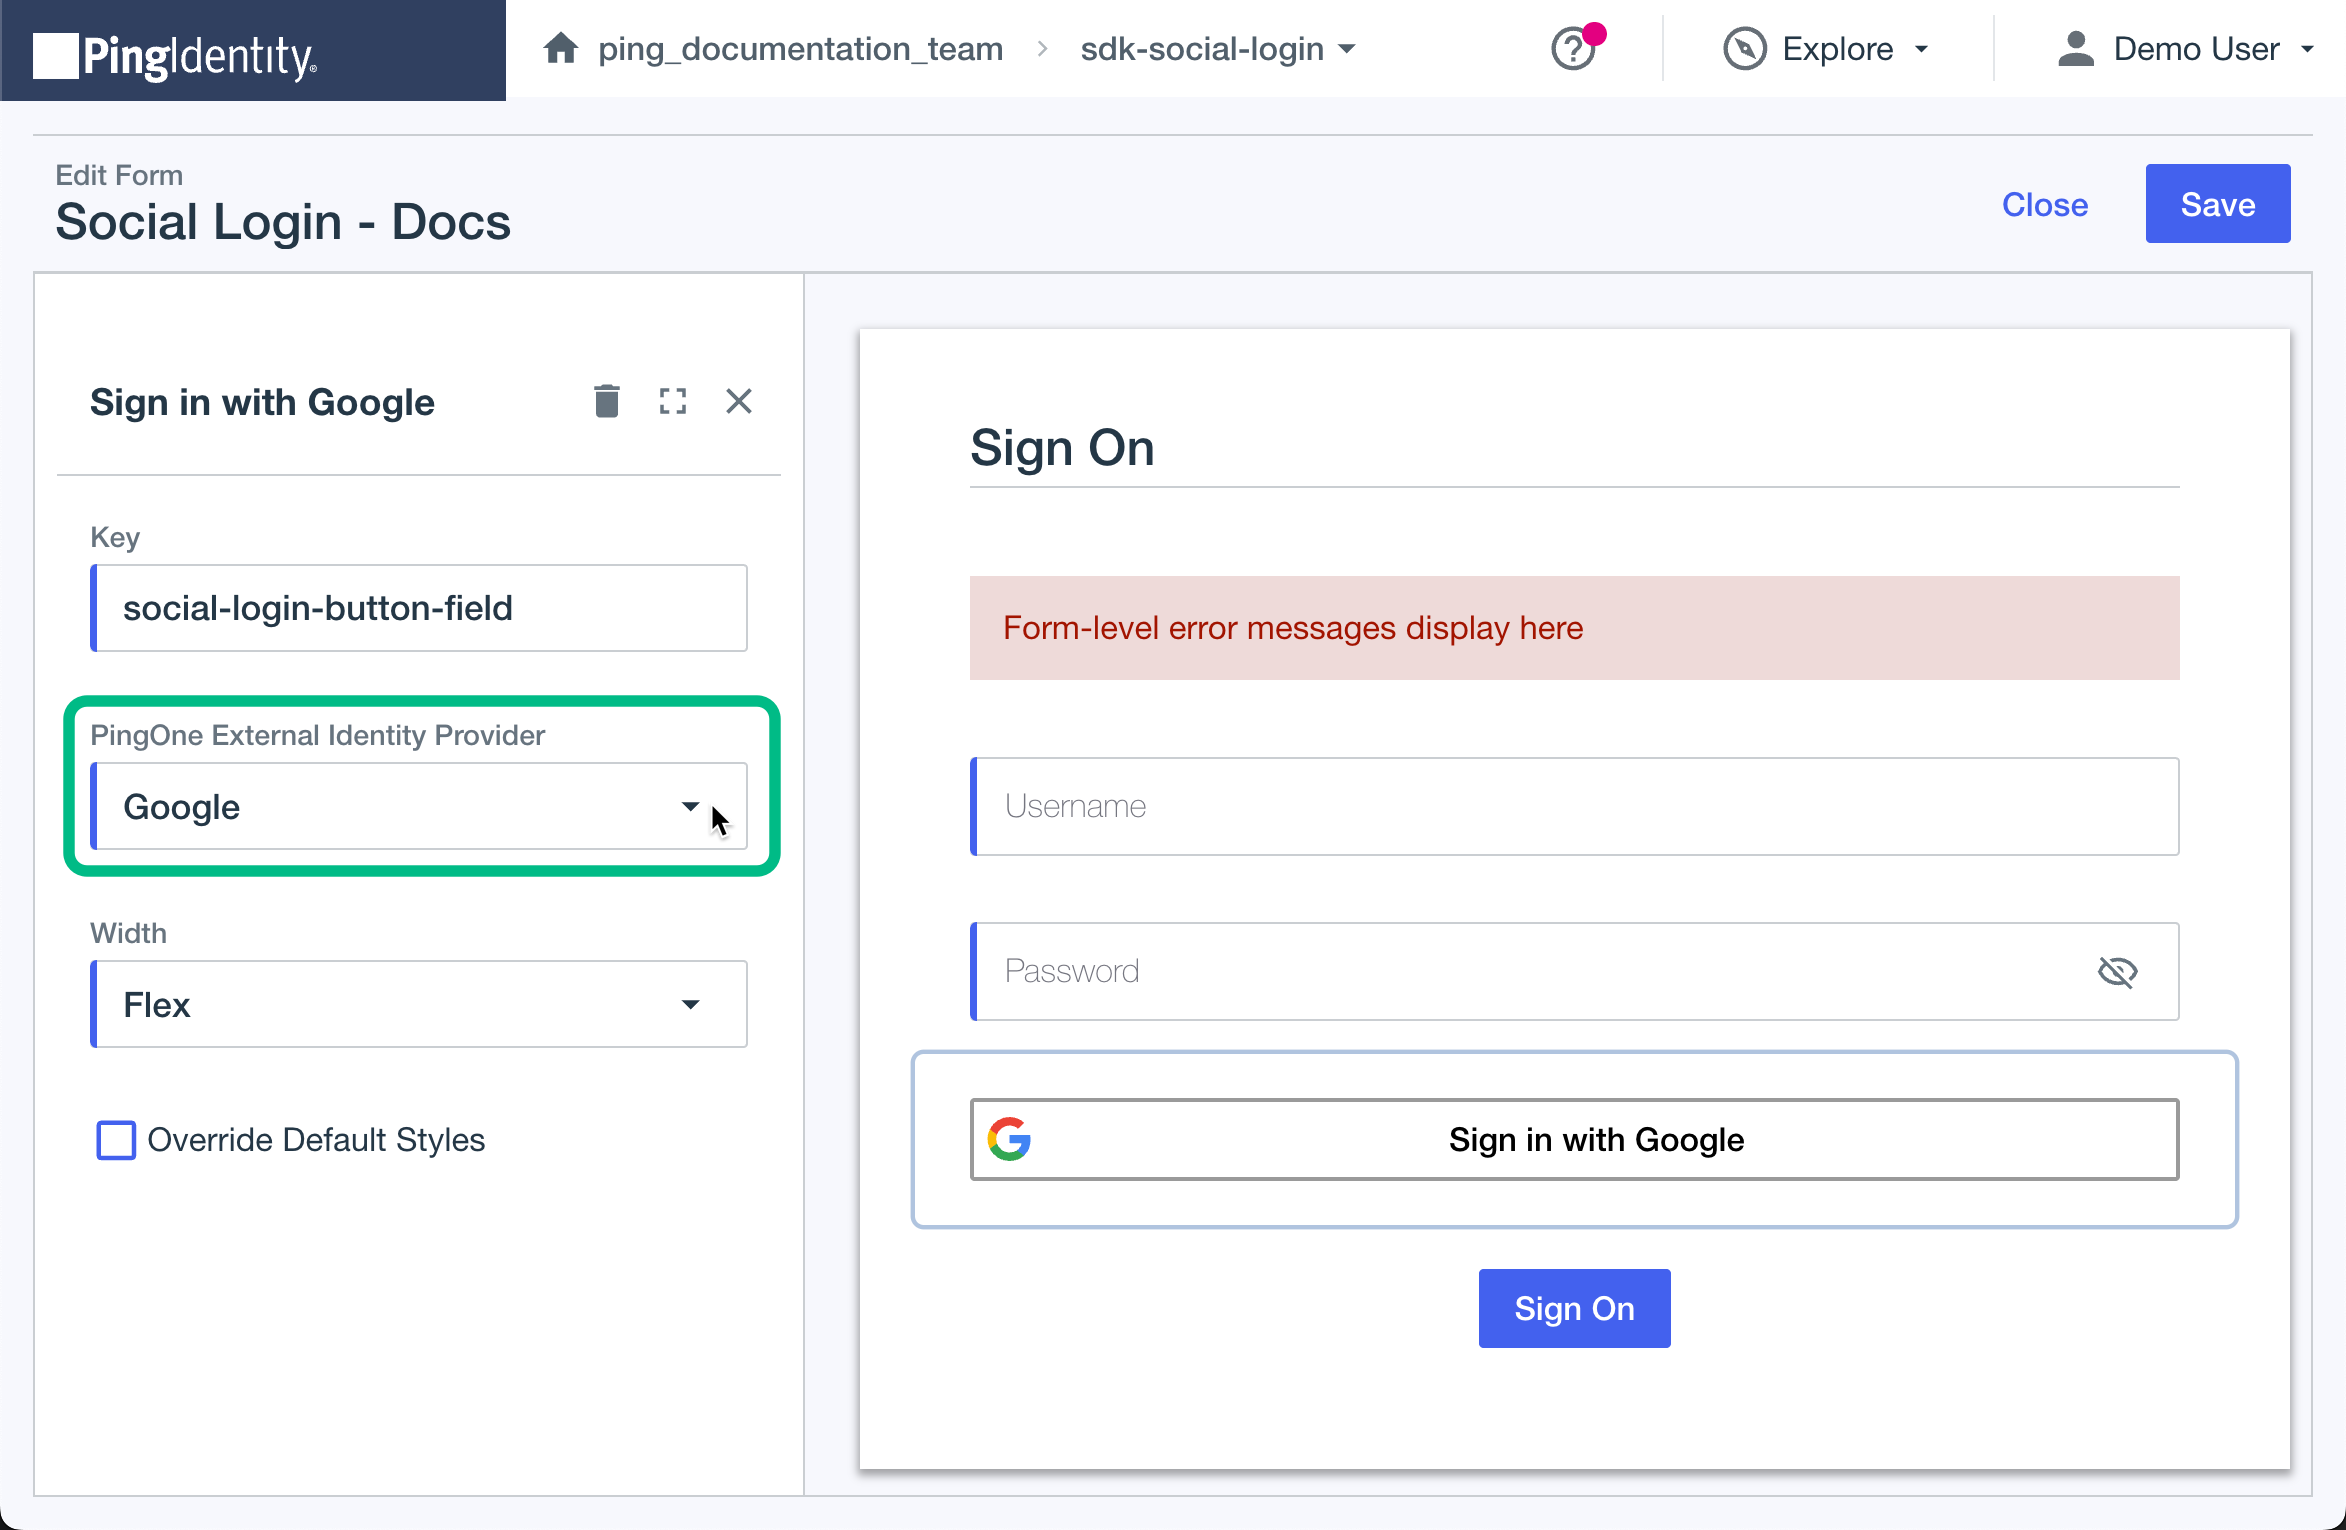 Figure 25. Configuring a Social Login field to use Google as the external IdP.
-
-
Save your changes.
Learn more in Creating a form in the PingOne documentation.
Adding a form to a DaVinci flow
When you have added your external identity providers to your form, you must now include it as part of your DaVinci flow.
-
Add the form you created for external IdPs to a flow by using the PingOne Forms connector.
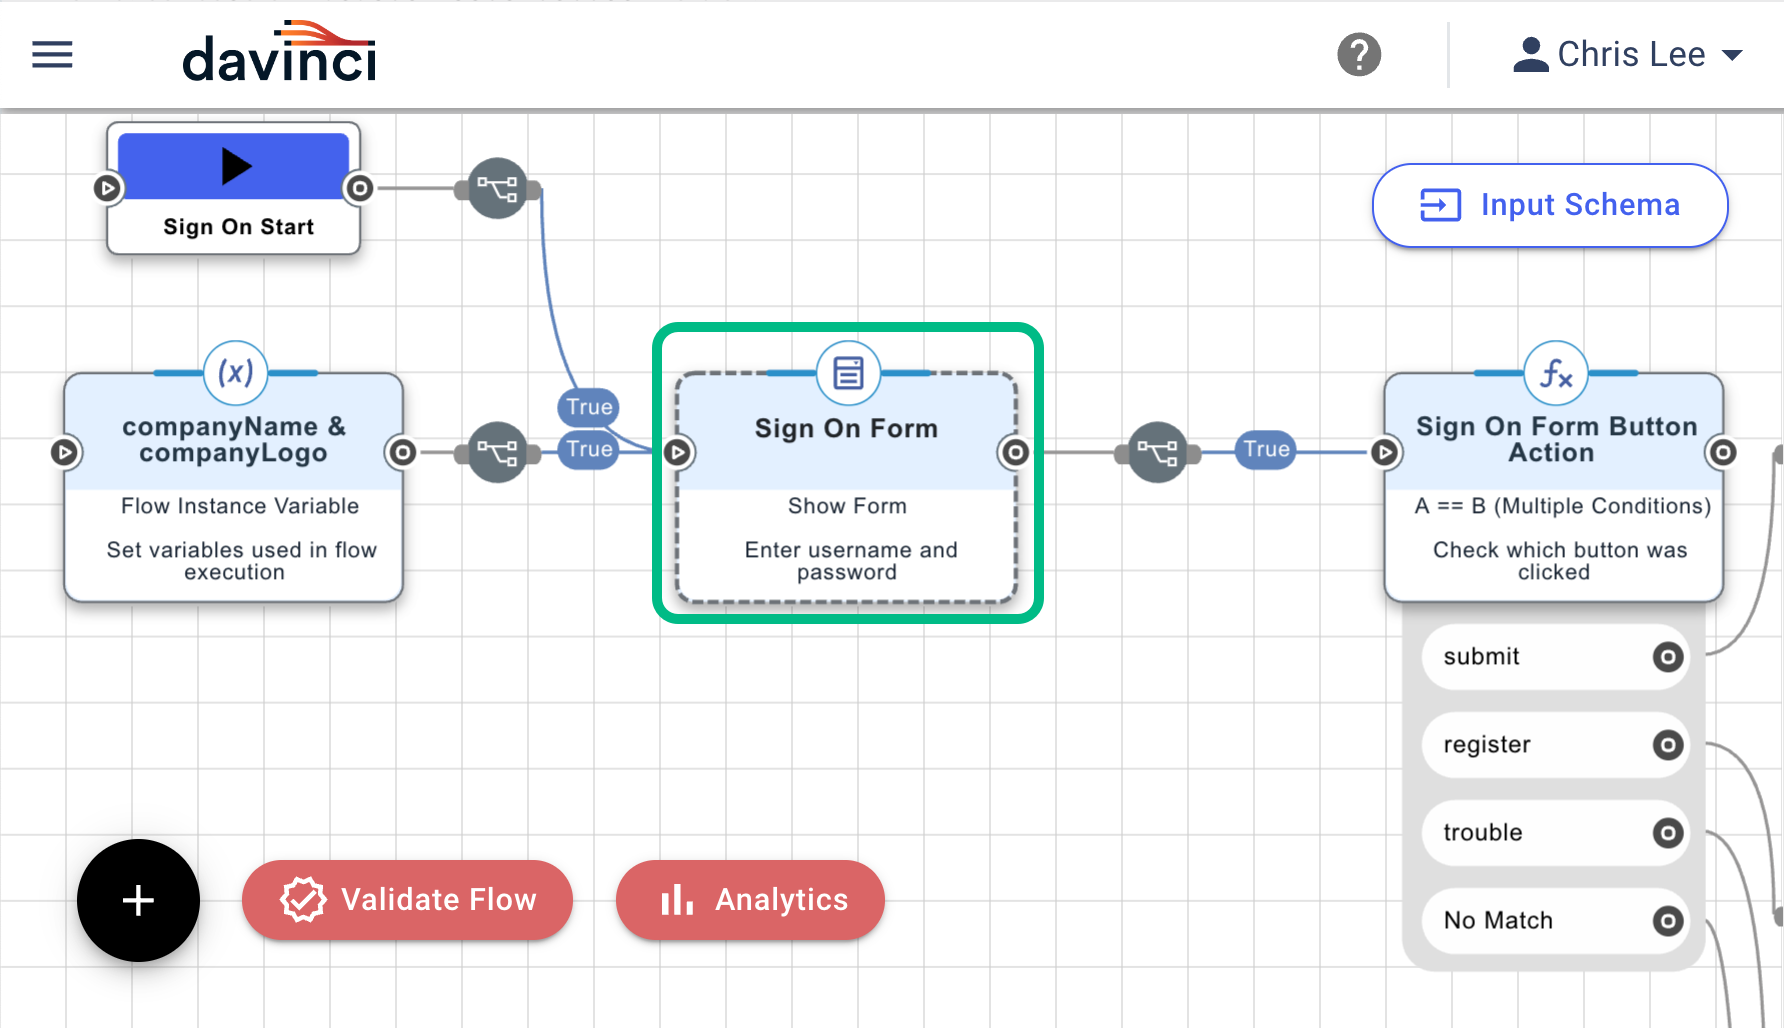 Figure 26. Example of a Forms Connector in a DaVinci flow.
 -
To ensure the server can redirect back to an Android or iOS mobile app you must add a custom URI scheme.
This is not required if you are only implementing a JavaScript client Select the PingOne Forms connector you just added, click the General tab, and in Application Return URL, enter a custom URI scheme for redirecting users to your client app after social sign on.
If you are implementing Android or iOS clients for this tutorial, use
myapp://example.com.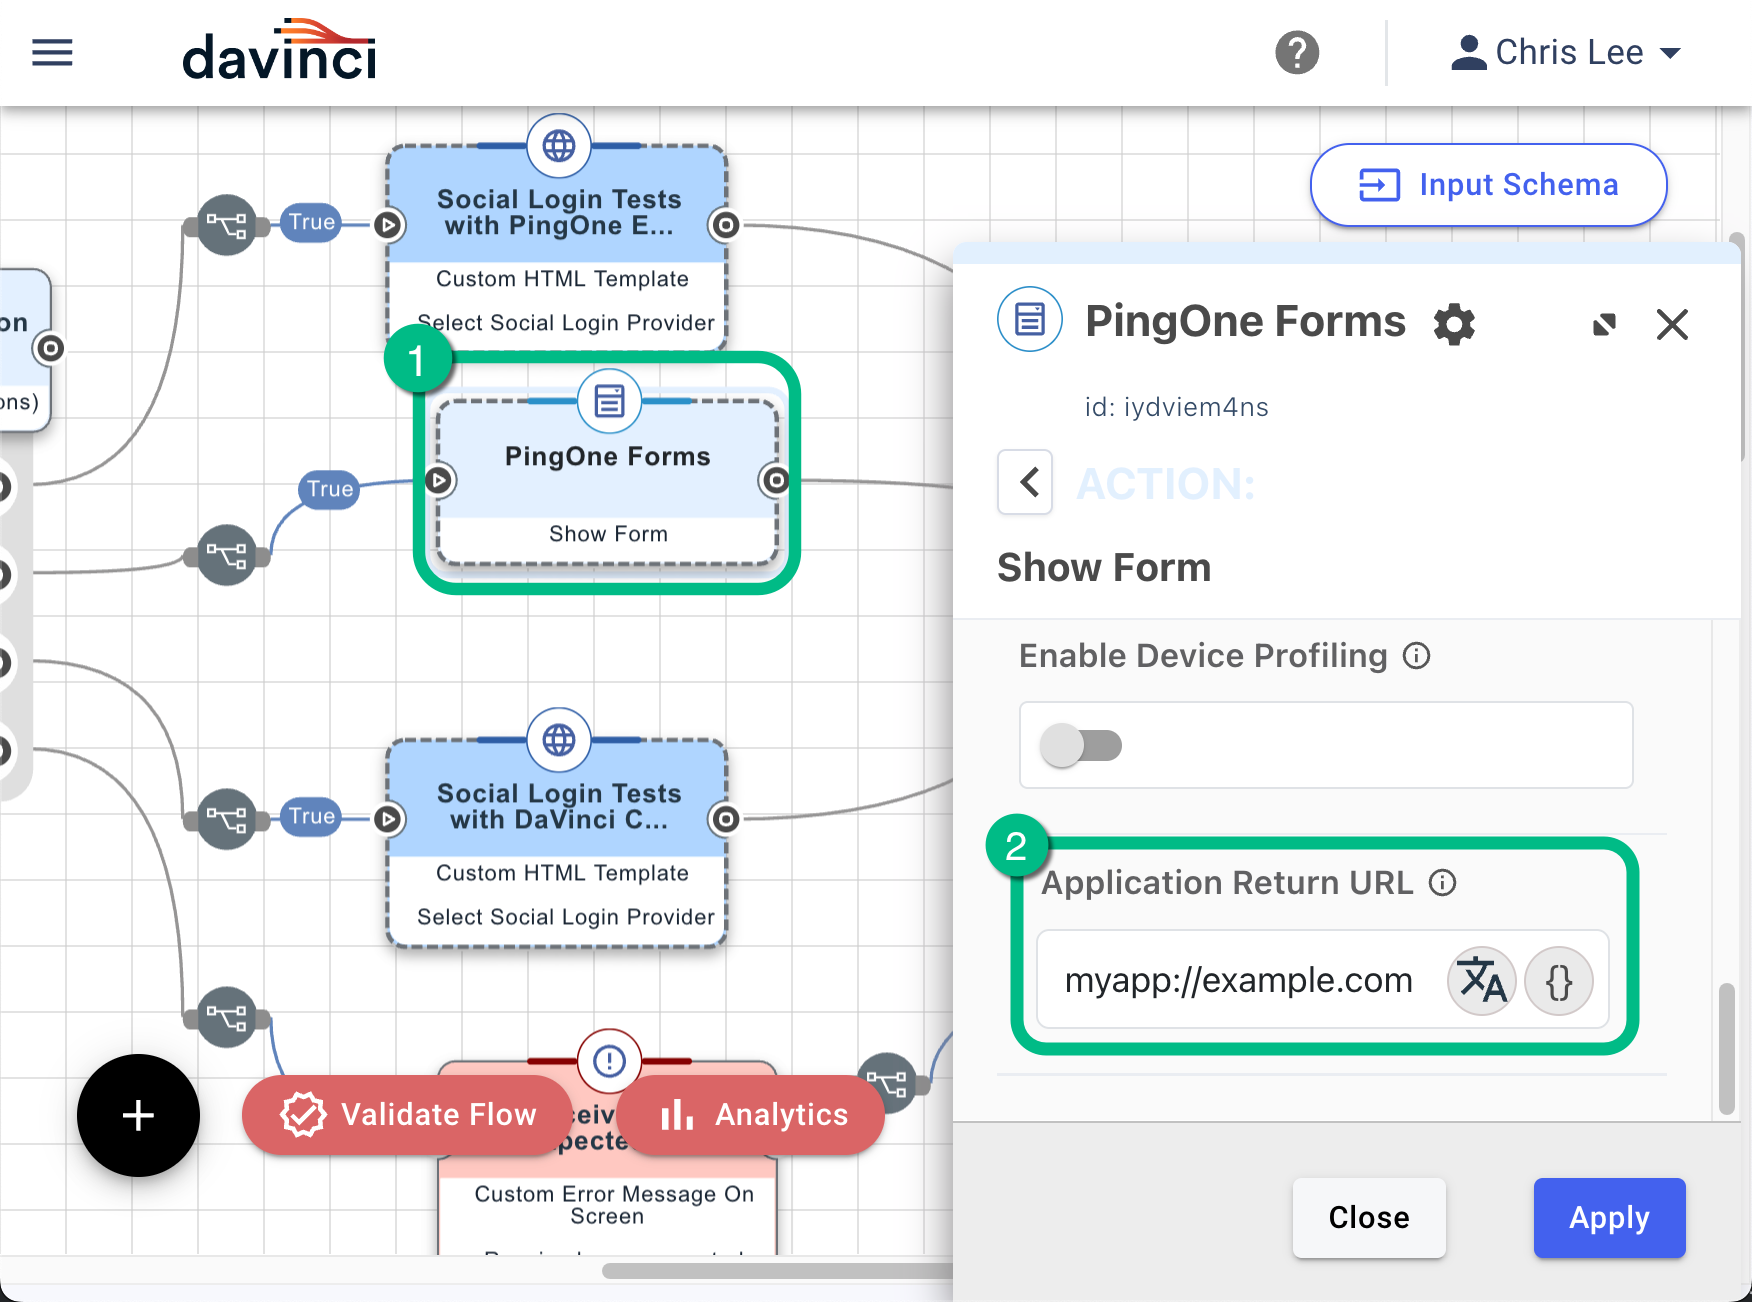 Figure 27. Configuring a return URL in the PingOne Form Connector.
 -
Apply your changes.
You can now proceed to Configuring a DaVinci flow to be launched by the Ping SDKs.
Option B: Configuring the HTTP Connector for social sign on
Complete the following steps to integrate external IdPs with PingOne by adding the HTTP Connector to a DaVinci flow.
Adding the HTTP Connector to a DaVinci flow
-
You must add the HTTP connector to your DaVinci flow so that it can display your custom HTML sign-on page.
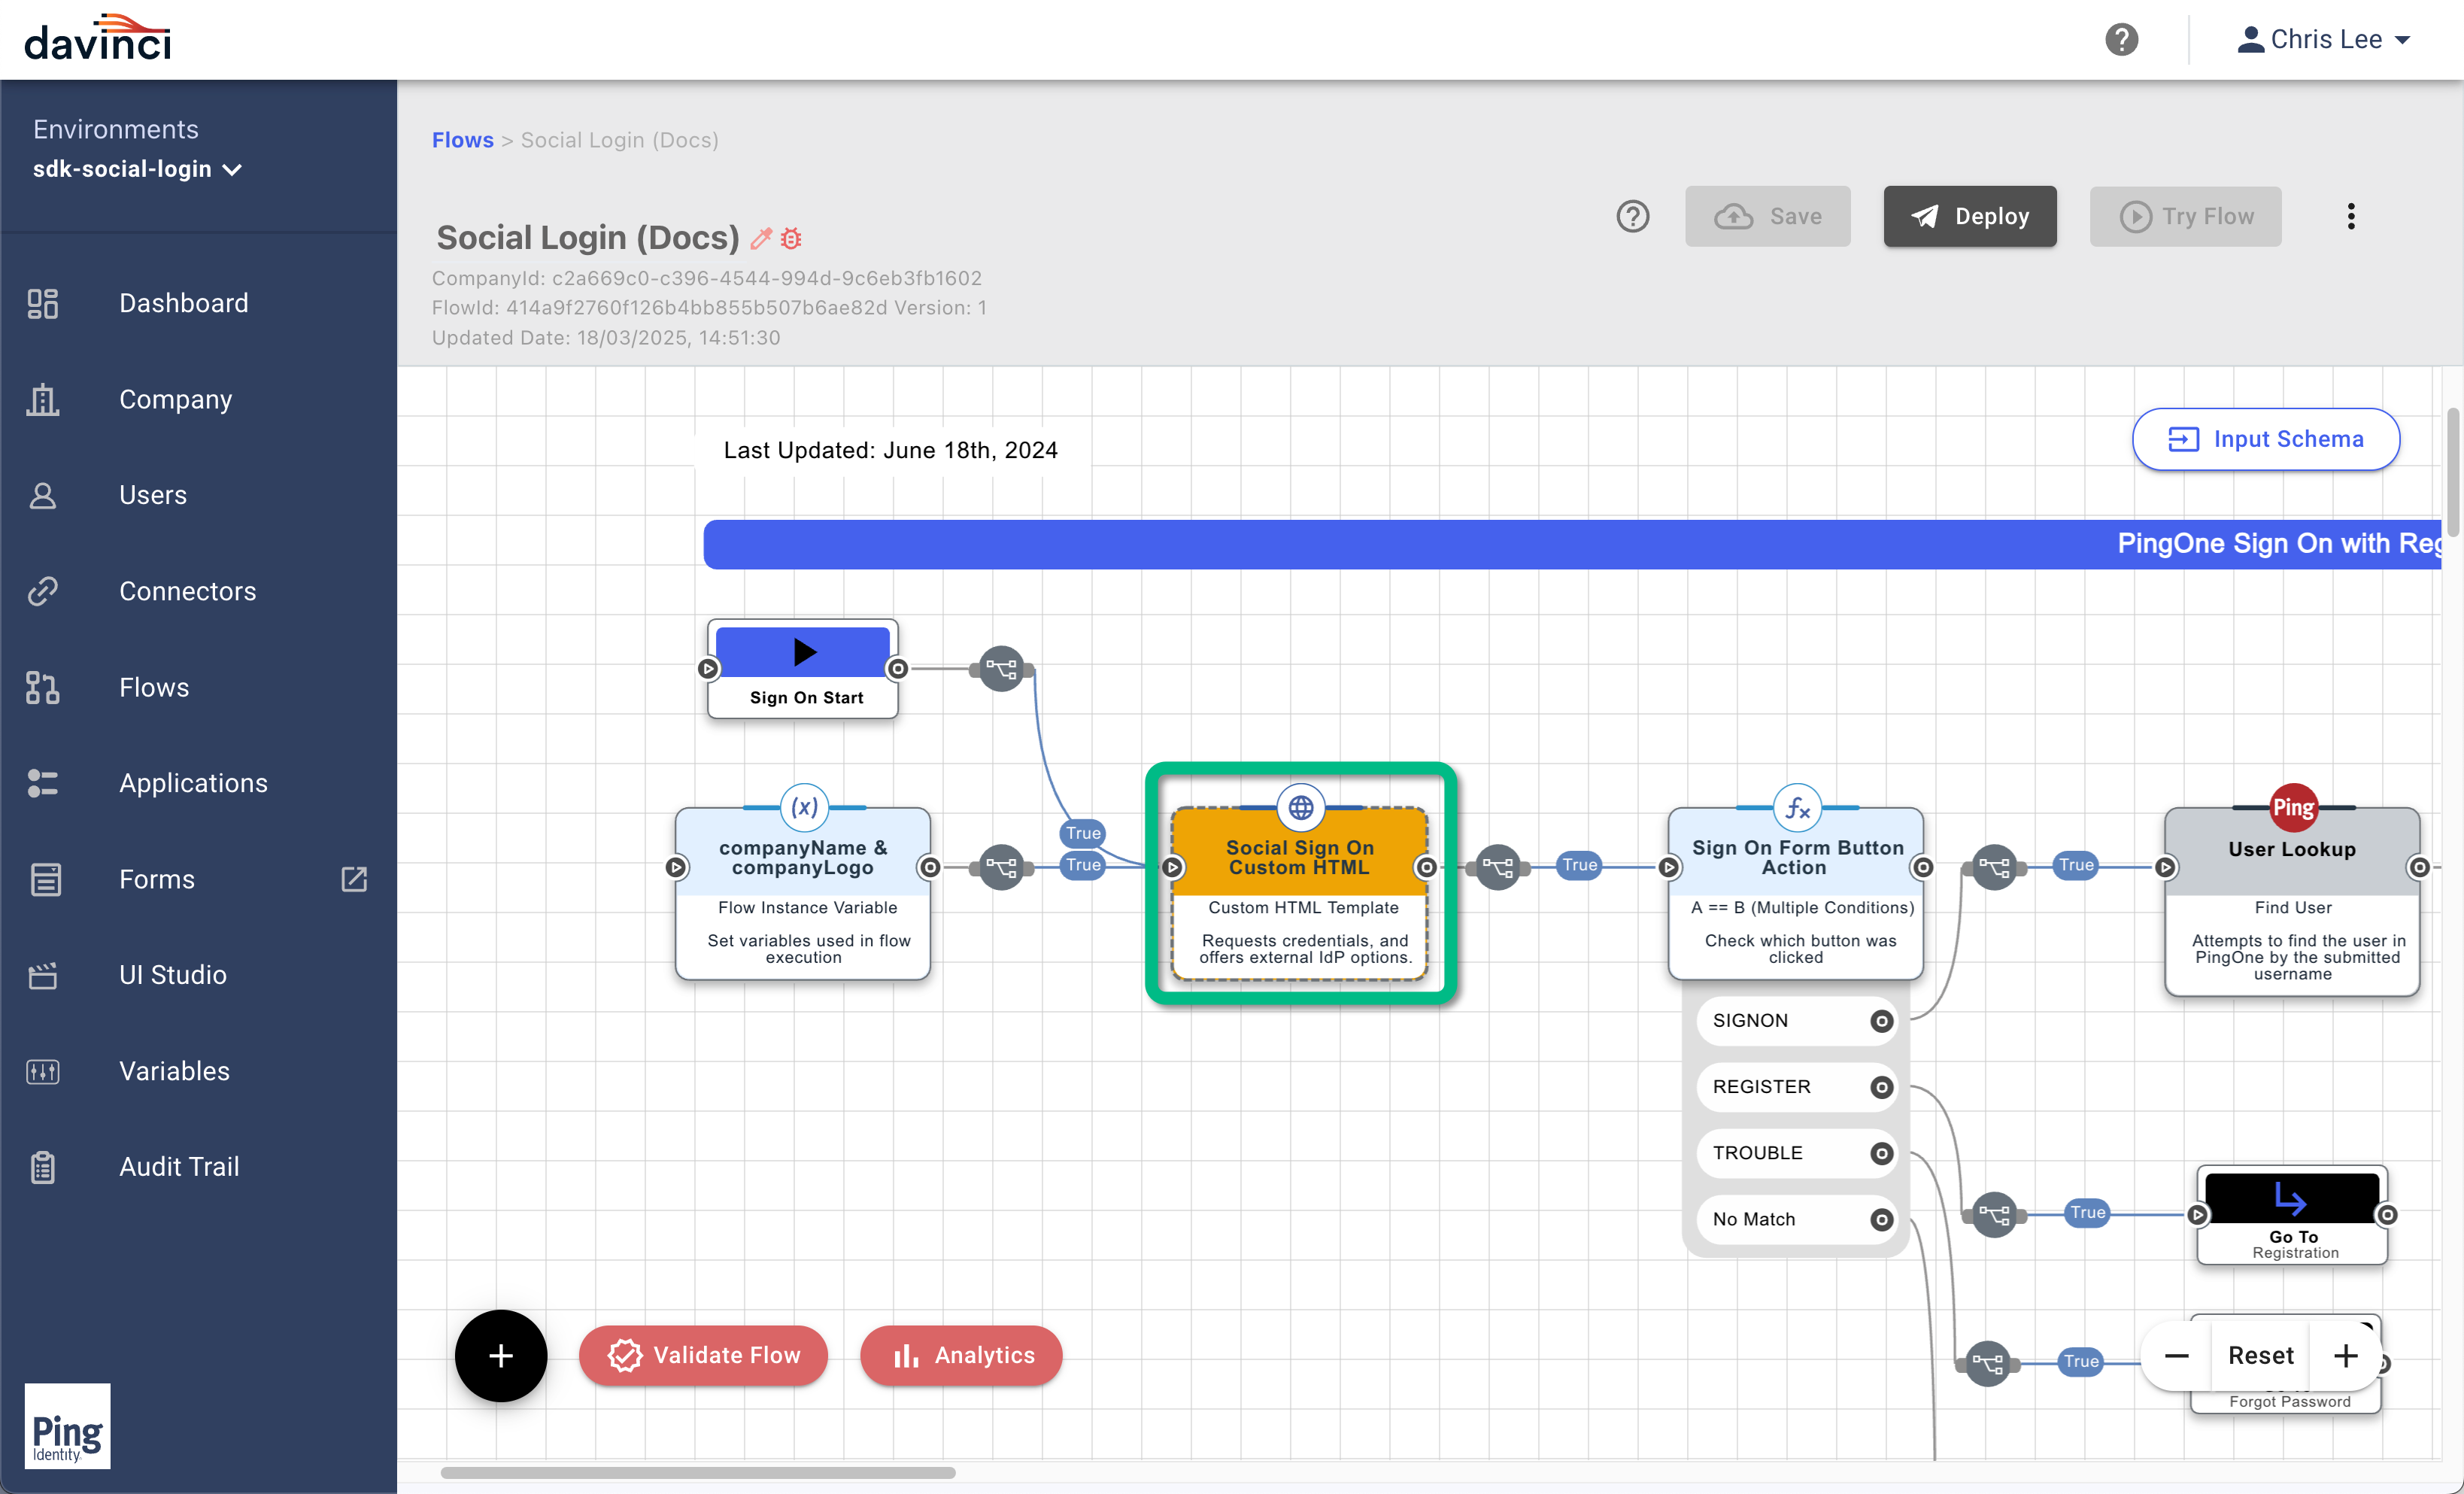 Figure 28. An HTTP connector added to a DaVinci flow.
To learn more, refer to Adding a connector.
Building a custom HTML sign-on page
With the HTTP Collector in place in the flow, you can now add custom HTML to display the sign-on page.
-
Select the HTTP Connector you added to your DaVinci flow, and add custom HTML to display a sign-on form.
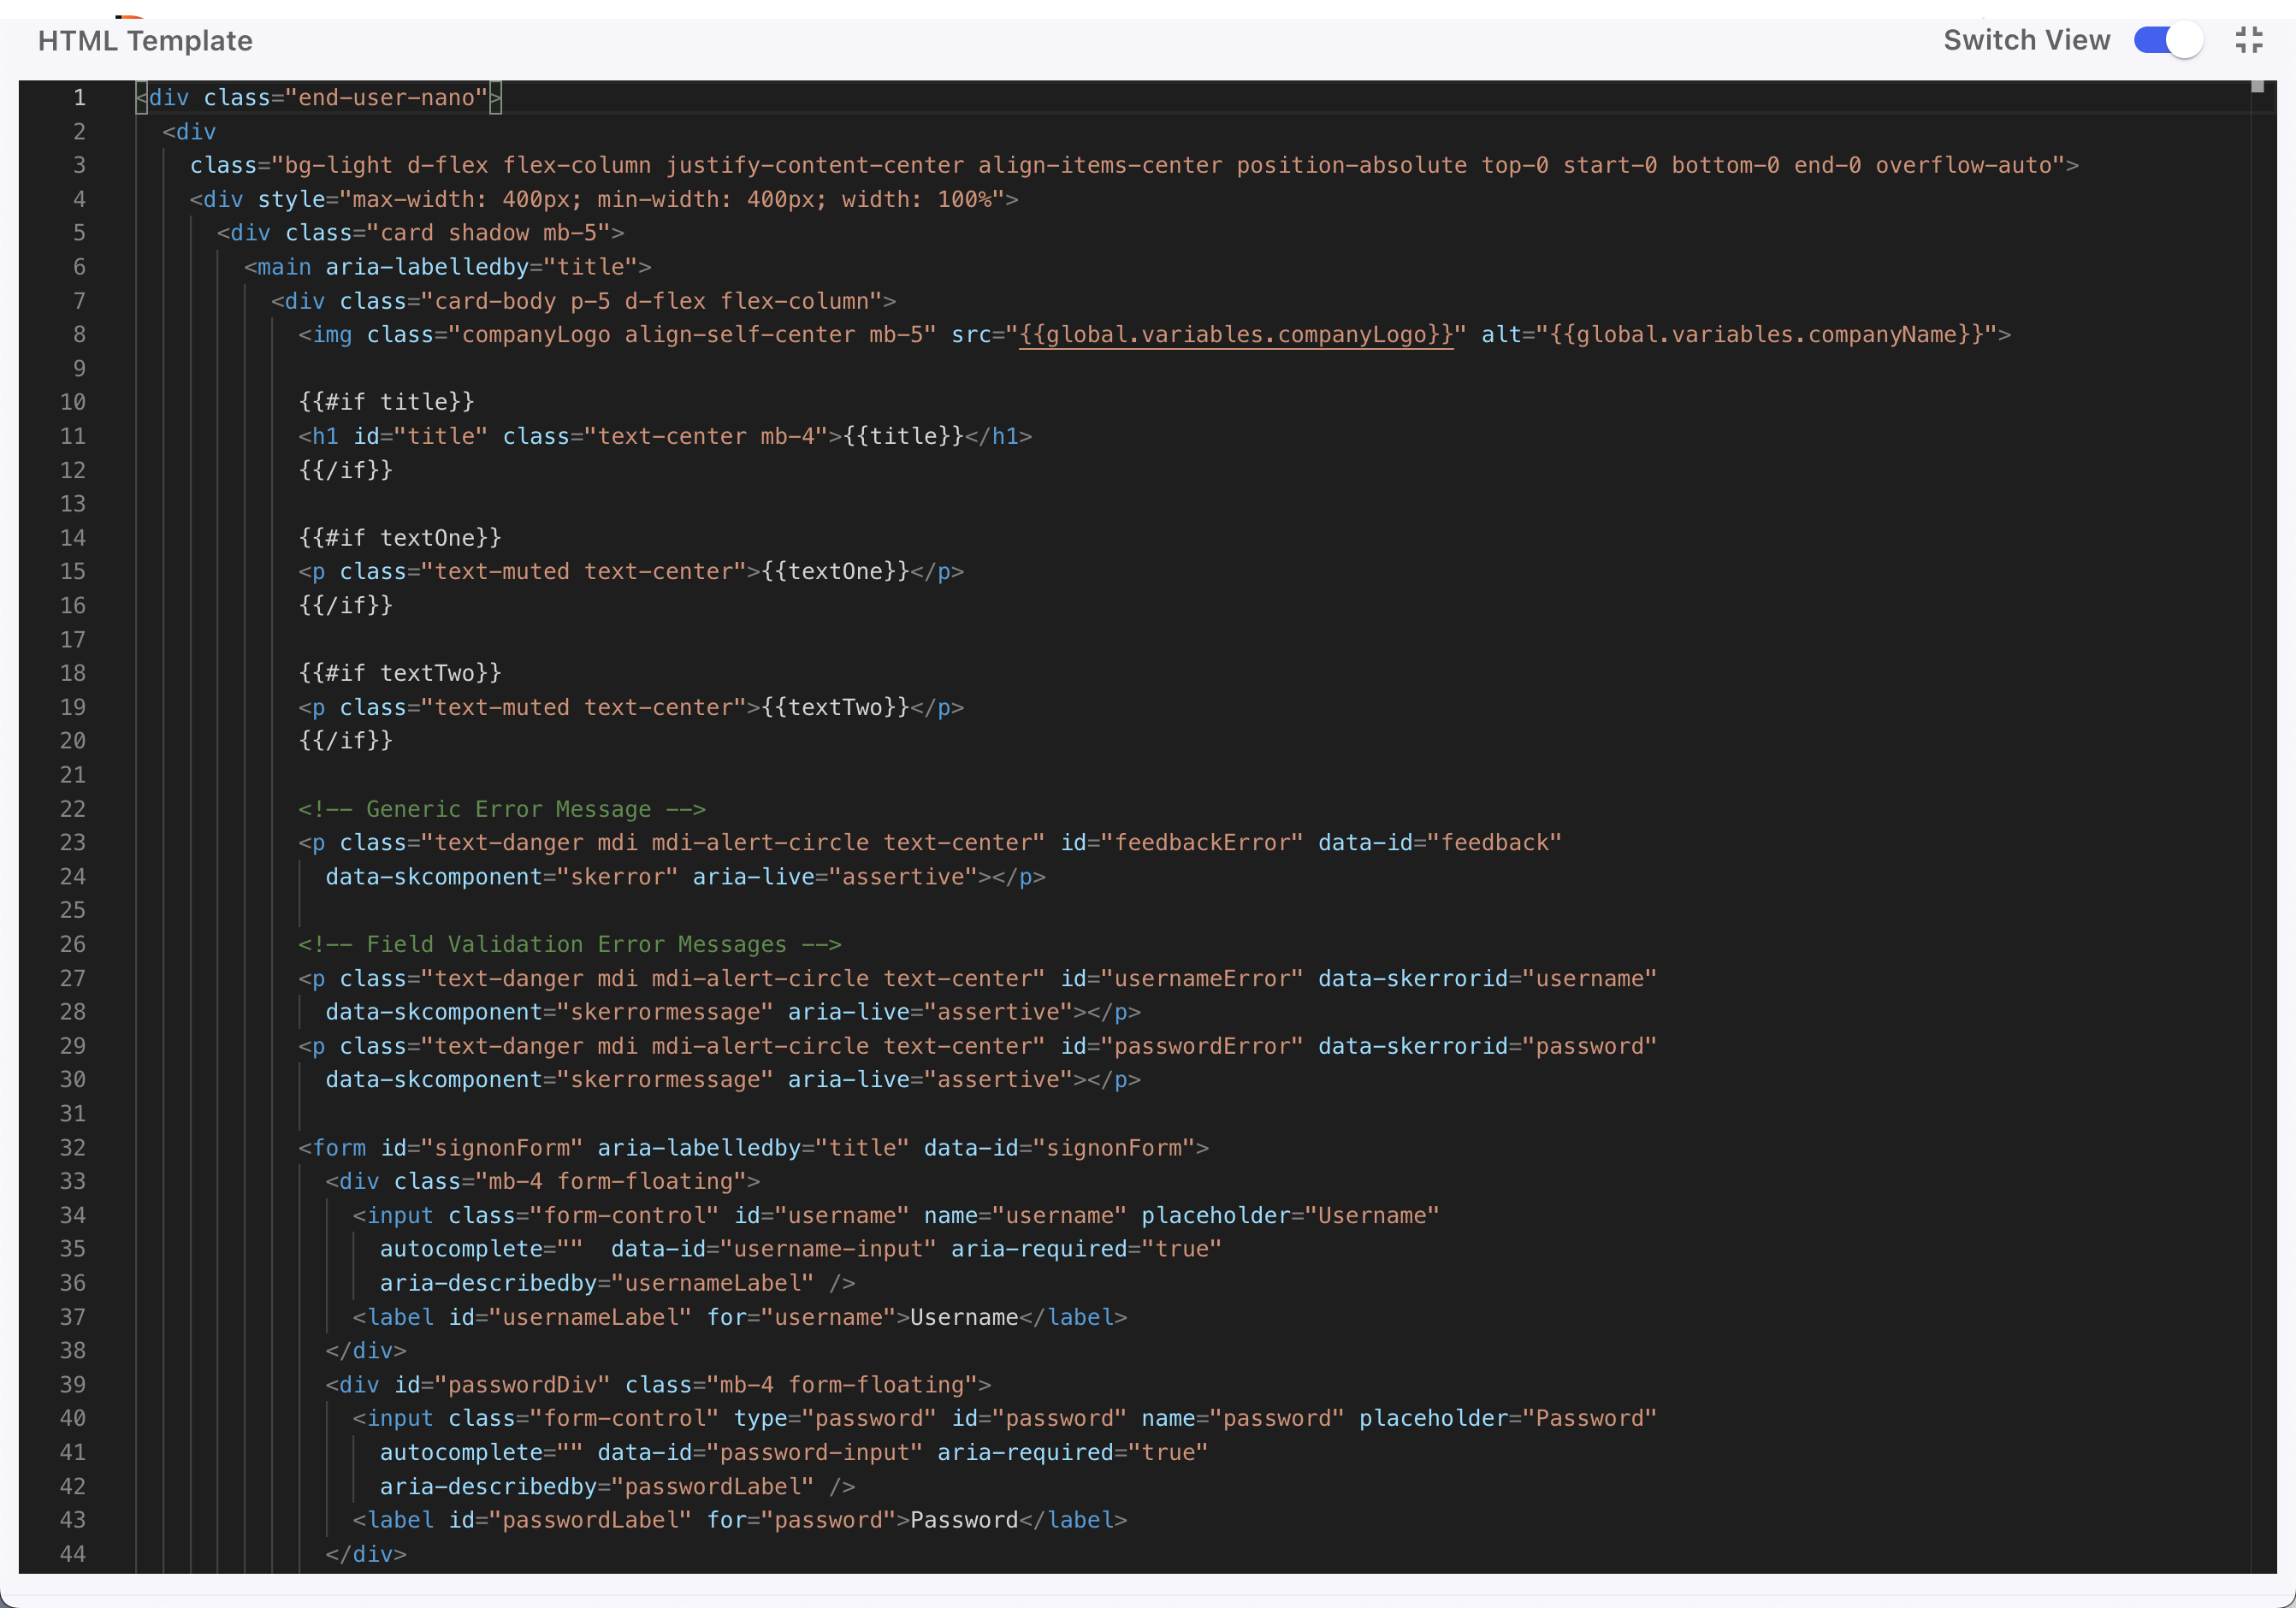 Figure 29. Example custom HTML form in an HTTP connector.
To learn more about adding custom HTML, refer to Building a custom page.
-
Add an skIDP component to your custom HTML for each external IdP option you want to display.
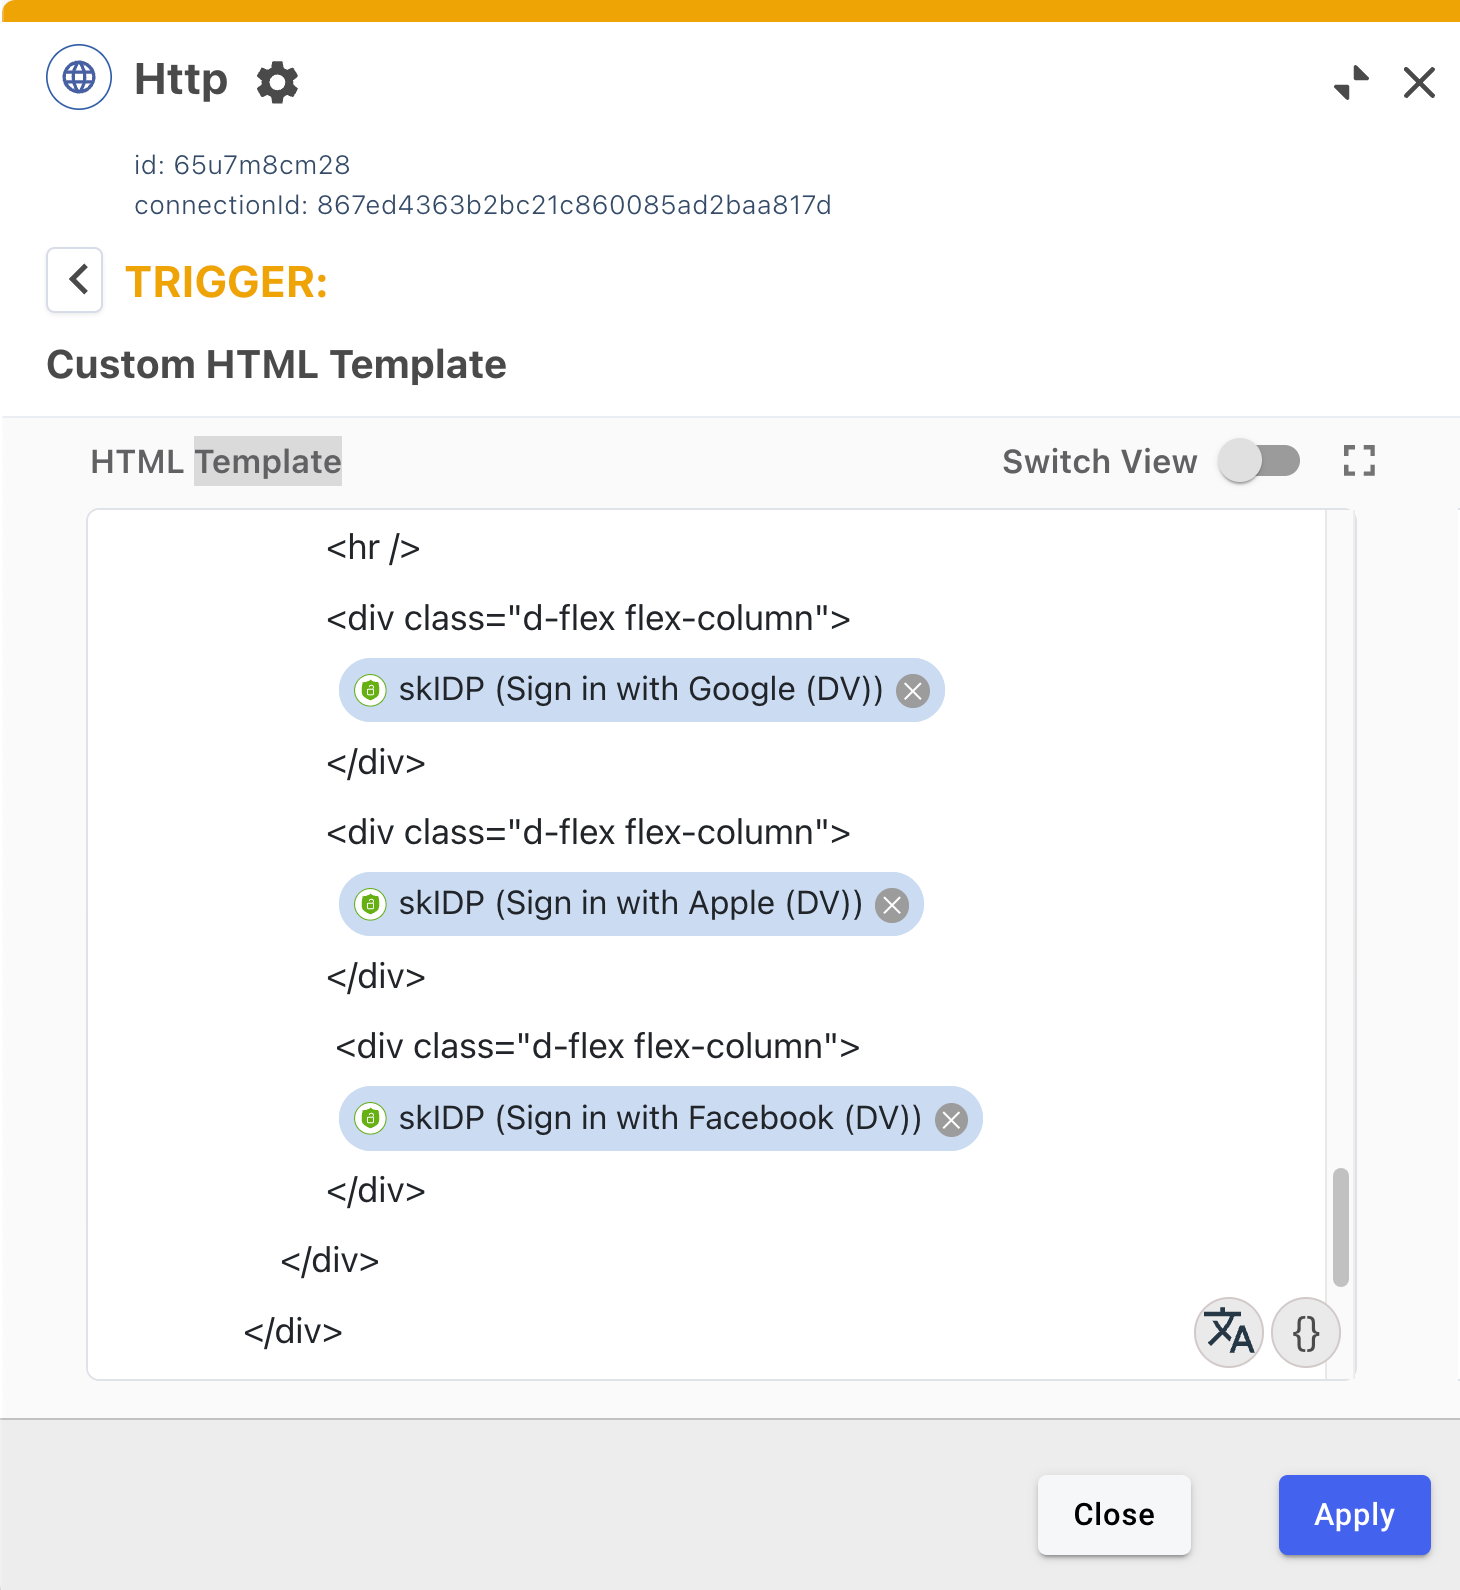 Figure 30. An HTTP connector with custom HTML showing three skIDP components.
To learn more, refer to Adding SK-Components to a connector.
-
Configure the skIDP component to use an external IdP:
-
In the HTML Template field, select an skIDP component to view the Update Component modal.
-
Select the Identity Provider tab.
-
In Identity Provider Connector, select
PingOne Authentication. -
In PingOne External Identity Provider, select one of the external IdPs you configured earlier.
-
Enable Link with PingOne User.
Failure to enable this option causes errors when attempting to use the flow with the Ping SDKs.
-
To ensure the server can redirect back to an Android or iOS mobile app you must add a custom URI scheme.
This is not required if you are only implementing a JavaScript client In Application Return to Url, enter a custom URI scheme for redirecting users to your client app after social sign on.
If you are implementing Android or iOS clients for this tutorial, use
myapp://example.com.
The result will resemble the following:
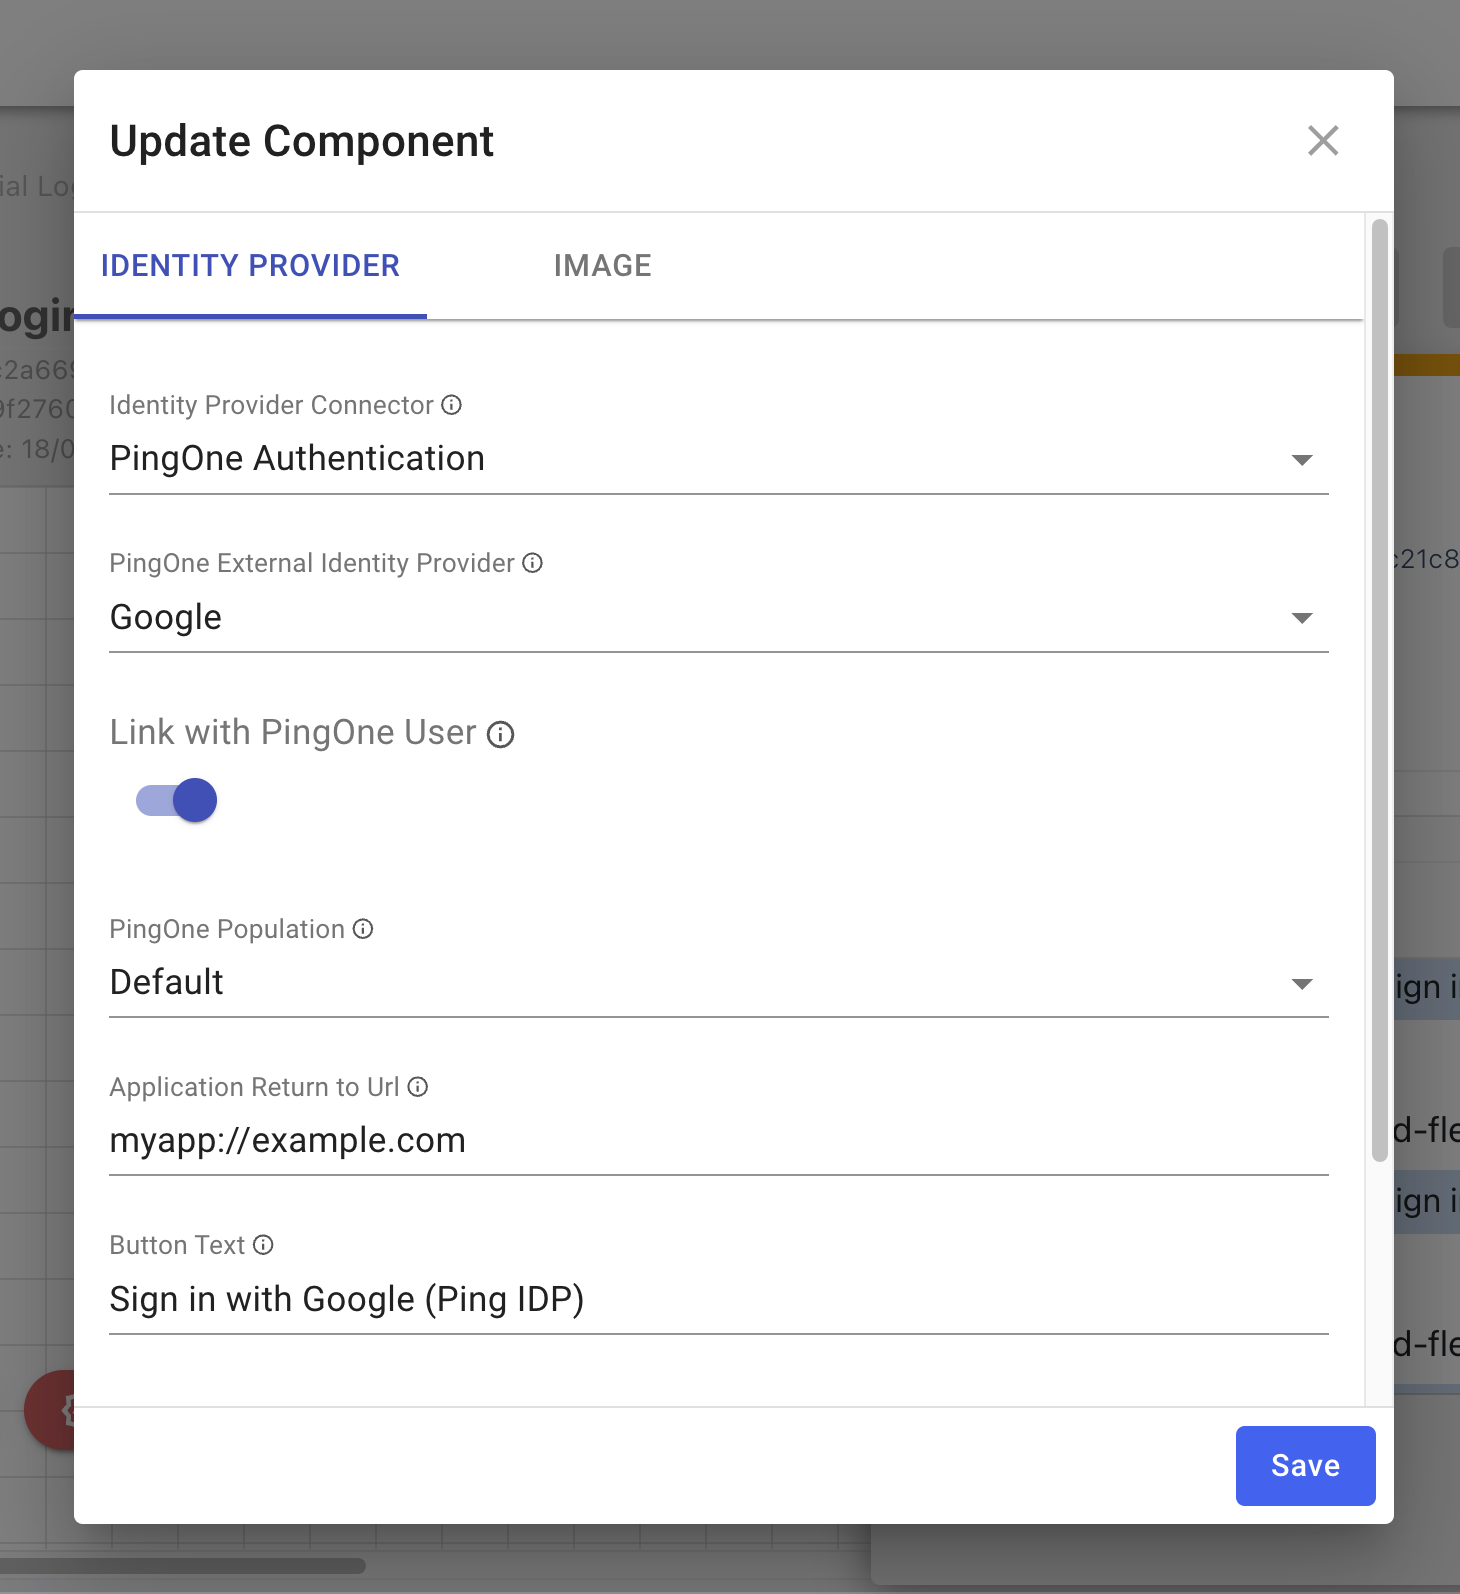 Figure 31. Configuring an skIDP component in an HTTP connector.
 -
-
Save your changes.
You can now proceed to Configuring a DaVinci flow to be launched by the Ping SDKs.
Configuring a DaVinci flow to be launched by the Ping SDKs
Now that your DaVinci flow is configured to display your selected external IdPs you must configure PingOne so that you can launch the flow by using the Ping SDKs.
This involves performing the following high-level steps:
-
Checking that your DaVinci flow uses only compatible connectors and fields.
-
Creating an application in DaVinci to connect PingOne to the DaVinci flow.
-
Creating an application in PingOne that the Ping SDKs can connect to and access the DaVinci application and its PingOne Flow Policy.
To learn how to complete the steps, refer to Launching a flow with a Ping SDK in the DaVinci documentation.
Configure client apps for social sign on
Select your platform to discover how to configure your client application to perform social sign on with an external IdP.
Configure an Android app for social sign on
Perform the following steps to configure an Android app for social sign on.
Step 1. Add the dependencies
You must add the davinci and external-idp modules to your project:
-
In the Project tree view of your Android Studio project, open the
build.gradle.ktsfile. -
In the
dependenciessection, add the following:implementation("com.pingidentity.sdks:davinci:1.1.0") implementation("com.pingidentity.sdks:external-idp:1.1.0")
Step 2. Handle the redirect scheme
You must configure your Android app to open when the server redirects the user to the custom URI scheme you entered when setting up PingOne.
For this tutorial, the custom URI scheme is myapp://example.com.
To configure your app to open when using the custom URI scheme:
-
In the Project tree view of your Android Studio project, open the
build.gradle.ktsfile. -
In the
android.defaultConfigsection, add a manifest placeholder for theappRedirectUriSchemeproperty that specifies the protocol of the custom schema:android { defaultConfig { manifestPlaceholders["appRedirectUriScheme"] = "myapp" } }
Step 3. Handling IdpCollector nodes
Your app must handle the IdpCollector node type that DaVinci sends when a user attempts to authenticate using an external IdP.
When encountering an IdpCollector node type, call idpCollector.authorize() to launch a custom tab and begin authentication with the external IdP:
var node = daVinci.start()

if (node is ContinueNode) {
    node.collectors.forEach {
        when (it) {
            is IdpCollector -> {
                when (val result = idpCollector.authorize()) {
                    is Success -> {
                        // When success, move to next Node
                        node.next()
                    }
                    is Failure -> {
                        // Handle the failure
                    }
                }
            }
        }
    }
}|
Use the following parameters to the |
The idpCollector.authorize() method returns a Success result when authentication with the external IdP completes successfully. If not, it returns Failure and Throwable which shows the root cause of the issue.
val result = idpCollector.authorize()

result.onSuccess {
    // Move to next Node
}
result.onFailure {
    it // The Throwable
}
The result resembles the following:
Configure an iOS app for social sign on
Perform the following steps to configure an iOS app for social sign on.
Step 1. Add the dependencies
You must add the davinci and external-idp modules to your project. You can use either Cocoapods or Swift Package Manager (SPM) to add the dependencies.
You can use CocoaPods or the Swift Package Manager to add the PingOne Protect dependencies to your iOS project.
Add dependencies using CocoaPods
-
If you do not already have CocoaPods, install the latest version.
-
If you do not already have a Podfile, in a terminal window, run the following command to create a new Podfile:
pod init
-
Add the following lines to your Podfile:
pod 'PingDavinci'
pod 'External-idp'
-
Run the following command to install pods:
pod install
Add dependencies using Swift Package Manager
-
With your project open in Xcode, select File > Add Package Dependencies.
-
In the search bar, enter the Ping SDK for iOS repository URL:
https://github.com/ForgeRock/ping-ios-sdk. -
Select the
ping-ios-sdkpackage, and then click Add Package. -
In the Choose Package Products dialog, ensure that the
PingDavinciandPingExternalIdplibraries are added to your target project. -
Click Add Package.
-
In your project, import the library:
import PingDavinci
import PingExternalIdp
Step 2. Handle the redirect scheme
You must configure your iOS app to open when the server redirects the user to the custom URI scheme you entered when setting up PingOne.
For this tutorial, the custom URI scheme is myapp://example.com.
To configure your app to open when using the custom URI scheme:
-
In Xcode, in the Project Navigator, double-click your application to open the Project pane.
-
On the Info tab, in the URL Types panel, configure your custom URL scheme:
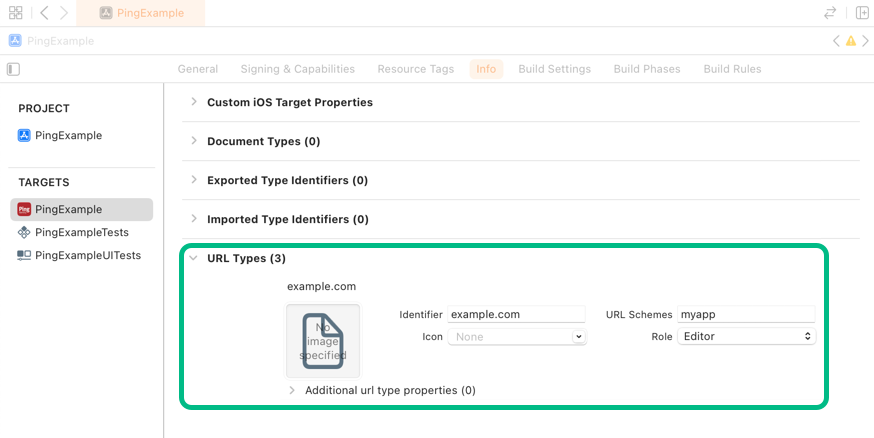
Step 3. Handling IdpCollector nodes
Your app must handle the IdpCollector node type that DaVinci sends when a user attempts to authenticate using an external IdP.
When encountering an IdpCollector node type, call idpCollector.authorize() to launch an in-app browser and begin authentication with the external IdP:
public class SocialButtonViewModel: ObservableObject {
    @Published public var isComplete: Bool = false
    public let idpCollector: IdpCollector

    public init(idpCollector: IdpCollector) {
        self.idpCollector = idpCollector
    }

    public func startSocialAuthentication() async → Result<Bool, IdpExceptions> {
        return await idpCollector.authorize()
    }

    public func socialButtonText() → some View {
        let bgColor: Color
        switch idpCollector.idpType {
        case "APPLE":
            bgColor = Color.appleButtonBackground
        case "GOOGLE":
            bgColor = Color.googleButtonBackground
        case "FACEBOOK":
            bgColor = Color.facebookButtonBackground
        default:
            bgColor = Color.themeButtonBackground
        }
        let text = Text(idpCollector.label)
            .font(.headline)
            .foregroundColor(.white)
            .padding()
            .frame(width: 300, height: 50)
            .background(bgColor)
            .cornerRadius(15.0)

        return text
    }
}
The idpCollector.authorize() method returns a Success result when authentication with the external IdP completes successfully. If not, it returns Failure and IdpExceptions, which shows the root cause of the issue.
Task {
    let result = await socialButtonViewModel.startSocialAuthentication()
    switch result {
    case .success(_):
        onNext(true)
    case .failure(let error): //<- Exception
        onStart()
    }
}
The result resembles the following:
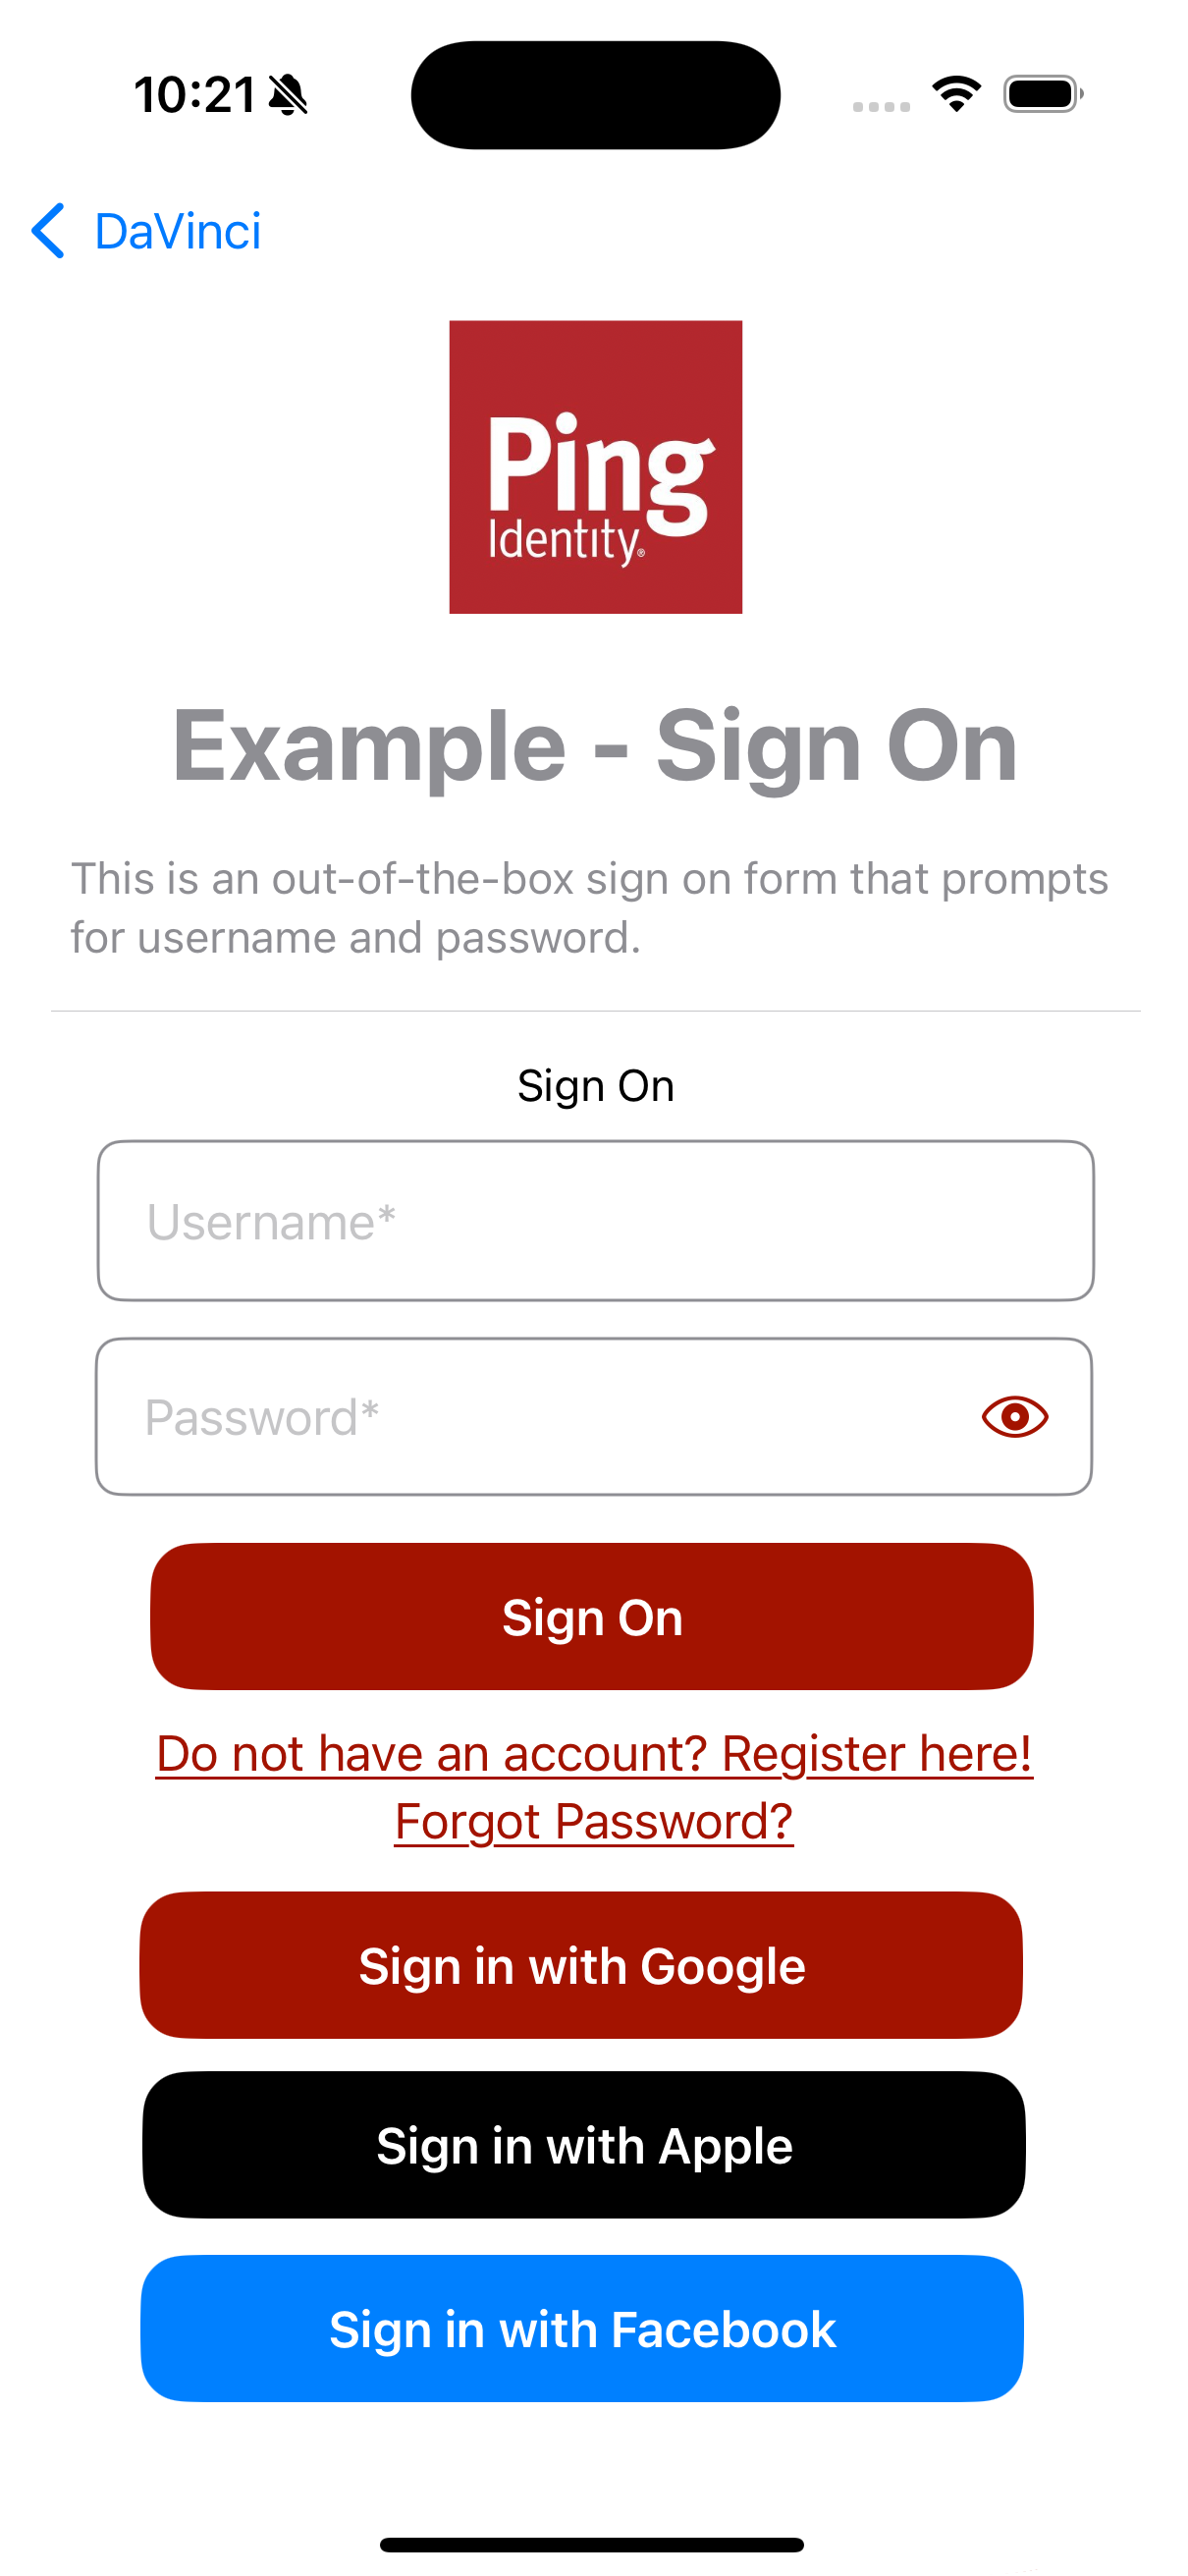
Configure a JavaScript app for social sign on
Perform the following steps to configure a JavaScript app for social sign on.
Step 1. Add the module
You must add the davinci module to your project:
import { davinci } from '@forgerock/davinci-client';Step 2. Handle the redirect back from the IdP
You must configure your JavaScript app to continue a flow when the server redirects the user back from the IdP.
Use the davinciClient.resume method to continue an existing flow, rather than start a new one.
const davinciClient = await davinci({ config });
const continueToken = urlParams.get('continueToken');
let resumed: any;

if (continueToken) {
  // Continue an existing flow
  resumed = await davinciClient.resume({ continueToken });
} else {
  // Setup configuration for a new flow
  await Config.setAsync(config);
}
Step 3. Handling IdpCollector nodes
Your app must handle the IdpCollector node type that DaVinci sends. The node contains details of the button to render and the URL, for example.
Use the davinciClient.externalIdp() method to obtain the details from the collector:
const collectors = davinciClient.getCollectors();

collectors.forEach((collector) => {
  if (collector.type === 'IdpCollector') {
    socialLoginButtonComponent(formEl, collector, davinciClient.externalIdp(collector));
  }
}
In this example, a socialLoginButtonComponent handles rendering the button:
social-login-button.ts file to render social sign-on buttonsimport type { IdpCollector } from "@forgerock/davinci-client/types";
export default function submitButtonComponent(
formEl: HTMLFormElement,
collector: IdpCollector,
updater: () => void
) {
const button = document.createElement("button");
button.value = collector.output.label;
button.innerHTML = collector.output.label;
if (collector.output.label.toLowerCase().includes('google')) {
button.style.background = 'white'
button.style.borderColor = 'grey'
} else if (collector.output.label.toLowerCase().includes('facebook')) {
button.style.color = 'white'
button.style.background = 'royalblue'
button.style.borderColor = 'royalblue'
} else if (collector.output.label.toLowerCase().includes('apple')) {
button.style.color = 'white'
button.style.background = 'black'
button.style.borderColor = 'black'
}
button.onclick = () => updater();
formEl?.appendChild(button);
}The result resembles the following: