Provision an application
|
The topics in this section are for tenants created on or after January 12, 2023. Learn more in Application management migration FAQ. |
On the Applications page, use the Provisioning tab to set up provisioning and configure the following:
-
Details about the application.
-
Properties in the target application.
-
Data in the target application.
-
Mappings from the Advanced Identity Cloud admin console to the target application.
-
Rules that specify the actions to take when certain reconciliation events occur.
-
Reconciliation to ensure data is synchronized between the Advanced Identity Cloud admin console and the target application.
-
Schedules to run reconciliation of accounts.
-
Privacy and consent for end-user data sharing and synchronization.
-
Provisioning rules to specify actions to take when provisioning between Advanced Identity Cloud and a target application.
-
Advanced Sync to create and manage mappings between an identity profile and an application or between applications.
After you register an application, you can use the Provisioning tab to create and manage connections to a target system like Salesforce.
Use the object type list to select a provisioning and reconciliation resource, such as Account.
The selected object type determines the side tabs that display, as each resource has different provisioning and reconciliation requirements.
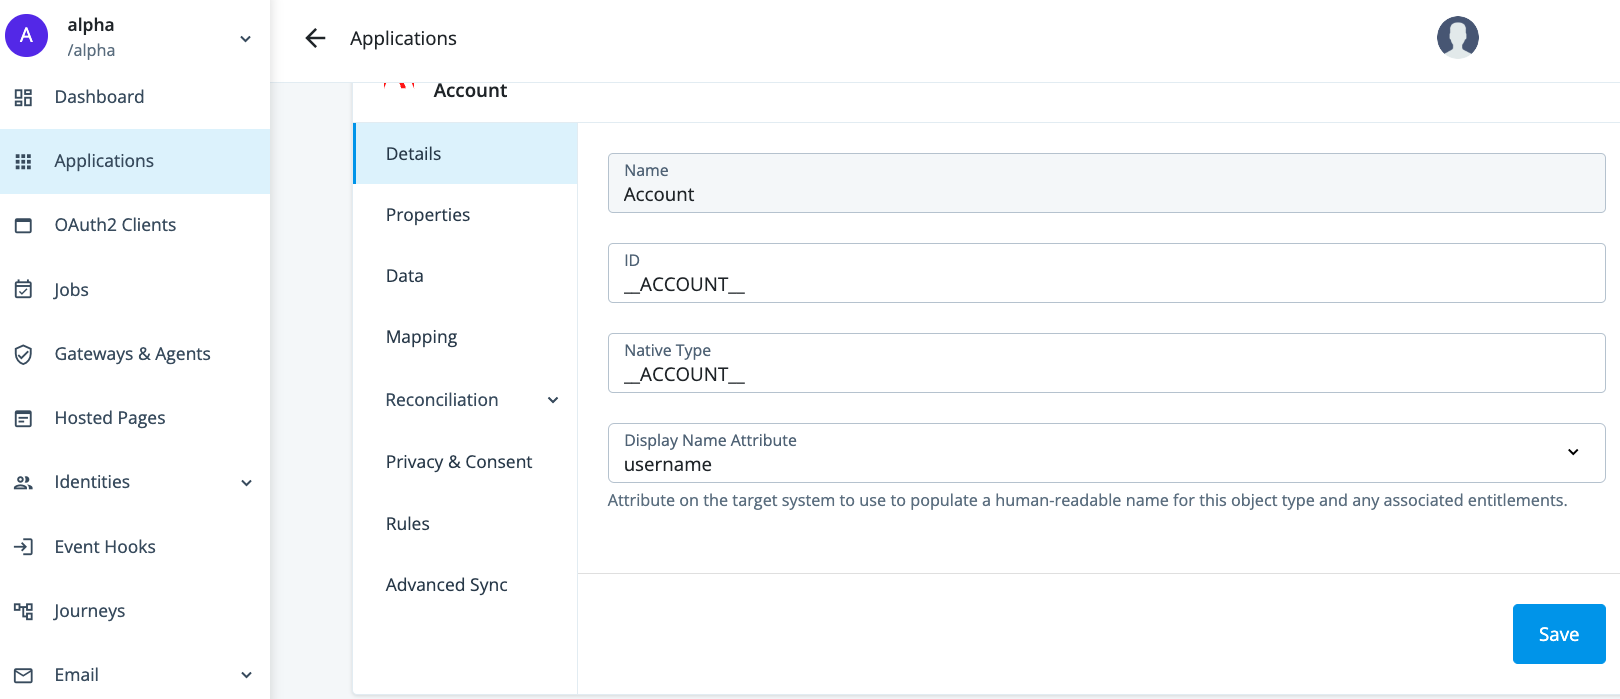
| Provisioning side tab | Description | Related sections |
|---|---|---|
Details |
View and manage an application, including name, ID, and native type. |
Select the specific application from Provision settings for an application. |
Properties |
View and manage properties for the selected object type. |
|
Data |
View data about the selected object type. |
|
Mapping |
View and manage mappings from the Advanced Identity Cloud admin console properties to external system properties and from external system properties to the Advanced Identity Cloud admin console properties. |
|
Reconciliation |
Preview mappings on target applications between external systems and the Advanced Identity Cloud admin console, and reconcile the data between the two systems. View and manage rules for the users and groups that use your application. View and manage schedules for Full and Incremental reconciliation. |
|
Privacy & Consent |
Manage end-user data sharing and synchronization. |
|
Rules |
View and manage provisioning rules for mappings between Advanced Identity Cloud and a target application. |
|
Advanced Sync |
Create and manage mappings between a managed object type and an application or between applications. |
Provision settings for an application
While the application templates contain the same basic settings, some applications have specific settings that you must configure in the Provisioning tab.
Learn more about accessing built-in connectors through the IDM native admin console in Connectors.
| For existing applications that use a deprecated version, there’s no upgrade requirement. You can safely continue using your current version unless notified otherwise. To use a newer application template version, you must create a new application. |
Manage application attributes
Properties are the application attributes that Advanced Identity Cloud creates automatically. You can use the Properties tab to view and modify the properties of an account object or group/organization identity that can access your application.
The tab displays the name, identity type, and other information such as multivalued or required, for a property.
Add or edit a property
-
On the Properties tab, do one of the following:
-
To add a new property, click Add a Property.
-
To edit a property, double-click a property.
-
-
In the Name drop-down field, select a property.
-
In the Type drop-down field, select a property type.
-
Set one or more of the following options:
Field Description Multi-valued
Make the property a multi-value property.
Required
Make the property a required property.
User-specific
Make the property specific to individual users and not roles. If you don’t check this option, the property appears in the role’s relationship page when you add a role to an application.
-
Optionally, click Show advanced settings to set any of the following options:
Field Description Creatable
Make the property creatable.
Readable
Make the property readable. Required for the property to appear in the Users & Roles tab.
Updatable
Make the property updatable.
Returned by default
Set the property to be returned by default. Requires the Readable option to be checked.
Enumerated Values
A list of allowed values that constrain the values you can set for the property. Supported for string and array type properties.
To define a list of values for this property:
-
Beside the Values field, click the plus sign.
-
In the text field, enter the unique identifier for the value.
-
In the value field, enter the display text for the value.
-
To add another value, click the plus sign, and repeat steps 2 and 3 above.
-
To delete a value, click the negative sign beside a value.
-
-
Click Save.
Set a property as user-specific
You can set a property to be for a specific user.
-
On the Properties tab, click a property.
-
Enable User-specific.
-
Click Save.
Set the display order of a property
When you add a new user or role, you specify properties for the identity. You can set the display order of the properties.
-
In the Provisioning page, under the application name and logo, click the drop-down arrow and select a user or role. For example, select User.
-
On the Properties tab, to set the order of a property, drag and drop a property up or down to the desired location.
-
To verify your changes, add a new user or role. For example, on the Users & Roles tab, select Users, and click + Assign Users.
-
The modal should display the properties in the order that you set.
View user access data
After you successfully connect to the target application, review the Data tab to verify the users and groups/organizations that have access to the application.
End-user data sharing
Users who have accounts in target applications can share their data with other applications. After a preference to share data with other applications has been configured, data from the target applications is synchronized with Advanced Identity Cloud.
Configure end-user data sharing (consent-based provisioning)
-
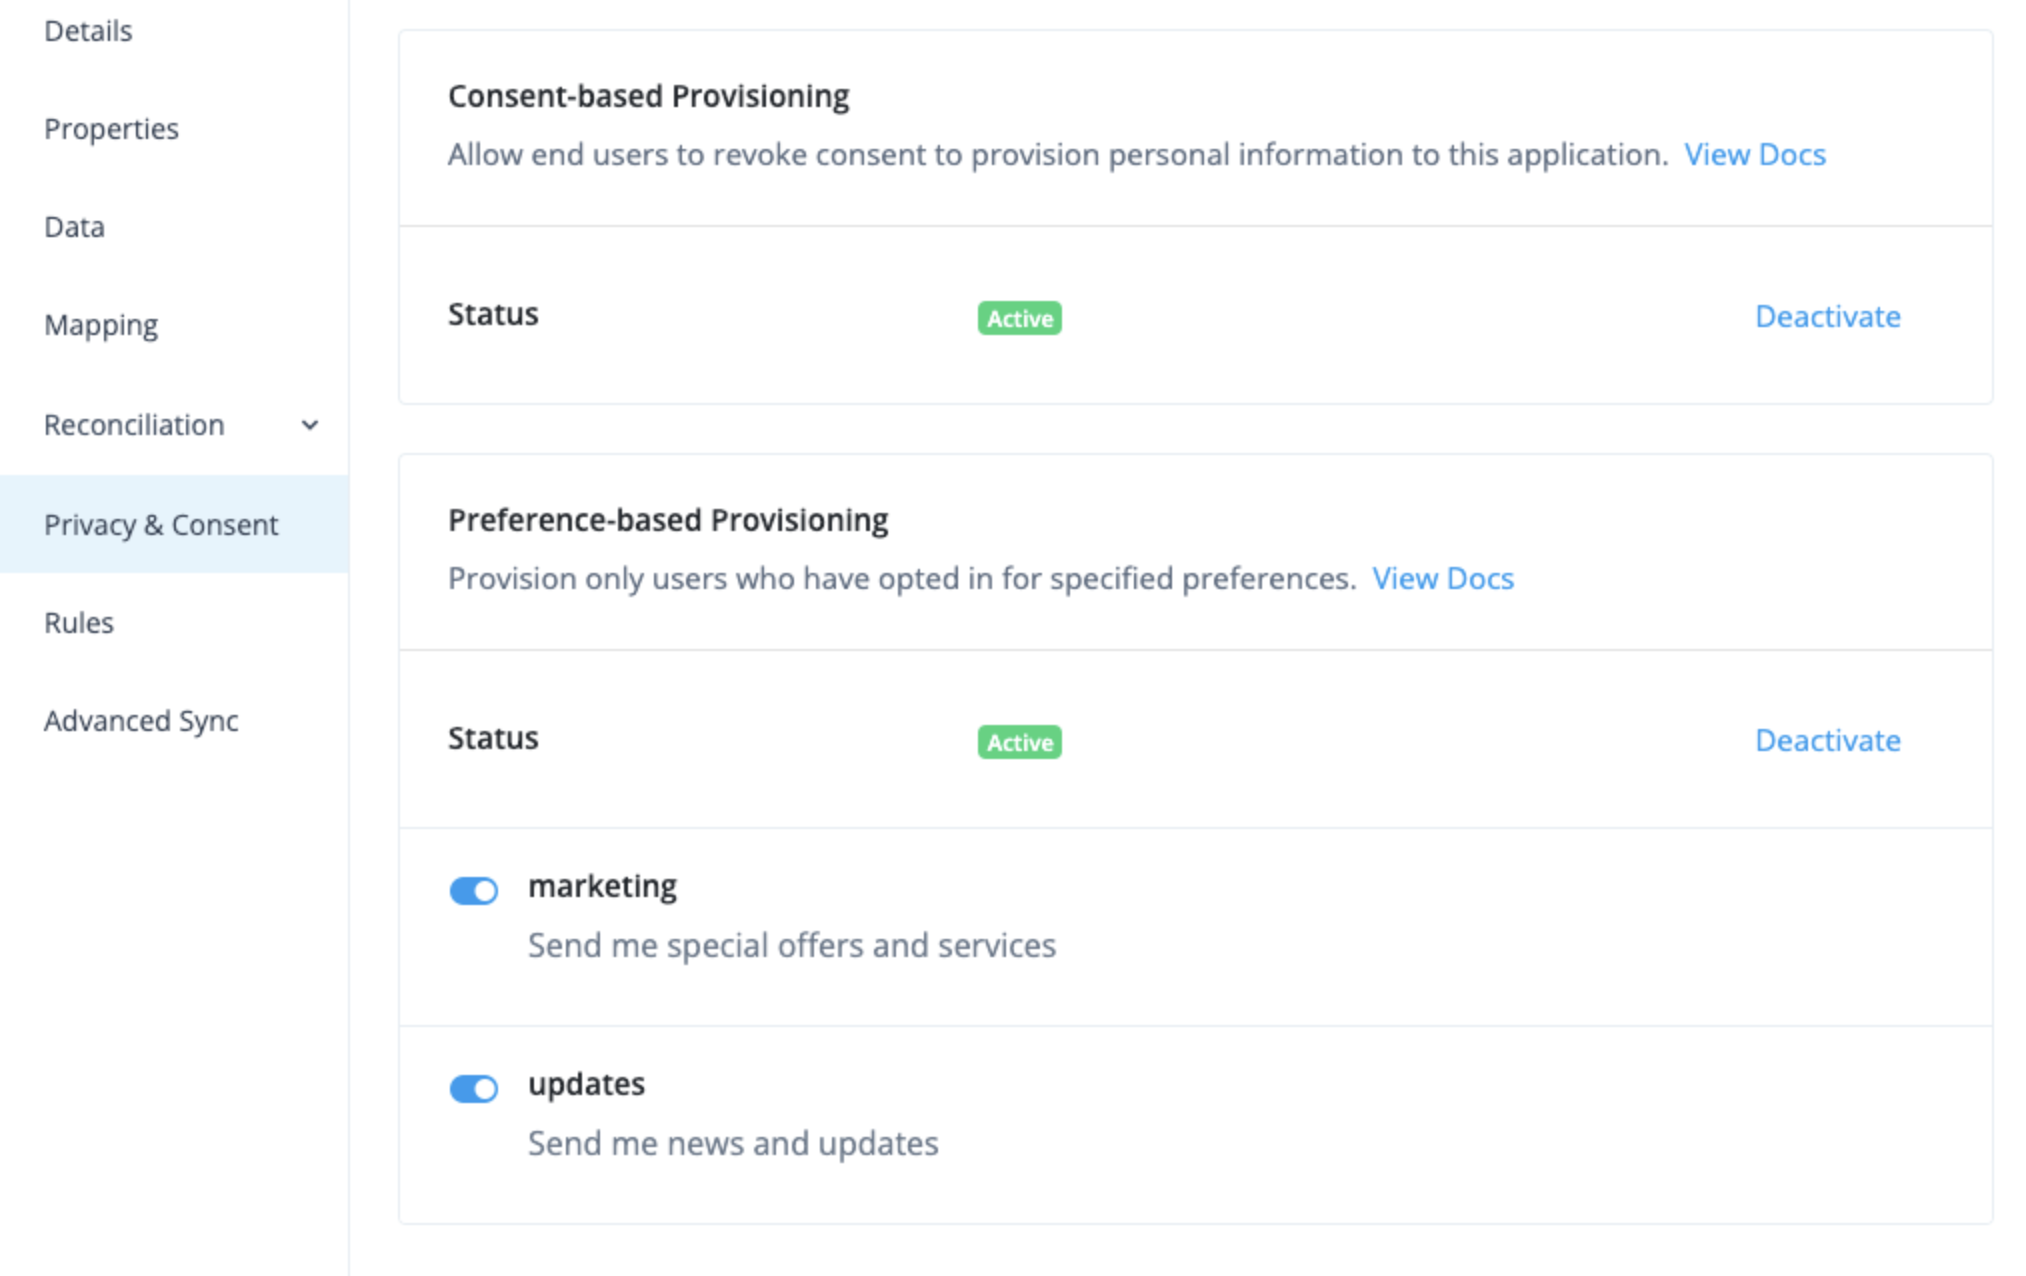
In the Advanced Identity Cloud admin console, on the Provisioning tab, click the Privacy & Consent tab.
-
In the Consent-based Provisioning section, click Activate to let end users prevent sharing of their personal data. To remove consent-based provisioning, click Deactivate.
-
To share only the data of users who have set sharing preferences:
-
In the Advanced Identity Cloud admin console, go to Hosted Pages and select Realm Default theme.
-
Go to Account Pages and select Layout.
-
Enable the Consent option.
-
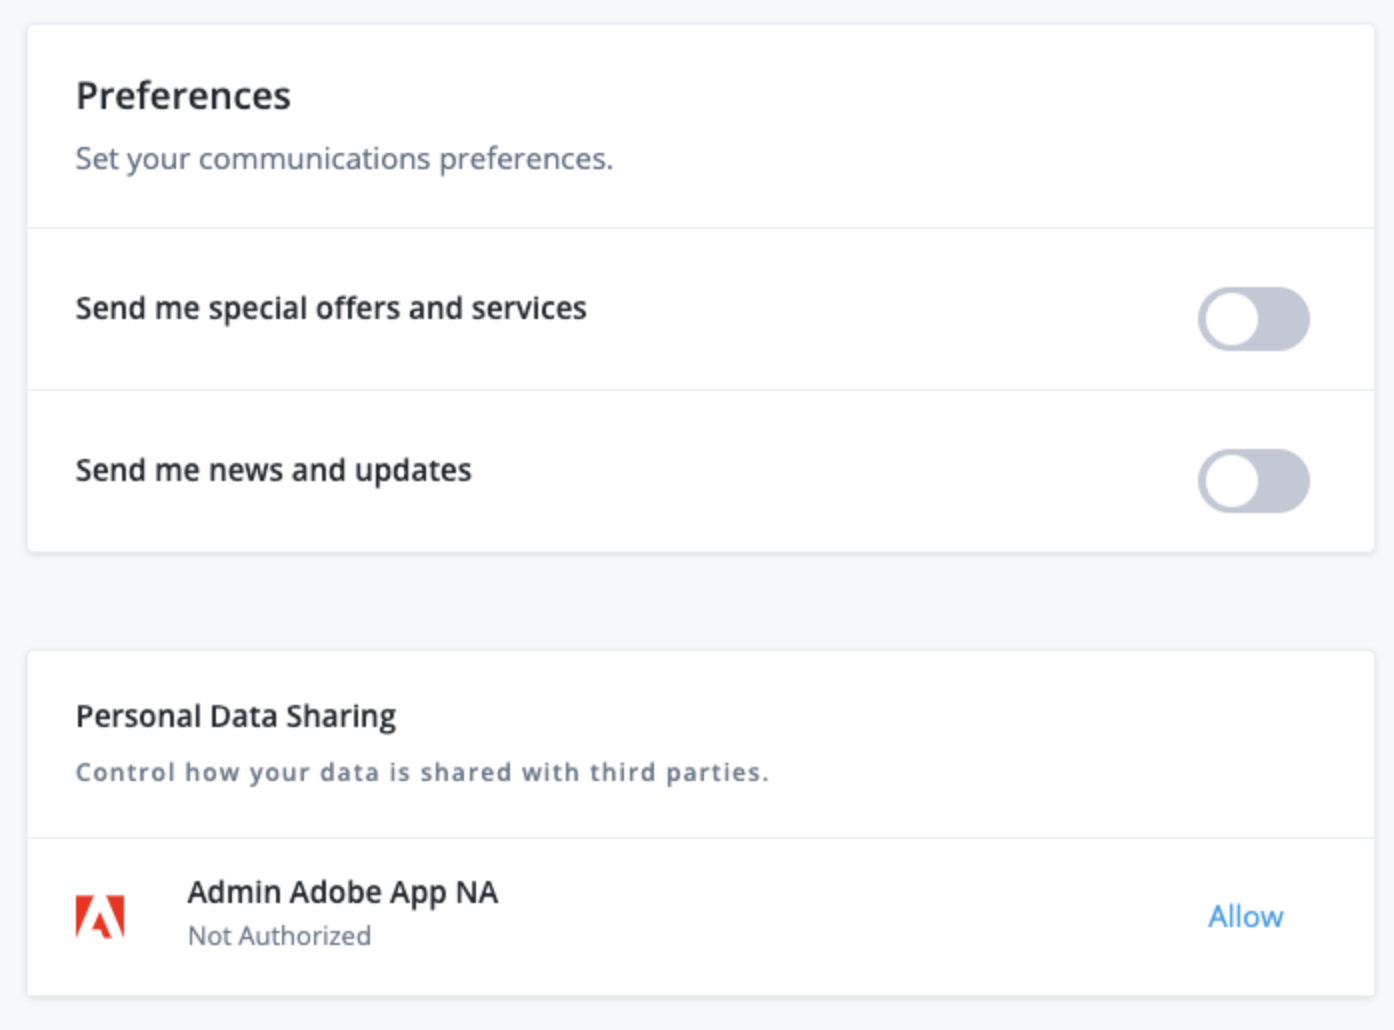
Click Save. The end-user profile page now displays the Personal Data Sharing option.
-
Configure preference-based provisioning
-
In the Advanced Identity Cloud admin console, on the Provisioning tab, click the Privacy & Consent tab.
-
In the Preference-based Provisioning section, click Activate to provision only users who have opted in for specified preferences. To remove preference-based provisioning, click Deactivate.
-
Choose which preferences to enable for end users:
-
marketing - to send special offers and services
-
updates - to send news and updates
-
-
In the Advanced Identity Cloud admin console, go to Hosted Pages and select Realm Default theme.
-
Go to Account Pages and select Layout.
-
Enable the Preferences checkbox.
-
Click Save. The end-user profile page now displays the communication Preferences section.
Manage mappings
The Mapping tab lets you create identity object and attribute mappings between Advanced Identity Cloud and an external system application. You define mappings between a source and a target.
The definition of source and target depends on if you’re provisioning user attributes from Advanced Identity Cloud (source) to an external target application (target) or if you’re reconciling user attributes from an external authoritative application (source) to Advanced Identity Cloud (target).
| To avoid inconsistencies between systems, don’t update mappings while a provisioning or reconciliation is in progress. |
Create a mapping (provisioning)
-
In the Advanced Identity Cloud admin console, go to Applications, then select your application, then click the Provisioning tab.
-
In the left navigation panel, click the Mapping tab.
-
Click + Add a property to open a mapping configuration modal.
-
In the list of targets, select an attribute to update in the external target application.
-
Click Next.
-
Edit a mapping (provisioning)
-
In the Advanced Identity Cloud admin console, go to Mappings, then click a mapping to open its configuration modal.
-
In the list of sources, select an Advanced Identity Cloud attribute to provide a source value.
This step is optional if you intend to apply a transformation script or a default value.
Create a mapping (authoritative)
If your application is connected to an external authoritative application:
-
Click + Add a property to open a mapping configuration modal.
-
In the list of targets, select an Advanced Identity Cloud attribute to update.
-
Click Next.
Edit a mapping (authoritative)
-
Click a mapping to open its mapping configuration modal.
-
In the list of sources, select an attribute from the external authoritative application to provide a source value.
This step is optional if you intend to apply a transformation script or a default value.
-
(Optional) Apply a transformation script to the mapping.
-
(Optional) Apply a conditional update to the mapping.
-
(Optional) Apply a default value to the mapping.
-
Click Save to save the mapping and close the mapping configuration modal.
Apply a transformation script to a mapping
You can apply a transformation script to a mapping to compute a target value using a combination of source values and string manipulations. For example, you may want to combine first name and last name attributes into a single name attribute.
-
Refer to steps 1 - 3 in Create a mapping (provisioning).
-
In the mapping configuration modal:
-
Check Apply transformation script.
-
Insert your transformation script into the Transformation Script editor. Refer to these examples:
-
(Optional) To use custom global variables in the script, refer to Define custom global variables for a script.
-
Click Save to save the mapping and close the mapping configuration modal.
-
Source object behavior
The source object in a transformation script changes depending on what you select from the
drop-down list of sources:
-
If you select a source attribute, such as
source.name, thesourceobject represents just that attribute. For example, to accessname.familyNameyou would referencesource.familyName. -
If you don’t select a source attribute, the
sourceobject represents the entire identity object and its attributes. For example, to accessname.familyNameyou would referencesource.name.familyName.
Transformation script example 1
source.name ? source.name.familyName : null ;In this example, the script checks if a value exists for source.name. If it does, we know
source.name is an object and familyName is one of the attributes on that object, so the script
sets the field with the value of source.name.familyName. Otherwise, the script sets this field
to null.
Transformation script example 2
source.givenName + ' ' + source.sn ;In this example, the script sets the field to a combination of the given name and surname, with a space in the middle; for example, "Jane Fergus".
Transformation script example 3a
source.active ? 'active' : 'inactive';In this example, the script checks if the source.active property has any value set. If true,
the script sets this field to the string active. Otherwise, the script sets the field to inactive.
Transformation script example 3b
You can configure the previous script slightly differently if you prefer (as described in
Source object behavior). If you select source.active from the drop-down list of sources,
source.active is represented as source in the transformation script. So the transformation
script would be:
source ? 'active' : 'inactive';Apply a conditional update to a mapping
You can apply a conditional update to a mapping so that the target attribute is only updated when
certain conditions evaluate to true.
-
Refer to steps 1 – 3 in Create a mapping (provisioning).
-
In the mapping configuration modal:
-
Click Show advanced settings.
-
Check Apply conditional update.
-
Choose one of the following ways to conditionally update the attribute:
-
To use filter fields:
-
Make sure Filter is selected.
-
Use the fields to set the conditions that must occur to update the attribute.
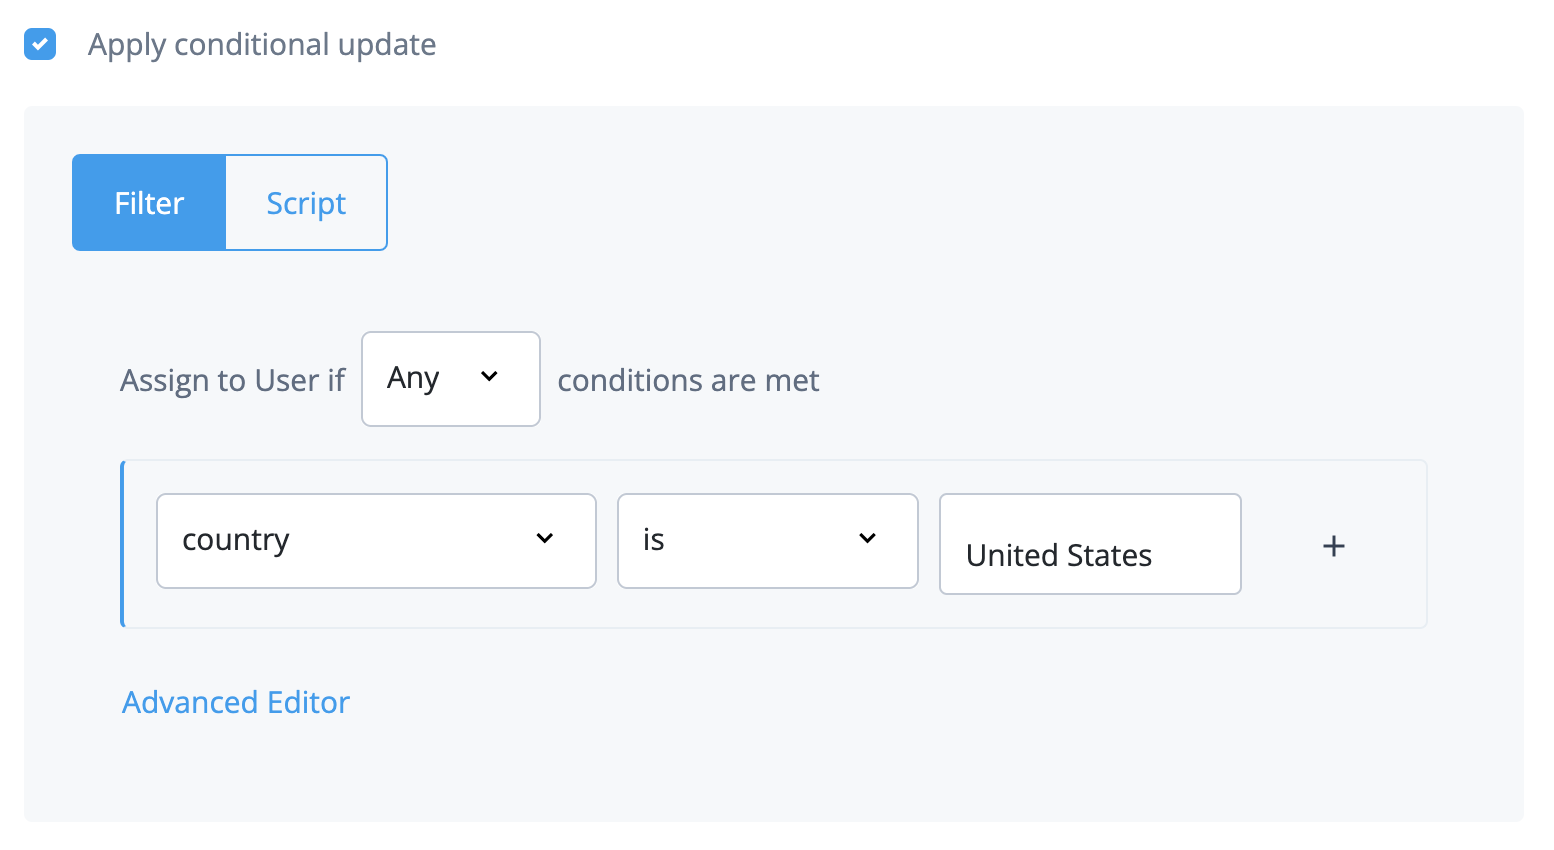
For example, if you want to update the attribute only for users in the United States, select "Country" from the list of attributes, select "is" from the list of operators, and enter "United States" in the open text field:
-
-
To use a filter query:
-
Make sure Filter is selected.
-
Click Advanced Editor.
If you build a filter with the filter fields, it is automatically populated as a query filter in the advanced editor. -
In the editor, edit the query filter.
For example, if you want to update the attribute only for users in the United States, enter
/object/country eq "United States":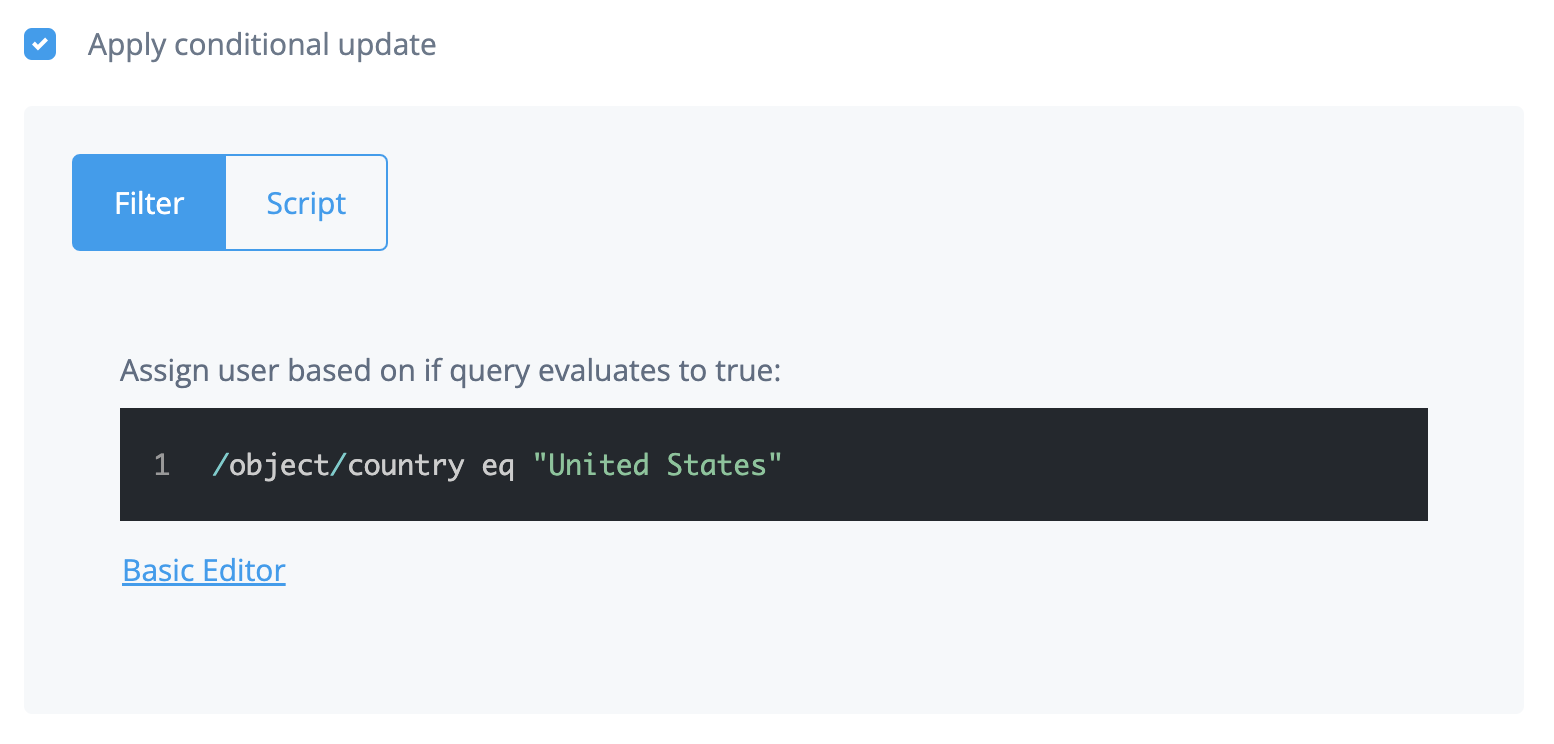
-
-
To use a script:
-
Click Script.
-
In the Conditional Update Script field, modify the script that defines the condition.
For example, if you want to update the attribute only for users in the United States, enter
object.country == "United States":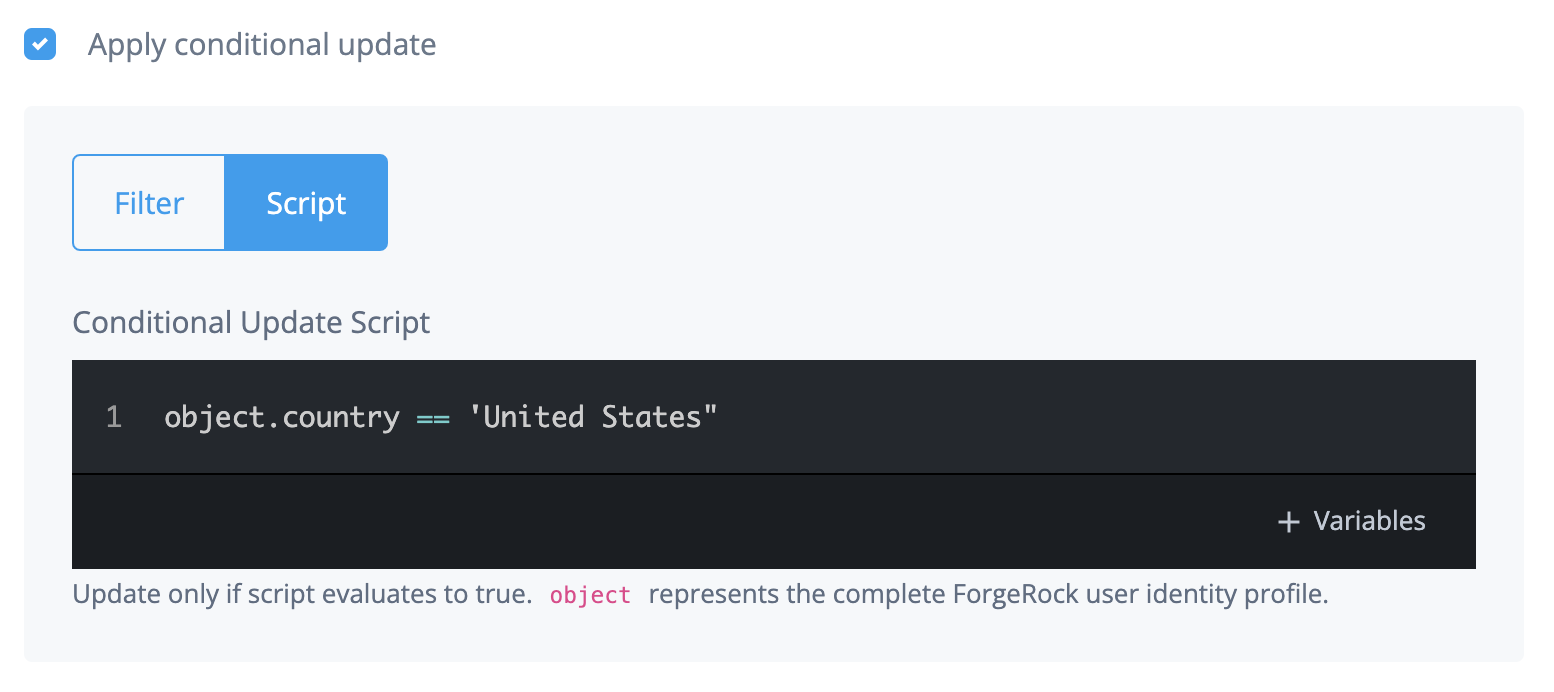
-
(Optional) To use custom global variables in the script, refer to Define custom global variables for a script.
-
-
-
Click Save to save the mapping and close the mapping configuration modal.
-
Apply a default value to a mapping
You can apply a default value to a mapping. The default value is applied to a target attribute if
the result of a mapping (including after any transformation script or conditional update) is a
value of null.
-
Refer to steps 1 - 3 in Create a mapping (provisioning).
-
In the mapping configuration modal:
-
Click Show advanced settings.
-
Check Apply a default if value is
null. -
Insert your default value into the editor.
-
Click Save to save the mapping and close the mapping configuration modal window.
-
Define custom global variables for a script
-
In the Transformation Script field or the Conditional Update Script field, click + Add Variables.
-
To specify the variables in a JSON format, check the JSON toggle.
-
To give the variable a name, enter a name in the Name field.
-
To give the variable a value, enter a value in the Value field.
-
To add more global variables for your script, click the plus sign and repeat the previous two steps.
-
Click Save.
Preview a mapping
Previewing provides an example of how user mapping appears from source to target.
| You can preview mappings only in target applications. |
-
In the left navigation panel, click the Mapping tab.
-
Click Preview.
-
In the list, choose an end user to preview. The page displays a preview of the target object that will be created when provisioning.
-
Click Done.
Delete a mapping
-
In the Advanced Identity Cloud admin console, go to Applications, then select your application, then click the Provisioning tab.
-
In the left navigation panel, click the Mapping tab.
-
Click a mapping.
-
Find the mapping you want to delete and click its ellipsis icon (), then click Delete.
-
In the Delete Mapping? modal, click Delete.
Reconcile and synchronize end-user accounts
A reconciliation operation involves a target system (the system with user account updates) and the Advanced Identity Cloud admin console (the system that receives the updates). For example, a Salesforce application and the Advanced Identity Cloud admin console. Mappings define the relationship between the target system and the Advanced Identity Cloud admin console.
The goal of reconciliation is to ensure synchronization and consistency between the Advanced Identity Cloud admin console and the external system application. Reconciliation uses the details you define in the Mappings tab to determine how to map and update properties.
Running reconciliation syncs end-user account changes, such as new accounts, updated accounts, and deleted accounts from an authoritative application to Advanced Identity Cloud.
Run or schedule a reconciliation
To manually run a reconciliation:
-
In the Advanced Identity Cloud admin console, go to Applications, select your application, then click the Provisioning tab.
-
From the Reconciliation drop-down menu, select Reconcile and click Reconcile Now.
To schedule a full or incremental reconciliation:
-
In the Advanced Identity Cloud admin console, go to Applications, select your application, then click the Provisioning tab.
-
From the Reconciliation drop-down menu, select Settings.
-
Click Set Up in the Schedule Jobs section to configure a Full Reconciliation or an Incremental Reconciliation.
Synchronize an identity
You can synchronize an identity in Advanced Identity Cloud with an identity that exists in a target system. To achieve this, Advanced Identity Cloud models the identity in the target system and makes it available for mapping as a series of objects and properties:
- Account object
-
The account object represents the user entity in the target system. Examples of account object properties are name and email.
For example, in a Salesforce application, the
account.emailobject property is mapped tomailin the Advanced Identity Cloud user identity. - Non-account object
-
Non-account objects represent entities linked to the user entity in the target system. Examples of non-account objects are roles, groups, departments, permissions, and licenses.
For example, in a Salesforce application, the
groupobject property is mapped to theGroupIdsfield in the Advanced Identity Cloud user identity.
Each templated application in Advanced Identity Cloud contains an account object and may contain one or more non-account objects that are modelled specifically to the target system.
Manually set non-account objects for an account object
After you create certain connectors and run reconciliation, you can start mapping the account object to various non-account objects. These non-account objects are predefined. For more information about connectors with predefined non-account objects, refer to Connectors with predefined non-account objects.
However, connectors for non-authoritative applications, such as a Scripted REST connector, a Scripted Groovy connector, or a Scripted Table connector, don’t have predefined non-account objects. The reason is that these types of connectors can have different non-account objects. These non-account objects are nonpredefined objects.
For connectors for non-authoritative applications, you must manually select the non-account objects that map to specific properties for an account object.
-
Select the Provisioning tab.
-
Select the Properties tab.
-
Edit a property.
-
On the Edit Property screen, enable Constrain values for this property.
-
On the Edit Property screen, enable Application Object Type.
-
In the Select Object Type drop-down field, select a non-account object type to map to the current property.
-
On the Edit Property screen, enable Entitlement.
-
Click Save.
Connectors with predefined non-account objects
The following connectors have predefined non-account object types. After creating a connector that is listed in the table and running reconciliation, you can associate the account object in the second column with the non-account objects in the third column.
| Connector | Account object | Predefined non account objects |
|---|---|---|
Active Directory |
|
|
Azure AD |
|
|
Google Workspace |
|
|
LDAP |
|
|
Powershell |
|
N/A |
Salesforce |
|
|
SAP SuccessFactors |
__GROUP__ |
|
SCIM |
|
|
Sripted Groovy |
|
N/A |
Scripted REST |
|
N/A |
Sripted SQL |
|
N/A |
ServiceNow |
|
|
Map target system object properties to Identity Cloud
To ensure all properties that are associated with a user account or role account synchronize during reconciliation, perform the following steps.
-
If your connector is not predefined, perform the steps in Manually set non-account objects for an account object.
-
Select the Provisioning tab.
-
Click Mapping.
-
Follow steps 3 - 6 in Edit a mapping (authoritative).
Run a reconciliation
Before you perform the following steps, to ensure you synchronize all information for the identity, map all relevant object properties with the identity.
-
On the Reconciliation > Reconcile tab, click the ellipsis (…) to the right of a mapping.
-
Click Reconcile Identity.
-
Verify the information on the page, and click Reconcile Identity.
-
After the reconciliation process is complete, click Done.
View a report about the last reconciliation
You can view information about the last reconciliation, such as:
-
The percent of all accounts successfully reconciled.
-
Information about each reconciled account: mapping source, mapping target, attempted action, and the result of the reconciliation.
Before you perform the following steps, make sure you run reconciliation.
-
On the Reconciliation > Settings tab, click Show advanced settings.
-
To view a searchable table report of the last reconciliation results, set Persist Associations to
true.-
If set to true, the UI displays a reconciliation report table and a search field that lets you search the table. The table displays below the reconciliation percentage graphic and percentage bars.
-
If set to false, the UI does not display a reconciliation report table.
To filter the report results, enter text in the Search users field.
To view different subsets of the report (1-to-1 match / no match), click View and select an item from the drop-down list.
-
|
To avoid performance issues for large reconciliation jobs, set Persist Associations to |
Manage reconciliation schedules
The Schedules section of the Reconciliation > Settings tab lets you view and schedule reconciliation events for accounts or groups/organizations that have access to your application.
You can schedule two types of reconciliation:
-
Full Reconciliation: A process that completely synchronizes the source and target. This process usually happens once a week on a weekend or once a month but at longer intervals. The long intervals are because the synchronization process is very labor-intensive and can take a large amount of time depending on the reconciliation data.
-
Incremental Reconciliation: Also referred to as liveSync, incremental reconciliation is a process that only synchronizes the deltas between the source and target. You can run incremental reconciliation every few minutes to get new updates. For example, if you run an incremental reconciliation at 12:55 PM, then again at 2:00 PM, the Advanced Identity Cloud admin console only looks at the timeframe in between to update, create, or delete data if anything changes in the source or target. Depending on the application, a timestamp or change number is used to synchronize the delta.
You can edit existing schedules and activate or deactivate them.
Set up a full or incremental reconciliation schedule
The initial state of a schedule is inactive.
-
On the Reconciliation > Settings tab, go to the Schedules section.
-
Click an inactive schedule: Full Reconciliation or Incremental Reconciliation.
-
Choose one of the following ways to edit the schedule:
-
Edit the fields on the Set up page and click Save Schedule.
-
To use a text editor to edit the schedule:
-
Enable the Use cron toggle.
-
Enter a valid cron string in the Frequency field.
-
Click Save Schedule.
-
-
Manage reconciliation rules
You use rules to define the actions you want Advanced Identity Cloud to perform when certain events occur during reconciliation. For example, if reconciliation detects that an identity object exists in Advanced Identity Cloud but not in the target application, Advanced Identity Cloud creates an identity object in the target application and links it to a source object in Advanced Identity Cloud if both of the following are true:
-
Reconciliation detects that the identity object exists in Advanced Identity Cloud but not in the target application.
-
You select Advanced Identity Cloud to take the action
CREATE.
Each rule has an action. Advanced Identity Cloud performs the action when a rule triggers an action to be performed on a record. Advanced Identity Cloud evaluates each record. When an event meets a rule condition, Advanced Identity Cloud performs the action you have defined for that rule.
The Situation Rules section of the Reconciliation > Settings tab displays the name and action of the rules for your application.
Situation (application) rules
| Situation rule | Description |
|---|---|
|
The source identity object matches multiple target identity objects based on the defined unique attribute. There must be a one-to-one link between a source and target identity object. can’t accurately make this link due to ambiguity. |
|
For authoritative apps only. The target identity object links to a missing source. This usually means the source identity object was deleted. |
|
The source links to a missing target identity object. This usually means the target identity object was deleted. |
|
The target identity object is linked to an old source object, usually deleted,
and can’t be linked to the new source identity object.
This usually the source identity object was deleted
and tried to recreate the source object.
On reconciliation, Advanced Identity Cloud
identified that it already found a source and target identity object linked.
For more information on |
|
The reconciliation finds a valid target identity object with no link established. This usually means another reconciliation needs to happen to establish a link (if you set the action to |
|
The source identity object doesn’t qualify, but target identity objects were found. |
|
A link is found, but the target identity object is missing. Advanced Identity Cloud had a matching source and target with a link but can no longer find the target identity object. |
|
The ideal situation for a record. The source and target identity objects both exist and a valid link between the two are present. This means the source and target both have a unique identifier that can only match one-to-one, and Advanced Identity Cloud established a link between the two. |
|
A valid source and target identity object match, but there is no link between the two. On a following reconciliation, Advanced Identity Cloud creates a link and the record moves from Found to the Confirmed rule. |
|
The source identity object doesn’t find a target identity object. This usually means a new record was created on the source, and typically, the action is Create. This creates a target identity object and links the source and target identity object. |
Rule action types
When a reconciliation determines the situation of a record, you must specify the action to be taken. There can only be one action per situation rule.
| Action | Description |
|---|---|
|
An asynchronous process has started. Don’t perform any action or generate any report. |
|
Create a target identity object and link the source and target. |
|
Delete the target identity object and unlink the source and target. |
|
Flag the link situation as an exception and log the incident. |
|
Don’t change the link or target object state. |
|
Create a link between the source and the correlated target identity object. |
|
Don’t perform any action or generate any report. |
|
Onboard the account and link the correlated target object. |
|
Don’t perform any action but report what would happen if the default action were performed. |
|
Unlink the linked target from the source. |
|
Update the target identity object and create a link between source and target. |
Configure basic and advanced correlation between accounts
You can correlate the user accounts in an application to user accounts in the Advanced Identity Cloud admin console. This correlation is important because account attributes in the application may have different names than account attributes in the Advanced Identity Cloud admin console.
The Account Correlation section of the Reconciliation > Settings tab lets you choose the attribute(s) to use to match users in your application to users in the Advanced Identity Cloud admin console.
-
On the Reconciliation > Settings tab, go to the Account Correlation section.
-
Click Match using.
-
In the Attribute(s) to Match list, choose the attribute(s) to use to match users in the target system to users in the Advanced Identity Cloud admin console.
-
To use a query to set or edit match attributes, click Use advanced query.
-
For an authoritative application:
-
Choose to correlate a user if any or all attributes are matched.
-
Use the User property field to set the user property(s) to match.
-
-
For a target application:
-
Edit the correlation query script.
-
-
-
Click Save.
Manage reconciliation events
Event hooks allow you to set an action that occurs when a specific event happens.
The Event Hooks section of the Reconciliation > Settings tab lets you view and define event hooks for reconciliation events.
Add an event hook
-
On the Reconciliation > Settings tab, in the Event Hooks section, you can view a table of available event hooks by Name and Script.
In the Script column, the default state is Not Configured.-
The event hook workflows include:
-
Account Change Detected -
Create -
Update -
Delete -
Link -
Unlink
-
-
-
Click an event hook row or click Add on the right of an event hook row to open the Add Event Hook modal.
-
Edit the script for the event hook.
-
Click Save or Save and Close.
Configure account change detection
To maintain data consistency between a source and target system, you can configure an event hook script to detect account changes during reconciliation. The script allows administrators to perform custom logic in response to unexpected changes in the target application. This response can be to revert the change, email the application owner, log a message, begin a workflow, or another action that the script author chooses because of the change.
-
In the Event Hooks section of the Reconciliation > Settings tab, click Account Change Detected or Add to open the Add Event Hook modal.
-
Add a script and include optional Passed Variables.
For example:
// Available bindings
// oldSource = Advanced Identity Cloud’s local version of the account
// source = Remote version of the account
// isLinked
// accountQualifier = default

if (isLinked) { (1)
  // if value has a delta, revert to existing value
  if(oldSource.value !== source.value) { (2)
    source.value = oldSource.value; (3)
    // Overwrite the account
    //source = openidm.update('system/connector-name/User/' + source['_id'], null, source);
  }
}
source; (4)
Only make direct updates of the
sourceobject in thesourcesystem, if it’s necessary that the change is reverted immediately after it’s detected. Direct in-memory changes of thesourceobject are preferred.If you choose to update the
sourceobject directly in the remote system, the state returned by the update must have all of the original fields that the synchronization engine used when it originally queried thesourceobject. These fields are located in the mappingsdefaultSourceFields.1 Only execute if the account is already linked. 2 Check if the incoming value is different from the existing value. 3 Revert the incoming value back to the existing value. 4 Send the modified object back to the sync engine. The script expects that the return value is the current state of the source object or account that IDM is using. The script should always return what the author wants the state of the account to be, either by directly changing the bound sourceobject or by returning the result of direct updates to thesourceobject in thesourcesystem. -
Click Save and Close to set the Script state to Configured.
Restrict reconciliation to specific identities
-
On the Reconciliation > Settings tab, click Show advanced settings.
-
Configure the following settings:
-
To restrict reconciliation to specific identities in an application by defining an explicit source query:
-
Enable Filter Source.
-
Choose to filter the source if Any or All conditions are met.
-
Use the remaining fields to define the explicit source query. You can define the query using all the properties available in the target system.
-
-
To restrict reconciliation to specific identities in Advanced Identity Cloud by defining an explicit target query:
-
Enable Filter Target.
-
Choose to filter the target if Any or All conditions are met.
-
Use the remaining fields to define the explicit target query using all the properties available in Advanced Identity Cloud.
-
-
To filter the application identities that are included in reconciliation using a script:
-
Enable Valid Source Script.
-
Edit the script.
-
-
To view a searchable table report of the last reconciliation results, set Persist Associations to
true. For more information, refer to View a report about the last reconciliation. -
To filter the Advanced Identity Cloud admin console identities that are included in reconciliation using a script:
-
Enable Valid Target Script.
-
Edit the script.
-
-
To allow correlation of source objects to empty target objects, enable Correlate empty target objects.
-
To prefetch each link in the database before processing each source or target object, enable Prefetch Links.
-
To allow reconciliations from an empty source to delete all data in a target resource, enable Allow reconciliations from an Empty Source.
-
To tune performance by adjusting the number of concurrent threads dedicated to reconciliation, in the Threads Per Reconciliation field, enter the number of concurrent threads.
-
To set the synchronization token used for incremental inbound reconciliation, enter a value in the Sync Token field.
-
-
Click Save.
Reset the last reconciliation job
You may need to reset the last reconciliation job if it failed or if it made a change you want to revert; for example, if the last reconciliation job added a new application user.
To reset the last reconciliation job, you must reset the sync token attribute. The sync token attribute stores the value of the last incremental reconciliation job that synced data inbound from a target system to Advanced Identity Cloud.
-
In your target system, get or create the reset value for the sync token attribute. To understand how to do this, refer to the documentation provided by the vendor of your target system.
-
In the Advanced Identity Cloud admin console, go to Applications > Provisioning > Reconciliation.
-
Click the Settings tab.
-
Scroll down and click Show advanced settings.
-
In the Sync Token text field, enter a new value for the sync token attribute.
-
Click Save.
Manage provisioning rules
Provisioning rules define the actions to perform when provisioning between Advanced Identity Cloud and a target application.
The Rules tab displays the action and result for your application.
Rule action types
Rule action types specify the consequence of an action and the related action to perform when an application event occurs.
| The application-name placeholder represents the application template name displayed in the Advanced Identity Cloud admin console. |
| Action | Result |
|---|---|
application-name application is assigned |
Create account in application-name |
application-name account is updated |
Update account in application-name |
application-name account is revoked |
Delete account in application-name |
Identity is deleted |
Delete account in application-name |
Provisioning failure |
Do nothing |
Edit a provisioning rule
Edit a provisioning rule to specify an action to perform in the target application after successfully completing a rule action in Advanced Identity Cloud:
-
In the Advanced Identity Cloud admin console, go to Applications > Provisioning > Rules, click the ellipsis icon ( ) adjacent to a rule and click Edit or click the row of the rule.
-
In the Edit Provisioning Rule modal, select the action option to perform on the target application:
-
For application is assigned and account is updated:
-
Select the Action to perform in application-name when an account is assigned or updated in Advanced Identity Cloud:
-
Create or Update account
-
Do nothing
-
-
Select one of the following actions to perform after successfully completing the first action:
-
Do nothing
-
Execute a script
Learn more in Launch a script as a post action.
-
-
Click Save.
-
-
For account is revoked:
-
Choose the Action to perform in application-name when an account is revoked in Advanced Identity Cloud:
-
Delete account in application-name
-
Do nothing
-
Execute a script
Learn more in Launch a script as an action.
-
-
Click Save.
-
-
For Identity is deleted:
-
Choose the Action to perform in application-name when an identity is deleted in Advanced Identity Cloud:
-
Delete account in application-name
-
Do nothing
-
Execute a script
Learn more in Launch a script as an action.
-
-
Click Save.
-
-
For Provisioning failure:
-
Choose the Action to perform in application-name when provisioning fails:
-
Do nothing
-
Execute a script
Learn more in Script triggers defined in mappings.
-
-
Click Save.
-
-
Manage advanced sync
In addition to the mapping on the Mapping tab, the Advanced Sync tab lets you create as many mappings as you want between your current application object type and another application or managed object type. The data can flow either to or from your current application and its object type.
Swap the sync direction depending on if your current application is the source or target. The source and target determine if you’re sending or receiving data from:
-
Application to application
-
Application to managed object type (custom or default)
-
Managed object type (custom or default) to application
For each application, there are different object types, and advanced sync is specific to each object type. For example, an application could have the Account and Group object type.
|
One half of the mapping is always the current application and the current object type. This half of the mapping can be the source or target. After you’ve created the mapping, you can’t change the source, target, or sync direction. |
Learn more in Advanced sync.
To manage advanced sync for an application:
-
In the Advanced Identity Cloud admin console, go to Applications, select your application, then click the Provisioning tab and select an object type for a mapping:
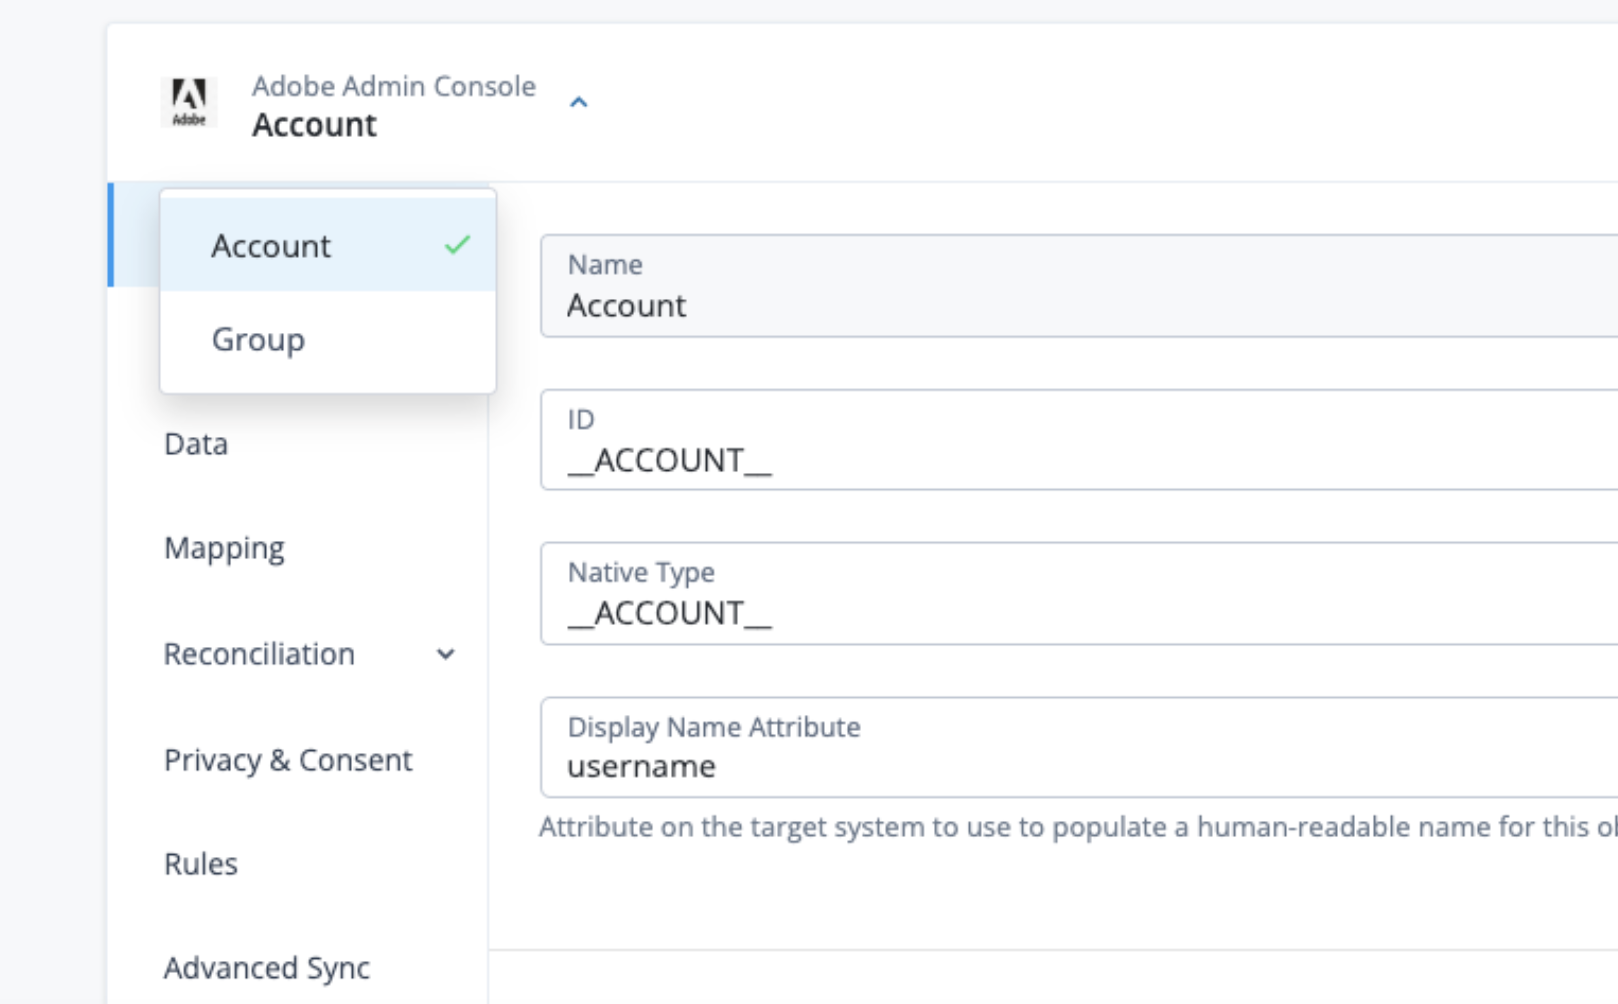
-
On the Advanced Sync tab, manage mappings:
-
To create a mapping, click Sync Data.
-
To update an existing mapping, click the mapping in the list.
-
To delete a mapping, click for the mapping and select Delete.
Learn more in Configure advanced sync.
-