Upgrade
This guide covers common aspects of upgrading an AM deployment, whether you are moving to a new maintenance release, upgrading to a new major release, or migrating from a legacy release to a newer AM release.
Release levels, and how much change to expect in a maintenance, minor, or major release, are defined in Product Release Levels. Release levels are identified by version number.
Before you upgrade
Review the tasks you need to complete before upgrading AM.
Upgrade servers
Learn, step by step, how to upgrade the AM core services.
Upgrade components
Review components and services that you might need to upgrade or reconfigure.
Migrate to FBC
Migrate from an LDAP configuration store to file-based configuration.
|
AM supports several versions of the web and Java agents, so you don’t usually need to upgrade your agents when you upgrade AM. You can find information on the supported AM versions in Web Agents or Java Agents. Learn more about upgrading web and Java agents in the Web Agents documentation or the Java Agents documentation. |
Name changes for ForgeRock products
Product names changed when ForgeRock became part of Ping Identity.
The following name changes have been in effect since early 2024:
| Old name | New name |
|---|---|
ForgeRock Identity Cloud |
PingOne Advanced Identity Cloud |
ForgeRock Access Management |
PingAM |
ForgeRock Directory Services |
PingDS |
ForgeRock Identity Management |
PingIDM |
ForgeRock Identity Gateway |
PingGateway |
Learn more about the name changes in New names for ForgeRock products in the Knowledge Base.
Supported upgrade paths
You can upgrade to AM 8 from any AM 7.x version.
If you’re upgrading to AM 8 from an unsupported version of AM, you must upgrade to a supported version first, and then to AM 8.
Find information about supported versions in Ping Identity Product Support Lifecycle Policy in the Ping Identity Knowledge Base.
Plan the upgrade
The work involved in upgrading AM software depends on the magnitude of change between your current version and the new version:
-
Maintenance releases have a limited effect on current functionality but contain necessary bug and security fixes. Keep up to date with maintenance releases, as the fixes are important and the risk of affecting service is minimal.
-
When upgrading to a new major or minor release, always plan and test the changes before carrying out the upgrade in production. Make sure you read the Release notes for intervening versions with care. Identify any changes likely to affect your deployment and then plan accordingly.
|
Authentication modules and chains have been removed in AM 8.0. If you’re still using modules and chains for authentication, you must migrate to nodes and trees as soon as possible. It’s recommended that you migrate to nodes and trees before upgrading to AM 8. If that’s not possible, and you need access to modules and chains for migration purposes, you can temporarily re-enable modules and chains in AM 8.0. Re-enable modules and chains
You can now access modules and chains through the REST endpoints. Modules and chains aren’t accessible through the AM admin UI. The option to re-enable modules and chains is only for migration purposes in AM 8.0. Authentication modules and chains will be removed completely in an upcoming release. |
Review the following best practices before you upgrade AM:
Route around servers during downtime
Upgrading servers takes at least one of your AM sites down while you update the server configurations to the new version. Plan for this site to be down. Route client applications to another site until the upgrade process is complete, and you have validated the result. Make sure client application owners are aware of the change, and let them know what to expect.
If you only have a single AM site, make sure the downtime happens in a low-usage window, and make sure you let client application owners plan accordingly.
During an upgrade, restrict access to the AM admin UI. The Upgrade Wizard doesn’t require authorization. Immediately after you deploy the new .war file, any user with access to the AM admin UI can start the upgrade process.
|
Back up the deployment
Always back up your deployment before you upgrade. If something goes wrong during the upgrade process, you can then roll back to the previous version.
-
In production environments, back up your configuration as described in Back up configurations.
-
In preparation for upgrading AM servers and their configurations, also take LDIF backups of the configuration store data in the directory servers. If possible, stop servers before upgrading and take a file system backup of the deployed servers and also of their configuration directories. This can make it easier to roll back from a failed upgrade.
For example, if you deploy AM in Apache Tomcat under
/am, you might take a file system backup of the following directories for each AM server:-
/path/to/tomcat/webapps/am/ -
~/am/ -
~/.openamcfg/
-
-
When upgrading tools, keep copies of any customized scripts.
-
Back up the key stores and trust stores you use to connect securely.
-
Record any custom advanced server properties configured under Configure > Server Defaults > Advanced or Deployment > Servers > Server Name > Advanced in the AM admin UI. These properties are lost during the upgrade and must be re-added after the upgrade is complete.
Review REST API versions before upgrading
Upgrading AM can update the default API version of several AM endpoints. After an upgrade, your applications might experience issues connecting to endpoints if they don’t specify the API version in REST calls.
By default, an upgraded AM instance responds to REST calls that don’t specify version information with the oldest version available for the endpoint. However, the oldest supported version might not be the one required by the application, as API versions become deprecated or unsupported.
To avoid version conflicts between application calls and REST endpoint APIs,
consider specifying the protocol and resource version required by the application
in the Accept-API-Version header when making requests to REST endpoints.
Learn more in Specify REST API versions.
|
AM includes a CSRF protection filter that’s enabled by default.
REST requests other than GET, HEAD, and OPTIONS made to endpoints under the Learn more in Protect against CSRF attacks. |
You can configure AM’s default REST API behavior. Learn more in Configure versioning behavior.
Review PingDS certificates before upgrading
Before you upgrade, review the certificates used to establish secure connections between AM and the DS stores.
If the FQDN value from the subject field of a non-wildcard certificate
doesn’t match the FQDN obtained from DNS for the DS instance,
AM can’t establish a secure connection with DS.
Additionally, if the DS instance responds to multiple FQDNs, you must also specify them in the certificate.
This step is critical for the configuration store. If AM can’t establish communication with the configuration store, it fails to start up.
You can find more information about setting up DS server certificates in Key management in the DS documentation.
Customize before upgrading
Prepare a .war file that contains any customizations you require.
Customizations include any changes you’ve made to the AM server installation, such as the following:
-
Custom plugins and extensions, for example:
-
Custom authentication nodes.
-
Custom SAML v2.0 attribute mappers.
-
Custom OAuth 2.0 scope validators.
New functionality often changes the samples provided with AM.
Don’t copy custom plugins or extensions from a previous version of AM to the
.warfile.You must customize the samples of the version you’re upgrading to before adding them to the
.warfile. For example, download the custom scope validator sample of the version you’re upgrading to, customize it, recompile it, then add the resulting.jarfile to the.warfile.Failure to use the new version’s samples as the base for your customizations can result in unexpected behavior.
-
-
Customized JSPs, redesigned login or service pages and additional CSS and visual content.
-
Any changes to AM classes or APIs.
Recompile any custom implementations you have created with each release of AM, because the method signature or imports for supported and evolving APIs can change in each version.
-
Any changes or additional Java class libraries (such as
.jarfiles inWEB-INF/lib).
Plan for rollback
Sometimes even a well-planned upgrade operation fails. In such cases, you need a plan to roll back to the pre-upgrade version.
For AM servers, you can roll back by restoring from a file system backup. Restore the old configuration directory service from LDIF before you restart the old servers. Learn more in Back up configurations.
| If you upgraded using the upgrade wizard and need to roll back the upgrade to a version earlier than AM 7.4, you must restore the default keystore. The upgrade wizard removes a default alias that AM versions before AM 7.4 need to start. If you don’t restore this alias, the rolled back instance of AM won’t start up. |
Upgrade AM instances
To upgrade an AM deployment, you must upgrade each server instance in your site by upgrading the AM software on each server. You only need to upgrade the configuration on one server in the site.
|
High-level upgrade steps
Upgrading AM involves the following high-level steps:
- On one server in your site
-
-
If you use Apache Tomcat as an application container:
-
Stop AM or the container where it runs.
-
-
Upgrade the AM server software.
The server is upgraded when you deploy the
.warfile of the new version. You must deploy the new.warfile on each server in the site. -
Upgrade the configuration.
Use one of the following methods:
-
This utility is provided in the
AM-8.0.1.zipfile and upgrades a configuration exported using Amster. This is the recommended way to update the configuration. -
The upgrade wizard is launched when you replace a deployed AM
.warfile with a newer version, then go to the deployment URL. -
The
openam-upgrade-tool-14.1.3.29.jaris installed when you set up the configuration tools.
You can’t upgrade the configuration by deploying a new version and then using ssoadm import-svc-configto import an existing configuration. -
-
Update the schema
Generally, the configuration store schema is updated when you update the configuration. From time to time, updates are required to the schema of other datastores, such as the identity store or the CTS store. You must make these updates manually.
Learn more in Update the schema.
-
Update tools and scripts.
Read the Release notes to understand the changes introduced in each version before you update AM tools and scripts.
-
Restart AM or the container where it runs.
-
- On the remaining servers in your site
-
-
If you use Apache Tomcat as an application container:
-
Stop AM or the container where it runs.
-
-
Upgrade the AM server software.
The server is upgraded when you deploy the
.warfile of the new version. You must deploy the new.warfile on each server in the site. -
Restart AM or the container where it runs.
-
| If you’re upgrading to AM 8 from an unsupported version of AM, you might need to upgrade to a supported version first, and then to AM 8. |
Before you upgrade
You must follow these steps before you start an upgrade.
-
Route client application traffic to another site during the upgrade.
-
Make the transient state encryption key available to all instances in the site.
An AES 256-bit key called
directenctestmust be available to all instances in the site. This might mean, for example, copying the keystore across the site.This key doesn’t need to be the same key that AM provides in the default keystore.
If you don’t provide this key, AM won’t start up after the upgrade.
What is the
directenctestkey for?AM uses the
directenctestkey to encrypt information stored in the transient state of authentication trees.The upgrade process maps this key to the
am.authn.trees.transientstate.encryptionsecret label.How do I make the
directenctestkey available?The alias must exist in a secret store configured globally, so that all realms can access it. You can configure additional secrets by realm, if required, after the upgrade.
+ You can create a new secret store to house this secret, or you can add it to one of your existing stores.
+ The following example creates the key alias in the AM keystore, or in a keystore configured in a secret store:
+
$ keytool \
-genseckey \
-alias directenctest \
-keyalg AES \
-keysize 256 \
-storetype JCEKS \
-keystore /path/to/keystore.jceks
Where do I find the keystore passwords?
The passwords are stored as secrets in a separate secret store. For example, a file system volume secret store.
After the upgrade, you can rename the key alias or set a different key in the secret label mapping. Make sure the secret label is always mapped to an existing, resolvable secret or key alias.
Upgrade Tomcat
AM 8 supports Apache Tomcat 10.x and removes support for earlier Tomcat versions. If you use Apache Tomcat as an application container, you must install Apache Tomcat 10.x and deploy AM 8 into that container. Running AM 8 in an Apache Tomcat 8.5 or 9 container does not work.
In addition to downloading and installing Apache Tomcat 10.x, make the following changes before you deploy AM:
-
Update any custom scripts, configurations, and allowlist entries to reflect the change to Jakarta EE 9 (Servlet API 5.0). In particular, change the following references:
-
javax.servlet→jakarta.servlet -
javax.websocket→jakarta.websocket
You don’t need to change other
javaxreferences, such asjavax.xmlandjavax.inject. -
-
The Tomcat system property to manage encoded slash (/) characters in requests has changed.
The
org.apache.tomcat.util.buf.UDecoder.ALLOW_ENCODED_SLASHproperty has been removed in Tomcat 10 and replaced with theencodedSolidusHandlingproperty.Update references to the old property in the
Connectorelement in your Tomcatserver.xmlfile.In production environments, avoid resource names that contain forward slashes.
Upgrade the server and configuration
Use one of the following methods to upgrade the AM server software and configuration:
amupgrade
The amupgrade utility converts a set of exported AM configuration files so that the configuration can be used
with the latest AM version. Use this utility with Amster and to upgrade file-based configurations. The
utility has the same Java requirements as Amster. Learn more in the
Amster Release notes.
amupgrade rules
The amupgrade utility uses upgrade rules to convert configuration between versions.
The upgrade rules are sequential, that is, they upgrade configuration from one version to the next minor consecutive version. If you’re upgrading to a version greater than the next minor consecutive version, you must run multiple amupgrade commands sequentially until you reach the required configuration.
In other words, if you’re upgrading your configuration from version 7.2.x to version 8.0.x:
-
Run
amupgradewith the7.2.x-to-7.3.x.groovyrules file to get a 7.3 configuration. -
Run
amupgradeon the 7.3 configuration with7.3.x-to-7.4.x.groovyrules file to get a 7.4 configuration. -
Continue running successive upgrades until you have an 8.0 configuration.
You can’t use amupgrade to upgrade a running AM instance.
|
Before you start
-
Download the AM
.zipfile from the Backstage download site. -
Extract the contents of the
.zipfile. -
In the extracted directory, locate the
Config-Upgrader-8.zipfile. -
Extract the
Config-Upgrader-8.zipfile.
Upgrade from an Amster configuration export
-
Follow the Amster documentation to export your configuration.
-
Upgrade the exported configuration to the new version:
$ amupgrade \
-i exported configuration \
-o output directory \
-a amster version \
rules/amster/from-to-to.groovy
Where:
-
exported configuration is the path to the configuration directory you generated in step 1
-
output directory is the directory to which the command writes the upgraded configuration
-
amster version is the version of Amster you will use to import the configuration
-
from is the AM version from which you’re upgrading
-
to is the AM version to which you’re upgrading
-
rules specifies the path to a configuration rules file in the
/path/to/amupgrade/rulesdirectory
For example:
$ amupgrade \ -i /path/to/AM7.5Config/ \ -o /path/to/AM8Config \ -a 8.0 \ rules/amster/7.5.x-to-8.0.x.groovy Reading existing configuration from files in /path/to/AM7.5-config/… Modifying configuration based on rules in [rules/amster/7.5.x-to-8.0.x.groovy]… reading configuration from Amster json files Writing configuration to new location at /path/to/AM8Config… Upgrade Completed, modified configuration saved to /path/to/AM8ConfigIf you are upgrading a file-based configuration, rather than a configuration exported with Amster, use the --fileBasedModeoption instead of the-iand-ooptions. -
-
Install a new version of DS with an
am-configprofile.Don’t upgrade or use an existing DS configuration store because configuration associated with the older DS version can cause conflicts.
-
Stop AM or the container where it runs.
-
Unconfigure AM by removing the configuration files in the $HOME directory of the user running the web application container.
For example:
$ rm -rf $HOME/am $HOME/.openamcfgTo uninstall AM and its associated configuration files, delete the following directories:
-
The configuration directory.
If you didn’t use the default configuration location (
$HOME/am), check the value of theBase installation directoryproperty under Deployment > Servers > Server Name > General > System. -
The hidden directory that holds a file pointing to the configuration directory.
For example, if you are using Apache Tomcat as the web container, this file could be
$HOME/.openamcfg/AMConfig_path_to_tomcat_webapps_am_.
-
-
Undeploy the AM web application.
For example, if you are using Apache Tomcat as the web container, remove the
.warfile and expanded web application from the container:$ cd /path/to/tomcat/webapps/ $ rm -rf am.war am/ -
Install the new version of AM using the new DS server for your configuration store.
-
Follow the Amster documentation to import the upgraded configuration.
-
Restart AM or the container where it runs.
Upgrade wizard
The upgrade wizard brings the AM configuration, including the version number, up to date with the new version.
-
Stop AM or the container where it runs.
-
Deploy your customized AM
.warfile.When you deploy the new
.warfile, you might need to delete working files left by the old deployment.For example, if you deploy on Apache Tomcat, replace
/path/to/tomcat/webapps/am.warwith the customized.warfile, then recursively delete the/path/to/tomcat/webapps/am/and/path/to/tomcat/work/Catalina/localhost/am/directories before restarting the server. -
Restart AM or the container where it runs.
-
After deploying AM, but before upgrading, your application container serves AM’s upgrader user interface.
Suspend any external network access to the application container until the upgrade is complete. After the upgrade is complete, AM prevents access to the upgrader UI.
-
Go to the deployment URL and follow the prompts to upgrade.
-
Restart AM or the container where it runs.
-
Update the identity store schema:
-
Log into AM.
-
Go to Realms > Realm Name > Datastores > External User Store.
-
Click Load Schema then click Save to apply your changes.
-
If you have additional identity stores, repeat the previous steps for each store.
-
|
openam-upgrade-tool
The openam-upgrade-tool lets you upgrade the configuration without user intervention.
-
Stop AM or the container where it runs.
-
Deploy your customized AM
.warfile.When you deploy the new
.warfile, you might need to delete working files left by the old deployment.For example, if you deploy on Apache Tomcat, replace
/path/to/tomcat/webapps/am.warwith the customized.warfile, then recursively delete the/path/to/tomcat/webapps/am/and/path/to/tomcat/work/Catalina/localhost/am/directories before restarting the server. -
Restart AM or the container where it runs.
-
Set up the configuration tools to install the
openam-upgrade-tool-14.1.3.29.jar.A
sampleupgradefile is expanded in the directory where you install the tool. -
Create a configuration file, for example,
upgrade.properties.You can use the
sampleupgradefile as a template.The upgrade configuration file should resemble the following:
$ grep -v "^#" upgrade.properties SERVER_URL=https://am.example.com:8443 DEPLOYMENT_URI=/am ACCEPT_LICENSES=true -
Run the upgrade tool, specifying the
upgrade.propertiesfile you created:$ java -jar openam-upgrade-tool-14.1.3.29.jar --file upgrade.properties Writing Backup; Done. Upgrading Services New service iPlanetAMAuthPersistentCookieService; Done. New service iPlanetAMAuthOpenIdConnectService; Done. New service OAuth2Provider; Done. New service iPlanetAMAuthDevicePrintModuleService; Done. New service crestPolicyService; Done. New service RestSecurity; Done. New service MailServer; Done. New service dashboardService; Done. New service iPlanetAMAuthOATHService; Done. Add Organization schema to sunFAMSAML2Configuration; Done. Upgrade sunAMAuthHOTPService; Done. Upgrade sunAMAuthADService; Done. Upgrade sunAMAuthOAuthService; Done. Upgrade iPlanetAMAuthCertService; Done. Upgrade sunIdentityRepositoryService; Done. Upgrade iPlanetAMPasswordResetService; Done. Upgrade iPlanetAMSessionService; Done. Upgrade iPlanetAMAuthService; Done. Upgrade iPlanetAMAuthLDAPService; Done. Upgrade sunAMAuthDataStoreService; Done. Upgrade AgentService; Done. New sub schema sunIdentityRepositoryService; Done. New sub schema AgentService; Done. Delete service sunFAMLibertyInteractionService; Done. Delete service sunFAMLibertySecurityService; Done. Creating entitlement application type crestPolicyService; Done. Creating entitlement application crestPolicyService; Done. Re-enabling Generic LDAPv3 Data Store; Done. Updating Platform Properties; Done. Writing Upgrade Log; Done. Upgrade Complete.You can find more information about
openam-upgrade-tool-14.1.3.29.jarin the reference documentation. -
Restart AM or the container where it runs.
Update tools, scripts, and components
-
Update the AM tools.
Follow Set up administration tools and the Amster User Guide to install an updated version of the tools.
When you have confirmed the new tools are working, delete the old tools.
-
Make sure the AM scripts are current and contain the modifications your environment requires.
To avoid overwriting changes made in customized scripts, the upgrade process doesn’t update scripts from earlier versions of AM.
Check the scripts in your environment are compatible with the version of AM you’re upgrading to by following these steps:
-
Read the Release notes for information about possible changes.
-
Install an AM 8 test environment, and compare the scripts.
New installations always have the current scripts.
-
-
Review the information in Upgrade components and services and decide if you need to reconfigure any of AM’s services or features.
Reconfigure any custom advanced properties if necessary. These properties are lost during the upgrade, and you’ll need to re-add them in the AM admin UI.
How do I configure advanced server properties?
-
To configure advanced server properties for all instances of the AM environment, go to Configure > Server Defaults > Advanced in the AM admin UI.
-
To configure advanced server properties for a particular instance, go to Deployment > Servers > Server Name > Advanced.
If the property you want to add or edit is already configured, click on the pencil () button to edit it. When you are finished, click on the tick () button.
Click Save Changes.
-
Update the schema
You might need to update the schema for specific datastores, depending on the version from which you are upgrading and the datastore type.
Configuration store
Generally, updating your configuration makes the required schema updates to the configuration store.
After you’ve updated the configuration, add an access control instruction (ACI) to the configuration store directory to give the AM administrative user server-side sorting privileges.
The ACI should be similar to the following:
aci: (targetcontrol="1.2.840.113556.1.4.473")(version 3.0;
acl "Allow server-side sorting"; allow (read)
 (userdn = "ldap:///uid=am,ou=admins,dc=example,dc=com");)
You can find more information about configuring AM configuration stores in Prepare configuration stores.
Identity store
Depending on the version you’re upgrading from, and the features you’ve configured, you might need to update your identity store schema manually.
- Upgrade from AM 7.0 with a PingDS identity store
-
-
In the path where you deployed the
am.warfile (for example,/path/to/tomcat/webapps/am) locate the following file in theWEB-INF/template/ldif/opendjdirectory:opendj_retry_limit_node_count.ldif -
Update the identity store schema as follows:
$ /path/to/opendj/bin/ldapmodify \
--hostname 'ds.example.com' \
--port 1636 \
--useSsl \
--usePkcs12TrustStore /path/to/opendj/config/keystore \
--truststorepassword:file /path/to/opendj/config/keystore.pin \
--continueOnError \
--bindDN uid=admin \
--bindPassword str0ngAdm1nPa55word \
/path/to/tomcat/webapps/am/WEB-INF/template/ldif/opendj/opendj_retry_limit_node_count.ldif
This schema update is required for the Save Retry Limit to User feature in the Retry Limit Decision node. The feature is enabled by default.
Even if you aren’t currently using the Retry Limit Decision node, you should make this schema update, in case you decide to use the node in the future. If you can’t update the identity store schema at this point, you must disable the feature.
-
- Using push or web authentication, or using the Ping SDKs for device profiling
-
Apply the following LDIF files:
-
/path/to/tomcat/webapps/am/WEB-INF/template/ldif/opendj/opendj_webauthndevices.ldif -
/path/to/tomcat/webapps/am/WEB-INF/template/ldif/opendj/opendj_deviceprofiles.ldif
For example:
$ /path/to/opendj/bin/ldapmodify \
--hostname 'ds.example.com' \
--port 1636 \
--useSsl \
--usePkcs12TrustStore /path/to/opendj/config/keystore \
--truststorepassword:file /path/to/opendj/config/keystore.pin \
--continueOnError \
--bindDN uid=admin \
--bindPassword str0ngAdm1nPa55word \
/path/to/tomcat/webapps/am/WEB-INF/template/ldif/opendj/opendj_webauthndevices.ldif \
/path/to/tomcat/webapps/am/WEB-INF/template/ldif/opendj/opendj_deviceprofiles.ldif
If you don’t make this schema change, you must remove the
webauthnDeviceProfilesContainerobject class from the user configuration after the upgrade:-
In the AM admin UI, go to Realms > Realm Name > Identity Stores > Identity Store Name.
-
On the User Configuration tab, remove
webauthnDeviceProfilesContainerfrom the LDAP User Object Class. -
Save your changes.
Make the same change for each identity store that doesn’t have the schema change, and in each realm that uses the identity store.
-
Upgrade components and services
As part of planning your upgrade, consider that some changes in later AM versions will have an impact on your environment. Usually, these changes are driven by changes in specification, security policies, or performance.
Wherever possible, the upgrade process makes the appropriate changes to your AM configuration. However, sometimes you’ll need to perform additional configuration based on your environment.
In addition to the mandatory upgrade steps outlined in Upgrade AM instances, if you’re using features described in these lists, you’ll need to perform further upgrade tasks.
Configure the user profile allowlist
The profile attribute allowlist controls the information returned to non-administrative users when they access json/user
endpoints. For example, the allowlist controls the attributes shown in the user profile page.
Common profile attributes are allowlisted by default. You must add any custom attributes that you want non-administrative users to see.
The allowlist can be set globally, or per realm, in the user self-service service. To modify the list:
-
Globally: Go to Configure > Global Services > User Self-Service > Profile Management, and edit the Self readable attributes field.
-
By realm: Go to Realms > Realm Name > Services > User Self-Service > Profile Management, and edit the Self readable attributes field.
You must add the user self-service service to the realm if you’ve not done so already but you don’t need to configure anything other than the allowlist.
You must allowlist the kbainfo attribute for users to manage their KB questions and answers in user self-service flows.
|
Configure secret stores after upgrade
Secret stores are repositories of cryptographic keys, key pairs, and credentials.
|
Follow these steps to make the secret stores available to other servers in the site:
Redeploy secret stores to a site after upgrade
You can reconfigure the secret stores and their mappings after upgrade. However, we recommend that you follow the steps in this procedure to ensure all secrets are available to all the instances in the site, and later on, you make additional changes to your environment.
The upgrade process creates several secret stores, globally and by realm, depending on the features configured in AM:
-
Go to Configuration > Secret Stores, and review the global secret stores created for your environment.
-
Make sure the keystores configured exist on the other servers within the site. You might need to copy the keystores across or make them available in some other way.
-
Make sure directories configured in file system secret stores and their content exist on the other servers within the site. You might need to copy the directories across or make them available in some other way.
-
-
Go to Realms > Realm Name > Secret Stores, and perform the same actions you took for the global secret stores.
Realm-based secret stores are created for those features that support different keystore configurations by realm. For example, SAML v2.0, or the persistent cookie decision node.
To find the realm-based secret stores, go to Realms > Realm Name > Secret Stores. The secrets themselves are stored in the
/path/to/am/security/secrets/realms/root/realm-name/secret-store-namedirectory.Repeat this step for each of the realms you have configured.
-
Deploy the new AM
.warfile on the rest of the AM servers. -
When the site is up, and before opening the service to end users, review the secret label mappings of the new secret stores and change them as required.
For example, the upgrade process could have created secret stores for features you aren’t using. These secret stores could have mappings to secrets that don’t exist. It’s advisable to remove unused secret mappings in production environments.
Learn more about available secret labels in Secret label default mappings.
Reference: SAML v2.0 mappings after upgrade
AM is flexible regarding the configuration of secrets for SAML v2.0. Therefore, migrating the different combinations may create a high number of secret labels in your environment.
As a rule of thumb, AM configures providers that were using the same key aliases in the same order, to use the same secret labels. If this rule can’t be satisfied, the upgrade process creates new secret labels for the provider by assigning it a secret label identifier.
Migrate to file-based configuration
Prior to AM 8.0, all information (configuration and data) was stored in LDAP directories. AM 8 can read its configuration from JSON files instead of directory servers.
File-based configuration (FBC) is best-suited to a DevOps-style deployment, with the associated tools and practices of that approach.
Static FBC data is written to configuration files in the file system and checked into a source control system, such as Git.
AM instances are created as Docker images, with the FBC incorporated into the image.
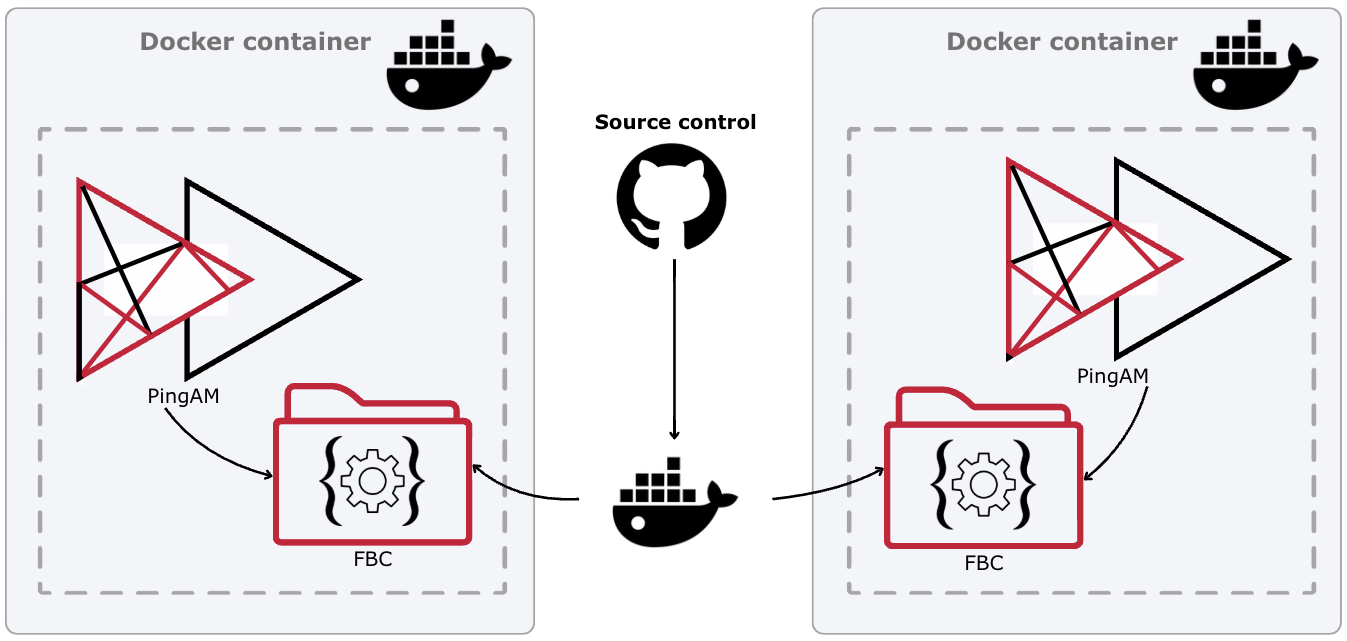
You can insert variables into these configuration files before you check them into source control. The variables are substituted with the appropriate values at runtime when you start the Docker container. Using variables lets you reuse the same base configuration files for multiple instances, and different staging environments. For example, development, QA, or pre-production, which are then promoted to production.
In an existing deployment, you can migrate your configuration to FBC after you’ve upgraded the configuration to AM 8.
| Before you start, read How AM reads FBC to understand the file-based configuration layers and their order of precedence. |
These topics assume you have already upgraded to AM 8 using the upgrade wizard. If you upgraded using, amupgrade and Amster, first deploy AM 8 and import the upgraded amster configuration. Then continue with the migration to FBC.
Migrating to FBC involves the following high-level steps:
Separate dynamic data from configuration data
Most deployments have one or more LDAP directories to store static configuration and data (identities, CTS tokens, policies, agents, and applications). If you store configuration and data in a single LDAP directory, you must separate the dynamic data first.
This section assumes you have stored identities in a separate datastore and focuses on CTS tokens, policies, agents, and applications. Export the data from your existing DS server and import it into one or more DS servers specifically for that data.
| You can use your existing directory to store your policies and applications, to avoid the overhead of setting up and managing additional DS instances during the migration. In this case, overwrite the contents of the directory with only the dynamic data. If you do use the existing instance, backup directory so that you can restore it if issues occur during the migration. |
To assist with the export, this table shows the default backend IDs and base DNs for AM data stored in DS directories. The table assumes you installed DS with the appropriate setup profiles. Adjust the values to reflect how you configured your DS server to store this data.
| There is no DS setup profile for UMA-related data. This table therefore shows the values suggested in Prepare external UMA datastores. |
| Data type | Backend ID | Base DN |
|---|---|---|
CTS tokens |
|
|
Policies, applications and agents |
|
|
UMA-related data |
|
|
-
Set up at least one external PingDS instance for your exported data, following these instructions:
-
Use the
export-ldifcommand on your current DS server instance to export the policies, applications, agents, CTS tokens and any UMA-related data from your existing configuration store.-
This command exports the CTS tokens to an LDIF file named
output-cts.ldif:$ /path/to/opendj/bin/export-ldif \ --hostname ds.example.com \ --port 4444 \ --bindDn uid=admin \ --bindPassword str0ngAdm1nPa55word \ --backendId amCts \ --ldifFile output-cts.ldif \ --trustAll Export task ExportTask-16a9dce5-ceb1-41f0-a94d-154246ba7393 scheduled to start immediately … Export task ExportTask-16a9dce5-ceb1-41f0-a94d-154246ba7393 has been successfully completed -
This command exports UMA-related data to an LDIF file named
output-uma.ldif:$ /path/to/opendj/bin/export-ldif \ --hostname ds.example.com \ --port 4444 \ --bindDn uid=admin \ --bindPassword str0ngAdm1nPa55word \ --backendId umaRsStore \ --ldifFile output-uma.ldif \ --trustAll Export task ExportTask-16a9dce5-ceb1-41f0-a94d-154246ba7393 scheduled to start immediately … Export task ExportTask-16a9dce5-ceb1-41f0-a94d-154246ba7393 has been successfully completed -
Follow the steps in Migrate policy or application data to DS to export the policy and application data.
You can find more information about this command in export-ldif.
-
-
Import the dynamic data into the new DS server or servers you’ve installed for this purpose.
-
This command imports the CTS tokens into a DS server instance at
ds-cts.example.com:$ /path/to/opendj/bin/import-ldif \ --hostname ds-cts.example.com \ --port 4444 \ --bindDn uid=admin \ --bindPassword str0ngAdm1nPa55word \ --backendId amCts \ --ldifFile output-cts.ldif \ --trustAll Import task ImportTask-2f93d32f-0599-4215-8d3e-ecb77164d64b scheduled to start immediately … Import task ImportTask-2f93d32f-0599-4215-8d3e-ecb77164d64b has been successfully completed -
This command imports the UMA-related data into a DS server instance at
ds-uma.example.com:$ /path/to/opendj/bin/import-ldif \ --hostname ds-uma.example.com \ --port 4444 \ --bindDn uid=admin \ --bindPassword str0ngAdm1nPa55word \ --backendId umaRsStore \ --ldifFile output-uma.ldif \ --trustAll Import task ImportTask-2f93d32f-0599-4215-8d3e-ecb77164d64b scheduled to start immediately … Import task ImportTask-2f93d32f-0599-4215-8d3e-ecb77164d64b has been successfully completed -
Follow the steps in Migrate policy or application data to DS to import the policy and application data to the DS server you’ve set up for that purpose.
You can find more information about this command in import-ldif.
-
-
On your AM configuration server, delete the dynamic data that you have exported.
Although you don’t have to do this, it does result in a cleaner migration of static configuration.
This command deletes the policies and applications, stored by default under
ou=services,ou=am-config.$ /path/to/opendj/bin/ldapdelete \ --deleteSubtree \ --hostname ds.example.com \ --port 4444 \ --bindDn uid=admin \ --bindPassword str0ngAdm1nPa55word \ --trustAll \ "ou=services,ou=am-config" # DELETE operation successful for DN ou=services,ou=am-config
Export existing configuration data
The migration utility consumes an LDIF export of the existing configuration.
Use the export-ldif command to export the data, supplying the following parameters:
-
The backend ID of the configuration store,
cfgStoreby default. -
The base DN of the branch containing the configuration,
ou=am-configby default. -
An LDIF file to store the exported configuration.
The following example, run on the DS server, assumes the default parameters when DS is installed for AM configuration:
$ /path/to/opendj/bin/export-ldif \
--backendId cfgStore \
--includeBranch ou=am-config \
--ldifFile /path/to/export-config/exported-configuration.ldif \
--offline
…
category=BACKEND severity=INFO seq=34 msg=Exported 1528 entries and skipped 0 in 0 seconds (average rate 24254.0/sec)The exported file contains the existing configuration under ou=am-config:
$ more /path/to/export-config/exported-configuration.ldif
dn: ou=am-config
objectClass: top
objectClass: untypedObject
ou: am-config
…Migrate exported configuration to FBC
The migration utility is an enhanced version of the AM amupgrade command, available in the AM .zip file.
-
If you don’t already have it, download AM-8.0.1.zip from the Backstage download site.
-
Extract the contents of the
.ziparchive. -
In the extracted directory, locate and extract the
Config-Upgrader-8.ziparchive. -
To migrate the LDAP configuration, run the
amupgradecommand with thefileBasedModeargument:$ /path/to/amupgrade \ --fileBasedMode \ --ignoreNoRuleTracking \ --inputConfig input-directory \ --output output-directory \ /path/to/amupgrade/rules/fbc/migrate-to-fbc.groovyMigration command-line arguments
--amsterVersion, -a-
The version of Amster that will be used to import the configuration (for example 8.0.0). This parameter is required unless the --fileBasedMode flag is provided.
--baseDn, -d-
Lets you set a custom base DN.
--clean-
Specifies that the migration should remove all existing files from the output location directory.
Default: true
--fileBasedMode, -m-
Specify that the configuration to be upgraded is file-based configuration (not Amster-exported configuration).
Default: false
--ignoreNoRuleTracking-
Don’t check for the existence of the Configuration Version Service. This lets you run the migration tool against individual files. However, it means that rules can be run multiple times against those files. Most rules don’t support this. Use with caution.
Default: false
--ignoreRequiredSecretMapping-
Prevents the upgrade from terminating due to missing required secret label mappings. Use with caution.
Default: false
-i, --inputConfig-
The directory containing the LDIF configuration files that you’re migrating.
--log-output, -l-
The logging output file; logs at FINE by default and FINEST in verbose mode.
--prettyArrays-
Whether to print each JSON array value on a new line.
Default: false
-o | --output directory-
The directory on the file system to which the migration utility writes the generated FBC.
--secretsConfigFile, -f-
The properties file that contains settings necessary to migrate credentials to secrets. This file is required if your rules contain secrets upgrades. Read the
sampleconfig.propertiesfile for more details. --sectionsSource, -s-
A file that specifies the structure (section details) of the output configuration.
Without this option, the migration utility generates the configuration properties as flat files.
This file can be a
section.propertiesfile for a specific service or anAM.warfile that includes the structure for all services.Example
section.propertiesfile for JSON audit handler######################################################################################################################## # Common handler section properties ######################################################################################################################## commonHandler=enabled commonHandler=topics ######################################################################################################################## # Common handler plugin section properties ######################################################################################################################## commonHandlerPlugin=handlerFactory ######################################################################################################################## # JSON handler section properties ######################################################################################################################## jsonConfig=location jsonConfig=elasticsearchCompatible jsonConfig=rotationRetentionCheckInterval jsonFileRotation=rotationEnabled jsonFileRotation=rotationMaxFileSize jsonFileRotation=rotationFilePrefix jsonFileRotation=rotationFileSuffix jsonFileRotation=rotationInterval jsonFileRotation=rotationTimes jsonFileRetention=retentionMaxNumberOfHistoryFiles jsonFileRetention=retentionMaxDiskSpaceToUse jsonFileRetention=retentionMinFreeSpaceRequired jsonBuffering=bufferingMaxSize jsonBuffering=bufferingWriteInterval rules-file-path-
The path to the upgrade rules file.
Although you’re not using this command to upgrade to a new version, the
amupgradecommand requires an upgrade rules file.Use the
noop.groovyfile (located in (/path/to/amupgrade/rules/fbc/noop.groovy) to migrate the configuration without applying any rules. --version, -V-
Prints the version of this configuration upgrader tool and exits.
--verbose, -v-
Logs verbose output; outputs at FINE level to the console and FINEST level to files.
For example:
$ /path/to/amupgrade \
--fileBasedMode \
--ignoreNoRuleTracking \
--inputConfig /path/to/export-config/ \
--output /path/to/fbc/config/ \
/path/to/amupgrade/rules/fbc/migrate-to-fbc.groovy
In this example, the new JSON configuration files are generated in
/path/to/fbc/config/.A sample
alpharealm configuration might look like the following:$ more /path/to/am/config/services/global/realms/root-alpha.json { "metadata": { "realm": "/alpha", "entityType": "", "entityId": "L2FscGhh", "uid": "o=alpha,ou=services,ou=am-config", "sunServiceID": null, "objectClass": [ "sunRealmService", "top" ], "pathParams": {}, "ou": [] }, "data": { "_id": "root-alpha", "_type": { "_id": "", "name": "", "collection": false }, "active": true, "aliases": [ "alpha" ], "parentPath": "/", "name": "alpha" } }
Provide configuration files to AM
-
Stop AM or the container where it runs.
-
Copy the FBC files to the location of the deployment layer of your AM 8.0 configuration, by default,
/path/to/am/config/config/services.Learn more about the deployment layer in How AM reads FBC.
AM reads FBC from its home directory. You’ll need access to this directory on your local host or in your Docker container.
For local hosts, change to the $AM_HOME/config/services directory:
$ cd $AM_HOME/config/services -
Copy the migrated configuration into the
servicesdirectory.$ cp /path/to/fbc/config/ $AM_HOME/config/servicesIf the directory contains default configuration, delete it before copying in your migrated configuration.
Start AM in FBC mode
When you’ve migrated your configuration to JSON files, you can point your upgraded AM instances to the FBC, and to the new policy and application datastores.
These instructions assume a local AM server running in an Apache Tomcat container. Adjust the instructions to suit your environment.
-
Set the following Java variable to
true:com.sun.identity.sm.sms_object_filebased_enabled=true -
Pass that variable to AM in some way. For example, for Tomcat you can set the variable in the
CATALINA_OPTSoptions:export CATALINA_OPTS="$CATALINA_OPTS -Dcom.sun.identity.sm.sms_object_filebased_enabled=true" -
Restart AM or the container where it runs.
-
Start up and test your environment.
Check that AM has the configuration you expect. You can also make changes to your configuration through the AM admin UI and check that those changes are made in the JSON configuration files.
Troubleshoot your FBC migration
Use these sections to help you troubleshoot if you encounter the following errors during a migration to FBC:
Failed to import /etc/am/configuration/global/DataStoreService.json
- Upgrade scenario
-
FBC import after an Amster export
- Error
-
user-data: [main] ERROR org.forgerock.amster.org.forgerock.openam.sdk.http.DefaultErrorHandler - Unhandled client error: [Status: 400 Bad Request] user-data: Failed to import /etc/am/configuration/global/DataStoreService.json - Explanation
-
The order of imported files causes the import of
DataStoreService.jsonto fail because the datastore instances that it references (for external application and policy stores) have not yet been created. - Solution
-
Import the
global/DataStoreInstancepath first, then import the remaining configuration.
Invalid SSO Token
- Upgrade scenario
-
FBC import after an Amster export
- Error
-
ERROR: Error updating properties for server null and tab sdk com.sun.identity.sm.SMSException: Invalid SSO Token: Invalid SSO Token - Explanation
-
Importing the CTS store properties when moving to an external CTS store fails for any subsequent import files because the CTS session is no longer valid.
- Solution
-
Import the
global/Serverspath first, then importglobal/DefaultCtsDataStoreStorePropertiesand finally import the remaining configuration.
Data validation failed for the attribute, Secret Label
- Upgrade scenario
-
FBC import after an Amster export of configuration prior to 7.5.0
- Error
-
Failed to import …output/global/KeyStoreSecretStore/default-keystore/KeyStoreMappings/am.default.authentication.nodes.persistentcookie.encryption.json ERROR org.forgerock.openam.sdk.http.ClientErrorException: 400 Bad Request: Data validation failed for the attribute, Secret Label - Explanation
-
The secret mapping labels for persistent cookies changed in 7.5. As a result an attempt to import previous names fails.
- Solution
-
Before performing the import:
-
Remove any instances of
global/KeyStoreSecretStore/…/am.default.authentication.modules.persistentcookie.encryption.json -
Remove any instances of
global/KeyStoreSecretStore/…/am.default.authentication.modules.persistentcookie.signing.json -
Rename any instances of
global/KeyStoreSecretStore/…/am.default.authentication.nodes.persistentcookie.encryption to am.authentication.nodes.persistentcookie.encryption. Modify the contents of each renamed file and perform the same search and replace. -
When the import is complete, optionally add encryption and signing secrets in the realms in which the
PersistentCookieAuthModuleis used. The new secret mapping format is:am.authentication.modules.persistentcookie.persistent-cookie-instance-name.encryptionam.authentication.modules.persistentcookie.persistent-cookie-instance-name.signing
-
services/customusernamecollector': Trying to redefine version 0.0 for path
- Upgrade scenario
-
FBC import after an Amster export
- Error
-
ERROR o.f.a.CrestApiProducer - ApiDescription 'frapi:openam/realm-config:2.0//services/customusernamecollector': Trying to redefine version 0.0 for path '' - Explanation
-
The
CustomUsernameCollectorAuthmodule isn’t recognized as an authentication module after the Amster import causing a failure to access the global service configuration. - Solution
-
Before importing the upgraded Amster configuration, make sure the
'com.example.custom.CustomUsernameCollectorAuth'is included in the list of authenticators in theglobal/Authentication.json file. Edit that file and add it as follows:"authenticators" : [ "com.sun.identity.authentication.modules.ad.AD", ... "org.forgerock.openam.authentication.modules.amster.Amster", "org.forgerock.openam.authentication.modules.CustomUsernameCollectorAuth" ]This example includes line breaks for legibility. In your file, the modules should all be on a single line.
UMA settings aren’t applied
- Upgrade scenario
-
FBC import after an Amster export
- Error
-
Could not create token in token data store: Operation failed: Result Code: Insufficient Access Rights - Explanation
-
Amster doesn’t export the default server settings for UMA. It only exports specific server settings, which inherit from the default server settings.
- Solution
-
Before you import the
global/Servers/01/UmaDataStoreProperties.jsonfile:-
If your deployment includes UMA configuration that is inherited from the server defaults (for example, the configuration for UMA to use external datastores), modify the inherited property to be
falseso that the specific server settings override the server defaults. -
Alternatively, remove the specific server file so that it’s not imported and doesn’t override the server defaults.
-
Amster import fails for global/Monitoring.json file
- Upgrade scenario
-
FBC import after an Amster export
- Error
-
`ERROR o.f.o.c.s.SmsJsonConverter - Invalid attribute named snmpPort specified.
- WARN o.f.o.c.r.s.SmsSingletonProvider - ::SmsSingletonProvider
-
InvalidAttributeException on Update org.forgerock.openam.core.sms.InvalidAttributeException: Invalid attribute specified.`
- Explanation
-
Performing an Amster import from an upgraded previous version export fails for
global/Monitoring.jsonbecause thesnmpPortandsnmpEnabledattributes aren’t recognized. - Solution
-
Before importing the
Monitoring.jsonfile, remove thesnmpPortandsnmpEnabledattributes and values.
Errors related to the keystore
- Upgrade scenario
-
Server startup with FBC
- Errors
-
ERROR: Unable to read private key password fileERROR: mapPk2Cert.JKSKeyProvider: java.io.FileNotFoundExceptionERROR: EventService.restartPSearches() Unable to start listener class com.sun.identity.sm.ldap.LDAPEventManager for data store DataStoreId… [CONTINUED]Unable to retrieve a connection - Explanation
-
These errors can be thrown when AM is unable to find the required keystores.
- Solution
-
Make sure your secret stores are configured correctly after the migration.
Migrate legacy instances
Rather than upgrade legacy instances (running an OpenAM or AM version that is no longer supported), you must instead manually migrate from your existing deployment to a new deployment.
For complex legacy deployments, Ping Identity can help you with the migration process.
Upgrade a legacy deployment
-
Prepare your customized AM
.warfile. -
Prepare a new deployment, installing servers from the new, customized
.warfile, starting with the instructions in Install AM. -
After installation, configure the new servers in the same way as the old servers, adapting as necessary.
-
Validate that the new service is performing as expected.
-
Redirect client application traffic from the old deployment to the new deployment.