Sessions
These topics cover concepts and implementation procedures to manage sessions in your AM environment.
This information is written for administrators configuring AM’s authentication and authorization components.
Name changes for ForgeRock products
Product names changed when ForgeRock became part of Ping Identity.
The following name changes have been in effect since early 2024:
| Old name | New name |
|---|---|
ForgeRock Identity Cloud |
PingOne Advanced Identity Cloud |
ForgeRock Access Management |
PingAM |
ForgeRock Directory Services |
PingDS |
ForgeRock Identity Management |
PingIDM |
ForgeRock Identity Gateway |
PingGateway |
Learn more about the name changes in New names for ForgeRock products in the Knowledge Base.
Introduction to sessions
AM uses two types of tokens that represent an exchange of information, usually interactive, between AM and a user or identity:
-
Journey sessions, which AM creates to track progress through a journey. These sessions last for the duration of the journey.
-
Authenticated sessions, which AM creates after a user has authenticated successfully to manage the user’s or entity’s access to resources.
AM session-related services are stateless unless otherwise indicated. They don’t hold any session information local to the AM instances.
Instead, they store session information either in the CTS token store (server-side sessions) or on the client (client-side sessions).
Session location
Sessions have different characteristics depending on where AM stores the sessions.
Both journey sessions and authenticated sessions can be stored on the client or on the server.
Session location is configured at the realm level.
The following table illustrates where AM can store sessions:
| In the CTS token store | On the client | In AM’s memory | |
|---|---|---|---|
Journey sessions |
✔ |
✔ (Default in new installations) |
✔ (Default after upgrade) |
Authenticated sessions |
✔ (Default) |
✔ |
✖ |
|
You can configure different session locations within the same AM deployment to suit the requirements of each realm. You can also configure the journey session location independently of the authenticated session location. For example, you could configure the same realm for client-side journey sessions and server-side authenticated sessions if it suits your environment. |
Choosing where to store sessions is an important decision you must make by realm. Review the information in the following tables before configuring sessions.
Where to store journey sessions
Consider the following factors when choosing storage location for journey sessions.
| Server-side journey sessions | Client-side journey sessions | In-memory journey sessions | |
|---|---|---|---|
Session location |
Authoritative source: CTS token store. Sessions might also be cached in AM’s memory for improved performance. |
On the client. No CTS storage or replication overheads. |
In AM server’s memory. |
Load balancer requirements |
None. Session stickiness recommended for performance. |
None. Session stickiness recommended for performance. |
Session stickiness. |
Core token service usage |
Authoritative source for authenticated sessions. Session allowlisting, when enabled. |
Session allowlisting, when enabled. |
None. |
Uninterrupted session availability |
No special configuration required. |
No special configuration required. |
Not available. |
Session security |
Sessions reside in the CTS token store, and are not accessible to users. |
Sessions reside on the client and should be signed and encrypted. |
Sessions reside in AM’s memory, and are not accessible to users. |
Where to store authenticated sessions
Consider the following factors when choosing storage location for authenticated sessions.
| Server-side authenticated sessions | Client-side authenticated sessions | |
|---|---|---|
Hardware |
Higher I/O and memory consumption. |
Higher CPU consumption. |
Logical hosts |
Variable or large number of hosts. |
Variable or large number of hosts. |
Session monitoring |
Available. |
Not available. |
Session location |
Authoritative source: CTS token store. Authenticated sessions could also be cached in AM’s memory for improved performance. |
In a cookie in the client. |
Load balancer requirements |
None. Session stickiness recommended for performance. |
None. Session stickiness recommended for performance. |
Uninterrupted session availability |
No special configuration required. |
No special configuration required. |
Core token service usage |
Authoritative source for authenticated sessions. |
Provides session denylisting for logged out sessions. |
Core token service demand |
Heavier. |
Lighter. |
Session security |
Authenticated sessions reside in the CTS token store, and aren’t accessible to users. |
Authenticated sessions should be signed and encrypted.(1) |
Cross-domain single sign-on support |
All AM capabilities supported. |
Web agents and Java agents: Supported without restricted tokens. |
(1) Web agents and Java agents support either signing or encrypting client-side sessions, but not both. Learn more in Client-side session security and agents.
Server-side sessions
Server-side sessions reside in the CTS token store and can be cached in memory on one or more AM servers to improve system performance.
|
Find information about configuring AM with sticky load balancing in Load balancing. |
If the session request is redirected to an AM server that doesn’t have the session cached, that server must retrieve the session from the CTS token store.
AM stores server-side sessions in the CTS token store and caches sessions in server memory. If a server with cached sessions fails, or if the load balancer in front of AM servers directs a request to a server that doesn’t have the session cached, the AM server retrieves the session from the CTS token store, incurring performance overhead.
AM sends a reference to the session to the client, but the reference doesn’t contain any of the session state information. AM can modify a session during its lifetime without changing the client’s reference to the session.
Advantages of server-side sessions
- Full feature support
-
Server-side sessions support all AM features, such as CDSSO and quotas. Client-side sessions don’t. Learn more in Limitations of client-side sessions.
This advantage doesn’t apply to journey sessions because they don’t provide these features. - Session information isn’t resident in browser cookies
-
With both server-side journey sessions and authenticated sessions, all the information about the session resides in the CTS and could be cached on one or more AM servers. With client-side authenticated sessions, session information is held in browser cookies. This information could be very long-lived.
Server-side journey sessions
While progressing through the authentication tree, the session reference is returned to the client after a call to the authenticate endpoint
and stored in the authId object of the JSON response.
AM maintains the journey session in the CTS token store. After the journey has completed, AM returns session state to the client and deletes the server-side authenticated session if the realm to which the user has authenticated is configured for client-side authenticated sessions.
Journey session allowlisting is an optional feature that maintains a list of in-progress journey sessions and their progress in the journey to protect against replay attacks. Learn more in Journey session allowlisting.
Server-side authenticated sessions
Once the user is authenticated, the session reference is known as an SSO token.
For browser clients, AM sets a cookie in the browser that contains the session reference.
For REST clients, AM returns the session reference in response to calls to the authentication endpoint.
Learn more in Session cookies and session security.
Related information: Choose where to store sessions
Configure server-side sessions
By default, AM configures the CTS token store schema in the AM configuration store. Before configuring your AM deployment to use server-side journey or authenticated sessions, we recommend you install and configure an external CTS token store. Learn more in Core Token Service (CTS).
Server-side journey and authenticated sessions benefit from configuring sticky load balancing. Learn more in Load balancing.
Configure server-side journey sessions
-
In the AM admin UI, go to Realms > Realm Name > Authentication > Settings > Trees.
-
From the Authentication session state management scheme drop-down list, select
CTS. -
In the Max duration (minutes) field, enter the maximum life of the journey session in minutes.
You can also set the maximum duration in a tree or at the node level. Learn more in Maximum duration.
-
Save your changes.
-
Go to Configure > Authentication > Core > Security.
-
In the Organization Authentication Signing Secret field, enter a base64-encoded HMAC secret that AM uses to sign the JWT that is passed back and forth between the client and AM during the authentication process. The secret must be at least 128-bits in length.
-
Save your changes.
Configure server-side authenticated sessions
-
In the AM admin UI, go to Realms > Realm Name > Authentication > Settings > General.
-
Ensure the Use Client-Side Sessions check box is not selected.
-
Save your changes.
-
Verify that AM creates a server-side authenticated session when non-administrative users authenticate to the realm. Perform the following steps:
-
Authenticate to AM as a non-administrative user in the realm you enabled for server-side sessions.
-
In a different browser, authenticate to AM as an administrative user. For example,
amAdmin. -
Go to Realms > Realm Name > Sessions.
-
Verify that a session is present for the non-administrative user.
-
Client-side sessions
For client-side sessions, AM returns the session state to the client after each request and requires the session state to be passed in with the subsequent request.
For security reasons, you should configure AM to sign and/or encrypt client-side journey and authenticated sessions. Decrypting and verifying the session can be an expensive operation to perform on each request. AM therefore caches the decrypt sequence in memory to improve performance.
|
Find information about configuring AM with sticky load balancing in Load balancing. |
Find information about configuring client-side security in Client-side session security.
Advantages of client-side sessions
- Unlimited horizontal scalability for session infrastructure
-
Client-side sessions provide unlimited horizontal scalability by storing the session state on the client as a signed and encrypted JWT.
Overall performance on hosts using client-side sessions can be easily improved by adding more hosts to the AM deployment.
- Replication-free deployments
-
Global deployments may struggle to keep their CTS token stores synchronized when distances are long and updates are frequent.
Client-side sessions aren’t constrained by the replication speed of the CTS token store. Therefore, client-side sessions are usually more suitable for deployments where a session can be serviced at any time by any server.
Limitations of client-side sessions
The following features aren’t supported or have limited support for client-side journey sessions and authenticated sessions:
| Functionality | Details |
|---|---|
Not supported |
|
Not supported |
|
Not supported for web and Java agents |
|
Not supported for web and Java agents |
|
Not supported for web and Java agents |
|
Not supported for journey sessions. Supported for authenticated sessions. |
|
Not supported |
|
Limited support |
Client-side journey sessions
Client-side journey sessions are configured by default in new installations.
While progressing through the authentication tree, the journey session state is returned to the client
after each call to the authenticate endpoint and stored in the authId object of the JSON response.
If the realm the user authenticated to is configured for server-side authenticated sessions, AM creates the authenticated session in the CTS token store when the journey completes.
Storing journey sessions on the client allows any AM server to handle the journey at any point in time without load balancing requirements.
Journey session allowlisting is an optional feature that maintains a list of in-progress journey sessions and their progress in the journey to protect against replay attacks. Learn more in Journey session allowlisting.
Client-side authenticated sessions
For browser-based clients, AM sets a cookie in the browser that contains the session state. When the browser transmits the cookie back to AM, AM decodes the session state from the cookie. For REST-based clients, AM sends the cookie in a header. Find more information about session cookies in Session cookies and session security.
Session denylisting is an optional feature that maintains a list of logged out client-side authenticated sessions in the CTS token store. Find more information about session termination and session denylisting in Session termination.
A user is granted a client-side journey session while they are completing the authentication tree.
If session denylisting is enabled, this journey session is "logged out" when the tree is completed, to prevent
replay attacks. This "logging out" adds the journey session to the session denylist for client-side sessions.
In the CTS store, this takes the form of a SESSION_BLACKLIST token that exists for the life of the journey session.
|
Learn more in Choose where to store sessions.
Configure client-side sessions
Client-side sessions require additional setup in your environment to keep the sessions safe, and to ensure both the browser and the web server where AM runs can manage large cookies. Additionally, some AM features can’t be used with client-side sessions. Review the following list before configuring client-side sessions:
-
Make sure the trust store used by AM has the necessary certificates installed:
-
A certificate is required for encrypting JWTs containing client-side sessions.
-
If you are using RS256 signing, then a certificate is required to sign JWTs. (HMAC signing uses a shared secret.)
The same certificates must be stored on all servers participating in an AM site. Find information about managing certificates for AM in Secrets, certificates, and keys.
-
-
Make sure your users' browsers can accommodate larger session cookie sizes required by client-side sessions. Find information about session cookie sizes in Session cookies and session security.
-
Make sure the AM web container can accommodate an HTTP header that is 16K in size or greater. When using Apache Tomcat as the AM web container, configure the
server.xmlfile’smaxHttpHeaderSizeproperty to16384or higher. -
Make sure your deployment doesn’t require any of the capabilities specified in the list of limitations that apply to client-side sessions.
Configure client-side journey sessions
-
In the AM admin UI, go to Realms > Realm Name > Authentication > Settings > Trees.
-
From the Authentication session state management scheme drop-down list, select
JWT. -
In the Max duration (minutes) field, enter the maximum life of the journey session in minutes.
You can also set the maximum duration in a tree or at the node level. Learn more in Maximum duration.
-
Save your changes.
-
Go to Configure > Authentication > Core > Security.
-
In the Organization Authentication Signing Secret field, enter a base64-encoded HMAC secret that AM uses to sign the JWT that is passed back and forth between the client and AM during the authentication process. The secret must be at least 128-bits in length.
-
Save your changes.
-
Protect your client-side journey sessions.
Learn more in Client-side session security.
Configure client-side authenticated sessions
-
In the AM admin UI, go to Realms > Realm Name > Authentication > Settings > General.
-
Select the Use Client-Side Sessions check box.
-
Save your changes.
-
Protect your client-side authenticated sessions.
Learn more in Client-side session security.
-
Verify that AM creates a client-side authenticated session when non-administrative users authenticate to the realm.
Perform the following steps:
-
Authenticate to the AM admin UI as the top-level administrator (by default, the
amAdminuser). Note that sessions for the top-level administrator are always stored in the CTS token store. -
Go to Realms > Realm Name > Sessions.
-
Verify that a session is present for the
amAdminuser. -
In your browser, examine the AM cookie, named
iPlanetDirectoryProby default. Copy and paste the cookie’s value into a text file and note its size. -
Open an incognito browser window that won’t have access to the
iPlanetDirectoryProcookie for theamAdminuser. -
Authenticate to AM as a non-administrative user in the realm for which you enabled client-side authenticated sessions. Make sure you don’t authenticate as the
amAdminuser this time. -
In your browser, examine the
iPlanetDirectoryProcookie. Copy and paste the cookie’s value into a second text file and note its size. The size of the client-side session cookie’s value should be considerably larger than the size of the cookie used by the server-side session for theamAdminuser. If the cookie isn’t bigger, you’ve not enabled client-side authenticated sessions correctly. -
Return to the original browser window in which the AM admin UI appears.
-
Refresh the window containing the Sessions page.
-
Verify that a session still appears for the
amAdminuser, but that no session appears for the non-administrative user in the realm with client-side authenticated sessions enabled.
-
In-memory sessions
In-memory sessions reside in AM’s memory. AM sends clients a reference to the session, but the reference doesn’t contain any of the session state information.
Advantages of in-memory sessions
- Faster performance with equivalent host
-
AM servers configured for in-memory journey sessions can validate more sessions per second per host than those configured for client-side or server-side journey sessions.
- Session information isn’t in browser cookies
-
Journey session information resides in AM’s memory, and isn’t accessible to users. With client-side sessions, journey session information is held in browser cookies.
In-memory journey sessions
In-memory journey sessions are configured by default after an upgrade.
While progressing through the authentication tree, the journey session state is returned to the client
after each call to the authenticate endpoint and stored in the authId object of the JSON response.
AM maintains the user’s journey session in its memory. After the journey has completed, AM performs the following tasks:
-
If the realm to which the user has authenticated is configured for server-side authenticated sessions, AM stores the authenticated session in the CTS token store and deletes the journey session from memory.
-
If the realm to which the user has authenticated is configured for client-side authenticated sessions, AM stores the authenticated session in a cookie on the user’s browser and deletes the journey session from memory.
Journey session allowlisting is an optional feature that maintains a list of in-progress journey sessions and their progress in the authentication flow to protect against replay attacks. Learn more in Journey session allowlisting.
|
Deployments where AM stores journey sessions in memory require sticky load balancing to route all requests for a specific journey to the same AM server. If a request reaches a different AM server, the journey starts again. Find information about configuring AM with sticky load balancing in Load balancing. |
Configure in-memory journey sessions
Follow these steps to store journey sessions in AM’s memory:
-
Make sure you have configured AM for sticky load balancing.
-
In the AM admin UI, go to Realms > Realm Name > Authentication > Settings > Trees.
-
From the Authentication session state management scheme drop-down list, select
In-Memory. -
In the Max duration (minutes) field, enter the maximum life of the journey session in minutes.
You can also set the maximum duration in a tree or at the node level. Learn more in Maximum duration.
-
Save your changes.
-
Go to Configure > Authentication > Core > Security.
-
In the Organization Authentication Signing Secret field, enter a base64-encoded HMAC secret that AM uses to sign the JWT that is passed back and forth between the client and AM during the authentication process. The secret must be, at least, 128-bits in length.
-
Save your changes.
Session termination
AM manages active sessions, allowing single sign-on when authenticated users attempt to access system resources in AM’s control.
Authenticated sessions are terminated when a configured timeout is reached or when a user performs actions that cause session termination. Session termination effectively logs the user out of all systems protected by AM.
With server-side authenticated sessions, AM terminates sessions in four situations:
-
When a user explicitly logs out.
-
When an administrator monitoring sessions explicitly terminates an authenticated session.
-
When an authenticated session exceeds the maximum time-to-live.
-
When a user is idle for longer than the maximum session idle time.
Under these circumstances, AM responds by removing server-side authenticated sessions from the CTS token store and from AM server memory caches. With the authenticated session no longer present in CTS, AM forces the user to reauthenticate during subsequent attempts to access protected resources.
When a user explicitly logs out of AM,
AM also attempts to invalidate the iPlanetDirectoryPro cookie in users' browsers
by sending a Set-Cookie header with an invalid session ID and a cookie expiration time that’s in the past.
In the case of administrator session termination and session timeout,
AM can’t invalidate the iPlanetDirectoryPro cookie until the next time the user accesses AM.
Session termination differs for client-side authenticated sessions.
Since client-side authenticated sessions aren’t maintained in the CTS token store, administrators can’t monitor or
terminate them.
Because AM doesn’t modify the iPlanetDirectoryPro cookie for client-side sessions after authentication,
the session idle time isn’t maintained in the cookie.
Therefore, AM doesn’t automatically terminate client-side authenticated sessions that have exceeded the idle
timeout.
Find information about tracking idle time in PingGateway in AmSessionIdleTimeoutFilter.
As with server-side authenticated sessions,
AM attempts to invalidate the iPlanetDirectoryPro cookie from a user’s browser when the user logs out.
When the maximum session time is exceeded, AM also attempts to invalidate the iPlanetDirectoryPro cookie in
the user’s browser the next time the user accesses AM.
It’s important to understand that AM can’t guarantee cookie invalidation.
For example, the HTTP response containing the Set-Cookie header might be lost.
This isn’t an issue for server-side sessions, because a logged-out session no longer exists in the CTS token store,
and a user who attempts to access AM after previously logging out will be forced to reauthenticate.
However, without the guarantee of cookie invalidation, deployments with client-side sessions can experience issues.
For example, a logged-out user could still have an iPlanetDirectoryPro cookie but AM wouldn’t know they had logged out.
Therefore, AM supports a feature that takes additional action when users log out of client-side sessions.
AM can maintain a list of logged out client-side sessions in a session denylist in the CTS token store.
Whenever users attempt to access AM with client-side sessions,
AM checks the session denylist to validate that the user has not, in fact, logged out.
Because AM doesn’t modify client-side session cookies after they’re stored in the end user’s browser, and client-side sessions contain the session maximum time-to-live, you must protect them against tampering. Learn more in Client-side session security.
Configure authenticated session timeout settings
Session timeout settings (maximum session time and maximum idle time) can be set in different locations to provide
greater control over terminating authenticated sessions.
AM determines which settings to apply to the authenticated session in the following order of precedence:
-
The session timeout settings for a user.
Go to Realms > Realm Name > Identities > Username > Services > Session to set user level session timeout values.
If the
Sessionservice isn’t listed, click Add Service and selectSessionin the list. -
The session timeout settings in a node:
-
Configure session timeout settings in the Set Session Properties node.
-
Configure session timeout settings in the Scripted Decision node using the
withMaxIdleTimeandwithMaxSessionTimemethods.Learn more in Set authenticated session timeouts.
If a tree has multiple nodes that set session timeouts, AM uses the settings associated with the last executed node to determine the timeouts for the resulting authenticated session.
If an inner tree includes nodes that set session timeouts, AM uses the updated timeouts in the parent tree.
-
-
The session timeout settings for an authentication tree.
Set the
maximumSessionTimeandmaximumIdleTimeproperties in the tree configuration.Session timeout values set on an inner tree are ignored.
Learn more in Configure authenticated session timeouts in a tree.
-
The session timeout values set in the realm.
Enable the Session service in the realm to set realm level session timeout values.
Learn more in Enable dynamic session attributes for the realm.
-
The session timeout values set globally for the AM site.
The default maximum session timeout is
120minutes and the default maximum idle time is30minutes.Go to Configure > Sessions > Dynamic Attributes to change the default session timeout values.
Learn more in Dynamic attributes.
Enable dynamic session attributes for the realm
To configure the session termination settings for a particular realm, enable the Session service:
-
In the AM admin UI, go to Realms > Realm Name > Services.
-
Check if the
Sessionservice appears in the list of services configured for the realm.If it doesn’t, click Add a Service and select
Sessionin the list.The Session page appears, showing the Dynamic Attributes tab.
-
Click Save Changes.
Learn more in Dynamic attributes.
Set maximum session time-to-live
When configuring the maximum session time-to-live (TTL), you must balance security and user experience. Depending on your application, it could be acceptable for your users to log in once a month. Financial applications, for example, tend to expire their sessions in less than an hour.
The longer an authenticated session is valid, the larger the window during which a malicious user could impersonate a user if they were able to hijack a session cookie.
The maximum session time-to-live is 120 minutes by default.
The following steps configure the maximum session time in a realm, but you can also configure it for a user, in a node, in a tree or globally:
-
In the AM admin UI, go to Realms > Realm Name > Services > Session > Dynamic Attributes.
-
In the Maximum Session Time field, set a value suitable for your environment.
-
Save your changes.
If you update the maximum session TTL, consider reviewing the expiry time for OAuth 2.0 JWTs according to your business needs. It may be convenient to set them to the same value, but there are times when these values need to be different.
-
To update the JWT lifetime for individual OIDC clients:
-
In the AM admin UI, go to Realms > Realm Name > Applications > OAuth 2.0 > Clients > Client ID > OpenID Connect.
-
Set OpenID Connect JWT Token Lifetime (seconds) to the same duration as the maximum session TTL (minutes).
This value overrides the JWT lifetime set for the OAuth 2.0 provider.
-
-
To update the JWT lifetime for the OAuth2 Provider service:
-
In the AM admin UI, go to Realms > Realm Name > Services > OAuth2 Provider > OpenID Connect.
-
Set OpenID Connect JWT Token Lifetime (seconds) to the same duration as the maximum session TTL (minutes).
-
Set maximum session idle timeout
Consider a user with a valid authenticated session navigating through pages or making changes to the configuration. If for any reason they leave their desk and their computer remains open, a malicious user could take the opportunity to impersonate them.
Session idle timeout can help mitigate those situations by logging out users after a specified duration of inactivity.
The maximum session idle timeout is 30 minutes by default.
| You can only use session idle timeout in realms configured for server-side sessions. |
The following steps configure the maximum idle time in a realm, but you can also configure it for a user, in a node, in a tree or globally:
-
In the AM admin UI, go to Realms > Realm Name > Services > Session > Dynamic Attributes.
-
On the Maximum Idle Time property, configure a value suitable for your environment.
-
Save your changes.
Configure client-side session denylisting
Session denylisting makes sure users who have logged out of client-side sessions can’t achieve single sign-on without reauthenticating to AM. Session denylisting doesn’t apply to journey sessions.
-
Make sure you deployed the Core Token Service (CTS) during AM installation.
The session denylist is stored in the CTS token store.
-
Go to Configure > Global Services, click Session, and locate the Client-Side Sessions tab.
-
Select the Enable Session Denylisting option to enable session denylisting for client-side authenticated sessions.
When you configure one or more AM realms for client-side sessions, you should enable session denylisting to track session logouts across multiple AM servers.
Changing the value of this property takes effect immediately.
-
Configure the Session Denylist Cache Size property.
AM maintains a cache of logged-out client-side authenticated sessions. The cache size should be approximately equal to the number of logouts expected during the maximum session time.
Increase the default value of 10,000 if the expected number of logouts during this period is significantly higher. If the session denylist cache is too small, AM reads denylist entries from the CTS token store instead of getting them from cache, which can lead to a small reduction in performance.
Changing the value of this property takes effect immediately.
-
Configure the Denylist Poll Interval property.
AM polls the Core Token service for changes to logged-out sessions if session denylisting is enabled. By default, the polling interval is 10 seconds.
The longer the polling interval, the more time a malicious user has to connect to other AM servers in a cluster and make use of a stolen session cookie. Shortening the polling interval improves the security for logged out sessions, but could reduce AM performance due to increased network activity.
Changing the value of this property doesn’t take effect until you restart AM.
-
Configure the Denylist Purge Delay property.
When session denylisting is enabled, AM tracks each logged-out session for the maximum session time plus the denylist purge delay. For example, if a session has a maximum time of 120 minutes and the denylist purge delay is one minute, AM tracks the session for 121 minutes. Increase the denylist purge delay if you expect system clock skews in a cluster of AM servers to be greater than one minute. There is no need to increase the denylist purge delay for servers running a clock synchronization protocol, such as Network Time Protocol.
Changing the value of this property doesn’t take effect until you restart AM.
-
Click Save Changes.
Enabling or disabling the session denylist, or altering the cache size, takes effect immediately.
Changes to any other session denylist properties don’t take effect until you restart AM.
Find detailed information about session service attributes in session configuration.
Session cookies and session security
Authenticated sessions require the user or client to be able to hold on to cookies. Cookies provided by AM’s Session Service can contain a JSON Web Token (JWT) with the session or just a reference to where the session is stored.
AM issues a cookie to the user or entity
regardless of the session location for client-side and server-side sessions.
By default, the cookie’s name is iPlanetDirectoryPro.
For authenticated sessions stored in the CTS token store,
the cookie contains a reference to the session in the CTS token store and several other pieces of information.
For authenticated sessions stored on the client,
the iPlanetDirectoryPro cookie contains all the information that would be held in the CTS token store.
Client-side session cookies consist of two parts: The first part of the cookie is identical to the cookie used by server-side sessions, which ensures the compatibility of the cookies regardless of the session location. The second part is a JSON Web Token (JWT), which contains session information, as illustrated below:
-
iPlanetDirectoryProcookie for server-side authenticated sessions:AQIC...sswo.*AAJ...MA..* -
iPlanetDirectoryProcookie for client-side authenticated sessions:AQIC...sswo.*AAJ...MA..*ey....................................fQ.
Note that the examples are not to scale. The size of the client-side session cookie increases when you customize AM to store additional attributes in users' sessions. You’re responsible for ensuring the size of the cookie doesn’t exceed the maximum cookie size allowed by your end users' browsers.
Since the session cookie is either a pointer to the authenticated session or the actual session itself, you must configure AM to secure the session cookie against hijacking, session tampering, and other security concerns.
For example, terminating a session effectively logs the user or entity out of all realms, but the way AM terminates sessions has security implications depending on where AM stores the sessions. You can also configure the session time-to-live, idle timeout, the number of concurrent sessions for a user, and others.
Related information:
View and manage sessions
The AM admin UI lets the administrator view and manage active server-side authenticated sessions by realm by going to Realms > Realm Name > Sessions.
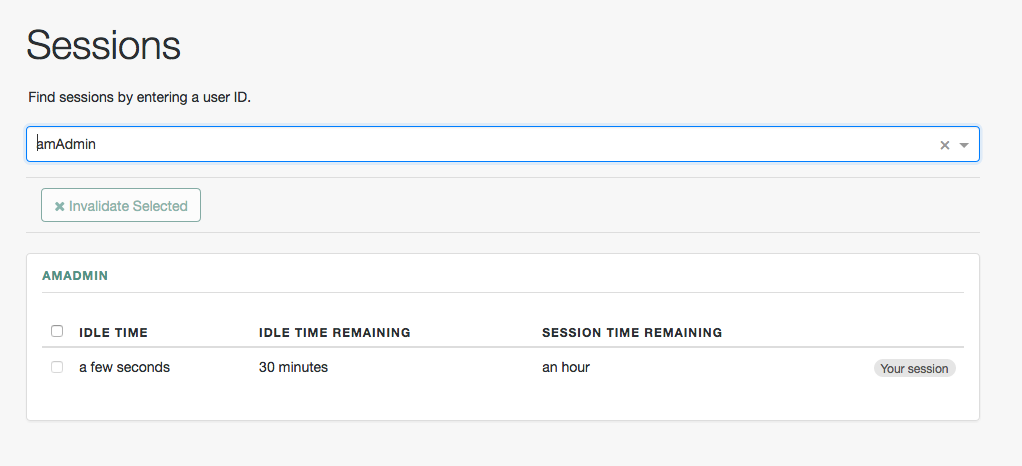
To search for active sessions, enter a username in the search box. AM retrieves the sessions for the user and displays them within a table. If no active server-side session is found, AM displays a session not found message.
You can end any sessions—except the current amAdmin user’s session—by selecting it
and clicking the Invalidate Selected button.
As a result, the user has to authenticate again.
|
Deleting a user doesn’t automatically remove any of the user’s server-side sessions. After deleting a user, check for any sessions for the user and remove them on the Sessions page. |
|
Use the REST API for advanced functionality regarding sessions. |
Manage sessions using REST
To manage authenticated sessions using REST, send requests to the /json/sessions endpoint, as shown in the following
examples.
Get information about sessions
To get information about an authenticated session, send an HTTP POST request to the /json/sessions/ endpoint,
using the getSessionInfo action.
This action returns information about the session token provided in the
iPlanetDirectoryPro header by default. To get information about a different session token, include it in the POST body
as the value of the tokenId parameter.
| To retrieve custom session properties in authentication trees, use a Scripted Decision node for user attributes and session properties or a Set Session Properties node for session properties only. |
The following example shows an administrative user passing their session token in the iPlanetDirectoryPro header
and the session token of bjensen as the value of the tokenId:
$ curl \
--request POST \
--header "iPlanetDirectoryPro: AQICS…NzEz*" \
--header "Accept-API-Version: resource=4.0" \
--header "Content-type: application/json" \
--data '{ "tokenId": "BXCCq…NX*1*" }' \
'https://am.example.com:8443/am/json/realms/root/sessions/?_action=getSessionInfo'
{
"username": "bjensen",
"universalId": "id=bjensen,ou=user,dc=am,dc=example,dc=com",
"realm": "/",
"latestAccessTime": "2024-02-21T14:31:18Z",
"maxIdleExpirationTime": "2024-02-21T15:01:18Z",
"maxSessionExpirationTime": "2024-02-21T16:29:56Z",
"properties": {
"AMCtxId": "aba7b4f3-16ff-4680-b06a-d7ba237d3730-91932"
}
}The getSessionInfo action doesn’t refresh the session idle timeout.
To obtain session information about a server-side session and reset the idle timeout,
use the getSessionInfoAndResetIdleTime action, as follows:
$ curl \
--request POST \
--header "iPlanetDirectoryPro: AQICS…NzEz*" \
--header "Accept-API-Version: resource=4.0, protocol=1.0" \
--header "Content-type: application/json" \
--data '{ "tokenId": "BXCCq…NX*1*" }' \
'https://am.example.com:8443/am/json/realms/root/sessions/?_action=getSessionInfoAndResetIdleTime'
{
"username": "bjensen",
"universalId": "id=bjensen,ou=user,dc=am,dc=example,dc=com",
"realm": "/",
"latestAccessTime": "2020-02-21T14:32:49Z",
"maxIdleExpirationTime": "2020-02-21T15:02:49Z",
"maxSessionExpirationTime": "2020-02-21T16:29:56Z",
"properties": {
"AMCtxId": "aba7b4f3-16ff-4680-b06a-d7ba237d3730-91932"
}
}
|
Validate sessions
To check if a session token is valid, send an HTTP POST request to the /json/sessions/ endpoint with the validate
action. Provide the session token in the POST data as the value of the tokenId parameter.
Provide the session token of an administrative user in the iPlanetDirectoryPro header.
If you don’t specify a tokenId, this request validates the session in the iPlanetDirectoryPro header.
|
The following example shows an administrative user, such as amAdmin,
validating a session token for bjensen:
$ curl \
--request POST \
--header "Content-type: application/json" \
--header "iPlanetDirectoryPro: AQICS…NzEz*" \
--header "Accept-API-Version: resource=3.0, protocol=1.0" \
--data '{ "tokenId": "BXCCq…NX*1*" }' \
'https://am.example.com:8443/am/json/realms/root/sessions?_action=validate'If the session token is valid, the user ID and its realm is returned:
{
  "valid": true,
  "sessionUid": "c888fe06-dcb4-43e9-b74a-db838c163aa6-164702",
  "uid": "bjensen",
  "realm": "/alpha"
}
By default, validating an authenticated session resets the session’s idle time,
which triggers a write operation to the CTS token store.
To avoid this, include refresh=false, for example, validate&refresh=false.
Refresh server-side sessions
To reset the idle time of a server-side authenticated session, send an HTTP POST request to the /json/sessions/ endpoint, with the
refresh action. This action refreshes the session token provided in the iPlanetDirectoryPro header by default.
To refresh a different session token, include it in the POST body as the value of the tokenId query parameter.
The following example shows an administrative user passing their session token in the iPlanetDirectoryPro header,
and bjensen’s session token as the tokenId parameter:
$ curl \
--request POST \
--header 'Content-Type: application/json' \
--header "iPlanetDirectoryPro: AQICS…NzEz*" \
--header "Accept-API-Version: resource=3.1, protocol=1.0" \
--data '{ "tokenId": "BXCCq…NX*1*" }' \
'https://am.example.com:8443/am/json/realms/root/sessions/?_action=refresh'
{
"uid": "bjensen",
"realm": "/alpha",
"idletime": 0,
"maxidletime": 30,
"maxsessiontime": 120,
"maxtime": 6171
}On success, AM resets the idle time for the server-side session, and returns timeout details of the authenticated session.
|
Invalidate sessions
To invalidate an authenticated session, send an HTTP POST request to the /json/sessions/ endpoint with the logout
action.
This action invalidates the session token provided in the iPlanetDirectoryPro header by default:
$ curl \
--request POST \
--header "Content-type: application/json" \
--header "iPlanetDirectoryPro: AQICS…NzEz*" \
--header "Accept-API-Version: resource=3.1, protocol=1.0" \
'https://am.example.com:8443/am/json/realms/root/realms/alpha/sessions/?_action=logout'
{
"result": "Successfully logged out"
}On success, AM invalidates the authenticated session and returns a success message.
If the token isn’t valid and can’t be invalidated, an error message is returned:
{
  "result": "Token has expired"
}
An administrative user can invalidate the session of another authenticated user by providing the session token as the
value of the tokenId query parameter.
This example shows an administrative user passing their session token in the iPlanetDirectoryPro header and
invalidating bjensen’s session by passing her session token in the tokenId parameter:
$ curl \
--request POST \
--header "Content-type: application/json" \
--header "iPlanetDirectoryPro: AQICS…NzEz*" \
--header "Accept-API-Version: resource=3.1, protocol=1.0" \
--data '{ "tokenId": "BXCCq…NX*1*" }' \
'https://am.example.com:8443/am/json/realms/root/sessions/?_action=logout'
{
"result": "Successfully logged out"
}Invalidate specific sessions
To invalidate specific authenticated sessions for a user, first obtain a list of the user’s active sessions.
Send an HTTP GET request to the /json/sessions/ endpoint, using the SSO token of
an administrative user, such as amAdmin as the value of the iPlanetDirectoryPro header.
Use a queryFilter to specify the name of the user and the realm to search.
For example, to obtain the list of active sessions for bjensen in the alpha realm, the query filter value would be:
username eq "bjensen" and realm eq "/alpha"
|
The query filter value must be URL-encoded when sent over HTTP. Learn more about query filter parameters in Query. |
In the following example, there are two authenticated sessions. Note the value of the sessionHandle properties.
$ curl \
--request GET \
--header "iPlanetDirectoryPro: AQICS…NzEz*" \
--header "Accept-API-Version: resource=3.1, protocol=1.0" \
'https://am.example.com:8443/am/json/realms/root/realms/alpha/sessions?_queryFilter=username%20eq%20%22bjensen%22%20and%20realm%20eq%20%22%2Falpha%22'
{
"result": [
{
"username": "bjensen",
"universalId": "id=bjensen,ou=user,o=alpha,ou=services,dc=am,dc=example,dc=com",
"realm": "/alpha",
"sessionHandle": "shandle:ITnOR5S…AA.",
"latestAccessTime": "2022-11-11T09:32:28.265Z",
"maxIdleExpirationTime": "2022-11-11T10:02:28Z",
"maxSessionExpirationTime": "2022-11-11T11:32:28Z"
},
{
"username": "bjensen",
"universalId": "id=bjensen,ou=user,o=alpha,ou=services,dc=am,dc=example,dc=com",
"realm": "/alpha",
"sessionHandle": "shandle:JfMui6O…AA.",
"latestAccessTime": "2022-11-11T09:32:24.395Z",
"maxIdleExpirationTime": "2022-11-11T10:02:24Z",
"maxSessionExpirationTime": "2022-11-11T11:32:24Z"
}
],
"resultCount": 2,
"pagedResultsCookie": null,
"totalPagedResultsPolicy": "NONE",
"totalPagedResults": -1,
"remainingPagedResults": -1
}To log out specific sessions, send an HTTP POST request to the /json/sessions/ endpoint, with the logoutByHandle action.
Include an array of the session handles to invalidate as values of the sessionHandles property in the POST body.
Use the SSO token of an administrative user, such as amAdmin, as the value of the iPlanetDirectoryPro header.
This example invalidates the sessions returned by the previous query:
$ curl \
--request POST \
--header "Content-Type: application/json" \
--header "iPlanetDirectoryPro: AQICS…NzEz*" \
--header "Accept-API-Version: resource=3.1, protocol=1.0" \
--data '{
"sessionHandles": [
"shandle:ITnOR5S…AA.",
"shandle:JfMui6O…AA."
]
}' \
'https://am.example.com:8443/am/json/realms/root/realms/alpha/sessions/?_action=logoutByHandle'
{
"result": {
"shandle:ITnOR5S…AAA.": true,
"shandle:JfMui6O…AA.": true
}
}Invalidate all sessions for a user
To invalidate (log out) all authenticated sessions for a user, send an HTTP POST request to the /json/sessions/ endpoint with the
logoutByUser action, specifying the username in the request payload.
Provide the session token of an administrative user in the iPlanetDirectoryPro header. Users can invalidate their
own sessions by providing their session token in the iPlanetDirectoryPro header and their username in the body of the
request.
This example logs out all bjensen’s sessions:
$ curl \
--request POST \
--header "Content-Type: application/json" \
--header "iPlanetDirectoryPro: AQICS…NzEz*" \
--header "Accept-API-Version: resource=5.1, protocol=1.0" \
--data '{"username": "bjensen"}' \
'https://am.example.com:8443/am/json/realms/root/sessions/?_action=logoutByUser'
{
"result": true
}Session invalidation by user works slightly differently for server-side and client-side sessions.
- Server-side sessions
-
Logout by user simply deletes all authenticated sessions for that user. This action creates an
AM-SESSION-LOGGED-OUTevent in the activity log and anAM-LOGOUTevent in the authentication log, as with any other session termination. - Client-side sessions
-
When the user logs out, a logout token is created. If there is only one AM instance in the site, the logout token is added to a local cache of that AM instance. If there are multiple AM instances in the site, the other instances poll the CTS a specified interval to update their logout token cache. Learn more in the Enable Invalidation of Sessions Based on User Identifier property.
An
AM-LOGOUT-USER-TOKENevent is created in the activity log when the user is logged out. The action isCREATEorUPDATEdepending on whether a token for the user being logged out already exists. TheuserIdcomponent of this audit entry is that of the caller, not of the target. For example, if an administrative user logs out another user, theuserIdis that of the administrative user, not that of the user being logged out. TheobjectIdindicates the target of the operation.A
DELETEevent is audited when the logout token expires and is deleted from the CTS.
|
Get and set session properties
Use the REST API to read and update properties on authenticated sessions. Define the properties you want to set in the session property allowlist service configuration. Find information on allowlisting session properties in the Session Property Whitelist service.
You can use the REST API to:
-
Get the names of the properties that you can read or update. This is the same set of properties configured in the Session Property Whitelist service.
-
Read and update property values.
|
The ability to set, change and delete session properties is affected by the session state:
|
Differentiate the user who performs the operation from the session affected by the operation as follows:
-
Specify the session token of the user performing the operation on session properties in the
iPlanetDirectoryProheader. -
Specify the session token of the user whose session is to be read or modified as the
tokenIdparameter in the body of the REST API call. -
Omit the
tokenIdparameter from the body of the REST API call if the session of the user performing the operation is the same session that you want to read or modify.
The following examples assume that you configured a property named LoginLocation in the Session Property Whitelist service.
To retrieve the names and values of the properties you can get or set, send an HTTP POST request to the json/sessions
endpoint, with the getSessionProperties action:
$ curl \
--request POST \
--header "Content-type: application/json" \
--header "iPlanetDirectoryPro: AQICS…NzEz*" \
--header "Accept-API-Version: resource=3.1, protocol=1.0" \
--data '{ "tokenId": "BXCCq…NX*1*" }' \
'https://am.example.com:8443/am/json/realms/root/sessions/?_action=getSessionProperties'
{
"LoginLocation": ""
}To set the value of a session property, send an HTTP POST request to the /json/sessions/ endpoint, with the updateSessionProperties action. If you do not specify a tokenId parameter in the request body, the operation
affects the session specified in the iPlanetDirectoryPro header:
$ curl \
--request POST \
--header "Content-Type: application/json" \
--header "iPlanetDirectoryPro: AQICS…NzEz*" \
--header "Accept-API-Version: resource=3.1, protocol=1.0" \
--data '{"LoginLocation":"40.748440, -73.984559"}' \
'https://am.example.com:8443/am/json/realms/root/sessions/?_action=updateSessionProperties'
{
"LoginLocation": "40.748440, -73.984559"
}To set multiple properties in a single REST API call, specify the list of properties and their values in the JSON payload; for example:
--data '{"property1":"value1", "property2":"value2"}'
To set the value of a session property on another user’s session, specify the session token of the user performing the action in the iPlanetDirectoryPro header and the session token to be modified as the value of the tokenId:
$ curl \
--request POST \
--header "Content-Type: application/json" \
--header "iPlanetDirectoryPro: AQICS…NzEz*" \
--header "Accept-API-Version: resource=3.1, protocol=1.0" \
--data '{"LoginLocation": "40.748440, -73.984559", "tokenId": "BXCCq…NX*1*"}' \
'https://am.example.com:8443/am/json/realms/root/sessions/?_action=updateSessionProperties'
{
"LoginLocation": "40.748440, -73.984559"
}If the user attempting to modify the session doesn’t have sufficient access privileges, the preceding examples result in a 403 Forbidden error.
You can’t set properties internal to AM sessions. If you try to modify an internal property in a REST API call, AM also returns a 403 Forbidden error; for example:
$ curl \
--request POST \
--header "Content-Type: application/json" \
--header "iPlanetDirectoryPro: AQICS…NzEz*" \
--header "Accept-API-Version: resource=3.1, protocol=1.0" \
--data '{"AuthLevel":"5", "tokenId": "BXCCq…NX*1*"}' \
'https://am.example.com:8443/am/json/realms/root/sessions/?_action=updateSessionProperties'
{
"code": 403,
"reason": "Forbidden",
"message": "Forbidden"
}Find a list of the default session properties in Session properties.
Session upgrade
Authenticated sessions can be upgraded to provide access to sensitive resources.
Consider a website for a university. Some resources, such as courses and degree catalogs, are free for anyone to access and don’t need to be protected. The university also provides the students with a portal they can use to access their grades. This portal is protected with a policy that requires users to authenticate. To pay tuition, students are required to present additional credentials to increase their authentication level and gain access to these functions.
Allowing authenticated users to provide additional credentials to access sensitive resources is called session upgrade. Session upgrade is AM’s mechanism to perform step-up authentication.
What triggers a session upgrade?
Session upgrade is triggered in the following situations:
-
An authenticated user is redirected to a URL that has the
ForceAuthparameter set totrue.For example,
https://am.example.com:8443/am/XUI/?realm=/alpha&ForceAuth=true#loginIn this case, the user is asked to reauthenticate to the default authentication service in the
alpharealm.When a new authenticated session is created, the old authenticated session should no longer be valid. For client-side sessions, invalidating the old session depends on the value of the Enable Session Denylisting configuration option:
-
If this option is
false(default), both the old and new authenticated sessions are considered valid after the session upgrade. -
If this option is
true, the old authenticated session is no longer valid
-
-
An authenticated user tries to access a resource protected by a web or Java agent, or a custom policy enforcement point (PEP).
In this case, AM sends the agent or PEP an advice that the user must perform one of the following actions:
-
Authenticate at an authentication level greater than the current level
-
Authenticate using a specific tree
The session upgrade flow during policy evaluation is as follows:
-
An authenticated user tries to access a resource.
-
The PEP, for example a web or Java agent, sends the request to AM for an authorization decision.
-
AM returns an authorization decision that denies access to the resource, and returns an advice indicating that the user must present additional credentials to access the resource.
-
The policy enforcement point sends the user back to AM for session upgrade.
-
The user provides additional credentials. For example, they might provide a one-time password, swipe their phone screen, or use face recognition.
-
AM authenticates the user.
-
The user can now access the sensitive resource.
-
Session upgrade outcomes
The following outcomes can result from a session upgrade:
- Successful
-
AM performs one of the following actions depending on the type of authenticated session configured for the realm:
-
If the realm is configured for server-side authenticated sessions, the resulting action depends on the mechanism used to perform session upgrade:
-
When using the
ForceAuthparameter, AM issues new session tokens to users on reauthentication, even if the current authenticated session already meets the security requirements. -
When using advices, AM copies the session properties to a new authenticated session and hands the client a new session token to replace the original one. The new authenticated session reflects the successful authentication to a higher level.
-
-
If the realm is configured for client-side authenticated sessions, AM hands the client a new session token to replace the original one. The new authenticated session reflects the successful authentication to a higher level.
-
- Unsuccessful
-
AM leaves the authenticated session as it was before the attempt at stronger authentication.
If session upgrade fails because the login page times out, AM redirects the user’s browser to the success URL from the last successful authentication.
|
Anonymous sessions can be upgraded to non-anonymous sessions by using the Anonymous Session Upgrade node. |
Session upgrade prerequisites
-
Configure a PEP, for example, a web or Java agent, that enforces AM policies on a website or application.
AM web and Java agents handle session upgrade without additional configuration because the agents are built to handle AM’s advices. If you build your own PEPs, you must take advices and session upgrade into consideration.
Learn more in the Web Agents and Java Agents documentation, and in Request policy decisions over REST (For RESTful PEPs).
-
Configure an authorization policy to protect a resource protected by the Java or web agent, or a RESTful PEP.
The following example policy allows GET and POST access to the
*://*:*/sample/*resource to any authenticated user: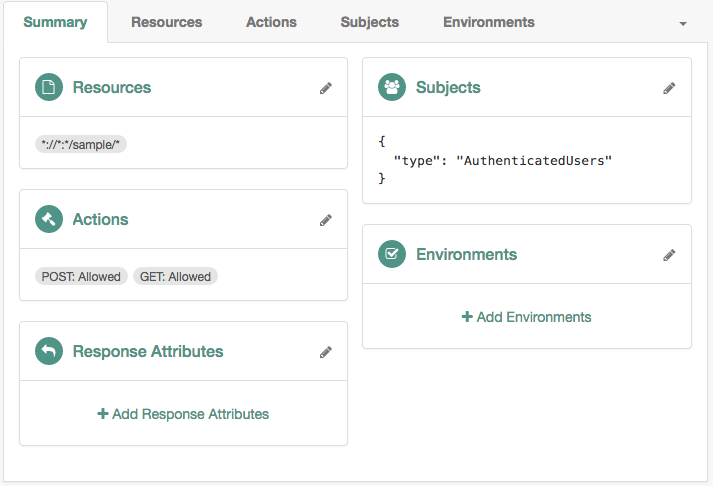
|
To track an authenticated session through a session upgrade, enable the cross-upgrade session reference property, which retains its value throughout the session lifecycle. Enabling this property ensures the session reference is recorded in the audit logs. |
Configure AM for session upgrade
-
Configure an authentication tree that validates a user’s credentials during session upgrade.
No additional configuration is required to perform session upgrade.
Because session upgrade is a mechanism that can be used to grant users access to sensitive information, consider configuring a strong authentication method such as multi-factor authentication (MFA). Also consider session lifetime in your environment. For example, if users should only have access to the protected resource to perform an operation, such as checking the balance of an account, consider implementing transactional authorization instead. -
Configure at least one of the following environment conditions in the authentication policy that you created as part of the prerequisites:
-
Authentication level (greater than or equal to)
Use this condition to present a list of authentication trees that provide a greater or equal authentication level to the one specified in the condition. The user can choose a tree if more than one tree meets the criteria of the condition.
The following policy requires an authentication tree that provides an authentication level of 3 or greater:

-
Authentication by service
Use this condition to specify the authentication tree the user must authenticate through. For example, the following policy requires the user to sign on using the
Exampletree: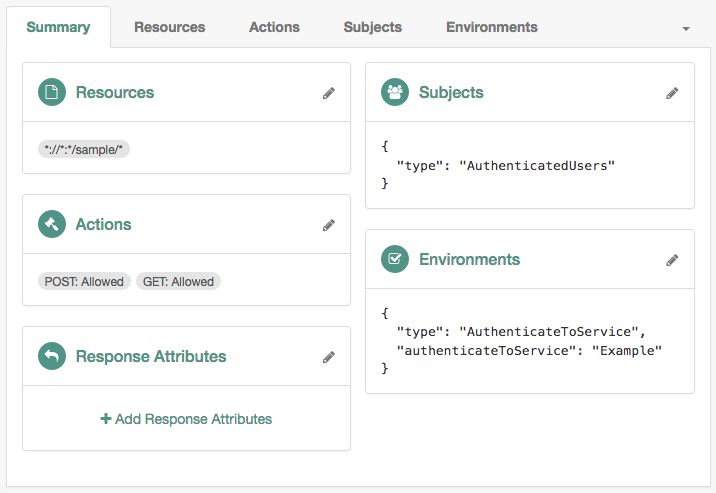
Authentication tree names are case-sensitive.
You can find more information about configuring policies and environment conditions in Policies.
-
-
Test session upgrade using a browser or REST:
Perform session upgrade with a browser
To upgrade an authenticated session using a browser, perform the following steps:
-
Ensure you have performed the tasks in Session upgrade prerequisites and Configure AM for session upgrade.
-
In a browser, go to your protected resource.
For example,
http://www.example.com:9090/sample.The agent redirects the browser to the AM login screen.
-
Sign on to AM as the user that should access the resource. For example, sign on as
bjensen.AM requires additional credentials to grant access to the resource. For example, if you set the policy environment condition to
Authentication by ServiceandExample, you will be required to sign on again asbjensen. -
Authenticate as
bjensen.Providing credentials for a different user will fail.
You can now access the protected resource.
Perform session upgrade over REST
To upgrade an authenticated session using REST, perform the following steps:
-
Ensure you have performed the tasks in Session upgrade prerequisites and Configure AM for session upgrade.
-
Sign on as an administrative user that has permission to evaluate policies, such as
amAdmin.For example:
$ curl \ --request POST \ --header "Content-Type: application/json" \ --header "X-OpenAM-Username: amadmin" \ --header "X-OpenAM-Password: password" \ --header "Accept-API-Version: resource=2.0, protocol=1.0" \ 'https://am.example.com:8443/am/json/realms/root/realms/alpha/authenticate' { "tokenId":"AQIC5wM…TU3OQ*", "successUrl":"/am/console", "realm":"/alpha" }You can also assign privileges to a user to evaluate policies.
-
Sign on as the user that should access the resources.
For example, sign on as
bjensen:$ curl \ --request POST \ --header "Content-Type: application/json" \ --header "X-OpenAM-Username: bjensen" \ --header "X-OpenAM-Password: Ch4ng31t" \ --header "Accept-API-Version: resource=2.0, protocol=1.0" \ 'https://am.example.com:8443/am/json/realms/root/realms/alpha/authenticate' { "tokenId":"AQIC5wM…TU3OQ*", "successUrl":"/am/console", "realm":"/alpha" } -
Request a policy decision from AM for a protected resource, in this case,
https://am.example.com:9090/sample.The
iPlanetDirectoryProheader sets the SSO token for the administrative user, and thesubjectelement of the payload sets the SSO token forbjensen.Example
$ curl --request POST \ --header "Content-Type: application/json" \ --header "iPlanetDirectoryPro: AQIC5wM2…" \ --header "Accept-API-Version:protocol=1.0,resource=2.1" \ --data '{ "resources": [ "http://www.example.com:9090/sample" ], "application": "iPlanetAMWebAgentService", "subject": { "ssoToken": "AQIC5wM…TU3OQ*"} }' \ "https://am.example.com:8443/am/json/realms/root/realms/alpha/policies?_action=evaluate" [ { "resource":"http://www.example.com:9090/sample", "actions":{ }, "attributes":{ }, "advices":{ "AuthLevelConditionAdvice":[ "3" ] }, "ttl":9223372036854775807 } ]AM returns an advice, which means that the user must present additional credentials to access that resource.
You can find more information about requesting policy decisions in Request policy decisions over REST.
-
Format the advice as XML, without spaces or line breaks.
The following example is spaced and tabulated for readability purposes only:
<Advices>
    <AttributeValuePair>
       <Attribute name="AuthLevelConditionAdvice"/>
       <Value>3</Value>
    </AttributeValuePair>
</Advices>
The example shows the XML render of a single advice. Depending on the conditions configured in the policy, the advice may contain several lines. Learn more in Policy decision advice.
-
URL-encode the XML advice.
For example:
%3CAdvices%3E%3CAttributeValuePair%3E%3CAttribute%20name%3D%22AuthLevelConditionAdvice%22%2F%3E%3CValue%3E3%3C%2FValue%3E%3C%2FAttributeValuePair%3E%3C%2FAdvices%3E
Ensure there are no spaces between tags when URL-encoding the advice.
-
Call AM’s
authenticateendpoint to request information about the advice.Use the following details:
-
Add the following URL parameters:
-
authIndexType=composite_advice -
authIndexValue=URL-encoded-Advice
-
-
Set the
iPlanetDirectoryProcookie as the SSO token forbjensen.
Example
$ curl --request POST \ --header "Content-Type: application/json" \ --cookie "iPlanetDirectoryPro=AQIC5wM…TU3OQ*" \ --header "Accept-API-Version: protocol=1.0,resource=2.1" \ 'https://am.example.com:8443/am/json/realms/root/realms/alpha/authenticate?authIndexType=composite_advice&authIndexValue=%3CAdvices%3E%3CAttributeValuePair%3E…' { "authId":"eyJ0eXAiOiJKV1QiLCJhbGciOiJIUzI1NiJ9.eyJhdXRoSW5kZ…", "template":"", "stage":"DataStore1", "header":"Sign in", "callbacks":[ { "type":"NameCallback", "output":[ { "name":"prompt", "value":"User Name:" } ], "input":[ { "name":"IDToken1", "value":"" } ] }, { "type":"PasswordCallback", "output":[ { "name":"prompt", "value":"Password:" } ], "input":[ { "name":"IDToken2", "value":"" } ] } ] }AM returns information about how the user can authenticate in a callback. In this case, providing a username and password. You can find a list of possible callbacks, and more information about the
/json/authenticateendpoint in Authenticate over REST. -
-
Call AM’s
authenticateendpoint to provide the required callback information.Use the following details:
-
Add the following URL query parameters:
-
authIndexType=composite_advice -
authIndexValue=URL-encoded-Advice
-
-
Set the
iPlanetDirectoryProcookie as the SSO token forbjensen. -
Send as data the complete payload AM returned in the previous step, ensuring you provide the requested callback information.
Provide the username and password for
bjensenin theinputobjects.
Example
$ curl \ --request POST \ --header 'Content-Type: application/json' \ --header "Accept-API-Version: protocol=1.0,resource=2.1" \ --cookie "iPlanetDirectoryPro=AQIC5wM…TU3OQ*" \ --data '{ "authId": "eyJ0eXAiOiJKV1QiLCJhbGciOiJIUzI1NiJ9.eyJhdXRoSW5kZ…", "template": "", "stage": "DataStore1", "header": "Sign in", "callbacks": [ { "type": "NameCallback", "output": [ { "name": "prompt", "value": "User Name:" } ], "input": [ { "name": "IDToken1", "value": "bjensen" } ] }, { "type": "PasswordCallback", "output": [ { "name": "prompt", "value": "Password:" } ], "input": [ { "name": "IDToken2", "value": "Ch4ng31t" } ] } ] }' \ 'https://am.example.com:8443/am/json/realms/root/realms/alpha/authenticate?authIndexType=composite_advice&authIndexValue=%3CAdvices%3E%3CAttributeValuePair%3E…' { "tokenId":"wpU01SaTq4X2x…NDVFMAAlMxAAA.*", "successUrl":"/am/console", "realm":"/alpha" }AM returns a new SSO token for
bjensen. -
-
Request a new policy decision from AM for the protected resource.
The
iPlanetDirectoryProheader sets the SSO token for the administrative user, and the subject element of the payload sets the new SSO token forbjensen:Example
$ curl --request POST \ --header "Content-Type: application/json" \ --header "iPlanetDirectoryPro: AQIC5wM2…" \ --header "Accept-API-Version:protocol=1.0,resource=2.1" \ --data '{ "resources":[ "http://www.example.com:9090/sample" ], "application":"iPlanetAMWebAgentService", "subject":{ "ssoToken":"wpU01SaTq4X2x…NDVFMAAlMxAAA.*" } }' \ "https://am.example.com:8443/am/json/realms/root/realms/alpha/policies/policies?_action=evaluate" [ { "resource":"http://www.example.com:9090/sample", "actions":{ "POST":true, "GET":true }, "attributes":{ }, "advices":{ }, "ttl":9223372036854775807 } ]AM returns that
bjensencan performPOSTandGEToperations on the resource.