SAML v2.0
These topics cover concepts, configuration, and usage procedures for working with the Security Assertion Markup Language (SAML) v2.0 features provided by PingAM.
They are intended for anyone using PingAM for SAML v2.0 identity and SPs, or using the Fedlet as a SAML v2.0 SP.
About SAML v2.0
Learn how AM servers support SAML v2.0.
Configure SAML v2.0
Configure AM’s SAML v2.0 support by using the AM admin UI.
Configure single sign-on
Enable SAML v2.0 single sign-on (SSO) and single logout (SLO).
Federate identities
Learn how to link identities, either permanently or temporarily.
SAML v2.0 in Java apps
Learn how to use the AM Fedlet.
SAML v2.0 Secure Attribute Exchange
Deploy AM as a SAML v2.0 gateway to a legacy IdP.
Name changes for ForgeRock products
Product names changed when ForgeRock became part of Ping Identity.
The following name changes have been in effect since early 2024:
| Old name | New name |
|---|---|
ForgeRock Identity Cloud |
PingOne Advanced Identity Cloud |
ForgeRock Access Management |
PingAM |
ForgeRock Directory Services |
PingDS |
ForgeRock Identity Management |
PingIDM |
ForgeRock Identity Gateway |
PingGateway |
Learn more about the name changes in New names for ForgeRock products in the Knowledge Base.
Introduction to SAML v2.0
SAML 2.0 helps organizations share, or federate identities and services, without having to manage the identities or credentials themselves. The credentials are managed by a single entity, known as the identity provider (IdP). The services are provided by service providers (SPs). Both providers are configured to trust one another.

AM uses the concept of the circle of trust to manage the relationship between IdPs and SPs.
Terminology
| Term | Description |
|---|---|
End user |
The person who is attempting to access the resource or application. In SAML v2.0, the end user is often referred to as the subject. The end user uses a user-agent, usually a web browser, when performing a SAML v2.0 flow. |
Single sign-on (SSO) |
The ability for an end user to authenticate once but gain access to multiple applications, without having to authenticate separately to each one. |
Single log out (SLO) |
The ability for an end user to log out once but terminate sessions in multiple applications, without having to log out separately from each one. |
Assertions |
An assertion is a set of statements about an authenticated user that let services make authorization decisions, that is, whether to allow that user to access the service, and what functionality they can use. SAML assertions are XML-formatted tokens. Assertions issued by AM can contain the following information about an end user:
|
Identity provider (IdP) |
The IdP is responsible for authenticating end users, managing their account, and issuing SAML assertions about them. |
Service provider (SP) |
The provider of the service or application that the end user is trying to access. The SP has a trust relationship with the IdP, which enables the SP to rely on the assertions it receives from the IdP. |
Circle of trust (CoT) |
A circle of trust is an AM concept that groups at least one IdP and at least one SP who agrees to share authentication information. |
Hosted and remote providers |
A hosted provider is one served by the current AM instance; a remote provider is one hosted elsewhere. |
Metadata |
Providers in SAML v2.0 share metadata, which represents the configuration of the provider, as well as the mechanisms it can use to communicate with other providers. For example, the metadata may contain necessary certificates for signing verification, as well as which of the SAML v2.0 bindings are supported. Sharing metadata greatly simplifies the creation of SAML v2.0 providers in a circle of trust. AM can import the XML-formatted metadata provided by remote providers. You can also export the metadata from hosted providers. For more information about metadata, refer to Metadata for the OASIS Security Assertion Markup Language (SAML) V2.0 in the SAML V2.0 Standard. |
Concepts
Security Assertion Markup Language (SAML) 2.0 is a standard that lets users access multiple services with a single set of credentials. The services may be provided by different organizations, using multiple domains. In summary, SAML v2.0 provides cross-domain single sign-on (CDSSO).
For more information, refer to Security Assertion Markup Language (SAML) v2.0.
SAML v2.0 depends on standards for describing how the providers interact and exchange information. The SAML v2.0 standards describe the messages sent between providers, how they are relayed, how they are exchanged, and common use cases.
In federation deployments where not all providers support SAML v2.0, AM can act as a multi-protocol hub; translating for providers that rely on other and older standards, such as WS-Federation. You can find an integration example in How do I configure PingAM as an Identity Provider for Microsoft Office 365 and Azure using WS-Federation? in the Knowledge Base.
When your organization acts as the IdP and you want to enable SPs to federate their services with yours, you can generate configuration files for a fedlet.
An AM fedlet is a small Java web application that can act as an SP for a specific IdP without requiring that you install all of AM. For more information on fedlets, refer to Implement SAML v2.0 SPs by using Fedlets.
Example flow
When configuring AM to provide single sign-on using SAML v2.0, you can:
-
Map accounts at the IdP to accounts at the SP, including mapping to an anonymous user.
-
As the IdP, make assertions to the SP, for example, to attest that the end user has authenticated with the IdP.
The SP then consumes assertions from the IdP to make authorization decisions, for example, to let an authenticated user complete a purchase that gets charged to the user’s account at the IdP.

-
An unauthenticated user attempts to access a SAML v2.0 SP.
-
The SP determines the IdP associated with the end user, and redirects the user’s browser to the IdP, using an HTTP 302 Redirect message. A SAML v2.0 authentication request is included in the query string.
This is an example of HTTP-Redirect binding and is the default when requesting SAML authentication by AM. AM also supports the HTTP-POST binding for processing SAML v2.0 authentication requests.
AM provides two deployment models to support single sign-on (SSO) when contacting the SP initially. For details, refer to Implement SSO and SLO.
-
The IdP validates the request, determines the authentication method that should be used, and authenticates the user.
The SP can specify a particular tree for authentication, or it can include requirements for the user such as to authenticate with multiple factors.
-
The IdP creates a SAML Artifact, which contains a unique artifact ID for the SAML v2.0 response.
The IdP redirects the end user’s browser to the SP, and includes the SAML Artifact in the query parameters. The browser only has access to the artifact ID rather than the SAML response itself, reducing risk of malicious interference.
-
The SP communicates directly with the IdP using the SOAP protocol to retrieve the SAML response relating to the artifact ID.
The IdP returns the SAML response, including the assertion using the SOAP protocol, directly to the SP.
The information in the SAML response is not shared with the user agent. This is an example of HTTP-Artifact binding, and is the default when AM is returning SAML assertions. AM also supports the HTTP-POST binding for transmitting SAML v2.0 assertions.
-
The SP validates the SAML response and that the signature matches the public key it holds for the IdP.
Optionally, the SP can choose to create a new account locally for the user or associate an identifier in the assertion with a user account it already has locally. Linked accounts are often referred to as a federated identity. Refer to Federate identities.
In order to link to an existing account, the SP can require the end user to also authenticate to the SP to determine the matching local account. Once linked, the user only needs to authenticate at the IdP when attempting access.
-
The SP can now use the information provided in the assertion, and any details in the local federated identity, to authorize the user, and decide whether to provide its services to the end user.
Use case: Let staff access Google Workspace
A common use case for SAML v2.0 is to allow your internal staff to access and use the applications provided by Google Workspace, such as Google Docs and Google Sheets. This section highlights how AM provides the solution.
In this scenario, Google acts as the SP, and AM acts as the IdP for a hypothetical organization, Example.com.
-
In AM, an administrative user configures an AM instance as the IdP.
-
The administrative user then configures Google Workspace as a remote SP and provides the values that Google requires to use AM as its IdP. For example, the login and logout URLs, profile management URLs, and validation certificate.
-
The Google Workspace administrator enters the provided URLs and certificate into the Google Workspace Admin console for the domain being configured.
-
After configuration is complete, users attempting to access a Google Workspace service will be asked for their corporate email address:
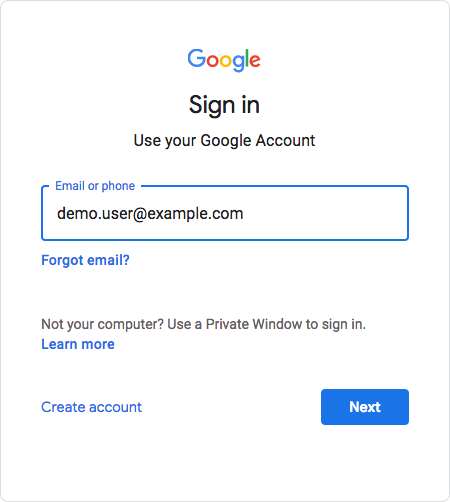
-
Based on the domain of the email address, Google redirects the user to sign in to AM, acting as the IdP:

-
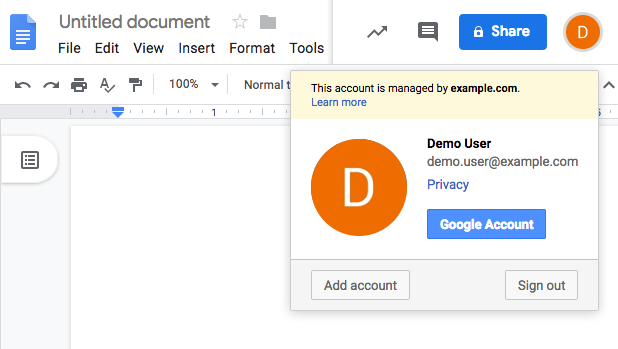
After successfully authenticating with AM, the user is redirected back to the Google Workspace application, for example, Google Docs.
Google, acting as the SP, creates a federated identity in its systems to manage local account options, such as privacy settings. The user can now access any of the Google Workspace apps, by authenticating to the IdP using their corporate Example.com account:
Deployment considerations
Before you set up SAML v2.0 in AM, you should:
-
Know which providers will participate in circles of trust.
-
Know how AM installations act as IdPs or SPs.
-
Define how to map shared user attributes in identity information exchanged with other participants in a circle of trust. Local user profile attribute names should map to user profile attribute names at other providers.
For example, if you exchange user identifiers with your partners, and you call it
uid, whereas another partner calls ituserid, then you map youruidto your partner’suserid. -
Import the keys used to sign assertions into the keystore in your AM configuration directory. You can use the Java
keytoolcommand.For more information about AM keystores, including location and different types of keystores available and how to change the default keys, refer to Secrets, certificates, and keys.
-
Agree with other providers on a synchronized time service.
-
Determine whether your session state configuration limits your usage of certain SAML v2.0 profiles. For more information, refer to Session state considerations.
-
Consider increasing DS search size limits if you intend to create a large number of SAML v2.0 entities. To ensure searches of defined entities work as expected, configure the DS search properties
ds-rlim-size-limitandds-rlimit-time-limit(DS 7.2 and later) ords-rlim-lookthrough-limit(pre DS 7.2).Learn more in Important Considerations in the following Knowledge Base Article: Issues with upgrades, Amster imports or exports, or registering clients (OAuth 2.0, OIDC and RADIUS) or Agents with reference to
sunserviceIDin PingAM.
Session state considerations
SAML v2.0 uses a combination of the CTS and browser-based data to store the progress of SAML v2.0 single sign-on SSO operations.
This combination lets AM instances continue single sign-on flows that started at a different instance, without needing sticky load balancing in most scenarios.
Single sign-on progress is stored in a JSON web token (JWT) in the browser’s session storage. The browser must support the sessionStorage API to handle SSO without the need for sticky load balancing of AM instances. You must configure sticky load balancing to support SAML v2.0 SSO with clients that do not support session storage, and on IdP proxy implementations.
Session storage is similar to local storage but is more limited:
-
Session storage exists only within the current browser tab.
-
Another tab that displays the same page will have a different session storage.
-
Session storage is shared between frames in the same tab (assuming they come from the same origin).
-
Session storage data survives a page refresh, but not closing and opening the tab.
|
You can enable session storage support in WebView components on Android by using the following property: settings.setDomStorageEnabled(true) You cannot use session storage when using multiple WebView components simultaneously. For more information, refer to WebSettings - setDomStorageEnabled in the Android Developers documentation. |
The JWT created in the browser’s session storage is encrypted
using the am.global.services.saml2.client.storage.jwt.encryption secret label,
which by default is mapped to the directenctest certificate alias.
For more information, refer to Secrets, certificates, and keys.
Performing single log out (SLO) operations with more than one AM instance has the following caveats:
-
AM instances cache information about SLO progress in memory. After the initial request, you must send each subsequent request in an SLO flow to the same instance; for example, by enabling sticky load balancing.
-
Use the HTTP-POST or HTTP-Redirect bindings for SAML v2.0 single logout (SLO). The SOAP binding is not supported.
In addition, browsers allow cookie sizes between 4,000 and 5,200 bytes, depending on the browser. If you are using client-side sessions, some SAML v2.0 features may cause the cookie to surpass the browser’s supported cookie size; such as:
-
In standalone mode, when performing single sign-on the IdP adds the full login URL (
FullLoginURLproperty) to the session cookie, which includes the authentication request data, adding to cookie size. -
In integrated mode, AM adds to the session those SAML v2.0 attributes mapped to AM attributes.
If a client-side session cookie exceeds the supported size in any of these cases, you can configure a custom post-authentication tree hook to remove unwanted properties or attributes, at the realm level. Note that removing properties or attributes in a custom SAML v2.0 SP adapter is not supported.
For more information about post-authentication tree hooks, refer to Create post-authentication hooks for trees.
The following table summarizes the high-level tasks required to configure SAML v2.0:
| Task | Resources |
|---|---|
Configure an SP, an IdP, and a CoT. The first step is deciding if AM is the SP, the IdP, or both, and/or what metadata you need to import from other providers. For example, if AM is the IdP for another service in your environment, you will have to import the metadata of the remote SP. Ensure the SPs and IdPs that work together share the same CoT. |
|
Make sure your providers are secure Configure signing and encryption secrets for your environment. |
|
Deploy the IdP discovery service If you have more than one IdP in your CoT, the IdP discovery service acts like a proxy between the SPs and the IPDs. |
|
Configure your environment for SSO and SLO AM provides two options for implementing SSO and SLO: integrated mode, and standalone mode. There are several considerations to make before deciding which mode is more appropriate for your environment. |
|
Decide how to federate identities AM supports different ways to federate identities depending of the configuration, and whether they exist or not in the SP. |
|
Configure AM as a SAML v2.0 Gateway for Legacy Applications Use AM Secure Attribute Exchange and PingGateway to integrate legacy applications into your SAML deployment. |
|
Use fedlets instead of SPs AM provides Fedlets, which are a small Java applications that can act as the SP without installing AM. They can redirect to AM for SSO, and to retrieve SAML assertions. |
Configure IdPs, SPs, and CoTs
To implement SAML v2.0 in AM, you share metadata for your hosted providers with other remote providers in a circle of trust (CoT).
You must also configure remote providers by importing their metadata.
In AM, a hosted provider is one served by the current AM instance; a remote provider is one hosted elsewhere.
Create a hosted IdP or SP
A hosted IdP or SP is a provider hosted by AM. For example, if AM is the authoritative source for users to a downstream application, then you would configure AM to be a hosted IdP.
To create other roles, use the /realm-config/federation/entityproviders/saml2 REST endpoint. Learn more about this
endpoint in the Online REST API reference.
Use the AM admin UI to create a hosted IdP or SP.
-
Go to Realms > Realm Name > Dashboard, and click SAML Applications.
-
Click Add Entity Provider, and select Hosted.
-
Enter an Entity ID, and verify the Entity Provider Base URL value is correct.
AM truncates sequences of whitespace with a single whitespace character in values such as entity IDs. For example, if
MyEntityID value(with one space) exists already, and you add a new entity,My Entity ID value(same name but multiple spaces), then AM will throw an error because the string values are treated as identical.AM uses the Entity Provider Base URL value for all SAML v2.0 related endpoints, so ensure other entities in your SAML deployment are able to access the specified URL.
-
In the Meta Aliases section, provide a URL-friendly value in either the Identity Provider Meta Alias, the Service Provider Meta Alias property, or both.
Ensure the aliases for providers are unique in a circle of trust and in the realm.
-
Click Create.
How do I switch between SP and IdP configuration for a given provider?
AM only displays the configuration of a single role. Click on the labels to select the role view:

-
On the Assertion Processing tab, in the Attribute Mapper section, map SAML attribute names (Name in Assertion) to local attribute names.
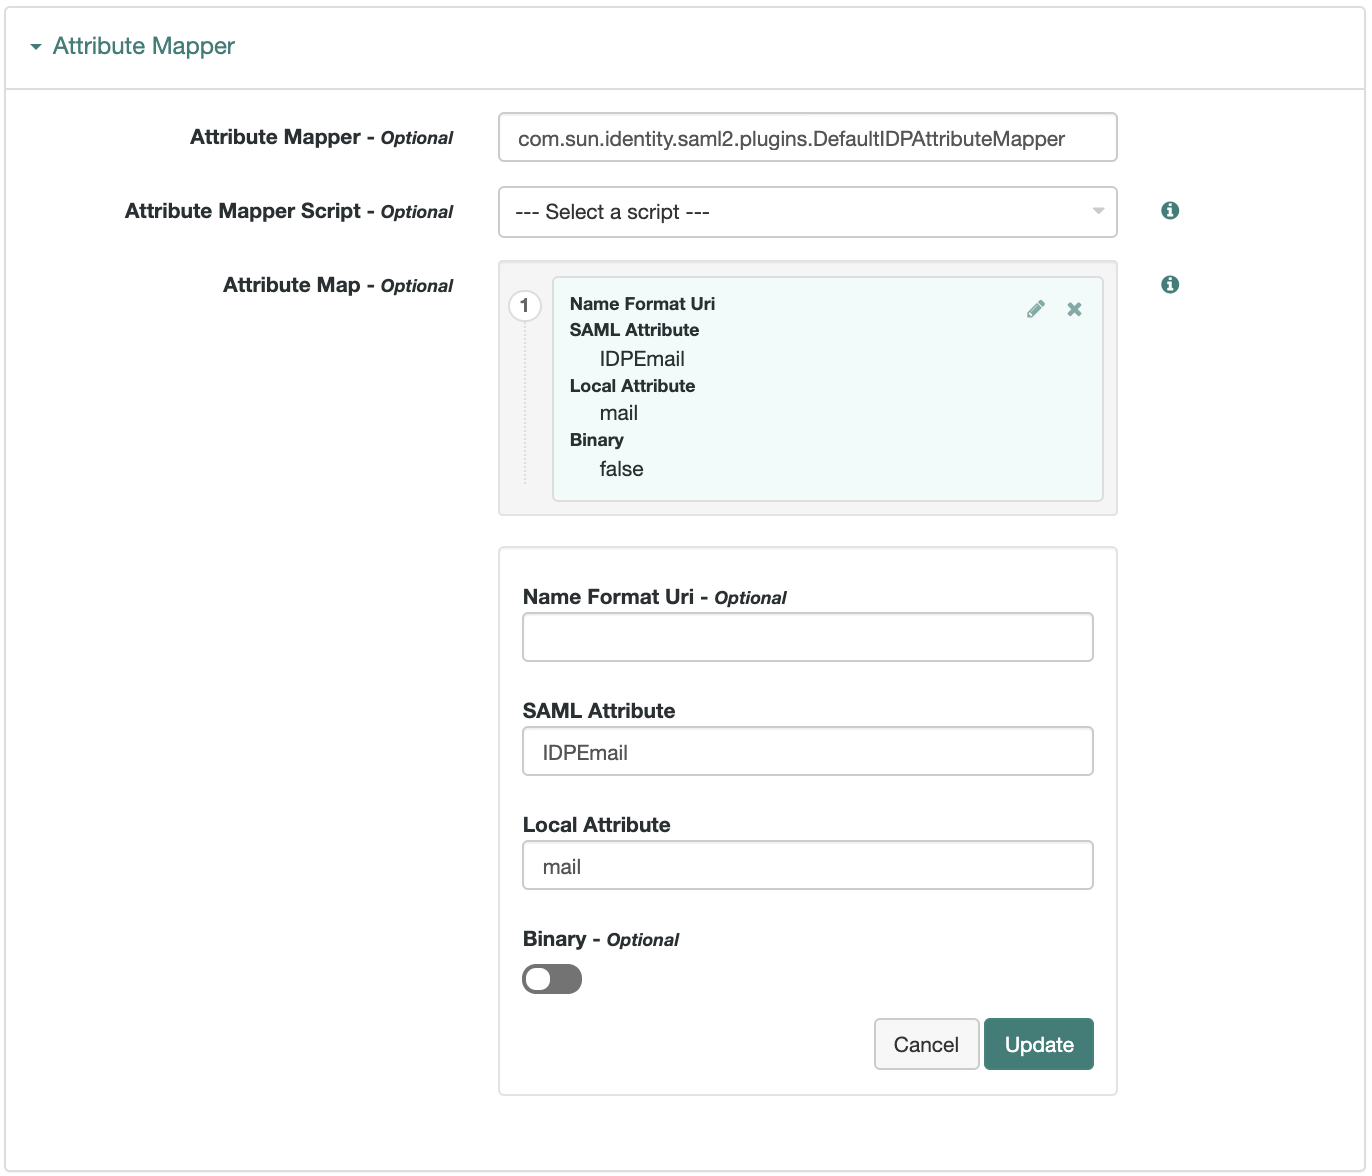 Figure 3. Example: Map SAML attributes to local attributes
The default mapping implementation has additional features beyond simply retrieving string attributes from the user profile.
-
Add an attribute that takes a static value by enclosing the profile attribute name in double quotes (
").For example, you can add a static SAML attribute called
partnerIDwith a value ofstaticPartnerIDValueby addingpartnerIDas the SAML Attribute with"staticPartnerIDValue"as the Local Attribute Name. -
Select the binary option when dealing with binary attribute values; for example, values that are Base64-encoded.
-
Use the optional
Name Format Uriproperty as required by the remote provider. For example, you may need to specifyurn:oasis:names:tc:SAML:2.0:attrname-format:uri.
-
-
Configure other properties to customize your SAML 2.0 application as required, for example:
Learn about configuring a hosted provider in:
-
Save your changes.
-
You can now export the metadata from your hosted provider.
Export metadata
Export the XML-based metadata from your entity provider to share with other providers in your CoT.
There are two ways you can export a provider’s metadata:
- Over REST
-
Run the following command, including an output filename, the entity ID, and realm:
$ curl \
--output metadata.xml \
"https://am.example.com:8443/am/saml2/jsp/exportmetadata.jsp?\
entityid=myProvider&realm=/alpha"
If you have configured your provider in the Top Level Realm, omit the
realmquery parameter. - In a browser
-
Export the XML-based metadata from a hosted or a remote provider if they can access the metadata URL. Open a URL in the following format in a browser:
https://am.example.com:8443/am/saml2/jsp/exportmetadata.jsp?entityid=myProvider&realm=/alpha
Import a remote IdP or SP
The following procedure provides steps for importing and configuring one or more remote entity providers:
-
Get the entity provider metadata as an XML-formatted file.
-
Go to Realms > Realm Name > Dashboard, and click SAML Applications.
-
From the Add Entity Provider drop-down menu, select Remote.
-
On the New Remote Entity Provider page, perform one of the following steps to import the XML file:
-
Drag and drop the XML file into the dotted box.
-
Click within the dotted box to open a file browser to select the XML file.
You can import multiple remote entities in a single operation, as long as the entity ID is unique within each.
Note that AM truncates sequences of whitespace with a single whitespace character in values such as Entity IDs. For example, if
ID value(with one space) exists already, a new entity with the same name but multiple spaces would result in an error because the string values are treated as identical. -
-
If you have already created a circle of trust, you can add the remote providers into one or more of them by using the Circles of Trust property.
-
Leave the Update Type as empty or set to
CREATE. -
Click Create.
-
To edit the configuration of an entity provider, go to Realms > Realm Name > Applications > Federation > Entity Providers, and select the entity provider to edit.
How do I switch between SP and IdP configuration for a given provider?
AM only displays the configuration of a single role. Click on the labels to select the role view:
Customize your SAML 2.0 application as required, for example:
Learn about configuring a remote provider in:
Configure a SAML 2.0 application tree
Configure the remote SP so that a specific authentication tree is always run for users authenticating with your SAML 2.0 app. The SAML flow invokes the associated tree regardless of any existing sessions or requested or configured authentication contexts.
To configure a SAML 2.0 app tree:
-
Go to Realms > Realm Name > Applications > Federation > Entity Providers > Remote SP Name.
-
Under Advanced > Tree Name, select the name of your authentication tree from the list.
Learn about the
Tree Nameproperty in the remote SP configuration. -
Save your changes.
When you configure an app tree, the processing of the SAML request depends on the authentication context requested by the SP. The following table shows the SAML response for a given configured comparison type and the requested authentication context.
| Authentication context | Comparison type | Response |
|---|---|---|
SP requested authn context |
|
Requested authn context included |
SP requested authn context |
|
|
SP doesn’t request authn context |
- |
|
IdP-initiated (no requested authn context) |
- |
|
|
You can’t delete a tree if it’s referenced by a SAML 2.0 app. |
Update remote SP certificate
To update all the metadata for a remote IdP or SP, you can import the metadata again. Reimporting the metadata deletes and recreates the entity provider, overwriting all existing provider settings with the values in the metadata XML file.
However, if you only want to update the signing and encryption certificate used by the SP to sign the authentication request without losing existing settings, follow these steps:
-
Get the SAML 2.0 SP metadata with the updated signed certificate.
You can find information about exporting provider metadata XML in Export metadata.
-
Update the certificate in one of the following ways:
- In the AM admin UI
-
-
On the New Remote Entity Provider page, make sure you choose
UPDATE_CERTIFICATESas the Update Type. -
Click Create.
-
- Over REST
-
Run the following REST API command, specifying:
-
sso-token: The SSO token of an administrative user
-
base64url-encoded metadata: The SP metadata XML encoded to base64url format
$ curl \ --request POST \ --header 'accept-api-version: resource=1.0' \ --header 'content-type: application/json' \ --header 'iPlanetDirectoryPro: sso-token' \ --data-raw '{ "standardMetadata": "base64url-encoded metadata", "updateType": "UPDATE_CERTIFICATES" }' \ 'https://am.example.com:8443/am/json/realms/root/realm-config/saml2/remote?_action=importEntity' { "importedEntities":["myProvider"] } -
Create a circle of trust (CoT)
A CoT is an AM concept that groups at least one IdP and at least one SP who agree to share authentication information.
-
Go to Realms > Realm Name > Applications > Federation > Circles of Trust, and click Add Circle of Trust.
-
Provide a name, and click Create.
-
On the Circle of Trust page, in the Entity Providers property, select at least one IdP and one SP.
You can add entity providers later if you haven’t created them yet.
-
Customize any other properties as required and save your changes.
Learn about configuring a CoT in CoT configuration.
Sign and encrypt messages
By default, IdPs and SPs do not sign or encrypt SAML v2.0 messages. While this is useful for test and demo environments, you should secure your production and production-like environments.
How signing works
When AM needs to sign a SAML request or response for the consumption of a remote entity provider, it determines the signing algorithm, and optionally, the digest method, based on the following logic, as recommended by the SAML v2.0 Metadata Profile for AlgorithmSupport Version 1.0 specification:
-
AM retrieves the remote entity provider’s metadata, and examines the role-specific extensions for a configured digest method, or signing algorithm.
-
If there is no role-specific algorithm configured, AM checks for algorithms configured in the entity provider-level extensions.
-
If signing algorithms are specified at either role-specific level or entity provider-level, but AM is unable to find a suitable key, it doesn’t sign the element, and displays an error.
Possible reasons that AM may not be able to locate a suitable signing key include:
- Algorithm mismatch
-
The signing algorithm can’t be used with the private key configured in the relevant secret label.
- Keysize mismatch
-
The required key size and actual key size aren’t equal.
-
If the entity provider doesn’t specify supported signing and digest methods in the standard metadata, AM falls back to the global default algorithm settings.
To change the global default algorithms AM uses for signing and encrypting different SAML v2.0 components, go to Configure > Global Services > Common Federation Configuration.
-
If the global default algorithms are not configured, AM examines the configured signing key type, and uses RSA-SHA256 for RSA keys, DSA-SHA256 for DSA keys, and ECDSA-SHA512 for EC keys.
AM has different default signing algorithm settings for XML signatures, and for query signatures.
AM determines the correct default query signing algorithm based on the signing key’s algorithm, be it RSA, DSA, or EC. It only falls back to the same defaults for both XML and query signing algorithms when the settings aren’t correctly defined.
After determining the required algorithm, the sender uses their own private key to write the signature on the request. Then, the provider receiving the message uses the public key exposed in the sender’s metadata to validate the signature.
How encryption works
When encrypting SAML v2.0 messages, the sender uses the receiver’s public key (exposed in the receiver’s metadata) to encrypt the request. The receiver decrypts it with its private key.
As with signing, providers also expose in their metadata the algorithms that they can use to encrypt assertion content.
Since SAML v2.0 messages are in XML format, encrypting them requires an additional key that is transported with the message, as explained in the XML Encryption Syntax and Processing Version 1.1 specification. AM refers to those keys as transport keys.
Consider the following example of an encryption/decryption flow:
-
The IdP generates a random symmetric transport key using the transport key algorithm exposed in the SP’s metadata.
-
The IdP encrypts the assertion with the transport key.
-
The IdP encrypts the transport key with the public key of the SP (which is also exposed in its metadata).
-
The SP decrypts the transport key using its private key. Then, it uses the transport key to decrypt the assertion.
This ensures only this SP can decrypt the message.
Configure the advertised signing and encryption algorithms
-
Configure the required signing algorithms and digests:
Hosted IdPs and SPs can advertise the algorithms they can use to sign assertion content. This information appears as part of the provider’s metadata extension.
Signing/digest algorithm metadata example
<Extensions> <alg:DigestMethod Algorithm="http://www.w3.org/2001/04/xmlenc#sha256"/> <alg:SigningMethod Algorithm="http://www.w3.org/2001/04/xmldsig-more#ecdsa-sha256"/> </Extensions>-
In the AM admin UI, go to Applications > Federation > Entity Providers > Hosted Entity Provider.
-
On the Assertion Content tab, in the Signing Algorithm drop-down list, select the signing algorithms this provider can use.
There is no default for this property.
-
On the Assertion Content tab, in the Digest Algorithm drop-down list, select the digest algorithms this provider can use.
There is no default for this property.
-
-
Configure the required encryption algorithms:
Hosted SPs and IdPs advertise their encryption algorithms so that the remote providers know which ones they should use when sending encrypted data.
Encryption algorithm metadata example
<!-- Enable RSA-OAEP key transport with AES-GCM data encryption: --> <KeyDescriptor use="encryption"> <EncryptionMethod Algorithm="http://www.w3.org/2009/xmlenc11#rsa-oaep"/> <EncryptionMethod Algorithm="http://www.w3.org/2001/04/xmlenc11#aes128-gcm"/> </KeyDescriptor>-
In the AM admin UI, go to Applications > Federation > Entity Providers > Hosted Entity Provider.
-
On the Assertion Content tab, in the Encryption Algorithm drop-down list, select the algorithms this provider can use.
Select one or more AES algorithms from the list to encrypt assertion content, and one or more asymmetric algorithms to encrypt the transport key.
For assertion encryption algorithms, use AES-GCM rather than the older AES-CBC modes. GCM offers authenticated encryption, which better protects against an attacker tampering with an encrypted assertion. Also sign assertions to make such attacks harder to exploit.
Assertion Encryption Algorithms Algorithm identifier Recommended http://www.w3.org/2009/xmlenc11#aes128-gcm✔
http://www.w3.org/2009/xmlenc11#aes192-gcm✔
http://www.w3.org/2009/xmlenc11#aes256-gcm✔
http://www.w3.org/2001/04/xmlenc#aes128-cbc(default)http://www.w3.org/2001/04/xmlenc#aes192-cbchttp://www.w3.org/2001/04/xmlenc#aes256-cbcKey Transport Algorithms Algorithm identifier Recommended http://www.w3.org/2009/xmlenc11#rsa-oaep(1)✔
http://www.w3.org/2001/04/xmlenc#rsa-oaep-mgf1p(default)http://www.w3.org/2001/04/xmlenc#rsa-1_5(2)✖
(1) When this algorithm is configured, AM uses the Mask Generation Function Algorithm property (Configure > Global Services > Common Federation Configuration) to create the transport key. For a list of supported mask generation function algorithms, refer to Algorithms.
(2) For security reasons, you should not use this option.
-
Configure AM to sign SAML v2.0 metadata
Map the am.services.saml2.metadata.signing.RSA secret label to an alias that AM uses to sign exported metadata:
-
In the AM admin UI, go to Configure > Secret Stores.
-
Select the Keystore or HSM store where you want to map the secret.
-
On the Mappings tab, select the
am.services.saml2.metadata.signing.RSAsecret label. -
In the Edit Mapping pane:
-
To edit a mapping, click the pen icon.
-
To add a mapping, enter the alias, and click Add.
-
To delete a mapping, click the cross icon.
-
-
Save your changes.
-
Export the XML-based metadata from your hosted provider to share with other providers in your circle of trust, specifying the
sign=truequery parameter:$ curl \ --output metadata.xml \ "https://am.example.com:8443/am/saml2/jsp/exportmetadata.jsp\ ?entityid=myHostedProvider\ &sign=true\ &realm=/mySubRealm"If you configure your provider in the Top Level Realm, you can omit the
realmquery parameter.The XML output contains a
<ds:Signature>element that the remote entity uses to verify the authenticity of the metadata.
Configure AM to sign and encrypt SAML v2.0 assertion content
Note the following important points when configuring signing and encryption of assertion content:
-
Assertions
HTTP-POST bindings require signed assertions. If the response is not signed, AM defaults to signing the assertion and uses the SP configuration to determine encryption settings.
You must configure signing secret labels on the IdP, as described in Secret label mappings for SAML v2.0 signing and encryption.
Failure to configure signing when using HTTP-POST bindings might result in errors such as:
ERROR: UtilProxySAMLAuthenticatorLookup.retrieveAuthenticationFromCache: Unable to do sso or federation.
com.sun.identity.saml2.common.SAML2Exception: Provider's signing certificate alias is missing.
or:
ERROR: SAML2Utils.verifyResponse:Assertion is not signed or signature is not valid. -
SAML authentication requests
Signing is recommended to verify the request’s authenticity and when using the
ForceAuthnflag. -
SAML assertion responses
Signing AND encrypting is recommended because responses can contain user data.
-
SAML logout requests
Signing is recommended to verify the request’s authenticity.
|
Configure key rollover by mapping more than one secret to the same secret label. Refer to Map and rotate secrets. |
AM provides global default secrets for signing and encrypting SAML v2.0 assertion content with the following secret labels:
-
am.default.applications.federation.entity.providers.saml2.idp.encryption -
am.default.applications.federation.entity.providers.saml2.idp.signing -
am.default.applications.federation.entity.providers.saml2.sp.encryption -
am.default.applications.federation.entity.providers.saml2.sp.signing
If you map these secret labels by realm, every provider of the same role uses the same secrets to sign and encrypt assertion content. For more granularity, you can override these settings and use custom secrets for each hosted provider in the realm:
-
In the AM admin UI, go to Applications > Federation > Entity Providers > Hosted Entity Provider.
-
On the Assertion Content tab, in the Secret Label Identifier property, enter a string value to identify the secret labels this provider will use.
For example,
mySamlSecrets.How do secret label identifiers work?
AM uses a secret identifier to know which secret labels are relevant for a provider. You can reuse the identifier that another provider is already using if you want them to share the same secrets.
When a provider is removed from the AM configuration, AM automatically removes the secret labels related to their identifier, unless they’re being used by another provider.
If you don’t specify a value for the secret label identifier, AM uses the global default secrets relative to the entity provider’s role, in the realm. If they aren’t mapped, AM searches for the global default secrets in the global secret stores.
-
Save your changes.
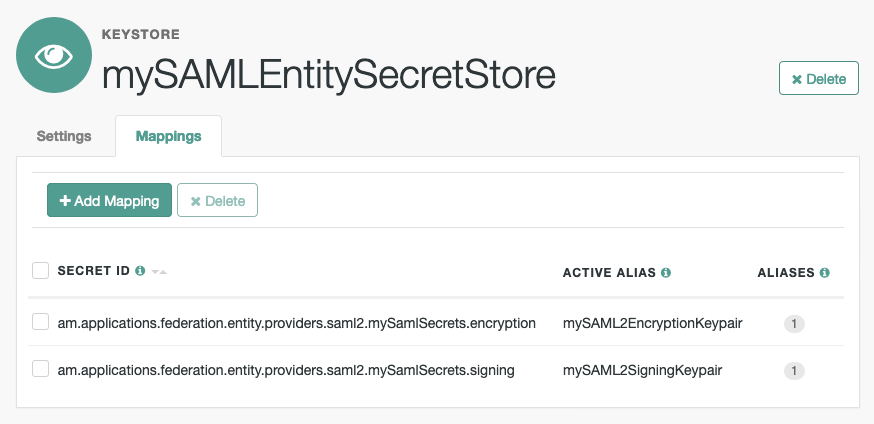
AM creates two new secret labels, at the realm level, based on the value you specified.
-
am.applications.federation.entity.providers.saml2.mySamlSecrets.signing -
am.applications.federation.entity.providers.saml2.mySamlSecrets.encryption
-
-
If you haven’t configured a secret store in the same realm as the entity provider, create one by following the steps in Secret stores.
-
Go to Realms > Realm Name > Secret Stores, and select the secret store in which to map the new secret labels.
-
On the Mappings tab, add mappings for the two custom secret labels.
For information on creating mappings, refer to Map and rotate secrets.
For information on the types of key pairs and secrets required, refer to Secret label mappings for SAML v2.0 signing and encryption.
-
In the AM admin UI, go to Applications > Federation > Entity Providers > Hosted Entity Provider.
-
On the Assertion Content tab, in the Signing and Encryption section, select the SAML v2.0 elements that AM should sign, and the elements to encrypt.
-
Save your changes.
AM now uses the key pairs you configured in the realm’s secret store to sign or encrypt the elements you selected.
For troubleshooting issues involving encryption, you can enable the
openam.saml.decryption.debug.modeadvanced property.Refer to SAML v2.0 advanced properties.
Certificates and secrets
SAML 2.0 secrets for hosted SP or IdP entities are managed by the secrets API, which lets you rotate certificates using secret mappings. This only applies to hosted entities; certificates for remote entities are derived from SAML 2.0 metadata provided by the third party.
The following certificates are used in SAML 2.0 flows with the corresponding secret mappings.
| Certificate | AM role | Third-party role | AM use case | Third-party use case | Secret |
|---|---|---|---|---|---|
Hosted IdP signing certificate |
Hosted IdP |
Remote SP |
Sign outbound SAML assertions |
Validate inbound signed SAML assertion |
( |
Hosted IdP encryption certificate |
Hosted IdP |
Remote SP |
Decrypt inbound encrypted SAML requests |
Encrypt outbound SAML requests |
( |
Hosted SP signing certificate |
Hosted SP |
Remote IdP |
Sign outbound SAML requests |
Validate inbound signed SAML requests |
( |
Hosted SP encryption certificate |
Hosted SP |
Remote IdP |
Decrypt inbound SAML assertions |
Encrypt outbound SAML assertions |
( |
(1) If defined, this secret is used; otherwise the default (in brackets) is used.
Deploy the IdP Discovery service
When your circle of trust includes multiple IdPs, SPs must discover which IdP corresponds to a request. You can deploy the IdP Discovery service for this purpose as a separate web application.
Browsers only send cookies for the originating domain.
Therefore, when a browser accesses the SP in the sp.example.com domain,
the SP has no way of knowing
whether the user has possibly authenticated at this-idp.example.com, or at that-idp.example.com.
The providers therefore host an IdP Discovery service in a common domain,
such as discovery.example.com, and use that service to discover where the user logged in.
The IdP Discovery service essentially writes and reads cookies from the common domain.
The providers configure their circle of trust to use the IdP Discovery service
as part of SAML v2.0 federation.
Before you continue, ensure that you have a CoT with more than one IdP configured, and at least one SP. See Deployment considerations. You will configure the IdP Discovery service in the CoT later.
Deploying the IdP Discovery service involves the following stages:
-
Deploy the
.warfile into your web application container. -
Configure the Discovery service.
-
Add the Discovery service endpoints for writing cookies to and reading cookies from the common domain to the CoT.
Deploy the Discovery service on Tomcat
How you deploy the Discovery service .war file depends on your web application container.
The procedure in this section shows how to deploy on Apache Tomcat.
-
Copy the
IDPDiscovery-8.0.0.warfile to thewebapps/directory.$ cp ~/Downloads/openam/IDPDiscovery-8.0.0.war /path/to/tomcat/webapps/disco.war -
Access the configuration screen through your browser.
In this example, Apache Tomcat listens for HTTP requests on
discovery.example.com:8443, and Tomcat has unpacked the application under/disco, so the URL ishttps://discovery.example.com:8443/disco, which redirects toConfigurator.jsp.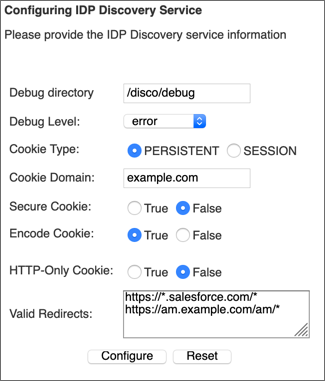 Figure 4. Completed Discovery Service Configuration Screen
The configuration screen shows the following fields:
- Debug Directory
-
The Discovery service logs to flat files in this directory.
- Debug Level
-
Default is
error. Other options includeerror,warning,message, andoff.Set this to
messagein order to see the service working when you run your initial tests. - Cookie Type
-
Set to PERSISTENT if you have configured AM to use persistent cookies, meaning single sign-on cookies that can continue to be valid after the browser is closed.
- Cookie Domain
-
The cookie domain is the common cookie domain used in your circle of trust for IdP discovery; in this case,
example.com. - Secure Cookie
-
Set this to true if clients should only return cookies when a secure connection is used.
- Encode Cookie
-
Leave this true unless your AM installation requires that you do not encode cookies. Normally, cookies are encoded such that cookies remain valid in HTTP.
- HTTP-Only Cookie
-
Set to true to use HTTPOnly cookies if needed to help prevent third-party programs and scripts from accessing the cookies.
- Valid Redirects
-
A list of valid URLs the user can be redirected to once the IdP Discovery process is complete. For example, the SPs in your CoT.
Incoming requests with URLs specified in the
RelayStateparameter that are not configured in this field are rejected.Add each URL in a new line, for example, by pressing the enter key after each one.
Use wildcards (*) to match one or more resources in the URL.
You must configure the same URLs in the Validation service of each of the IdPs in the Top Level Realm.
For more information, see Configure the Validation service.
-
Restrict permissions to the Discovery service configuration file in
$HOME/libIdPDiscoveryConfig.properties, where$HOMEcorresponds to the user who runs the web container where you deployed the service.
Add the Discovery service to your circles of trust
Each provider has a circle of trust including itself. You configure each of these circles of trust to use the IdP Discovery service as described in the following steps:
-
On the SP console, log in as AM Administrator.
-
On the SP console, under Realms > Realm Name > Applications > Federation > Circle of Trust > Circle of Trust Name, add SAML2 Writer and Reader Service URLs for the IdP Discovery service endpoints, and save your work.
In this example, the writer URL is
https://discovery.example.com:8443/disco/saml2writer, and the reader URL ishttps://discovery.example.com:8443/disco/saml2reader. -
On each IdP console, log in as AM Administrator.
-
On the IdP console, under Realms > Realm Name > Applications > Federation > Entity Providers > Circle of Trust > Circle of Trust Name, also add SAML2 Writer and Reader service URLs for the IdP Discovery service endpoints, and save your work.
Implement SSO and SLO
AM provides two options for implementing SSO and SLO with SAML v2.0:
- Integrated mode
-
Integrated mode single sign-on and single logout uses a SAML2 authentication node on a service provider (SP), thereby integrating SAML v2.0 authentication into the AM authentication process. The authentication node handles the SAML v2.0 protocol details for you.
Integrated mode supports SP-initiated single sign-on only because the authentication service that includes the SAML v2.0 node resides on the SP. You can’t trigger IdP-initiated single sign-on in an integrated mode implementation.
Integrated mode doesn’t support SLO.
- Standalone mode
-
Standalone mode requires that you invoke JSPs pages to initiate single sign-on and SLO.
|
You can also configure web and Java agents to work alongside AM when performing SSO and SLO. Find out more in Web or Java agents SSO and SLO. |
The following table provides information to help you decide whether to implement integrated mode or standalone mode for your AM SAML v2.0 deployment:
| Deployment task or requirement | Implementation mode |
|---|---|
You want to deploy SAML v2.0 single sign-on and single logout using the easiest technique. |
Use integrated mode. |
You want to trigger SAML v2.0 IdP-initiated SSO. |
Use standalone mode. |
You want to use the SAML v2.0 Enhanced Client or Proxy (ECP) single sign-on profile. |
Use standalone mode. |
Your IdP and SP instances are using the same domain name; for example, |
Use standalone mode. |
(1) Due to the way integrated mode tracks authentication status by using a cookie, it can’t be used when both the IdP and SP share a domain name.
SSO and SLO in integrated mode
Authentication nodes and trees support SSO in integrated mode only. The SAML2 Authentication node handles the SAML v2.0 authentication flow, but relies on other nodes.
Integrated mode flow

-
An unauthenticated user initiates authentication to an AM SAML v2.0 SP. The login URL references an authentication tree that includes a SAML2 authentication node. For example,
https://am.example.com:8443/am/XUI/?service=mySAM2LTree. -
If there are any authentication nodes that precede the SAML2 Authentication node, AM executes them.
-
The SAML2 authentication node processing begins.
-
The authentication node requests an assertion from the IdP. The configuration of the SAML2 Authentication node determines the details of the request.
If the user is not authenticated in the IdP, the IdP will request them to authenticate.
-
The IdP responds to the SP with a SAML assertion.
-
If the SAML assertion contains a non-transient name ID, AM searches the identity store, attempting to locate a user with the same name ID.
If the name ID for the account exists, the tree ends in the success node.
If the name ID does not exist…
-
... and a Create Object node (or a Provision Dynamic Account node for standalone AM environments) is configured in the tree, it creates a new account in the SP using auto-federation, including the name ID in the user profile.
-
... and method of authenticating the user is available in the tree, a Write Federation Information node writes the persistent name ID in the user profile.
For more information about linking when autofederation is not configured, see Link identities for authentication.
Implement SAML v2.0 single sign-on in integrated mode
The following list is an overview of the activities you perform when implementing SAML v2.0 single sign-on in integrated mode:
-
Preparing entity providers and a circle of trust, and changing several endpoints in the SP configuration.
-
Configuring a tree that contains, at least, the SAML2 authentication node.
Configure AM for integrated mode
-
If you have not already done so, configure SAML v2.0 by performing the tasks listed in Deployment considerations.
-
In the AM admin UI, create a hosted SP by following the steps in Create a Hosted Entity Provider.
Ensure that you have configured the attribute map (Assertion Processing > Attribute Mapper). It determines how AM will map assertion attributes coming from the IdP to the user’s profile on the SP.
During the authentication process, the mapping is used to find existing users on the SP, and to create or update user accounts on the SP.
-
Configure a remote IdP by following the steps in Import and Configure a Remote Entity Provider.
When you specify the circle of trust for the IdP, use the Add to Existing option and specify the circle of trust that you created when you created the hosted SP.
-
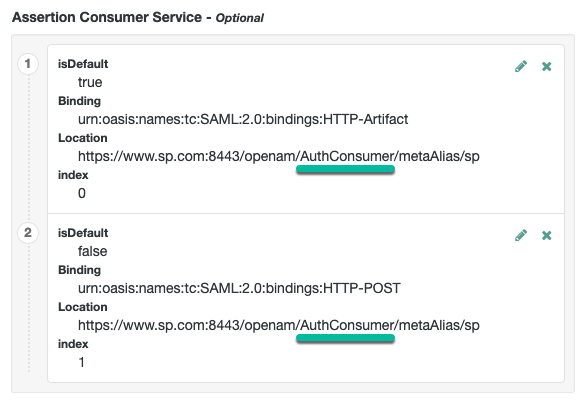
Change the Assertion Consumer Service locations in the hosted SP configuration.
The default locations support standalone mode. Therefore, you must change the locations when implementing integrated mode.
Change the locations as follows:
-
In the AM admin UI, go to Realms > Realm Name > Applications > Federation > Entity Providers > SP Name > Services > Assertion Consumer Service.
-
Change the location of the HTTP-Artifact consumer service to use
AuthConsumer, rather thanConsumer. For example, if the location ishttps://www.sp.com:8443/am/Consumer/metaAlias/sp, change it tohttps://www.sp.com:8443/am/AuthConsumer/metaAlias/sp. -
Similarly, change the location for the HTTP-POST consumer service to use
AuthConsumerrather thanConsumer.Note that you do not need to change the location for the PAOS service because integrated mode does not support the PAOS binding.
-
The results will resemble the following:
Save your changes. Now you are ready to configure authentication trees.
-
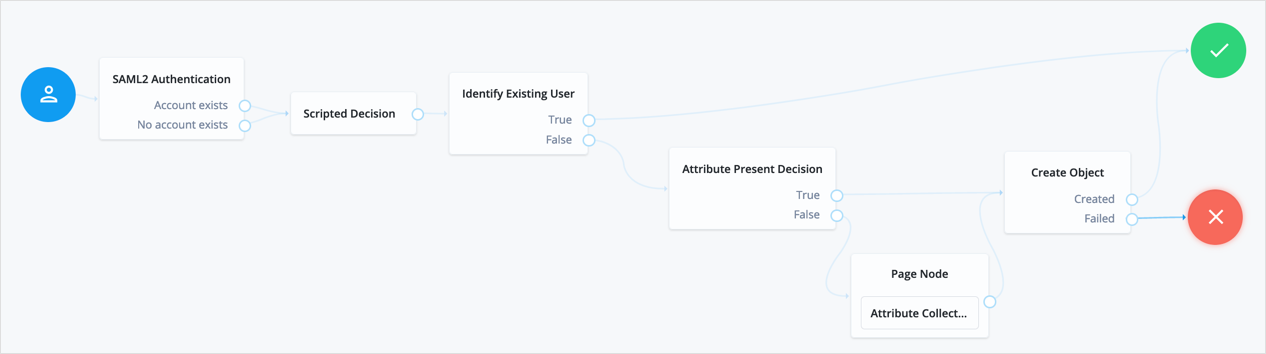
Create accounts dynamically during federation (standalone AM)
In integrated mode, the SP can use authentication trees to tailor the authentication experience to users. You can create very complicated trees, or even multiple trees to satisfy the requirements of your organization.
The example shown in this procedure uses the SAML v2.0 node to request an assertion from the IdP, and then creates an account for the user in the SP, if one does not exist.
If you are not using auto-federation, you can also use authentication trees to create persistent links between user accounts.
Perform the following steps to configure a tree similar to the following:

-
Add a SAML2 Authentication node.
Integrated mode is SP SSO-initiated only, and SLO is not supported.
The node processes the assertion, makes its contents available to the authentication tree’s state in the
userInfoobject, and tries to map the assertion’s nameID using theuidmapping in the SP’s assertion map.If the node finds a match, the tree continues through the
Account Existsoutput. Otherwise, the tree continues through theNo Account Existsoutput. -
Add a Provision Dynamic Account node to the
No account existsoutcome. -
(Optional) If you have not configured auto-federation, you can add the Write Federation Information node to create a persistent link between the accounts.
For examples, see Link identities by using authentication trees.
Create accounts dynamically during federation
In integrated mode, the SP can use authentication trees to tailor the authentication experience to users. You can create very complicated trees, or even multiple trees to satisfy the requirements of your organization.
The example shown in this procedure uses the SAML v2.0 node to request an assertion from the IdP, and then creates an account for the user in the SP if one does not exist.
If you are not using auto-federation, you can also use authentication trees to create persistent links between the user accounts.
Perform the steps in this procedure to configure a tree similar to the following:
-
Add a SAML2 Authentication node.
Integrated mode is SP SSO-initiated only, and SLO is not supported.
The node processes the assertion, makes its contents available to the authentication tree’s state in the
userInfoobject, and tries to map the assertion’s nameID using theuidmapping in the SP’s assertion map.If the node finds a match, the tree continues through the
Account Existsoutput. Otherwise, the tree continues through theNo Account Existsoutput.Note that the attribute the node uses to map the nameID isn’t configurable, and this example adds nodes to process the
userInfoobject and match its contents to the managed user’s schema. -
Add a Scripted Decision node to copy the information from the assertion to the authentication tree’s shared state.
Example script
-
Next-generation
-
Legacy
if (nodeState.get("userInfo")) {
  if (nodeState.get("objectAttributes")) {
    nodeState.remove("objectAttributes");
  }
  var userName=null,sn=null,mail=null;

  try {
    var attribs = nodeState.get("userInfo")["attributes"];

    userName=attribs["uid"][0];
    sn=attribs["sn"][0];
    mail=attribs["mail"][0];

  } catch (e) {
    logger.error("Error getting userInfo: " + e);
  }
  nodeState.putShared("objectAttributes", {"userName":userName,"sn":sn,"mail":mail});
}
action.goTo("true");
var fr = JavaImporter(org.forgerock.openam.auth.node.api.Action); if (nodeState.get("userInfo")) { if (nodeState.get("objectAttributes")) { nodeState.remove("objectAttributes"); } var userName=null,sn=null,mail=null; try { var attribs = nodeState.get("userInfo").get("attributes"); userName=attribs.get("uid").get(0).asString(); sn=attribs.get("sn").get(0).asString(); mail=attribs.get("mail").get(0).asString(); } catch (e) { logger.error("Error getting userInfo: " + e); } nodeState.putShared("objectAttributes", {"userName":userName,"sn":sn,"mail":mail}); } action = fr.Action.goTo("true").build();For more information, see Scripted Decision node API.
-
-
Add an Identify Existing User node to search the user with the appropriate attribute.
For example,
userName. -
Complete the tree adding the required nodes to create the new account if it does not exist on the SP.
The scripted decision node that you created before gathering the attributes that are now available to create the account. However, these may not be enough to satisfy your managed user rules. To ensure that the required attributes are available, use the Required Attributes Present node to check them, and the Attribute Collector node to collect the ones missing.
Finally, to create the account, use the Create Object node.
Ensure that you configure the appropriate identity resource in this node. For example,
managed/alpha_user. -
(Optional) If you have not configured auto-federation, you can add the Write Federation Information node to create a persistent link between the accounts.
For examples, see Link identities by using authentication trees.
SSO and SLO in standalone mode
SSO lets users sign in once and remain authenticated as they access services in the circle of trust.
SLO attempts to log out all session participants:
-
For hosted IdPs, single logout attempts to log out of all SPs with which the session established SAML federation.
-
For hosted SPs, single logout attempts to log out of the IdP that was source of the assertion for the authenticated session.
JSP pages for SSO and SLO
With standalone mode, AM SAML v2.0 Federation provides JSP files that direct users to do SSO and SLO across providers in a circle of trust. AM has two JSPs for single sign-on and two JSPs for SLO, allowing you to initiate both processes either from the IdP side, or from the SP side.
The JSP pages are found under the context root where you deployed AM, in saml2/jsp/.
When you perform HTTP GET requests to these JSPs, there are several query parameters to specify. Which query parameters you can use depends on the JSP. When setting parameters in the JSPs, make sure the parameter values are correctly URL-encoded.
|
The JSP pages only support query parameters sent by using HTTP GET requests. Do not attempt to use HTTP POST or PUT requests to the pages. |
IDP-initiated SSO JSP
idpSSOInit.jsp-
Used to initiate single sign-on from the identity provider side, so call this on the identity provider not the service provider.
Also mapped to the endpoint
idpssoinitunder the context root.
-
https://www.idp.com:8443/am/saml2/jsp/idpSSOInit.jsp -
https://www.idp.com:8443/am/idpssoinit
-
The following URL initiates single sign-on from the identity provider side, leaving the user at
https://forgerock.com:https://www.idp.com:8443/am/saml2/jsp/idpSSOInit.jsp ?metaAlias=/idp &spEntityID=https%3A%2F%2Fwww.sp.com%3A8443%2Fam &RelayState=https%3A%2F%2Fforgerock.com
idpSSOInit.jsp query parameters
metaAlias-
(Required) Use this parameter to specify the local alias for the provider, such as,
metaAlias=/alpha/idp.This parameter takes the format
/realm-name/provider-name, as described in MetaAlias.Do not repeat the slash for the Top Level Realm; for example,
metaAlias=/idp. spEntityID-
(Required) Use this parameter to indicate the remote service provider.
Make sure you URL-encode the value. For example, specify
spEntityID=https://www.sp.com:8443/amasspEntityID=https%3A%2F%2Fwww.sp.com%3A8443%2Fam. affiliationID-
(Optional) Use this parameter to specify a SAML affiliation identifier.
binding-
(Optional) Use this parameter to indicate which binding to use for the operation.
For example, specify
binding=HTTP-POSTto use HTTP POST binding with a self-submitting form. You can also specifybinding=HTTP-Artifact. NameIDFormat-
(Optional) Use this parameter to specify a SAML Name Identifier format identifier.
For example,
urn:oasis:names:tc:SAML:2.0:nameid-format:persistent, orurn:oasis:names:tc:SAML:2.0:nameid-format:transient. RelayState-
(Optional) Use this parameter to specify where to redirect the user when the process is complete. Make sure you URL-encode the value.
For example,
RelayState=https%3A%2F%2Fforgerock.comtakes the user tohttps://forgerock.com. RelayStateAlias-
(Optional) Use this parameter to specify the parameter to use as
RelayState.For example, if the query string
target=http%3A%2F%2Fforgerock.com&RelayStateAlias=target, is equivalent toRelayState=http%3A%2F%2Fforgerock.com.
IdP-initiated SLO JSP
idpSingleLogoutInit.jsp-
Used to initiate single logout from the IdP.
Also mapped to the endpoint
IDPSloInitunder the context root.
-
https://www.idp.com:8443/am/saml2/jsp/idpSingleLogoutInit.jsp -
https://www.idp.com:8443/am/IDPSloInit
-
The following URL performs single logout from the identity provider side, using a self-submitting form rather than a redirect, and leaving the user at
https://forgerock.com:https://www.idp.com:8443/am/saml2/jsp/idpSingleLogoutInit.jsp ?binding=urn:oasis:names:tc:SAML:2.0:bindings:HTTP-POST &RelayState=https%3A%2F%2Fforgerock.com
idpSingleLogoutInit.jsp query parameters
binding-
(Required) Use this parameter to indicate which binding to use for the operation. The full, long name format is required for this parameter to work.
The value must be one of the following:
-
urn:oasis:names:tc:SAML:2.0:bindings:HTTP-Redirect -
urn:oasis:names:tc:SAML:2.0:bindings:HTTP-POST -
urn:oasis:names:tc:SAML:2.0:bindings:SOAPConsent-
(Optional) Use this parameter to specify a URI that is a SAML Consent Identifier.
Destination-
(Optional) Use this parameter to specify a URI Reference indicating the address to which the request is sent.
Extension-
(Optional) Use this parameter to specify a list of Extensions as string objects.
goto-
(Optional) Use this parameter to specify where to redirect the user when the process is complete.
RelayStatetakes precedence over this parameter. logoutAll-
(Optional) Use this parameter to specify that the identity provider should send single logout requests to service providers without indicating a session index.
RelayState-
(Optional) Use this parameter to specify where to redirect the user when the process is complete. Make sure you URL-encode the value.
For example,
RelayState=https%3A%2F%2Fforgerock.comtakes the user tohttps://forgerock.com.To ensure the redirect is permitted, add the URL to the
RelayState URL List. For details of this setting, see the Reference section.
SP-initiated SSO JSP
spSSOInit.jsp-
Use this page to initiate single sign-on from the service provider side.
Also mapped to the endpoint
spssoinitunder the context root.
-
https://www.sp.com:8443/am/saml2/jsp/spSSOInit.jsp -
https://www.sp.com:8443/am/spssoinit
-
The following URL takes the user from the service provider side to authenticate at the identity provider, and then comes back to the end user profile page at the service provider after successful SSO. Lines are folded to show you the query string parameters:
https://www.sp.com:8443/am/saml2/jsp/spSSOInit.jsp
?metaAlias=/sp
&idpEntityID=https%3A%2F%2Fwww.idp.com%3A8443%2Fam
&RelayState=https%3A%2F%2Fwww.sp.com%3A8443%2Fam%2FXUI%2F%23profile%2Fdetails
spSSOInit.jsp query parameters
idpEntityID-
(Required) Use this parameter to indicate the remote identity provider. Make sure you URL-encode the value.
For example, encode
idpEntityID=https://www.idp.com:8443/amas:idpEntityID=https%3A%2F%2Fwww.idp.com%3A8443%2Fam. metaAlias-
(Required) Use this parameter to specify the local alias for the provider, such as
metaAlias=/alpha/sp.This parameter takes the format
/realm-name/provider-nameas described in MetaAlias. Do not repeat the slash for the Top Level Realm, for examplemetaAlias=/sp. affiliationID-
(Optional) Use this parameter to specify a SAML affiliation identifier.
AllowCreate-
(Optional) When set to
true, the identity provider can create a new identifier for the principal if none exists. AssertionConsumerServiceIndex-
(Optional) Use this parameter to specify an integer that indicates the location to which the Response message should be returned to the requester.
AuthComparison-
(Optional) Use this parameter to specify a comparison method to evaluate the requested context classes or statements.
AM accepts the following values:
-
better. Specifies that the authentication context statement in the assertion must be better (stronger) than one of the provided authentication contexts.
-
exact. Specifies that the authentication context statement in the assertion must exactly match at least one of the provided authentication contexts.
-
maximum. Specifies that the authentication context statement in the assertion must not be stronger than any of the other provided authentication contexts.
-
minimum. Specifies that the authentication context statement in the assertion must be at least as strong as one of the provided authentication contexts.
-
AuthnContextClassRef-
(Optional) Use this parameter to specify authentication context class references. Separate multiple values with pipe (|) characters.
When hosted IDP and SP entities are saved in the AM admin UI, any custom authentication contexts are also saved, as long as they are included in the extended metadata. You can load custom authentication contexts in the extended metadata using the
ssoadmcommand. AuthnContextDeclRef-
(Optional) Use this parameter to specify authentication context declaration references. Separate multiple values with pipe (|) characters.
AuthLevel-
(Optional) Use this parameter to specify the authentication level of the authentication context that AM should use to authenticate the user.
binding-
(Optional) Use this parameter to indicate which binding to use for the operation.
For example, specify
binding=HTTP-POSTto use HTTP POST binding with a self-submitting form. You can also specifybinding=HTTP-Artifact. Destination-
(Optional) Use this parameter to specify a URI Reference indicating the address to which the request is sent.
ForceAuthn-
(Optional) When set to
truethe identity provider should force authentication.Configure the
org.forgerock.openam.saml2.authenticatorlookup.skewAllowanceadvanced property to specify the maximum permissible time since authentication by the IdP. See SAML v2.0 advanced properties.When false, the IdP can reuse existing security contexts.
isPassive-
(Optional) When set to
truethe IdP authenticates passively.A value of trueis not honored if you have configured an application tree, and the tree includes a node that requires user interaction. NameIDFormat-
(Optional) Use this parameter to specify a SAML Name Identifier format identifier.
For example,
urn:oasis:names:tc:SAML:2.0:nameid-format:persistent, orurn:oasis:names:tc:SAML:2.0:nameid-format:transient. RelayState-
(Optional) Use this parameter to specify where to redirect the user when the process is complete. Make sure you URL-encode the value.
For example,
RelayState=https%3A%2F%2Fforgerock.comtakes the user tohttps://forgerock.com.To ensure the redirect is permitted, add the URL to the
RelayState URL List. For details of this setting, see the Reference section. RelayStateAlias-
(Optional) Use this parameter to specify the parameter to use as the
RelayState.For example, the query string
target=http%3A%2F%2Fforgerock.com&RelayStateAlias=target, is the same asRelayState=http%3A%2F%2Fforgerock.com. reqBinding-
(Optional) Use this parameter to indicate the binding to use for the authentication request.
Valid values in include
urn:oasis:names:tc:SAML:2.0:bindings:HTTP-Redirect(default) andurn:oasis:names:tc:SAML:2.0:bindings:HTTP-POST. sunamcompositeadvice-
(Optional) Use this parameter to specify a URL-encoded XML blob that specifies the authentication level advice.
For example, the following XML indicates a requested authentication level of 1. Notice the required : before the
1:<Advice> <AttributeValuePair> <Attribute name="AuthLevelConditionAdvice"/> <Value>/:1</Value> </AttributeValuePair> </Advice>
SP-initiated SLO JSP
spSingleLogoutInit.jsp-
Used to initiate single logout from the SP.
Also mapped to the endpoint
SPSloInitunder the context root.
-
https://www.sp.com:8443/am/saml2/jsp/spSingleLogoutInit.jsp -
https://www.sp.com:8443/am/SPSloInit
-
The following URL initiates single logout from the service provider side, using the HTTP redirect method, leaving the user at
http://forgerock.com:https://www.sp.com:8443/am/saml2/jsp/spSingleLogoutInit.jsp ?binding=urn:oasis:names:tc:SAML:2.0:bindings:HTTP-Redirect &RelayState=http%3A%2F%2Fforgerock.com
spSingleLogoutInit.jsp query parameters
binding-
(Required) Use this parameter to indicate which binding to use for the operation. The full, long name format is required for this parameter to work.
For example, specify
binding=urn:oasis:names:tc:SAML:2.0:bindings:HTTP-POSTto use HTTP POST binding with a self-submitting form, rather than the default HTTP redirect binding. You can also specifybinding=urn:oasis:names:tc:SAML:2.0:bindings:HTTP-Artifact. idpEntityID-
(Required for Fedlets) Use this parameter to indicate the remote identity provider. If the
bindingproperty is not set, then AM uses this parameter to find the default binding. Make sure you URL-encode the value.For example, specify
idpEntityID=https://www.idp.com:8443/amasidpEntityID=https%3A%2F%2Fwww.idp.com%3A8443%2Fam. NameIDValue-
(Required for Fedlets) Use this parameter to indicate the SAML Name Identifier for the user.
SessionIndex-
(Required for Fedlets) Use this parameter to indicate the
sessionIndexof the authenticated session to terminate. Consent-
(Optional) Use this parameter to specify a URI that is a SAML Consent Identifier.
Destination-
(Optional) Use this parameter to specify a URI Reference indicating the address to which the request is sent.
Extension-
(Optional) Use this parameter to specify a list of extensions as string objects.
goto-
(Optional) Use this parameter to specify where to redirect the user when the process is complete.
The
RelayStateparameter takes precedence over this parameter. RelayState-
(Optional) Use this parameter to specify where to redirect the user when the process is complete. Make sure you URL-encode the value.
For example,
RelayState=https%3A%2F%2Fforgerock.comtakes the user tohttps://forgerock.com.To ensure the redirect is permitted, add the URL to the
RelayState URL List. For details of this setting, see the Reference section. spEntityID-
(Optional, for Fedlets) Use this parameter to indicate the Fedlet entity ID.
When missing, AM uses the first entity ID in the metadata.
Modify the SSO JSP page to indicate progress
During single sign-on login in standalone mode, AM presents users with a self-submitting form when access has been validated. This page is otherwise blank.
Perform the steps in the following procedure if you want to present users with something to indicate that the operation is in progress:
-
To modify the templates to add feedback that single sign-on is in progress, such as an image, edit the source of the AM Java Server Page,
saml2/jsp/autosubmitaccessrights.jsp, under the file system directory where the AM.warfile has been unpacked.When you add an image or other presentation element, make sure that you retain the form and Java code as-is.
-
Unpack the AM-8.0.0.war file.
-
Overwrite the modified
saml2/jsp/autosubmitaccessrights.jspfile, where you unpacked the.warfile.Also, include any images referenced in your files.
-
Pack up your custom version of AM, and then deploy it in your web container.
ECP profile configuration
The SAML v2.0 Enhanced Client or Proxy (ECP) profile is intended for use when accessing services over devices like simple phones, medical devices, and set-top boxes that lack the capabilities needed to use the more widely used SAML v2.0 Web Browser single sign-on profile.
The ECP knows which IdP to contact for the user, and is able to use the reverse SOAP (PAOS) SAML v2.0 binding for the authentication request and response. The PAOS binding uses HTTP and SOAP headers to pass information about processing SOAP requests and responses, starting with a PAOS HTTP header that the ECP sends in its initial request to the server. The PAOS messages continue with a SOAP authentication request in the server’s HTTP response to the ECP’s request for a resource, followed by a SOAP response in an HTTP request from the ECP.
An enhanced client, such as a browser with a plugin or an extension, can handle these communications on its own. An enhanced proxy is an HTTP server, such as a WAP gateway, that can support the ECP profile on behalf of client applications.
AM supports the SAML v2.0 ECP profile on the server side for IdPs and SPs. You must build the ECP.
By default, an AM IdP uses the com.sun.identity.saml2.plugins.DefaultIDPECPSessionMapper class
to find an authenticated session for requests to the IdP from the ECP.
The default session mapper uses AM cookies as it would for any other client application.
If you must change the mapping after writing and installing your own session mapper,
you can change the class under Realms > Realm Name > Applications > Federation > Entity Providers >
IdPName > IDP > Advanced > ECP Configuration.
By default, an AM SP uses the com.sun.identity.saml2.plugins.ECPIDPFinder class
to return IdPs from the list under Realms > Realm Name > Applications >
Federation > Entity Providers > SP Name > SP > Advanced > ECP Configuration > Request IDP List.
You must populate the list with IdP entity IDs.
The endpoint for the ECP to contact on the AM SP is /SPECP
as in https://www.sp.com:8443/am/SPECP.
The ECP provides two query string parameters to identify the SP and to specify the URL of the resource to access.
metaAlias-
This specifies the SP, by default,
metaAlias=/realm-name/sp, as described in MetaAlias. RelayState-
This specifies the resource the client aims to access, such as
RelayState=https%3A%2F%2Fforgerock.org%2Findex.html. Make sure this parameter is URL-encoded.For example, to access the SP followed by the resource at
https://forgerock.org/index.html, usehttps://www.sp.com:8443/am/SPECP?metaAlias=/sp&RelayState=https%3A%2F%2Fforgerock.org%2Findex.html.To ensure the redirect is permitted, add the URL to the
RelayState URL List. For details of this setting, see the Reference section.
Web or Java agents SSO and SLO
You can use web agents and Java agents in a SAML v2.0 Federation deployment.
Configuring agents to work alongside AM when performing SAML v2.0 single sign-on and single logout involves altering the URLs the agents use for logging in unauthenticated users, and logging users out.
Use web or Java agents with a SAML v2.0 SP
This procedure applies when AM is configured as an IdP in one domain, and a web or Java agent protects resources on behalf of a second AM server, configured as an SP, on a second domain.
-
Install the web or Java agent, as described in the Web Agents documentation or the Java Agents documentation.
The following steps will guide you to configure the agent through the AM admin UI. If your agent is not using the centralized configuration mode, make the changes to the noted properties in the configuration file of the agent instead:
agent.conffor the web agent orAgentConfiguration.propertiesfor the Java agent. -
When using web agents:
-
In the AM admin UI of the SP, go to Realms > Realm Name > Applications > Agents > Web > Agent Name > AM Services.
-
When using integrated mode SSO:
-
Set the AM Login URL List property (
com.sun.identity.agents.config.login.url) to the authentication tree that contains the SAML2 Authentication node. For example:https://www.sp.com:8443/am/XUI/#login/&service=mySAMLTree
-
-
When using standalone mode SSO:
-
Set the AM Login URL List property (
com.sun.identity.agents.config.login.url) to the URL of the SP-initiated SSO JSP file, including the parameters necessary for initiating SSO. For example:https://www.sp.com:8443/am/saml2/jsp/spSSOInit.jsp ?metaAlias=/sp &idpEntityID=https%3A%2F%2Fwww.idp.com%3A8443%2Fopenam
-
Add the URL of the SP-initiated SLO JSP file to the AM Logout URL property (
com.sun.identity.agents.config.logout.url). For example:https://www.sp.com:8443/am/saml2/jsp/spSingleLogoutInit.jsp ?binding=urn:oasis:names:tc:SAML:2.0:bindings:HTTP-Redirect &RelayState=http%3A%2F%2Fwww.sp.com
-
-
Save your changes.
-
-
Set the Enable Custom Login Mode (
org.forgerock.openam.agents.config.allow.custom.login) property to1. -
Disable the Invalidate Logout Session property (
org.forgerock.agents.config.logout.session.invalidateset tofalse). -
When using Java agents:
-
In the AM admin UI of the SP, go to Realms > Realm Name > Applications > Agents > Java > Agent Name > AM Services.
-
When using integrated mode SSO:
-
Set the AM Login URL List property (
com.sun.identity.agents.config.login.url) to the authentication tree that contains the SAML2 Authentication node. For example:https://www.sp.com:8443/am/XUI/#login/&service=mySAMLTree
-
-
When using standalone mode SSO:
-
Set the AM Login URL List property (
com.sun.identity.agents.config.login.url) to the URL of the SP-initiated SSO JSP file, including the parameters necessary for initiating SSO. For example:https://www.sp.com:8443/am/saml2/jsp/spSSOInit.jsp ?metaAlias=/sp &idpEntityID=https%3A%2F%2Fwww.idp.com%3A8443%2Fopenam
-
Add the URL of the SP-initiated SLO JSP file to the AM Logout URL property (
com.sun.identity.agents.config.logout.url). For example:https://www.sp.com:8443/am/saml2/jsp/spSingleLogoutInit.jsp ?binding=urn:oasis:names:tc:SAML:2.0:bindings:HTTP-Redirect &RelayState=http%3A%2F%2Fwww.sp.com
-
-
Enable the Enable Custom Login Mode property (set the
org.forgerock.openam.agents.config.allow.custom.logintotrue). -
Enable the Convert SSO Tokens Into OIDC JWTs property (set the
org.forgerock.agents.accept.ipdp.cookie.enabledtotrue). -
Save your changes.
-
Federate identities
AM supports linking, or federating, identities between the IdP and the SP.
See the following table for a list of tasks to configure how AM federates identities:
| Task | Resources |
|---|---|
Decide whether to permanently link identities AM lets you choose whether to maintain the link between federated entities after logout (persistent federation) or to create a new link each time the user logs in (transient federation). Also, learn how to manage persistent federation. |
|
Link identities automatically Configure AM to link identities automatically when they exist in both the IdP and the SP,
or to create an account on the SP when the |
|
Link identities using the authentication service Configure AM to link identities when the |
|
Link identities in the IdP to a single, shared account on the SP Configure AM to temporarily link an identity in the IdP to, for example,
the |
Persistent or transient federation
You can choose to permanently link identities, known as persistent federation. AM lets you configure the SP to persistently link identities, based on an attribute value from the IdP. When you know the user accounts on both the IdP and the SP share a common attribute value, such as an email address or another unique user identifier, you can use this method to link accounts without user interaction. See Link identities automatically based on an attribute value.
In some cases, the IdP can choose to communicate a minimum of information about an authenticated user, with no user account maintained on the SP side. This is known as transient federation.
Transient federation can be useful when the SP either needs no user-specific account to provide a service, or when you do not want to retain a user profile on the SP, but instead, you make authorization decisions based on attribute values from the IdP.
In a SAML v2.0 federation where accounts have been persistently linked, authentication is required only on the IdP side.
Authentication is required on the SP side, however, when the SP is unable to map the identity in the assertion from the IdP to a local user account.
This can happen the first time accounts are linked, for example. After which, the persistent identifier establishes the mapping.
Authenticating to the SP may also be required when transient federation is used when linking identities. The SP must authenticate the user for every SAML assertion received. This is because the identifier used to link the identities is transient; it does not provide a repeatable, durable means to link the identities.
|
You can prevent the ability to persistently link accounts on the SP side
by setting the |
Enable persistent federation
Both integrated and standalone SAML v2.0 implementations allow you to persistently link accounts.
Before attempting to configure persistent federation, make sure that you have configured AM for SAML v2.0 SSO, created the IdP and SPs, and configured a circle of trust.
Find information about these tasks in Deployment considerations and Implement SSO and SLO.
-
If you are using integrated mode:
-
Create an authentication tree that contains the SAML2 Authentication node.
If you have not created one yet, see SSO and SLO in Integrated Mode for an example.
-
In the NameID Format field, specify the value
urn:oasis:names:tc:SAML:2.0:nameid-format:persistent.You can also link accounts together using different nameid formats. For example, you could use the
urn:oasis:names:tc:SAML:1.1:nameid-format:unspecifiedvalue, and receive the IdP user’s e-mail address in the NameID value. The SP would display the login page to identify the local user account and persistently link them. -
Save your work.
-
Initiate single sign-on by accessing a URL that calls an authentication tree that includes the SAML2 node.
For example,
https://www.sp.com:8443/am/XUI/#login/&realm=alpha&service=mySAML2Tree.
-
-
If you are using standalone mode single sign-on:
-
Initiate single sign-on with either the
spSSOInit.jsporidpSSOInit.jspJSP page, includingNameIDFormat=urn:oasis:names:tc:SAML:2.0:nameid-format:persistentas a query parameter.For example, to initiate single sign-on from the service provider, access a URL similar to the following:
https://www.sp.com:8443/am/saml2/jsp/spSSOInit.jsp
?idpEntityID=https%3A%2F%2Fwww.idp.com%3A8443%2Fam
&metaAlias=/sp
&NameIDFormat=urn:oasis:names:tc:SAML:2.0:nameid-format:persistent
To initiate single sign-on from AM acting as the identity provider, access a URL similar to the following:
https://www.idp.com:8443/am/saml2/jsp/idpSSOInit.jsp
?spEntityID=https%3A%2F%2Fwww.sp.com%3A8443%2Fam
&metaAlias=/idp
&NameIDFormat=urn:oasis:names:tc:SAML:2.0:nameid-format:persistent
-
-
To test your work:
-
Authenticate to the IdP as the user you want to persistently link.
On success, you will be redirected to the SP.
If there was no login page displayed at the SP, you might have enabled auto-federation, or AM was able to find a link between the two identities without requiring authentication at the SP.
To make sure there are no existing links, create a new identity in the IdP, and initiate single sign-on again, authenticating to the IdP as the new user.
-
Authenticate to the SP as the local user to link with.
The accounts are persistently linked, with persistent identifiers stored in the user’s profile on both the IdP and the SP.
Subsequent attempts to access the SP will only require that the user authenticates to the IdP, as the identities are now permanently linked.
You can prevent the ability to persistently link accounts on the SP side by setting the
spDoNotWriteFederationInfoproperty totrue, and on the IdPside by setting theidpDisableNameIDPersistencetotrue.
-
Enable transient federation
Both integrated and standalone SAML v2.0 implementations allow you to temporarily link accounts.
Before you configure transient federation, you must do the following: * Configure AM for SAML v2.0 * Create the IdP and SPs * Configure a circle of trust * Configure AM to support SSO
Find information about these tasks in Deployment considerations and Implement SSO and SLO.
-
If you are using integrated mode SSO:
-
Create an authentication tree that contains the SAML2 Authentication node.
If you have not created one yet, see SSO and SLO in integrated mode for an example.
-
In the NameID Format field, specify the value
urn:oasis:names:tc:SAML:2.0:nameid-format:transient. -
Save your work.
-
Initiate SSO by accessing a URL that calls an authentication tree that includes the SAML v2.0 node:
For example,
https://www.sp.com:8443/am/XUI/#login/&realm=alpha&service=mySAMLTree.
-
-
If you are using standalone mode SSO:
-
Initiate single sign-on with either the
spSSOInit.jsporidpSSOInit.jspJSP page, includingNameIDFormat=urn:oasis:names:tc:SAML:2.0:nameid-format:transientas a query parameter.For example, to initiate SSO from the SP, access a URL similar to the following:
https://www.sp.com:8443/am/saml2/jsp/spSSOInit.jsp
?idpEntityID=https%3A%2F%2Fwww.idp.com%3A8443%2Fam
&metaAlias=/sp
&NameIDFormat=urn:oasis:names:tc:SAML:2.0:nameid-format:transient
To initiate single sign-on from the IdP, access a URL similar to the following:
https://www.idp.com:8443/am/saml2/jsp/idpSSOInit.jsp
?spEntityID=https%3A%2F%2Fwww.sp.com%3A8443%2Fam
&metaAlias=/idp
&NameIDFormat=urn:oasis:names:tc:SAML:2.0:nameid-format:transient
-
-
To test your work:
-
Authenticate to the IDP as the user you want to temporarily link.
On success, you will be redirected to the SP.
-
Authenticate to the SP as the local user.
The accounts are only linked temporarily, for the duration of the session. Once the user logs out, the accounts are no longer linked.
Nothing is written in the user’s profile on either the identity provider and the service provider.
Subsequent attempts to access the SP will require that the user authenticates to the IDP AND the SP (assuming no existing session exists), as the identities are not linked.
-
Federation for persistently linked accounts
The SAML v2.0 Name Identifier management profile lets you change a persistent identifier that has been set to federate accounts, and terminate federation for an account.
When user accounts are stored in an LDAP directory server,
name identifier information is stored on the sun-fm-saml2-nameid-info and sun-fm-saml2-nameid-infokey attributes
of a user’s entry.
(To configure these attribute types, in the AM admin UI,
go to Configure > Global Services > SAMLv2 Service Configuration.)
AM provides a pair of JSP files for managing persistently linked accounts;
idpMNIRequestInit.jsp for initiating changes from the IdP side,
and spMNIRequestInit.jsp for initiating changes from the SP side.
The JSP parameters are listed below. When setting parameters in the JSPs, make sure the parameter values are correctly URL-encoded.
idpMNIRequestInit.jsp parameters
spEntityID-
(Required) Use this parameter to indicate the remote service provider. Make sure you URL-encode the value. For example, specify
spEntityID=https://www.sp.com:8443/amasspEntityID=https%3A%2F%2Fwww.sp.com%3A8443%2Fam. metaAlias-
(Required) Use this parameter to specify the local alias for the provider; such as,
metaAlias=/myRealm/idp. This parameter takes the format/realm-name/provider-nameas described in MetaAlias.
You do not repeat the slash for the Top Level Realm; for example, metaAlias=/idp.
requestType-
(Required) Type of manage name ID request, either
NewIDto change the ID, orTerminateto remove the information that links the accounts on the identity provider and service provider. SPProvidedID-
(Required if
requestType=NewID) Name identifier in use as described above. affiliationID-
(Optional) Use this parameter to specify a SAML affiliation identifier.
binding-
(Optional) Use this parameter to indicate which binding to use for the operation. The full, long name format is required for this parameter to work.
The value must be one of the following:
-
urn:oasis:names:tc:SAML:2.0:bindings:HTTP-POST -
urn:oasis:names:tc:SAML:2.0:bindings:HTTP-Redirect -
urn:oasis:names:tc:SAML:2.0:bindings:SOAPrelayState-
(Optional) Use this parameter to specify where to redirect the user when the process is complete. Make sure you URL-encode the value. For example,
relayState=http%3A%2F%2Fforgerock.comtakes the user tohttp://forgerock.com.
spMNIRequestInit.jsp Parameters
idpEntityID-
(Required) Use this parameter to indicate the remote identity provider. Make sure you URL-encode the value. For example, specify
idpEntityID=https://www.idp.com:8443/amasidpEntityID=https%3A%2F%2Fwww.idp.com%3A8443%2Fam. metaAlias-
(Required) Use this parameter to specify the local alias for the provider; such as,
metaAlias=/myRealm/sp. This parameter takes the format/realm-name/provider-nameas described in MetaAlias. You do not repeat the slash for the Top Level Realm,metaAlias=/sp. requestType-
(Required) Type of manage name ID request, either
NewIDto change the ID, orTerminateto remove the information that links the accounts on the identity provider and service provider. IDPProvidedID-
(Required if
requestType=NewID) Name identifier in use as described above. affiliationID-
(Optional) Use this parameter to specify a SAML affiliation identifier.
binding-
(Optional) Use this parameter to indicate which binding to use for the operation. The full, long name format is required for this parameter to work.
The value must be one of the following:
-
urn:oasis:names:tc:SAML:2.0:bindings:HTTP-POST -
urn:oasis:names:tc:SAML:2.0:bindings:HTTP-Redirect -
urn:oasis:names:tc:SAML:2.0:bindings:SOAPrelayState-
(Optional) Use this parameter to specify where to redirect the user when the process is complete. Make sure you URL-encode the value. For example,
relayState=http%3A%2F%2Fforgerock.comtakes the user tohttp://forgerock.com.
Change federation of persistently linked accounts
-
Retrieve the name identifier value, used to manage the federation in the second step.
-
You can retrieve the name identifier value on the IDP side by checking the value of the
sun-fm-saml2-nameid-infokeyproperty.For example, if the user’s entry in the directory shows:
sun-fm-saml2-nameid-infokey:
  https://www.idp.com:8443/am|
  https://www.sp.com:8443/am|
  XyfFEsr6Vixbnt0BSqIglLFMGjR2
-
Then, the name identifier on the IDP side is
XyfFEsr6Vixbnt0BSqIglLFMGjR2.You can retrieve the name identifier value on the SP side by checking the value of
sun-fm-saml2-nameid-info. For example, if the user’s entry in the directory shows the following:sun-fm-saml2-nameid-info: https://www.sp.com:8443/am| https://www.idp.com:8443/am| ATo9TSA9Y2Ln7DDrAdO3HFfH5jKD| https://www.idp.com:8443/am| urn:oasis:names:tc:SAML:2.0:nameid-format:persistent| 9B1OPy3m0ejv3fZYhlqxXmiGD24c| https://www.sp.com:8443/am| SPRole| false
-
Then, the name identifier on the SP side is 9B1OPy3m0ejv3fZYhlqxXmiGD24c.
-
Use the identifier to initiate a change request, as in the following examples:
-
To initiate a change request from the service provider, use a URL similar to the following example:
https://www.sp.com:8443/am/saml2/jsp/spMNIRequestInit.jsp
?idpEntityID=https%3A%2F%2Fwww.idp.com%3A8443%2Fam
&metaAlias=/sp
&requestType=NewID
&IDPProvidedID=XyfFEsr6Vixbnt0BSqIglLFMGjR2
You can substitute
openam/SPMniInitforopenam/saml2/jsp/spMNIRequestInit.jsp. -
To initiate a change request from the identity provider, use a URL similar to the following example:
https://www.idp.com:8443/am/saml2/jsp/idpMNIRequestInit.jsp
?spEntityID=https%3A%2F%2Fwww.sp.com%3A8443%2Fam
&metaAlias=/idp
&requestType=NewID
&SPProvidedID=9B1OPy3m0ejv3fZYhlqxXmiGD24c
You can substitute
openam/IDPMniInitforopenam/saml2/jsp/idpMNIRequestInit.jsp
-
Terminate federation of persistently linked accounts
AM lets you terminate account federation, where the accounts have been linked with a persistent identifier, as described in To Enable Persistent Federation.
The examples below work in an environment where the identity provider is www.idp.example
and the service provider is www.sp.example.
Both providers have deployed AM on port 8443 under deployment URI /am.
-
To initiate the process of terminating account federation from the service provider, access the following URL with at least the query parameters shown:
https://www.sp.com:8443/am/saml2/jsp/spMNIRequestInit.jsp
?idpEntityID=https%3A%2F%2Fwww.idp.com%3A8443%2Fam
&metaAlias=/sp
&requestType=Terminate
-
To initiate the process of terminating account federation from the identity provider, access the following URL with at least the query parameters shown:
https://www.idp.com:8443/am/saml2/jsp/idpMNIRequestInit.jsp
?spEntityID=https%3A%2F%2Fwww.sp.com%3A8443%2Fam
&metaAlias=/idp
&requestType=Terminate
Link identities automatically with auto-federation
AM lets you configure the SP to automatically link identities based on an attribute value in the assertion returned from the IdP, known as auto-federation.
When you know the user accounts on both the IdP and the SP share a common attribute value, such as an email address or other unique user identifier, you can configure AM to map the attributes to each other, and link identities, without the user having to authenticate to the SP.
Link identities automatically based on an attribute value
This procedure demonstrates how to automatically link identities based on an attribute value that is the same in both accounts.
Before attempting to configure auto-federation, ensure that you have configured AM for SAML v2.0, created the identity and SPs, and configured a circle of trust. You must also have configured AM to support single sign-on. For information on performing those tasks, see Deployment considerations and Implement SSO and SLO.
Perform the following steps on the hosted IdP(s), and again on the hosted SP(s):
-
Go to Realms > Realm Name > Applications > Federation > Entity Providers, and click on the name of the hosted provider.
AM only displays the configuration of a single role. Click on the labels to select the role view:
-
On the hosted IdP:
-
Go to the Assertion Processing tab.
-
Review the Attribute Map configuration. If the attributes you want to use to link the accounts on the IdP and the SP are not in the map already, add them.
The IdP will send these attributes in the assertion, and the SP will then map them using its own attribute map.
Tips to configure the Attribute Map on the IdP
The user profile attributes used here must both be allowed in user profiles, and also be specified for the identity repository.
See Adding User Profile Attributes, for instructions on allowing additional attributes in user profiles.
To see the profile attributes available for an LDAP identity repository, log in to the AM admin UI, and go to Realms > Realm Name > Identity Stores > User Configuration. Check the LDAP User Attributes list.
The default IdP mapping implementation allows you to add static values in addition to values taken from the user profile. You add a static value by enclosing the profile attribute name in double quotes ("), as in the following example:
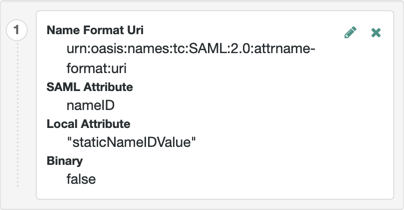
-
Save your work.
-
-
On the hosted SP:
-
Go to the Assertion Processing tab.
-
Review the Attribute Map configuration, and ensure that the attribute mappings you created on the IdP are represented in the map.
Tips to Configure the Attribute Map on the SP
The value of Key is a SAML attribute sent in an assertion, and the value of Value is a property in the authenticated session, or an attribute of the user’s profile.
By default, the SP maps the SAML attributes it receives to equivalent-named session properties. However, when the SP is configured to create identities during autofederation and the identity does not exist yet, the SP maps the SAML attributes to their equivalents in the newly-created user profile.
The special mapping
Key: *, Value: *means that the SP maps each attribute it receives in the assertion to equivalent-named properties or attributes. For example, if the SP receivesmailandfirstnamein the assertion, it maps them tomailandfirstnamerespectively.Remove the special mapping and add key pairs to the map if:
-
(During autofederation) The attributes in the IdP’s and the SP’s identity stores do not match.
-
You need control over the names of the session properties.
-
You need control over which attributes the SP should map, because the IdP adds too many to the assertion.
For example, if the SAML attribute is
firstnameand you want the SP to map it to a session property/user profile attribute calledcn, create a mapping similar toKey: firstname, Value: cn. -
-
Enable Auto Federation. In the Attribute property, enter the SAML attribute name that the SP will use to link accounts, as configured in the Attribute Map.
-
Save your work.
-
-
To test your work, initiate single sign-on; for example, as described in IdP-Initiated SSO JSP.
Authenticate to the IdP as a test user. Attempt to access the SP. Notice that the user has an authenticated session, and can access their profile page on the SP without having to authenticate again.
Create identities automatically with auto-federation
On occasion, there may not yet be an identity to link with on the SP. For example, if it is the first time a user is attempting to access the service, and they do not have an account in the SP identity store.
You can configure AM to dynamically create an account for the user in the SP identity store, using the values in the assertion as profile properties, as defined in the attribute mappings.
Create and link identities based on attribute values
Before attempting to configure auto-federation to create identities based on attribute values, ensure that you have configured AM for SAML v2.0, created the identity and SPs, and configured a circle of trust. You must also have configured AM to support single sign-on. For information on performing those tasks, see Deployment considerations and Implement SSO and SLO.
The following steps demonstrate how to dynamically create missing accounts on the SP:
-
Go to Realms > Realm Name > Applications > Federation > Entity Providers, and click on the name of the hosted provider.
How do I switch between SP and IdP configuration for a given provider?
AM only displays the configuration of a single role. Click on the labels to select the role view:
-
On the hosted IdP:
-
Go to the Assertion Processing tab.
-
Review the Attribute Map configuration. If the attributes you want to populate when creating the new user are not in the map already, add them.
The IdP will send these attributes in the assertion, and the SP will then map them using its own attribute map.
Tips to configure the attribute map on the IdP
The user profile attributes used here must both be allowed in user profiles, and also be specified for the identity repository.
See Adding User Profile Attributes, for instructions on allowing additional attributes in user profiles.
To see the profile attributes available for an LDAP identity repository, log in to the AM admin UI, and go to Realms > Realm Name > Identity Stores > User Configuration. Check the LDAP User Attributes list.
The default IdP mapping implementation allows you to add static values in addition to values taken from the user profile. You add a static value by enclosing the profile attribute name in double quotes ("), as in the following example:
-
Save your work.
-
-
On the hosted SP:
-
Go to the Assertion Processing tab.
-
Review the Attribute Map configuration, and ensure that the attribute mappings on the IdP are represented in the map.
Tips to configure the attribute map on the SP
The value of Key is a SAML attribute sent in an assertion, and the value of Value is a property in the authenticated session, or an attribute of the user’s profile.
By default, the SP maps the SAML attributes it receives to equivalent-named session properties. However, when the SP is configured to create identities during autofederation and the identity does not exist yet, the SP maps the SAML attributes to their equivalents in the newly-created user profile.
The special mapping
Key: *, Value: *means that the SP maps each attribute it receives in the assertion to equivalent-named properties or attributes. For example, if the SP receivesmailandfirstnamein the assertion, it maps them tomailandfirstnamerespectively.Remove the special mapping and add key pairs to the map if:
-
(During autofederation) The attributes in the IdP’s and the SP’s identity stores do not match.
-
You need control over the names of the session properties.
-
You need control over which attributes the SP should map, because the IdP adds too many to the assertion.
For example, if the SAML attribute is
firstnameand you want the SP to map it to a session property/user profile attribute calledcn, create a mapping similar toKey: firstname, Value: cn. -
-
Enable auto-federation.
In the attribute property, enter the SAML attribute name that the SP will use to link accounts, as configured in the Attribute Map.
The value of the named attribute is used as the username of the created user when auto-federation is enabled.
-
Save your work.
-
Go to Realms > Realm Name > Authentication > Settings.
-
On the User Profile tab, in the User Profile field, select Dynamic or Dynamic with User Alias.
For more information the user profile property, see User Profile.
-
Save your work.
-
-
To test your work:
-
Create a new user on the IdP, including values for any attributes you mapped in the providers.
-
Log out of the AM admin UI, and initiate SSO; for example, as described in IdP-Initiated SSO JSP.
-
Authenticate as the new user you created in the IdP.
-
On success, check
https://www.sp.com:8443/am/XUI/#profile/detailsto see the new user account created on the SP, and the attributes that were copied from the assertion.
-
Link identities for authentication
IdPs and SPs must be able to communicate information about users. Sometimes the IdP chooses to share a minimum amount of information about an authenticated user.
For example, the IdP can return a generated, opaque NameID that can’t directly be used
to locate an identity in the SP identity store.
AM can use these pseudonym identifiers to establish links between otherwise unrelated accounts, by requiring that the user authenticates to the SP using a linking authentication mechanism.
First authentication to the SP
The following list describes the sequence of events that occurs the first time a user attempts to authenticate to the AM SP:
-
Accessing the SP.
A user attempts to access a service and is redirected to the AM server acting as the SP.
The redirect URL specifies an authentication tree containing the SAML2 Authentication node. For example,
https://www.sp.com:8443/am/XUI/#login/&service=spSAMLTree. -
Authentication at the IdP.
AM redirects the user to the IdP. The user authenticates successfully at the IdP. The IdP returns a SAML assertion to the SP.
-
SP attempts to access a federated identity.
AM attempts to locate the identity in its own user store. No link between the IdP identity and a local one is found.
-
Invocation of the linking authentication node(s).
Because no link is found, AM follows the route through the authentication tree that lets the user authenticate on the SP.
-
Identity federation.
After successful authentication at the SP, AM writes the name ID from the assertion into the local user’s profile, creating a permanent link between the two identities.
Find information on creating permanent links between identities in Persistent or transient federation.
Find an example of an authentication tree that links identities in SSO and SLO in Integrated Mode.
Subsequent authentications to the SP
The following list describes the sequence of events that occurs during subsequent authentication attempts, after the user’s identities on the IdP and SP have been federated:
-
Accessing the SP.
A returning user attempts to access their service and is redirected to the AM server acting as the SP.
Their login URL specifies the authentication tree containing the SAML2 Authentication node and the Write Federation Information node. For example,
https://www.sp.com:8443/am/XUI/#login/&service=spSAMLTree. -
Authentication at the IdP.
AM redirects the user to the IdP, and the user authenticates successfully at the IdP. The IdP returns a SAML assertion to the SP.
-
SP attempts to access a federated identity.
AM attempts to locate the name ID in its user store. The search for the name ID succeeds.
Because there’s a match, the user doesn’t need to log in to the SP and can access the service.
Configure authentication mechanisms to link accounts
If you aren’t using auto-federation, configure AM to link accounts in one of the following ways, depending on whether AM is standalone or part of an integrated Ping Identity Platform deployment.
Link accounts persistently (standalone AM)
Configure a tree similar to the following:
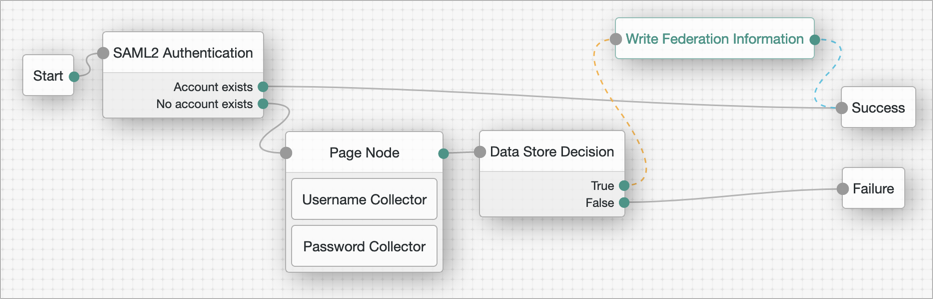
-
Add a SAML2 Authentication node.
Integrated mode is SP SSO-initiated only. SLO isn’t supported.
Make sure that the NameID Format specified is
persistent.The node processes the assertion, makes its contents available to the authentication tree’s state in the
userInfoobject, and tries to map the assertion’s nameID using theuidmapping in the SP’s assertion map.If the node finds a match, the tree continues through the
Account Existsoutput. Otherwise, the tree continues through theNo Account Existsoutput. -
On the
No Account Existsoutcome, configure nodes to authenticate the user to the SP.
Link accounts persistently (Ping Identity Platform deployment)
Configure a journey similar to the following:
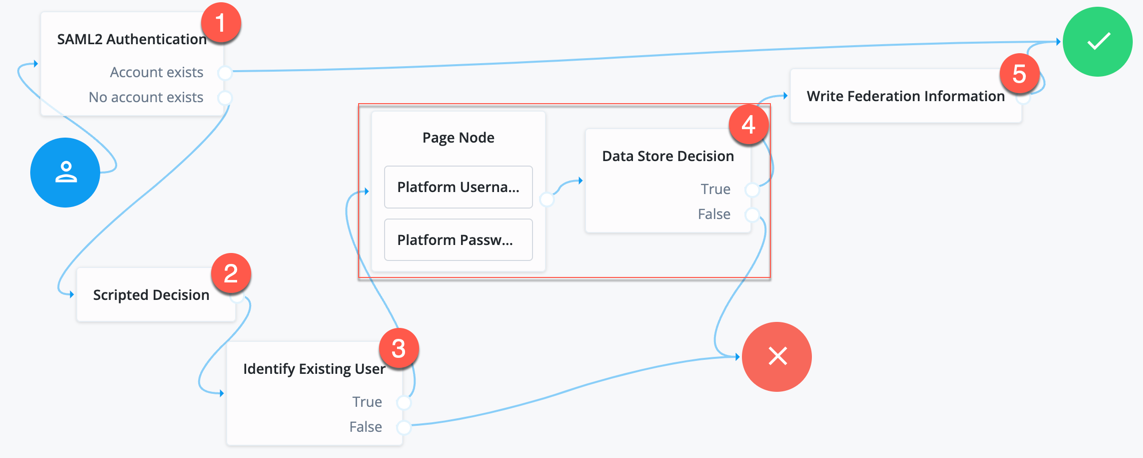
-
Add a SAML2 Authentication node.
Integrated mode is SP SSO-initiated only. SLO isn’t supported.
Make sure that the NameID Format specified is
persistent.The node processes the assertion, makes its contents available to the authentication tree’s state in the
userInfoobject, and tries to map the assertion’s nameID using theuidmapping in the SP’s assertion map.If the node finds a match, the tree continues through the
Account Existsoutput. Otherwise, the tree continues through theNo Account Existsoutput.Note that the attribute the node uses to map the nameID isn’t configurable, and this example adds nodes to process the
userInfoobject and match its contents to the managed user’s schema instead. -
Add a Scripted Decision node to copy the information from the assertion to the authentication tree’s shared state.
Example script
-
Next-generation
-
Legacy
if (nodeState.get("userInfo")) {
  if (nodeState.get("objectAttributes")) {
    nodeState.remove("objectAttributes");
  }
  var userName=null,sn=null,mail=null;

  try {
    var attribs = nodeState.get("userInfo")["attributes"];

    userName=attribs["uid"][0];
    sn=attribs["sn"][0];
    mail=attribs["mail"][0];

  } catch (e) {
    logger.error("Error getting userInfo: " + e);
  }
  nodeState.putShared("objectAttributes", {"userName":userName,"sn":sn,"mail":mail});
}
action.goTo("true");
var fr = JavaImporter(org.forgerock.openam.auth.node.api.Action); if (nodeState.get("userInfo")) { if (nodeState.get("objectAttributes")) { nodeState.remove("objectAttributes"); } var userName=null,sn=null,mail=null; try { var attribs = nodeState.get("userInfo").get("attributes"); userName=attribs.get("uid").get(0).asString(); sn=attribs.get("sn").get(0).asString(); mail=attribs.get("mail").get(0).asString(); } catch (e) { logger.error("Error getting userInfo: " + e); } nodeState.putShared("objectAttributes", {"userName":userName,"sn":sn,"mail":mail}); } action = fr.Action.goTo("true").build();For more information, see Scripted Decision node API.
-
-
Add an Identify Existing User node to search the user with the appropriate attribute.
For example,
userName. -
Authenticate the user to the SP.
-
Add the Write Federation Information node to the successful outcome of the authentication process to create the link between the accounts.
If a transient link exists, it is converted into a persistent one.
Link identities to a single, shared account
You temporarily map identities on the IdP to a single account on the SP;
for example, the anonymous account, in order to exchange attributes about the user without a user-specific
account on the SP.
This approach can be useful when the SP either needs no user-specific account to provide a service, or when you don’t want to create or retain identity data on the SP, but instead you make authorization decisions based on attribute values from the IdP.
Link identities to an SP account
The following steps demonstrate how to auto-federate using a single user account on the SP.
Before attempting these steps, ensure that you have configured AM for SAML v2.0, created the identity and SPs, and configured a circle of trust. You must also have configured AM to support single sign-on. For information on performing those tasks, see Deployment considerations and Implement SSO and SLO.
-
On the hosted IdP:
-
In the AM admin UI, go to Realms > Realm Name > Applications > Federation > Entity Providers > Hosted Identity Provider Name.
-
On the Assertion Processing tab, if the attributes you want to access from the SP are not yet included in the Attribute Map property, add the attribute mappings.
Enter attribute map values using the following format:
SAML Attribute Name=Profile Attribute Name. -
Save your work.
-
-
On the hosted SP:
-
In the AM admin UI, go to Realms > Realm Name > Applications > Federation > Entity Providers > Hosted Service Provider Name.
-
On the Assertion Processing tab, if the attributes you want to access from the IdP are not yet included in the Attribute Map property, add the attribute mappings.
Enter attribute map values using the following format:
SAML Attribute Name=Profile Attribute Name.You can use a special wildcard mapping of
*=*, which maps each attribute in the assertion to an identically named attribute on the SP, using the relevant value. -
Ensure that the Auto Federation property is not selected.
-
In the Transient User field, add the account name AM will use to link all identities from the IdP, for example;
anonymous. -
Save your work.
-
-
To test your work:
-
Create a new user on the IdP, including values for any attributes you mapped in the providers.
-
Log out of the AM admin UI, and initiate SSO using transient federation; for example, as described in To Enable Transient Federation.
-
Authenticate to the IdP as the new user you created.
-
After successfully authenticating to the IdP, check that the identity is linked to a transient account by performing the following steps:
-
In a separate browser or private window, log in to the AM admin UI of the SP.
-
Go to Realms > Realm Name > Sessions.
-
Enter the transient user name you configured earlier; for example,
anonymous.You will see one or more sessions of users who have initiated single sign-on and been temporarily linked to the transient user account.
-
-
Link identities in bulk
If you manage both the IdP and SP,
you can link accounts in bulk by using the ssoadm bulk federation commands.
Before you can run the bulk federation commands, first establish the relationship between accounts,
set up the providers as described in Configure IdPs, SPs, and CoTs,
and install the ssoadm tool.
See Set up administration tools.
To understand the relationships between accounts,
consider an example where the IdP is at www.idp.com and the SP is at www.sp.com.
A test user account has the Universal ID id=bjensen,ou=user,dc=idp,dc=com on the IdP.
This maps to the Universal ID id=bjensen,ou=user,dc=sp,dc=com on the SP.
The ssoadm command requires a file that maps local user IDs to remote user IDs,
one per line, separated by the vertical bar (|) character.
Each line of the file appears as follows:
local-user-ID|remote-user-ID
In the example, starting on the SP side, the line for the test user reads as follows:
id=bjensen,ou=user,dc=sp,dc=com|id=bjensen,ou=user,dc=idp,dc=com
All the user accounts mapped in your file must exist at the IdP and the SP when you run the commands to link them.
Link the accounts using the ssoadm bulk federation commands:
-
Prepare the data with the
ssoadm do-bulk-federationcommand.The following example starts on the SP side:
$ cat /tmp/user-map.txt id=bjensen,ou=user,dc=sp,dc=com\|id=bjensen,ou=user,dc=idp,dc=com $ ssoadm do-bulk-federation \ --metaalias /sp \ --remoteentityid https://www.idp.com:8443/am \ --useridmapping /tmp/user-map.txt \ --nameidmapping /tmp/name-map.txt \ --adminid uid=amAdmin,ou=People,dc=am,dc=example,dc=com \ --password-file /tmp/pwd.txt \ --spec saml2 Bulk Federation for this host was completed. To complete the federation, name Id mapping file should be loaded to remote provider. -
Copy the name ID mapping output file to the other provider:
$ scp /tmp/name-map.txt openam@www.idp.com:/tmp/name-map.txt openam@www.idp.com’s password: ** name-map.txt 100% 177 0.2KB/s 00:00 -
Import the name ID mapping file with the
ssoadm import-bulk-fed-datacommand.The following example is performed on the IdP side:
$ ssoadm import-bulk-fed-data \
  --adminid uid=amAdmin,ou=People,dc=am,dc=example,dc=com \
  --password-file /tmp/pwd.txt \
  --metaalias /idp \
  --bulk-data-file /tmp/name-map.txt
Bulk Federation for this host was completed.
At this point the accounts are linked.
Implement a SAML v2.0 gateway by using Secure Attribute Exchange
Most deployments can rely on AM to handle authentication and provide identity assertions. AM provides basic authentication journeys out of the box with the expectation that you’ll add custom authentication journeys to suit your deployment.
PingGateway lets you integrate legacy systems into your access management deployment.
In a deployment where you need AM to act as a SAML v2.0 gateway to a legacy application that serves as an IdP, you can use AM Secure Attribute Exchange (SAE). On the IdP side, SAE lets AM retrieve the information needed to create assertions from an external authentication service, bypassing AM authentication and trusting the external service as the authoritative source of authentication. On the SP side, SAE lets AM securely provide attributes to an application that makes its own policy decision based on the attributes rather than rely on AM for the policy decision.
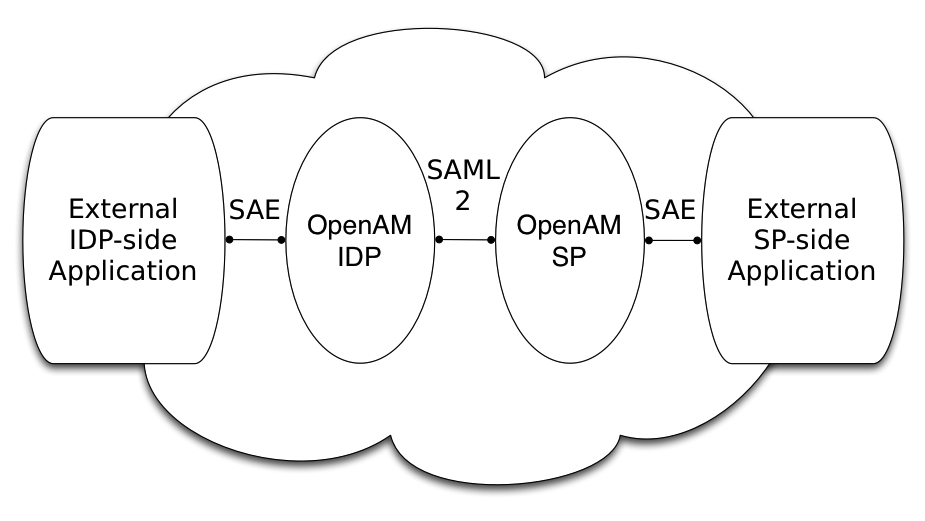
When you use SAE on the IdP side,
an external application acts as the authoritative source of authentication.
After a user authenticates successfully,
the application tells AM to create an authenticated session by sending a secure HTTP GET or POST to AM
that asserts the identity of the user.
AM processes the assertion to create a session for the user.
If the user is already authenticated and comes back to access the application,
the application sends a secure HTTP POST to AM
to assert both the user’s identity and also any necessary attributes related to the user.
AM processes the assertion to create the session for the user and populate the attributes in the authenticated session.
When the user logs out,
the external authentication application can initiate single logout from the IdP AM server
by sending the sun.cmd=logout attribute to AM using SAE.
On the SP side, AM communicates using SAML v2.0 with AM on the IdP side. AM can use SAE to transmit attributes to an application through a secure HTTP POST.
SAE relies either on shared keys and symmetric encryption, or on public and private keys and asymmetric encryption to protect attributes communicated between AM and external applications.
AM ships with sample JSPs that demonstrate secure attribute exchange. To try the sample, you must set up an AM circle of trust to include an IdP and an SP, install the SDK sample web application on each provider, and then configure the providers appropriately as described in this page to secure communications with the sample SAE applications on both the IdP and SP sides.
Install the SAE samples
Set up an AM server as an IdP, and another as an SP,
connecting the two in a circle of trust called samplesaml2cot.
Configure both the hosted providers and also the remote providers
as described in Configure IdPs, SPs, and CoTs.
This chapter assumes you set up the hosted IdP at https://www.idp.com:8443/am
and the hosted SP at https://www.sp.com:8443/am.
Make sure federation is working before you add secure attribute exchange applications
that rely on functioning SAML v2.0 communications between the providers.
The SAE samples are not delivered with AM.
Instead, you find them with the client SDK samples
in openam-examples/openam-example-clientsdk-war folder of the openam-public repo.
The SAE samples are under /saml2/sae where you install the samples.
saeIDPApp.jsp is the IdP side external application.
saeSPApp.jsp is the SP side external application.
Prepare to secure SAE communications
In order for SAE to be secure, you must both set up a trust relationship between the application on the IdP side and the AM server acting as IdP, and set up a trust relationship between the application on the SP side and the AM server acting as the SP. These trust relationships can be based on a shared secret and symmetric encryption, or on public and private key pairs and asymmetric encryption. The trust relationships on either side are independent. For example, you can use a shared secret on the IdP side and certificates on the SP side.
When using symmetric encryption, you must define a shared secret string used both for the application and the provider.
The sample uses secret12 as the shared secret.
To simplify configuration,
the sample uses the same shared secret, and thus symmetric encryption, for both trust relationships.
When using symmetric encryption, you must also use the encoded version of your shared secret.
To get the encoded version of a shared secret string, use the encode.jsp page on the provider,
as in https://www.idp.com:8443/am/encode.jsp and https://www.sp.com:8443/am/encode.jsp.
An encoded version of secret12 looks something like AQICEcFhDWmb6sVmMuCJuVh43306HVacDte9.
When using asymmetric encryption, you must obtain a public-private key pair for the application, and store the keys in a keystore on the application side. Also store the public key from AM which is acting as the provider in the application’s keystore. Make note of the certificate aliases for your application’s private key, and for AM’s public key. Also note the path to the keystore for your application, the keystore password, and the private key password.
Secure the IdP side
This configuration uses the default sample settings with a shared secret of secret12,
without encryption of the attributes:
-
Log in as
amAdminto the AM server console where you set up the hosted identity provider (IdP). -
The sample includes a
branchattribute not found in user profiles by default. Therefore, under Realms > Realm Name > Authentication > Settings > User Profile, set User Profile toIgnored, and save your work. -
Under Realms > Realm Name > Applications > Federation > Entity Providers, select the name of the hosted IdP to access the IdP configuration:
-
Under Assertion Processing > Attribute Mapper, add both
mail=mailandbranch=branchto the attribute map, and save your work. -
Under Advanced > SAE Configuration, make sure the IDP URL reflects an endpoint on the IdP such as
https://www.idp.com:8443/am/idpsaehandler/metaAlias/idp, and save your work. -
Also under Advanced > SAE Configuration > Application Security Configuration, add the URL value for the kind of encryption you are using, and save your work.
When using the defaults, the value is something like
url=https://www.idp.com:8443/samples/saml2/sae/saeIDPApp.jsp|type=symmetric|secret=encoded-secret, where the AM SDK sample web application is deployed on the IdP side with context root/samplesand the encoded-secret is something likeAQICEcFhDWmb6sVmMuCJuVh43306HVacDte9.If you use a different mechanism to secure the communications between the SAE application and the provider, read the online help in the console to see how to construct your URL value.
-
-
Under Realms > Realm Name > Applications > Federation > Entity Providers, select the name of the remote SP to access the SP configuration on the IdP side:
-
Under Assertion Processing > Attribute Mapper, add both
mail=mailandbranch=branchto the attribute map, and save your work. -
Under Advanced > SAE Configuration, make sure the SP URL reflects an endpoint on the SP, such as
https://www.sp.com:8443/am/spsaehandler/metaAlias/sp, and save your work. -
Also under Advanced > SAE Configuration, add the URL to the sample SAE application as the SP Logout URL, such as
https://www.sp.com:8443/samples/saml2/sae/saeSPApp.jsp, and save your work.
-
Secure the SP side
This configuration uses the default sample setting of symmetric encryption, with a shared secret of secret12.
Login as amAdmin to the AM server console where you set up the hosted service provider (SP):
-
The sample includes a
branchattribute not found in user profiles by default. Therefore, under Realms > Realm Name > Authentication > Settings > User Profile, set User Profile toIgnored, and save your work. -
Under Realms > Realm Name > Applications > Federation > Entity Providers, select the name of the hosted SP to access the SP configuration:
-
Under Assertion Processing > Attribute Mapper, add both
mail=mailandbranch=branchto the attribute map, and save your work. -
Also under Assertion Processing > Attribute Mapper > Auto Federation, select Enabled, set the Attribute to
mail, and save your work. -
Under Advanced > SAE Configuration, make sure the SP URL reflects an endpoint on the SP such as
https://www.sp.com:8443/am/spsaehandler/metaAlias/sp, and save your work. -
Furthermore, under Advanced > SAE Configuration, add the URL to the sample SAE application as the SP Logout URL such as
https://www.sp.com:8443/samples/saml2/sae/saeSPApp.jsp, and save your work. -
Also under Advanced > SAE Configuration > Application Security Configuration, add the URL value for the kind of encryption you are using, and save your work.
When using the defaults, the value is something like
url=https://www.sp.com:8443/samples/saml2/sae/saeSPApp.jsp|type=symmetric|secret=encoded-secret, where the AM SDK sample web application is deployed on the IdP side with context root/samplesand the encoded-secret is something likeAQICkX24RbZboAVgr2FG1kWoqRv1zM2a6KEH.If you use a different mechanism to secure the communications between the SAE application and the provider, read the online help in the console to see how to construct your URL value.
-
Try it out
After completing the setup described above, go to the IdP-side SAE application;
for example, at https://www.idp.com:8443/samples/saml2/sae/saeIDPApp.jsp.
Make sure you set the SP App URL and SAE URL on IDP end to fit your configuration.
For example, if you used the settings above, use the following values:
- SP App URL
-
https://www.sp.com:8443/samples/saml2/sae/saeSPApp.jsp - SAE URL on IDP end
-
https://www.idp.com:8443/am/idpsaehandler/metaAlias/idp
Check the settings, and select Generate URL to open the Secure Attributes Exchange IDP APP SAMPLE page.
Select the ssourl link to start the exchange.
The resulting web page shows the attributes exchanged, including the mail and branch values used. The text of that page is something like the following:
SAE SP APP SAMPLE

Secure Attrs :
mail            testuser@foo.com
sun.idpentityid https://www.idp.com:8443/am
sun.spentityid  https://www.sp.com:8443/am
branch          mainbranch
sun.authlevel   0
Implement SAML v2.0 SPs by using Fedlets
An AM Fedlet is a small Java web application that can act as an SP for a specific IdP without requiring that you install all of AM.
When your organization acts as the IdP and you want to enable SPs to federate their services with yours, you can generate configuration files for a Fedlet.
Fedlets are easy to integrate into Java web applications; they do not require an entire AM installation alongside your application, but instead can redirect to AM for single sign-on, and to retrieve SAML assertions.
Fedlet Support for SAML v2.0 Features
| SAML v2.0 Feature | Java Fedlet |
|---|---|
IdP and SP-initiated single sign-on (HTTP Artifact) |
Supported |
IdP and SP-initiated single sign-on (HTTP POST) |
Supported |
IdP and SP-initiated single logout (HTTP POST) |
Supported |
IdP and SP-initiated single logout (HTTP Redirect) |
Supported |
Sign requests and responses |
Supported |
Encrypt assertion, attribute, and NameID elements |
Supported |
Export SP Metadata |
Supported |
Multiple IdPs |
Supported |
External IdP discovery service |
Supported |
Bundled IdP reader service for discovery |
Supported |
After receiving the configuration files for the Fedlet, the SP administrator installs them, and then obtains the Fedlet web application from the AM distribution and installs it in the application web container.
The following table summarizes the high-level tasks required to configure Fedlets:
| Task | Resources |
|---|---|
Create and configure the Fedlet Configure the Fedlet files and its keystore for your environment, add the metadata from the IdPs to it, and share the Fedlet’s metadata with the IdPs. |
|
Ensure the Fedlet is secure By default, signing and encryption are not configured. You should configure them to sign and encrypt data, such as assertions. |
|
Test the Fedlet You can test the Fedlet as a standalone application, or by integrating it inside one of your applications. |
Create and configure the Fedlet
An AM Fedlet is a small web application that makes it easy to add SAML v2.0 service provider (SP) capabilities to your Java web application.
The full AM distribution file, AM-8.0.0.zip,
includes the Java Fedlet package, Fedlet-8.0.0.zip, that you can use as the basis of your Fedlet.
This section covers how to configure a Java Fedlet using that distribution,
by editing the circle of trust, Java properties, and IdP and SP XML configuration templates.
The high-level steps are:
-
Determine the roles that the IdP(s) and Fedlet play in SAML v2.0 Circles of Trust.
-
Unpack the Fedlet from the full AM distribution
.zipfile to access the Fedlet.warfile and template configuration files. -
Prepare the Fedlet configuration, including setting up a configuration directory and keystore if needed.
-
Obtain SAML v2.0 metadata configuration files from the IdP(s), and add them to the Fedlet configuration.
-
Finish preparing the Fedlet configuration by editing the remaining Fedlet template configuration files.
-
Share the Fedlet SAML v2.0 configuration files with the IdP(s).
An IdP relies on the standard SAML v2.0 metadata to communicate with the Fedlet.
-
Deploy and test the Fedlet.
Contents of the Java Fedlet distribution .zip file
Unpack the Java Fedlet distribution .zip file into a working directory:
$ mkdir fedlet && cd fedlet
$ unzip ../Fedlet-8.0.0.zip
The Fedlet-8.0.0.zip file contains the following files:
fedlet.war-
This file contains a Java Fedlet web application that serves as an example, and that you can embed in your applications.
README-
This file describes Fedlet features.
conf/-
This folder contains the Fedlet configuration templates that you edit as appropriate for your deployment.
When editing the templates, place copies of the files in the Fedlet home directory on the system where you deploy the Fedlet. By default the Fedlet home directory is
user.home/uri, where user.home is the value of the Java system propertyuser.homefor the user running the web container where you deploy the Fedlet, and uri is the path of the URI where you deploy the Fedlet, such as/fedlet.For example, if user.home is the
/home/userfolder, that user could have a/home/user/fedletfolder for Fedlet configuration files:$ mkdir ~/fedletTo change the location, set the system property
com.sun.identity.fedlet.homewhen starting the container where the Fedlet runs:$ java -Dcom.sun.identity.fedlet.home=/path/to/fedlet/conf … conf/FederationConfig.properties-
This file defines settings for the Fedlet as a web application. It does not address the SAML v2.0 configuration.
For more about this file, see Configuring Java Fedlet Properties.
conf/fedlet.cot-template-
This template defines settings for a SAML v2.0 circle of trust to which the Fedlet belongs, and should be named
fedlet.cotafter configuration.For more about this file, see Configure circles of trust.
conf/idp.xml(not provided)-
The
idp.xmlfile is standard SAML v2.0 metadata that describes the IdP configuration.Templates for other SAML v2.0 configuration files are provided, but no
idp.xmltemplate file is provided.Instead you must obtain the SAML v2.0 metadata from the IdP, and add it as an
idp.xmlfile here, alongside the other SAML v2.0 configuration files. How you obtain this file from the IdP depends on the IdP implementation.To obtain this information from an AM instance, see To Create a Hosted Entity Provider.
conf/idp-extended.xml-template-
This template holds extended SAML v2.0 IdP settings that AM uses, and should be named
idp-extended.xmlafter configuration.For more about this file, see Configure the IdPs.
conf/sp.xml-template-
This template describes standard SAML v2.0 SP settings, and should be named
sp.xmlafter configuration.For more about this file, see Configure the SPs.
conf/sp-extended.xml-template-
This template describes extended SAML v2.0 SP settings that the Fedlet uses, and should be named
sp-extended.xmlafter configuration.For more about this file, see Configure the SPs.
To configure a Fedlet, make copies of the template files listed above, configure the necessary properties and values, and provide the resulting files to the person administering the SP, ready to deploy. See Deploy and test the Fedlet on the SP.
Configuring Java Fedlet Properties
File: FederationConfig.properties
The Java Fedlet to configure by hand includes a FederationConfig.properties file
that defines settings for the Fedlet as a web application.
The configuration for a single Java Fedlet includes only one FederationConfig.properties file,
regardless of how many IdP and SP configurations are involved.
This file does not address the SAML v2.0 configuration.
When configured this file contains sensitive properties such as the value of am.encryption.pwd.
Make sure it is readable only by the user running the Fedlet application.
Deployment URL settings
The following settings define the Fedlet deployment URL.
com.iplanet.am.server.protocol-
Set this to the protocol portion of the URL, such as HTTP or HTTPS.
com.iplanet.am.server.host-
Set this to the host portion of the URL, such as
www.sp.com. com.iplanet.am.server.port-
Set this to the port portion of the URL, such as 80, 443, 8080, or 8443.
com.iplanet.am.services.deploymentDescriptor-
Set this to path portion of the URL, starting with a
/, such as/fedlet.
Log and Statistics Settings
The following settings define the Fedlet configuration for logging and monitoring statistics.
com.iplanet.am.logstatus-
This sets whether the Fedlet actively writes debug log files.
Default:
ACTIVE com.iplanet.services.debug.level-
This sets the debug log level.
The following settings are available, in order of increasing verbosity:
-
off -
error -
warning -
message
Default:
message -
com.iplanet.services.debug.directory-
This sets the location of the debug log folder.
Trailing spaces in the file names are significant. Even on Windows systems, use slashes to separate directories.
Examples:
/home/user/fedlet/debug,C:/fedlet/debug com.iplanet.am.stats.interval-
This sets the interval at which statistics are written, in seconds.
The shortest interval supported is 5 seconds. Settings less than 5 (seconds) are taken as 5 seconds.
Default:
60 com.iplanet.services.stats.state-
This sets how the Fedlet writes monitoring statistics.
The following settings are available:
off
console(write to the container logs)
file(write to Fedlet stats logs)Default:
file com.iplanet.services.stats.directory-
This sets the location of the stats file folder.
Trailing spaces in the file names are significant. Even on Windows systems, use slashes to separate directories.
Examples:
/home/user/fedlet/stats,C:/fedlet/stats
Public and private key settings
The following settings define settings for access to certificates and private keys used in signing and encryption.
Other sections in this guide explain how to configure a Fedlet for signing and encryption including how to work with the keystores that these settings reference, and how to specify public key certificates in standard SAML v2.0 metadata. When working with a Java Fedlet, see Enable signing and encryption in a Fedlet.
com.sun.identity.saml.xmlsig.keystore-
This sets the path to the keystore file that holds public key certificates of IdPs and key pairs for the Fedlet.
For hints on generating a keystore file with a key pair, see Change default key aliases.
Example:
@FEDLET_HOME@/keystore.jceks com.sun.identity.saml.xmlsig.storepass-
This sets the path to the file that contains the keystore password encoded by using the symmetric key set as the value of
am.encryption.pwd.When creating the file, encode the cleartext password by using your own test copy (not a production version) of AM.
-
In the AM admin UI, go to Deployment > Servers > Server Name > Security > Encryption, and set the Password Encryption Key to your symmetric key.
Do not do this in a production system where the existing symmetric key is already in use!
-
Switch to the
encode.jsppage, such ashttps://am.example.com:8443/am/encode.jsp, enter the cleartext password to encode with your symmetric key, and select Encode. -
Copy the encoded password to your file.
Example:
@FEDLET_HOME@/.storepass -
com.sun.identity.saml.xmlsig.keypass-
This sets the path to the file that contains the private key password encoded by using the symmetric key set as the value of
am.encryption.pwd.To encode the cleartext password, follow the same steps for the password used when setting
com.sun.identity.saml.xmlsig.storepass.Example:
@FEDLET_HOME@/.keypass com.sun.identity.saml.xmlsig.certalias-
This sets the alias of the Fedlet’s public key certificate.
Example:
fedlet-cert com.sun.identity.saml.xmlsig.storetype-
The sets the type of keystore.
Default:
JKS(JCEKSis recommended.) am.encryption.pwd-
This sets the symmetric key that used to encrypt and decrypt passwords.
Example:
uu4dHvBkJJpIjPQWM74pxH3brZJ5gJje
Alternative implementation settings
The Java Fedlet properties file includes settings that let you plug in alternative implementations of Fedlet capabilities. You can safely use the default settings, as specified in the following list. The list uses the same order for the keys you find in the file.
com.sun.identity.plugin.configuration.class-
Default:
com.sun.identity.plugin.configuration.impl.FedletConfigurationImpl com.sun.identity.plugin.datastore.class.default-
Default:
com.sun.identity.plugin.datastore.impl.FedletDataStoreProvider com.sun.identity.plugin.log.class-
Default:
com.sun.identity.plugin.log.impl.FedletLogger com.sun.identity.plugin.session.class-
Default:
com.sun.identity.plugin.session.impl.FedletSessionProvider com.sun.identity.plugin.monitoring.agent.class-
Default:
com.sun.identity.plugin.monitoring.impl.FedletAgentProvider com.sun.identity.plugin.monitoring.saml2.class-
Default:
com.sun.identity.plugin.monitoring.impl.FedletMonSAML2SvcProvider com.sun.identity.plugin.monitoring.idff.class-
Default:
com.sun.identity.plugin.monitoring.impl.FedletMonIDFFSvcProvider com.sun.identity.saml.xmlsig.keyprovider.class-
Default:
com.sun.identity.saml.xmlsig.JKSKeyProviderDespite the name, this provider supports JCEKS keystores.
com.sun.identity.saml.xmlsig.signatureprovider.class-
Default:
com.sun.identity.saml.xmlsig.AMSignatureProvider com.sun.identity.common.serverMode-
Default:
false com.sun.identity.webcontainer-
Default:
WEB_CONTAINER com.sun.identity.saml.xmlsig.passwordDecoder-
Default:
com.sun.identity.fedlet.FedletEncodeDecode com.iplanet.services.comm.server.pllrequest.maxContentLength-
Default:
16384 com.iplanet.security.SecureRandomFactoryImpl-
Default:
com.iplanet.am.util.SecureRandomFactoryImpl com.iplanet.security.SSLSocketFactoryImpl-
Default:
com.sun.identity.shared.ldap.factory.JSSESocketFactory com.iplanet.security.encryptor-
Default:
com.iplanet.services.util.JCEEncryption com.sun.identity.jss.donotInstallAtHighestPriority-
Default:
true com.iplanet.services.configpath-
Default:
@BASE_DIR@
Configure circles of trust
File: fedlet.cot
This file defines settings for a SAML v2.0 circle of trust. The Fedlet belongs to at least one circle of trust.
Configure a circle of trust with a single IdP
When the Fedlet is involved in only a single circle of trust with one IdP and the Fedlet as an SP,
the only settings to change are cot-name and sun-fm-trusted-providers.
-
Save a copy of the template as a
fedlet.cotfile in the configuration folder, as in the following example:$ cp ~/Downloads/fedlet/conf/fedlet.cot-template ~/fedlet/fedlet.cot -
Set
cot-nameto the name of the circle of trust. -
Set
sun-fm-trusted-providersto a comma-separated list of the entity names for the IdP and SP.For example, if the IdP is AM with entity ID
https://am.example.com:8443/amand the SP is the Fedlet with entity IDhttps://sp.example.net:8443/fedlet, then set the property as follows:sun-fm-trusted-providers=https://am.example.com:8443/am,https://sp.example.net:8443/fedlet
Configure a circle of trust with multiple IdPs
When the circle of trust involves multiple IdPs, use the Fedlet in combination with the AM IdP Discovery service.
|
For this to work, the IdPs must be configured to use IdP discovery, and users must have preferred IdPs. |
-
Set up the AM IdP Discovery service.
For details see Deploy the IdP Discovery service.
-
Configure the circle of trust as described in Configure a circle of trust with a single IdP, but specifying multiple IdPs, including the IdP that provides the IDP Discovery service.
-
Set the
sun-fm-saml2-readerservice-urland thesun-fm-saml2-writerservice-urlproperties as defined for the IDP Discovery service.
Configure multiple circles of trust
This procedure concerns deployments where the Fedlet participates as SP in multiple Circles of Trust, each involving their own IdP.
-
For each circle of trust, save a copy of the template in the configuration folder.
The following example involves two circles of trust:
$ cp ~/Downloads/fedlet/conf/fedlet.cot-template ~/fedlet/fedlet.cot $ cp ~/Downloads/fedlet/conf/fedlet.cot-template ~/fedlet/fedlet2.cot -
Set up IdP XML files for each IdP as described in Configure the IdPs.
-
For each circle of trust, set up the cot file as described in Configure a circle of trust with a single IdP.
-
In the extended SP XML file described in Configure the IdPs, set the Attribute element with name
cotlistto include values for all circles of trust. The values are taken from thecot-namesettings in the cot files.The following example works with two circles of trust,
cotandcot2.<Attribute name="cotlist"> <Value>cot</Value> <Value>cot2</Value> </Attribute>The same Attribute element is also available in extended IdP XML files for cases where an IdP belongs to multiple circles of trust.
Configure the IdPs
Files: idp.xml, idp-extended.xml
As described in Contents of the Java Fedlet distribution .zip file, the IdP provides its standard SAML v2.0 metadata as XML,
which you save in the configuration folder as a idp.xml file.
If the IdP uses AM, the IdP can also provide extended SAML v2.0 metadata as XML,
which you save in the configuration folder as a idp-extended.xml file,
rather than using the template for extended information.
If you have multiple IdPs,
then number the configuration files, as in idp.xml, idp2.xml, idp3.xml,
and also idp-extended.xml, idp2-extended.xml, idp3-extended.xml, and so on.
IdP standard XML
This section covers the configuration in the idp.xml file.
The idp.xml file contains standard SAML v2.0 metadata for an IdP in a circle of trust
that includes the Fedlet as SP.
The IdP provides you the content of this file.
If the IdP uses AM then the administrator can export the metadata
by using either the ssoadm create-metadata-templ command
or the /saml2/jsp/exportmetadata.jsp endpoint under the AM deployment URL.
If the IdP uses an implementation different from AM,
see the documentation for details on obtaining the standard metadata.
The standard, product-independent metadata are covered in
Metadata for the OASIS Security Assertion Markup Language (SAML) V2.0.
The standard XML namespace describing the XML document has identifier urn:oasis:names:tc:SAML:2.0:metadata.
An XML schema description for this namespace is found online at
http://docs.oasis-open.org/security/saml/v2.0/saml-schema-metadata-2.0.xsd.
IdP extended XML
This section covers the configuration in the idp-extended.xml file.
Most extended metadata are specific to the AM implementation of SAML v2.0.
If the IdP runs AM, have the IdP provide the extended metadata exported
by using the ssoadm create-metadata-templ command.
This section covers only the basic settings relative to all IDPs.
The extended metadata file describes an EntityConfig element,
defined by the namespace with the identifier urn:sun:fm:SAML:2.0:entityconfig.
The XML schema definition is described in the entity-config-schema.xsd file,
available as part of the AM source code, though not included in the AM .war file.
The unconfigured Fedlet includes a template file, conf/idp-extended.xml-template.
This extended metadata template for the IdP requires
that you edit at least the IDP_ENTITY_ID and fedletcot values
to reflect the IdP entity ID used in the standard metadata
and the circle of trust name defined in the fedlet.cot file, respectively.
The hosted attribute on the EntityConfig element must remain set to hosted="0", meaning that the IdP is remote.
The IdP is likely to play at least the role of single sign-on IdP,
though the namespace defines elements for the attribute authority and policy decision point roles shown in the template,
as well as the others defined in the standard governing SAML v2.0 metadata.
The extended metadata file is essentially a series of XML maps of key-value pairs
specifying IdP configuration for each role.
All role-level elements can take a metaAlias attribute that the Fedlet uses when communicating with the IdP.
Each child element of a role element defines an Attribute whose name is the key.
Each Attribute element can contain multiple Value elements.
The Value elements' contents comprise the values for the key.
All values are strings, sometimes with a format that is meaningful to AM.
The basic example in the IdP template shows the minimal configuration for the single sign-on IdP role.
In the following example, the description is empty and the name of the circle of trust is fedletcot.
<IDPSSOConfig>
   <Attribute name="description">
     <Value/>
   </Attribute>
   <Attribute name="cotlist">
     <Value>fedletcot</Value>
   </Attribute>
</IDPSSOConfig>
<AttributeAuthorityConfig>
   <Attribute name="cotlist">
     <Value>fedletcot</Value>
   </Attribute>
</AttributeAuthorityConfig>
<XACMLPDPConfig>
   <Attribute name="wantXACMLAuthzDecisionQuerySigned">
     <Value></Value>
   </Attribute>
   <Attribute name="cotlist">
     <Value>fedletcot</Value>
   </Attribute>
</XACMLPDPConfig>
When functioning as IdP, AM can take many other Attribute values.
These are implementation dependent.
You can obtain the extended metadata from AM by using the ssoadm create-metadata-templ subcommand.
|
Custom authentication contexts can be loaded and saved when they are loaded via ssoadm as part of the hosted IDP/SP extended metadata and the saves are made in the AM admin UI. Any custom contexts loaded via ssoadm are also visible in the AM admin UI. For example, you can specify custom entries
in the |
Configure the SPs
Files: sp.xml, sp-extended.xml
As mentioned in Contents of the Java Fedlet distribution .zip file, the Fedlet SAML v2.0 configuration is defined in two XML files,
the standard metadata in a sp.xml file and the extended metadata in a sp-extended.xml file.
If the Fedlet has multiple SP personalities, then number the configuration files,
as in sp.xml, sp2.xml, sp3.xml,
and also sp-extended.xml, sp2-extended.xml, sp3-extended.xml, and so on.
Service provider standard XML
This section covers the configuration in the sp.xml file.
The sp.xml file contains standard SAML v2.0 metadata for the Fedlet as SP.
If you edit the standard metadata, make sure that you provide the new version to your IdP,
as the IdP software relies on the metadata to get the Fedlet’s configuration.
The standard metadata are covered in
Metadata for the OASIS Security Assertion Markup Language (SAML) V2.0.
The standard XML namespace describing the XML document has identifier urn:oasis:names:tc:SAML:2.0:metadata.
An XML schema description for this namespace is found online at
http://docs.oasis-open.org/security/saml/v2.0/saml-schema-metadata-2.0.xsd.
A standard metadata file describes the SAML v2.0 roles that the Fedlet plays.
The default base element of the file is an EntityDescriptor, which is a container for role descriptor elements.
The EntityDescriptor element can therefore contain multiple role descriptor elements.
The namespace for the standard metadata document is urn:oasis:names:tc:SAML:2.0:metadata.
You can get the corresponding XML schema description online at
http://docs.oasis-open.org/security/saml/v2.0/saml-schema-metadata-2.0.xsd.
In general, you can find standard SAML v2.0-related XML schema definitions at
http://docs.oasis-open.org/security/saml/v2.0/.
Fedlets do not support all arbitrary SP configurations. As lightweight SP components, Fedlets are built to play the SP role in web single sign-on and single logout, to perform attribute queries and XACML policy decision requests, and to work with multiple IDPs including circles of trust with an IDP discovery service. For a list of what Fedlets support, see the table Fedlet Support for SAML v2.0 Features.
When preparing a standard SP metadata file, follow these suggestions.
-
Start either with an existing example or with the template file,
conf/sp.xml-template. -
When using the template, replace the following placeholders.
FEDLET_ENTITY_ID-
The Fedlet entity ID used when communicating with the IdP.
AM often uses the deployment URL as the entity ID, though that is a convention rather than a requirement.
FEDLET_PROTOCOL-
The Fedlet deployment protocol (
http,https) FEDLET_HOST-
The Fedlet deployment host name
FEDLET_PORT-
The Fedlet deployment port number
FEDLET_DEPLOY_URI-
The Fedlet application deployment path
-
Add and edit role elements as children depending on the roles the Fedlet plays as described in the following sections.
Single Sign-On and Logout: SPSSODescriptor Element
Add an SPSSODescriptor element to play the SP role in web single sign-on and logout.
An SPSSODescriptor element has attributes specifying
whether requests and assertion responses should be digitally signed.
-
The
AuthnRequestsSignedattribute indicates whether the Fedlet signs authentication requests.If you set the
AuthnRequestsSignedattribute to true, then you must also configure theSPSSODescriptorelement to allow the Fedlet to sign requests. For details see the section on Enable signing and encryption in a Fedlet. -
The
WantAssertionsSignedattribute indicates whether the Fedlet requests signed assertion responses from the IdP.
An SPSSODescriptor element’s children indicate what name ID formats the Fedlet supports,
and where the IdP can call the following services on the Fedlet.
-
The
AssertionConsumerServiceelements specify endpoints that support the SAML Authentication Request protocols.You must specify at least one of these. The template specifies two, with the endpoint supporting the HTTP POST binding as the default.
-
The optional
SingleLogoutServiceelements specify endpoints that support the SAML Single Logout protocols.
Service Provider Extended XML
This section covers the configuration in the sp-extended.xml file.
The extended metadata are specific to the AM implementation of SAML v2.0.
The extended metadata file describes an EntityConfig element,
defined by the namespace with the identifier urn:sun:fm:SAML:2.0:entityconfig.
The XML schema definition is described in the entity-config-schema.xsd file,
available as part of the AM source code, though not included with the unconfigured Fedlet.
The unconfigured Fedlet does include a template file, conf/sp-extended.xml-template.
This extended metadata template for the IdP requires that you edit at least the FEDLET_ENTITY_ID placeholder value,
the appLogoutUrl attribute value in the SPSSOConfig element, and the fedletcot values.
The FEDLET_ENTITY_ID value must reflect the SP entity ID used in the standard metadata.
For the single logout profile, the appLogoutUrl attribute value must match the Fedlet URL based on the values
used in the FederationConfig.properties file.
The fedletcot values must correspond to the circle of trust name defined in the fedlet.cot file.
The hosted attribute on the EntityConfig element must remain set to hosted="1",
meaning that the SP is hosted (local to the Fedlet).
If you provide a copy of the file to your IdP running AM, however,
then set hosted="0" for the IdP, as the Fedlet is remote to the IdP.
The extended metadata file is essentially a series of XML maps of key-value pairs
specifying IdP configuration for each role.
All role-level elements can take a metaAlias attribute that the Fedlet uses when communicating with the IdP.
Each child element of a role element defines an Attribute whose name is the key.
Each Attribute element can contain multiple Value elements.
The Value elements' contents comprise the values for the key.
All values are strings, sometimes with a format that is meaningful to the Fedlet.
The basic example in the SP template shows the configuration options, documented in the following lists.
Service Provider Extended XML: SPSSOConfig Settings
This section covers elements for the SP single sign-on role, arranged in the order they appear in the template.
description-
Human-readable description of the Fedlet in the SP single sign-on role
signingCertAlias-
Alias of the public key certificate for the key pair used when signing messages to the IDP
The key pair is found in the Fedlet’s keystore, and the certificate is included in the standard metadata. See Public and private key settings for details on how to specify access to the keystore, and Service provider standard XML for details on how to set up standard metadata.
encryptionCertAlias-
Alias of the public key certificate for the key pair used when encrypting messages to the IDP
The key pair is found in the Fedlet’s keystore, and the certificate is included in the standard metadata. See Public and private key settings for details on how to specify access to the keystore, and Service provider standard XML for details on how to set up standard metadata.
basicAuthOn-
Set this to true to use HTTP Basic authorization with the IdP.
Default: false
basicAuthUser-
When using HTTP Basic authorization with the IdP, this value is the username.
basicAuthPassword-
When using HTTP Basic authorization with the IdP, this value is the password.
Encrypt the password using the
encode.jsppage of your test copy of AM that you might also have used to encode keystore passwords as described in Public and private key settings. autofedEnabled-
Set to
trueto enable automatic federation with AM, based on the value of a profile attribute common to user profiles in AM and in the Fedlet’s context.Default: false
autofedAttribute-
If you enable automatic federation, set this property to the name of the user profile attribute used for automatic federation.
transientUser-
Use this effective identity for users with transient identifiers.
Default: anonymous
spAdapter-
Class name for a plugin SP adapter
This class must extend
com.sun.identity.saml2.plugins.SAML2ServiceProviderAdapter. spAdapterEnv-
When using a plugin SP adapter, this attribute’s values optionally take a map of settings
key=valueused to initialize the plugin. fedletAdapter-
Class name for an alternate fedlet adapter. Default is an empty value.
fedletAdapterEnv-
When using an alternate fedlet adapter, this attribute’s values optionally take a map of settings
key=valueused to initialize the plugin. spAccountMapper-
Class name for an implementation mapping SAML protocol objects to local user profiles
Default:
com.sun.identity.saml2.plugins.DefaultLibrarySPAccountMapper spAttributeMapper-
Class name for an implementation mapping SAML assertion attributes to local user profile attributes
Default:
com.sun.identity.saml2.plugins.DefaultSPAttributeMapper spAuthncontextMapper-
Class name for an implementation determining the authentication context to set in an authentication request, and mapping the authentication context to an authentication level
Default:
com.sun.identity.saml2.plugins.DefaultSPAuthnContextMapper spAuthncontextClassrefMapping-
String defining how the SAML authentication context classes map to authentication levels and indicate the default context class
Format:
authnContextClass|authLevel[|default]Default:
urn:oasis:names:tc:SAML:2.0:ac:classes:PasswordProtectedTransport|0|default spAuthncontextComparisonType-
How to evaluate authentication context class identifiers.
exact-
Assertion context must exactly match a context in the list
minimum-
Assertion context must be at least as strong as a context in the list
maximum-
Assertion context must be no stronger than a context in the list
better-
Assertion context must be stronger than all contexts in the list
Default:
exact attributeMap-
Map of SAML assertion attributes to local user profile attributes
Default:
*=* saml2AuthModuleName-
Name of an alternative SAML v2.0 authentication module
localAuthURL-
URL to a login page on the Fedlet side
Use this to override the Assertion Consumer Service URL from the standard metadata when consuming assertions.
intermediateUrl-
URL to an intermediate page returned before the user accesses the final protected resource
defaultRelayState-
If no RelayState is specified in a SAML request, redirect to this URL after successful single sign-on.
URL-encode the
defaultRelayStatevalue. appLogoutUrl-
One or more Fedlet URLs that initiate single logout
Replace the placeholders in the default with the values for your Fedlet.
Default:
FEDLET_PROTOCOL://FEDLET_HOST:FEDLET_PORT/FEDLET_DEPLOY_URI/logout assertionTimeSkew-
Tolerate clock skew between the Fedlet and the IdP of at most this number of seconds.
Default: 300
wantAttributeEncrypted-
Set to true to request the IdP to encrypt attributes in the response
wantAssertionEncrypted-
Set to true to request the IdP to encrypt the SAML assertion in the response
wantNameIDEncrypted-
Set to true to request the IdP to encrypt the name ID in the response
wantPOSTResponseSigned-
Set to true to request the IDP to sign the response when using HTTP POST
wantArtifactResponseSigned-
Set to true to request the IDP to sign the response when using HTTP Artifact
wantLogoutRequestSigned-
Set to true to request that the IDP sign single logout requests
wantLogoutResponseSigned-
Set to true to request that the IDP sign single logout responses
wantMNIRequestSigned-
Set to true to request that the IDP manage name ID requests
wantMNIResponseSigned-
Set to true to request that the IDP manage name ID responses
cotlist-
Set this to the circle of trust name used in Configure circles of trust.
Default:
fedletcot saeAppSecretList-
When using Secure Attribute Exchange with AM this represents the Application Security Configuration settings.
Values take the format
url=FedletURL|type=symmetric|secret=EncodedSharedSecret[|encryptionalgorithm=EncAlg|encryptionkeystrength=EncStrength]orurl=FedletURL|type=asymmetric|privatekeyalias=FedletSigningCertAlias[|encryptionalgorithm=EncAlg|encryptionkeystrength=EncStrength|pubkeyalias=FedletPublicKeyAlias]You can omit the
privatekeyaliassetting if the signing certifcate is specified in the standard metadata. saeSPUrl-
When using Secure Attribute Exchange (SAE) with AM this is the Fedlet URL that handles SAE requests. If this is omitted, then SAE is not enabled.
saeSPLogoutUrl-
When using Secure Attribute Exchange with AM this is the Fedlet URL that handles SAE global logout requests.
ECPRequestIDPListFinderImpl-
When using the Enhanced Client and Proxy profile this is the class name for the implementation that returns a list of preferred IDPs trusted by the ECP.
Default:
com.sun.identity.saml2.plugins.ECPIDPFinder ECPRequestIDPList-
When using the Enhanced Client and Proxy profile this is the list of IDPs for the ECP to contact.
When not specified the list finder implementation is used.
enableIDPProxy-
Set this to true to enable IDP proxy functionality.
Default: false
idpProxyList-
A list of preferred IDPs that the Fedlet can proxy to
idpProxyCount-
Number of IDP proxies that the Fedlet can have
Default: 0
useIntroductionForIDPProxy-
Set this to true to pick a preferred IDP based on a SAML v2.0 introduction cookie.
Default: false
Service Provider Extended XML: AttributeQueryConfig Settings
This section covers elements for the Attribute Requester role, arranged in the order they appear in the template.
signingCertAlias-
Alias of the public key certificate for the key pair used when signing messages to the IDP
The key pair is found in the Fedlet’s keystore, and the certificate is included in the standard metadata. See Public and private key settings for details on how to specify access to the keystore, and Service provider standard XML for details on how to set up standard metadata.
encryptionCertAlias-
Alias of the public key certificate for the key pair used when encrypting messages to the IDP
The key pair is found in the Fedlet’s keystore, and the certificate is included in the standard metadata. See Public and private key settings for details on how to specify access to the keystore, and Service provider standard XML for details on how to set up standard metadata.
wantNameIDEncrypted-
Set to true to request that the IDP encrypt the name ID
cotlist-
Set this to the circle of trust name used in Configure circles of trust.
Default:
fedletcot
Service Provider Extended XML: XACMLAuthzDecisionQueryConfig Settings
This section covers elements for the XACML decision requester role, enabling the Fedlet to act as a Policy Enforcement Point, arranged in the order they appear in the template.
signingCertAlias-
Alias of the public key certificate for the key pair used when signing messages to the IDP
The key pair is found in the Fedlet’s keystore, and the certificate is included in the standard metadata. See Public and private key settings for details on how to specify access to the keystore, and Service provider standard XML for details on how to set up standard metadata.
encryptionCertAlias-
Alias of the public key certificate for the key pair used when encrypting messages to the IDP
The key pair is found in the Fedlet’s keystore, and the certificate is included in the standard metadata. See Public and private key settings for details on how to specify access to the keystore, and Service provider standard XML for details on how to set up standard metadata.
basicAuthOn-
Set to true to use HTTP Basic authorization when contacting the Policy Decision Provider
Default: false
basicAuthUser-
When using Basic authorization to contact the Policy Decision Provider, use this value as the username
basicAuthPassword-
When using Basic authorization to contact the Policy Decision Provider, use this value as the password
Encrypt the password using the
encode.jsppage of your test copy of AM that you might also have used to encode keystore passwords as described in Public and private key settings. wantXACMLAuthzDecisionResponseSigned-
Set this to true to request that the Policy Decision Provider sign the XACML response
wantAssertionEncrypted-
Set this to true to request that the Policy Decision Provider encrypt the SAML assertion response
cotlist-
Set this to the circle of trust name used in Configure circles of trust.
Default:
fedletcot
Enable signing and encryption in a Fedlet
By default, when you create the Java Fedlet, signing and encryption are not configured. You can, however, set up AM and the Fedlet to sign and to verify XML signatures, and to encrypt and to decrypt data such as SAML assertions.
Enabling signing and encryption for the Java Fedlet involves the following high-level stages:
-
Before you create the Fedlet, configure the IdP to sign and encrypt data. See Realms > Realm Name > Applications > Federation > Entity Providers > IdP Name > Signing and Encryption in the AM admin UI.
For evaluation, you can use the
testcertificate delivered with AM. -
Initially deploy and configure the Fedlet, but do not use the Fedlet until you finish.
-
On the Fedlet side, set up a JCEKS keystore used for signing and encryption. For evaluation, you can use copy the
keystore.jceksfile delivered with AM. You can find the file in the$HOME/am/security/keystores/directory for a server instance with the base URIopenam. The built-in keystore includes thetestcertificate.You must also set up the
.storepassand.keypassfiles using thefedletEncode.jsppage, such ashttps://am.example.com:8443/fedlet/fedletEncode.jsp, to encode passwords on the Fedlet side.The passwords for the test keystore and private key are recorded in the AM
.storepassand.keypassfiles. These files are located in the/path/to/am/security/secrets/defaults/directory. -
Configure the Fedlet to perform signing and encryption by ensuring the Fedlet has access to the keystore, and by updating the SP metadata for the Fedlet.
-
Import the updated SP metadata into the IdP to replace the default Fedlet configuration.
-
Restart the Fedlet or container in which the Fedlet runs for the changes you made on the Fedlet side to take effect.
Configure the Fedlet for signing and encryption
The FederationConfig.properties file specifies the paths to the keystore
holding the signing or encryption keys for the Fedlet, the keystore password file, and the private key password file.
-
After setting up your keystore and password files as described above, edit the properties file in the configuration directory, such as
$HOME/fedlet/FederationConfig.properties, to point to the keystore and password files. -
Export the certificate to use for signing and encryption purposes.
$ keytool -export -rfc -keystore keystore.jceks -alias test Enter keystore password: -----BEGIN CERTIFICATE----- MIIDaDCCAlCgAwIBAgIDcB/YMA0GCSqGSIb3DQEBCwUAMGUxCzAJBgNVBAYTAlVL MRAwDgYDVQQIEwdCcmlzdG9sMRAwDgYDVQQHEwdCcmlzdG9sMRIwEAYDVQQKEwlG b3JnZVJvY2sxDzANBgNVBAsTBk9wZW5BTTENMAsGA1UEAxMEdGVzdDAeFw0xNjAz MTgxMTU2MjhaFw0yNjAzMTYxMTU2MjhaMGUxCzAJBgNVBAYTAlVLMRAwDgYDVQQI EwdCcmlzdG9sMRAwDgYDVQQHEwdCcmlzdG9sMRIwEAYDVQQKEwlGb3JnZVJvY2sx DzANBgNVBAsTBk9wZW5BTTENMAsGA1UEAxMEdGVzdDCCASIwDQYJKoZIhvcNAQEB BQADggEPADCCAQoCggEBAKNbl89eP6B8kZATNSPe3+OZ3esLx31hjX+dakHtPwXC AaCKqJFwjwKdxyRuPdsVG+8Dbk3PGhk26aJrSE93EpxeqmQqxNPMeD+N0/8pjkuV YWwPIQ/ts2iTiWOVn7wzlE4ASfvupqOR5pjuYMWNo/pd4L7QNjUCKoAt9H11HMyi P+6roo/EYgX4AH7OAhfUMncYsopWhkW/ze9z8wTXc8BAEgDmt8zFCez1CtqJB/Ml SBUGDgk8oHYDsHKmx05baBaOBQ8LRGP5SULSbRtu34eLFootBIn0FvUZSnwTiSpb aHHRgWrMOVm07oSLWBuO3h/bj38zBuuqqVsAK8YuyoECAwEAAaMhMB8wHQYDVR0O BBYEFHxfAbr6PQ5Xgc+jVx+AGTPnnpWZMA0GCSqGSIb3DQEBCwUAA4IBAQAZBMJ2 9/2idv1ztC6ArHtB4kw/nHHwthXFwtWAN7sRPB8tLW7fD8aJ43RQr5107Bg1Lgkm t+FZxpafqUC/mukjIzGzbW0COMSOTcWUGss+HxK6M6Fl9aOzKJMct1uOSpPFgjIt cGqydGZXR2FH93vXWoAotUwtZ119IixIdxpOJwYJg0HFn+GEfpU1PmiLfq2/uwqJ 0hGCNfNcm9puagzhQrcDFOnolxjnYPSfSkU5wxlGo99yE5eJwoHXXU7csaZVttmx 7sPj1lUENogXUM6JMqzSyEIm1XCOCL8rZJkZ781W5CwZhuJTNzV31sBREs8FaaCe ksu7Y48BmkUqw6E9 -----END CERTIFICATE----- -
Edit the standard metadata file for the Fedlet, such as
$HOME/fedlet/sp.xml, to include the certificate in KeyDescriptor elements, that are children of the SPSSODescriptor element.<EntityDescriptor xmlns="urn:oasis:names:tc:SAML:2.0:metadata" entityID="http://www.example.com:8080/fedlet"> <SPSSODescriptor AuthnRequestsSigned="true" WantAssertionsSigned="true" protocolSupportEnumeration="urn:oasis:names:tc:SAML:2.0:protocol"> <KeyDescriptor use="signing"> <ds:KeyInfo xmlns:ds="http://www.w3.org/2000/09/xmldsig#"> <ds:X509Data> <ds:X509Certificate> MIIDaDCCAlCgAwIBAgIDcB/YMA0GCSqGSIb3DQEBCwUAMGUxCzAJBgNVBAYTAlVL MRAwDgYDVQQIEwdCcmlzdG9sMRAwDgYDVQQHEwdCcmlzdG9sMRIwEAYDVQQKEwlG b3JnZVJvY2sxDzANBgNVBAsTBk9wZW5BTTENMAsGA1UEAxMEdGVzdDAeFw0xNjAz MTgxMTU2MjhaFw0yNjAzMTYxMTU2MjhaMGUxCzAJBgNVBAYTAlVLMRAwDgYDVQQI EwdCcmlzdG9sMRAwDgYDVQQHEwdCcmlzdG9sMRIwEAYDVQQKEwlGb3JnZVJvY2sx DzANBgNVBAsTBk9wZW5BTTENMAsGA1UEAxMEdGVzdDCCASIwDQYJKoZIhvcNAQEB BQADggEPADCCAQoCggEBAKNbl89eP6B8kZATNSPe3+OZ3esLx31hjX+dakHtPwXC AaCKqJFwjwKdxyRuPdsVG+8Dbk3PGhk26aJrSE93EpxeqmQqxNPMeD+N0/8pjkuV YWwPIQ/ts2iTiWOVn7wzlE4ASfvupqOR5pjuYMWNo/pd4L7QNjUCKoAt9H11HMyi P+6roo/EYgX4AH7OAhfUMncYsopWhkW/ze9z8wTXc8BAEgDmt8zFCez1CtqJB/Ml SBUGDgk8oHYDsHKmx05baBaOBQ8LRGP5SULSbRtu34eLFootBIn0FvUZSnwTiSpb aHHRgWrMOVm07oSLWBuO3h/bj38zBuuqqVsAK8YuyoECAwEAAaMhMB8wHQYDVR0O BBYEFHxfAbr6PQ5Xgc+jVx+AGTPnnpWZMA0GCSqGSIb3DQEBCwUAA4IBAQAZBMJ2 9/2idv1ztC6ArHtB4kw/nHHwthXFwtWAN7sRPB8tLW7fD8aJ43RQr5107Bg1Lgkm t+FZxpafqUC/mukjIzGzbW0COMSOTcWUGss+HxK6M6Fl9aOzKJMct1uOSpPFgjIt cGqydGZXR2FH93vXWoAotUwtZ119IixIdxpOJwYJg0HFn+GEfpU1PmiLfq2/uwqJ 0hGCNfNcm9puagzhQrcDFOnolxjnYPSfSkU5wxlGo99yE5eJwoHXXU7csaZVttmx 7sPj1lUENogXUM6JMqzSyEIm1XCOCL8rZJkZ781W5CwZhuJTNzV31sBREs8FaaCe ksu7Y48BmkUqw6E9 </ds:X509Certificate> </ds:X509Data> </ds:KeyInfo> </KeyDescriptor> <KeyDescriptor use="encryption"> <ds:KeyInfo xmlns:ds="http://www.w3.org/2000/09/xmldsig#"> <ds:X509Data> <ds:X509Certificate> MIIDaDCCAlCgAwIBAgIDcB/YMA0GCSqGSIb3DQEBCwUAMGUxCzAJBgNVBAYTAlVL MRAwDgYDVQQIEwdCcmlzdG9sMRAwDgYDVQQHEwdCcmlzdG9sMRIwEAYDVQQKEwlG b3JnZVJvY2sxDzANBgNVBAsTBk9wZW5BTTENMAsGA1UEAxMEdGVzdDAeFw0xNjAz MTgxMTU2MjhaFw0yNjAzMTYxMTU2MjhaMGUxCzAJBgNVBAYTAlVLMRAwDgYDVQQI EwdCcmlzdG9sMRAwDgYDVQQHEwdCcmlzdG9sMRIwEAYDVQQKEwlGb3JnZVJvY2sx DzANBgNVBAsTBk9wZW5BTTENMAsGA1UEAxMEdGVzdDCCASIwDQYJKoZIhvcNAQEB BQADggEPADCCAQoCggEBAKNbl89eP6B8kZATNSPe3+OZ3esLx31hjX+dakHtPwXC AaCKqJFwjwKdxyRuPdsVG+8Dbk3PGhk26aJrSE93EpxeqmQqxNPMeD+N0/8pjkuV YWwPIQ/ts2iTiWOVn7wzlE4ASfvupqOR5pjuYMWNo/pd4L7QNjUCKoAt9H11HMyi P+6roo/EYgX4AH7OAhfUMncYsopWhkW/ze9z8wTXc8BAEgDmt8zFCez1CtqJB/Ml SBUGDgk8oHYDsHKmx05baBaOBQ8LRGP5SULSbRtu34eLFootBIn0FvUZSnwTiSpb aHHRgWrMOVm07oSLWBuO3h/bj38zBuuqqVsAK8YuyoECAwEAAaMhMB8wHQYDVR0O BBYEFHxfAbr6PQ5Xgc+jVx+AGTPnnpWZMA0GCSqGSIb3DQEBCwUAA4IBAQAZBMJ2 9/2idv1ztC6ArHtB4kw/nHHwthXFwtWAN7sRPB8tLW7fD8aJ43RQr5107Bg1Lgkm t+FZxpafqUC/mukjIzGzbW0COMSOTcWUGss+HxK6M6Fl9aOzKJMct1uOSpPFgjIt cGqydGZXR2FH93vXWoAotUwtZ119IixIdxpOJwYJg0HFn+GEfpU1PmiLfq2/uwqJ 0hGCNfNcm9puagzhQrcDFOnolxjnYPSfSkU5wxlGo99yE5eJwoHXXU7csaZVttmx 7sPj1lUENogXUM6JMqzSyEIm1XCOCL8rZJkZ781W5CwZhuJTNzV31sBREs8FaaCe ksu7Y48BmkUqw6E9 </ds:X509Certificate> </ds:X509Data> </ds:KeyInfo> <EncryptionMethod Algorithm="http://www.w3.org/2001/04/xmlenc#aes128-cbc"> <xenc:KeySize xmlns:xenc="http://www.w3.org/2001/04/xmlenc#"> 128 </xenc:KeySize> </EncryptionMethod> </KeyDescriptor> <SingleLogoutService Binding="urn:oasis:names:tc:SAML:2.0:bindings:HTTP-Redirect" Location="http://www.example.com:8080/fedlet/fedletSloRedirect" ResponseLocation="http://www.example.com:8080/fedlet/fedletSloRedirect" /> <SingleLogoutService Binding="urn:oasis:names:tc:SAML:2.0:bindings:HTTP-POST" Location="http://www.example.com:8080/fedlet/fedletSloPOST" ResponseLocation="http://www.example.com:8080/fedlet/fedletSloPOST" /> <SingleLogoutService Binding="urn:oasis:names:tc:SAML:2.0:bindings:SOAP" Location="http://www.example.com:8080/fedlet/fedletSloSoap" /> <NameIDFormat> urn:oasis:names:tc:SAML:2.0:nameid-format:transient </NameIDFormat> <AssertionConsumerService index="0" isDefault="true" Binding="urn:oasis:names:tc:SAML:2.0:bindings:HTTP-POST" Location="http://www.example.com:8080/fedlet/fedletapplication" /> <AssertionConsumerService index="1" Binding="urn:oasis:names:tc:SAML:2.0:bindings:HTTP-Artifact" Location="http://www.example.com:8080/fedlet/fedletapplication" /> </SPSSODescriptor> <RoleDescriptor xmlns:xsi="http://www.w3.org/2001/XMLSchema-instance" xmlns:query="urn:oasis:names:tc:SAML:metadata:ext:query" xsi:type="query:AttributeQueryDescriptorType" protocolSupportEnumeration="urn:oasis:names:tc:SAML:2.0:protocol"> </RoleDescriptor> <XACMLAuthzDecisionQueryDescriptor WantAssertionsSigned="false" protocolSupportEnumeration="urn:oasis:names:tc:SAML:2.0:protocol" /> </EntityDescriptor> -
Edit the extended metadata file for the Fedlet, such as
$HOME/fedlet/sp-extended.xml.Set the certificate alias names to the alias for the Fedlet certificate, and the
want*Signedandwant*Encryptedvalues totrue.If you reformat the file, take care not to add white space around string values in elements.
<?xml version="1.0"?> <EntityConfig xmlns="urn:sun:fm:SAML:2.0:entityconfig" xmlns:fm="urn:sun:fm:SAML:2.0:entityconfig" hosted="1" entityID="http://www.example.com:8080/fedlet"> <SPSSOConfig metaAlias="/sp"> <Attribute name="description"> <Value/> </Attribute> <Attribute name="signingCertAlias"> <Value>test</Value> </Attribute> <Attribute name="encryptionCertAlias"> <Value>test</Value> </Attribute> <Attribute name="basicAuthOn"> <Value>false</Value> </Attribute> <Attribute name="basicAuthUser"> <Value/> </Attribute> <Attribute name="basicAuthPassword"> <Value/> </Attribute> <Attribute name="autofedEnabled"> <Value>false</Value> </Attribute> <Attribute name="autofedAttribute"> <Value/> </Attribute> <Attribute name="transientUser"> <Value>anonymous</Value> </Attribute> <Attribute name="spAdapter"> <Value/> </Attribute> <Attribute name="spAdapterEnv"> <Value/> </Attribute> <Attribute name="fedletAdapter"> <Value>com.sun.identity.saml2.plugins.DefaultFedletAdapter</Value> </Attribute> <Attribute name="fedletAdapterEnv"> <Value/> </Attribute> <Attribute name="spAccountMapper"> <Value>com.sun.identity.saml2.plugins.DefaultLibrarySPAccountMapper</Value> </Attribute> <Attribute name="useNameIDAsSPUserID"> <Value>false</Value> </Attribute> <Attribute name="spAttributeMapper"> <Value>com.sun.identity.saml2.plugins.DefaultSPAttributeMapper</Value> </Attribute> <Attribute name="spAuthncontextMapper"> <Value>com.sun.identity.saml2.plugins.DefaultSPAuthnContextMapper</Value> </Attribute> <Attribute name="spAuthncontextClassrefMapping"> <Value>urn:oasis:names:tc:SAML:2.0:ac:classes:PasswordProtectedTransport\|0\|default</Value> </Attribute> <Attribute name="spAuthncontextComparisonType"> <Value>exact</Value> </Attribute> <Attribute name="attributeMap"> <Value>*=*</Value> </Attribute> <Attribute name="saml2AuthModuleName"> <Value/> </Attribute> <Attribute name="localAuthURL"> <Value/> </Attribute> <Attribute name="intermediateUrl"> <Value/> </Attribute> <Attribute name="defaultRelayState"> <Value/> </Attribute> <Attribute name="appLogoutUrl"> <Value>http://www.example.com:8080/fedlet/logout</Value> </Attribute> <Attribute name="assertionTimeSkew"> <Value>300</Value> </Attribute> <Attribute name="wantAttributeEncrypted"> <Value>true</Value> </Attribute> <Attribute name="wantAssertionEncrypted"> <Value>true</Value> </Attribute> <Attribute name="wantNameIDEncrypted"> <Value>true</Value> </Attribute> <Attribute name="wantPOSTResponseSigned"> <Value/> </Attribute> <Attribute name="wantArtifactResponseSigned"> <Value/> </Attribute> <Attribute name="wantLogoutRequestSigned"> <Value/> </Attribute> <Attribute name="wantLogoutResponseSigned"> <Value/> </Attribute> <Attribute name="wantMNIRequestSigned"> <Value/> </Attribute> <Attribute name="wantMNIResponseSigned"> <Value/> </Attribute> <Attribute name="responseArtifactMessageEncoding"> <Value>URI</Value> </Attribute> <Attribute name="cotlist"> <Value>fedlet-cot</Value> </Attribute> <Attribute name="saeAppSecretList"> </Attribute> <Attribute name="saeSPUrl"> <Value/> </Attribute> <Attribute name="saeSPLogoutUrl"> </Attribute> <Attribute name="ECPRequestIDPListFinderImpl"> <Value>com.sun.identity.saml2.plugins.ECPIDPFinder</Value> </Attribute> <Attribute name="ECPRequestIDPList"> <Value/> </Attribute> <Attribute name="ECPRequestIDPListGetComplete"> <Value/> </Attribute> <Attribute name="enableIDPProxy"> <Value>false</Value> </Attribute> <Attribute name="idpProxyList"> <Value/> </Attribute> <Attribute name="idpProxyCount"> <Value>0</Value> </Attribute> <Attribute name="useIntroductionForIDPProxy"> <Value>false</Value> </Attribute> <Attribute name="spSessionSyncEnabled"> <Value>false</Value> </Attribute> <Attribute name="relayStateUrlList"> </Attribute> </SPSSOConfig> <AttributeQueryConfig metaAlias="/attrQuery"> <Attribute name="signingCertAlias"> <Value>test</Value> </Attribute> <Attribute name="encryptionCertAlias"> <Value>test</Value> </Attribute> <Attribute name="wantNameIDEncrypted"> <Value>true</Value> </Attribute> <Attribute name="cotlist"> <Value>fedlet-cot</Value> </Attribute> </AttributeQueryConfig> <XACMLAuthzDecisionQueryConfig metaAlias="/pep"> <Attribute name="signingCertAlias"> <Value>test</Value> </Attribute> <Attribute name="encryptionCertAlias"> <Value>test</Value> </Attribute> <Attribute name="basicAuthOn"> <Value>false</Value> </Attribute> <Attribute name="basicAuthUser"> <Value/> </Attribute> <Attribute name="basicAuthPassword"> <Value/> </Attribute> <Attribute name="wantXACMLAuthzDecisionResponseSigned"> <Value>false</Value> </Attribute> <Attribute name="wantAssertionEncrypted"> <Value>true</Value> </Attribute> <Attribute name="cotlist"> <Value>fedlet-cot</Value> </Attribute> </XACMLAuthzDecisionQueryConfig> </EntityConfig> -
Make a copy of the
sp-extended.xmlfile, calledsp-extended-copy.xml, and sethosted="0"in the root element of the copy.Use the copied file,
sp-extended-copy.xml, when importing the Fedlet configuration into AM. AM must register the Fedlet as a remote SP. -
In the AM admin UI, delete the original SP entity configuration for the Fedlet, and then import the updated metadata for the new configuration into AM on the IdP side.
-
Restart the Fedlet or the container in which it runs in order for the Fedlet to pick up the changes to the configuration properties and the metadata.
Deploy and test the Fedlet on the SP
This page covers the two options for deploying the Fedlet.
Install and configure the Fedlet as a demo application
To deploy the Fedlet on the SP, you require the following:
-
The configuration files, as created in Create and configure the Fedlet.
-
The Fedlet
.warfile, provided in theFedlet-8.0.0.zip, within the AM distribution file;AM-8.0.0.zip.-
Create a
fedletdirectory, in the home directory of the user that runs the AM web container:$ cd $HOME $ mkdir fedlet -
Copy the fedlet configuration files to the
$HOME/fedletdirectory.The result may resemble the following:
$ cd /Users/tomcat-user/fedlet $ ls -A1 FederationConfig.properties fedlet.cot idp-extended.xml idp.xml sp-extended.xml sp.xml -
Deploy the Fedlet
.warfile into your web container:$ cp fedlet.war /path/to/tomcat/webappsUpon completion, you can proceed to Test Fedlet single sign-on and single logout.
-
Embed the Java Fedlet in a web application
The Fedlet .war file, fedlet.war, serves as an example
and to provide the code needed to embed the Fedlet in your web application.
The basic steps for using the Fedlet in your application are as follows:
-
Unpack the Fedlet
.zipfile to a working directory, remove any files you do not want to keep, such asindex.jsporfedletEncode.jsp, and merge the Fedlet files with those of your web application. -
To integrate single sign-on into your application, modify the functionality in the
fedletSampleApp.jsppage or add it to your application’s logic.If you add it to your application’s logic, then you must also edit your application’s deployment descriptor file,
web.xml, to set the assertion consumer URI, which by default is/fedletapplicationin the basic SP XML for the Fedlet. Addservletandservlet-mappingelements as shown in the following example.<servlet> <servlet-name>yourapplication</servlet-name> <jsp-file>/your-application.jsp</jsp-file> </servlet> <servlet-mapping> <servlet-name>yourapplication</servlet-name> <url-pattern>/fedletapplication</url-pattern> </servlet-mapping> -
Build a
.warfile from your web application with embedded Fedlet files.This is the version of the application to deploy. When you deploy your
.warfile, also provide the Fedlet configuration files. For information on where to put the configuration files and how to deploy the.warfile with embedded Fedlet, see Install and configure the Fedlet as a demo application.
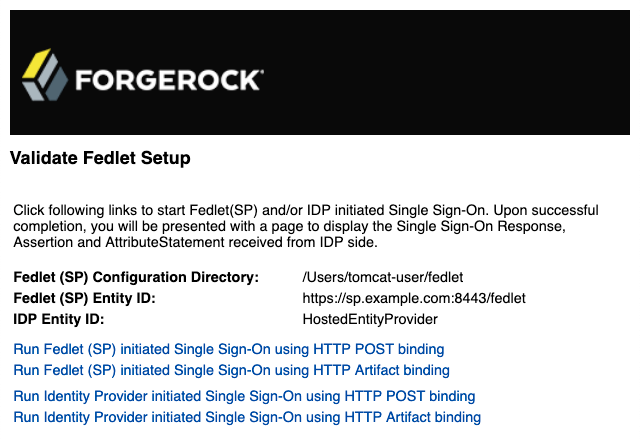
Integrate with the Fedlet WAR File
You can integrate your applications with the Java Fedlet to perform many of the SAML v2.0 SP operations. The Java Fedlet offers the SAML v2.0 capabilities identified in Fedlet Support for SAML v2.0 Features.
Integrate your application
The Fedlet includes the following files that you can use when building your own SP application:
conf/-
Configuration files copied to the
$HOME/fedletdirectory when you first deploy and configure the Fedlet. When deploying your application, you can move these to an alternate location passed to the Java virtual machine for the web application container at startup. For example, if you store the configuration under the/export/fedlet/directory, then you could pass the following property to the JVM.-Dcom.sun.identity.fedlet.home=/export/fedlet/conf
You do not need to include these files in your application.
fedletAttrQuery.jsp-
Sample SAML attribute query and response handlers.
fedletEncode.jsp-
Utility JSP to encode a password, such as the password used to protect a Java keystore.
fedletSampleApp.jsp-
Demo application. You can remove these before deployment to replace them with your application.
fedletXACMLQuery.jsp-
Sample SAML XACML query and response handlers.
logout.jsp-
Utility page to perform single log out.
saml2/jsp/-
JSPs to initiate single sign-on and single logout, and to handle errors, and also a JSP for obtaining Fedlet metadata,
saml2/jsp/exportmetadata.jsp. WEB-INF/classes/-
Localized Java properties files for strings used in the Fedlet user interface.
WEB-INF/lib/-
Fedlet libraries required by your application.
WEB-INF/web.xml-
Fedlet web application configuration, showing how JSPs map to URLs used in the Fedlet. Add mappings for your application before deployment.
In the
web.xmlmappings, your application must be mapped to/fedletapplication, as this is the assertion consumer URL set in the Fedlet metadata.<servlet> <servlet-name>yourApp</servlet-name> <jsp-file>/fedletSampleApp.jsp</jsp-file> </servlet> <servlet-mapping> <servlet-name>yourApp</servlet-name> <url-pattern>/fedletapplication</url-pattern> </servlet-mapping>
Follow these steps for a demonstration of how to customize demo pages within the Fedlet:
-
Backup the
fedletSampleApp.jspfile.$ cd /path/to/tomcat/webapps/fedlet/ $ cp fedletSampleApp.jsp fedletSampleApp.jsp.orig -
Edit the
fedletSampleApp.jspfile to reduce it to a single redirection to themyapp.jsppage. An implementation of the<html>element of the file follows below.<html> <head> <title>Fedlet Sample Application</title> <meta http-equiv="Content-Type" content="text/html; charset=iso-8859-1" /> </head> <body> <% // BEGIN : following code is a must for Fedlet (SP) side application Map map; try { // invoke the Fedlet processing logic. this will do all the // necessary processing conforming to SAML v2.0 specifications, // such as XML signature validation, Audience and Recipient // validation etc. map = SPACSUtils.processResponseForFedlet(request, response, new PrintWriter(out, true)); response.sendRedirect("myapp.jsp"); } catch (SAML2Exception sme) { SAMLUtils.sendError(request, response, response.SC_INTERNAL_SERVER_ERROR, "failedToProcessSSOResponse", sme.getMessage()); return; } catch (IOException ioe) { SAMLUtils.sendError(request, response, response.SC_INTERNAL_SERVER_ERROR, "failedToProcessSSOResponse", ioe.getMessage()); return; } catch (SessionException se) { SAMLUtils.sendError(request, response, response.SC_INTERNAL_SERVER_ERROR, "failedToProcessSSOResponse", se.getMessage()); return; } catch (ServletException se) { SAMLUtils.sendError(request, response, response.SC_BAD_REQUEST, "failedToProcessSSOResponse", se.getMessage()); return; } // END : code is a must for Fedlet (SP) side application %> </body> </html> -
Add a
myapp.jsppage to the Fedlet, such as the following:<html> <head> <title>My Application</title> <meta http-equiv="Content-Type" content="text/html" /> </head> <body> <h1>My Application</h1> <p>After you change the <code>fedletSampleApp.jsp</code>, all it does is redirect to this home page after successful login.</p> </body> </html> -
Go to the Fedlet URL, such as
https://am.example.com:8443/fedlet/, and try one of the login methods.After login, you are redirected to the
myapp.jsppage.
Perform single sign-on
The Java Fedlet includes a JSP file, saml2/jsp/fedletSSOInit.jsp,
that you can call to initiate single sign-on from the Fedlet (SP) side.
The Fedlet home page, index.jsp, calls this page when the user does Fedlet-initiated single sign-on.
When calling this JSP, the parameters to use are those also used by
the saml2/jsp/spSSOInit.jsp page in AM.
The parameters are described in Implement SSO and SLO.
For IdP-initiated single sign-on, call the appropriate page on the IdP. AM’s page is described in Implement SSO and SLO.
After single sign-on, the user-agent is directed by default
to the assertion consumer URI set in the Fedlet metadata, which by default is /fedletapplication.
Also by default, that URI points to the JSP, fedletSampleApp.jsp.
Perform single logout
The Java Fedlet includes a JSP file, saml2/jsp/spSingleLogoutInit.jsp,
that you can call to initiate single logout from the Fedlet (SP) side.
The Fedlet assertion consumer page, fedletSampleApp.jsp,
calls this when the user does Fedlet-initiated single logout.
When calling this JSP,
the parameters to use are those also used by the saml2/jsp/spSingleLogoutInit.jsp page in AM.
Those parameters are described in Implement SSO and SLO.
For IdP-initiated single logout, call the appropriate page on the IdP. AM’s page is described in Implement SSO and SLO.
Set the RelayState parameter when initiating logout to redirect the user-agent appropriately
when the process is complete.
Customize SAML v2.0
AM includes several customization points that let you extend SAML v2.0 functionality. AM provides some default implementation for these extension points, but you can also configure your own custom implementation per entity provider.
You can implement a custom SAML v2.0 customization in Java, or for the extension points described in this section, using a script.
Configure AM to use your custom implementation in the entity provider settings. For information about configuration settings, refer to the Reference section.
|
If configured, a scripted implementation takes precedence over any Java
class that is specified. To make sure the Java class is used, clear any |
The following table provides an overview of the SAML v2.0 extension points that you can implement in Java or with a script.
| Extension point | Description |
|---|---|
Customize the default IdP attribute mapper to specify which user attributes are included in an assertion. |
|
Customize SAML responses and browser redirects. |
|
Customize configuration in the hosted SP adapter environment. |
|
Customize the value of the NameID attribute in the SAML assertion. |
Java implementation
The plugin interfaces and default Java implementation can be found in the openam-federation-library.
To view the supported plugin interfaces, refer to these packages:
Scripted implementation
AM provides a scripting engine and template scripts for you to extend SAML v2.0 behavior by running scripts stored as configuration, rather than by updating code. Creating and modifying plugin scripts enables rapid development without the need to change or recompile core AM.
-
To explore the default scripts in the AM admin UI, including the available script properties, go to Realms > Realm Name > Scripts and select the script you want to examine.
-
For all available sample scripts, refer to Sample scripts.
-
To view the available bindings for SAML scripts, refer to SAML v2.0 scripting API.
IdP attribute mapper
Use the IdP attribute mapper to map user-configured attributes to SAML attribute objects to insert into the generated SAML assertion.
The default implementation is to retrieve the mapped attribute values from the user profile first. If the attribute values aren’t present in the user’s profile, then the IdP attribute mapper attempts to retrieve them from the authenticated session.
These steps assume your environment is already correctly configured for single sign-on using SAML v2.0, where AM is the hosted IdP.
Java implementation
- Java interface
- Default Java class
-
com.sun.identity.saml2.plugins.DefaultIDPAttributeMapper
To create a custom IdP attribute mapper in Java, follow these high-level steps:
-
Include the
openam-federation-libraryas a dependency in your Maven project. -
Write a Java class that implements the
com.sun.identity.saml2.plugins.IDPAttributeMapperinterface, or extends thecom.sun.identity.saml2.plugins.DefaultIDPAttributeMapperclass. -
Override the
getAttributes()method to customize the list of the attributes returned. -
Package your custom class in a JAR file and copy to the
/WEB-INF/libfolder where you deployed AM. -
Configure AM to use the new Java plugin.
-
In the AM admin UI, go to Realms > Realm Name > Applications > Federation > Entity Providers > Hosted IDP Name > Assertion Processing.
-
In the Attribute Mapper field, type the fully qualified name of your custom class.
-
Save your changes.
-
-
Restart AM or the container in which it runs.
| Learn more in How do I create a custom SAML2 IDP attribute mapper in PingAM? in the Knowledge Base. |
Scripted implementation
Complete the following steps to implement an example IdP attribute mapper script that modifies the SAML attributes that are inserted in the assertion returned by the IdP.
|
Learn about IdP attribute mapper scripts from the following resources:
|
-
In the AM admin UI, go to Realms > Realm Name > Scripts, and click SAML2 IDP Attribute Mapper Script to modify the default script. Alternatively, create a new script of type
Saml2 IDP Attribute Mapper. -
In the Script field, insert the following lines of example code to return a custom static attribute, around line 150, preceding
return attributes;:var customSet = new java.util.HashSet(); customSet.add("test"); attributes.add(idpAttributeMapperScriptHelper.createSAMLAttribute("customSAMLAttribute", null, customSet)); -
Validate and save your changes.
-
Configure AM to use the updated IdP attribute mapper script.
-
Still in the AM admin UI, go to Applications > Federation > Entity Providers > Hosted IDP Name > Assertion Processing.
-
Under Attribute Mapper, select your customized script from the Attribute Mapper Script drop-down list.
-
Save your changes.
-
-
Test your changes and verify that the
AttributeStatementelement in the SAML assertion contains the custom attribute.For example:
<saml:AttributeStatement>
  <saml:Attribute Name="customSAMLAttribute">
    <saml:AttributeValue
        xmlns:xs="http://www.w3.org/2001/XMLSchema"
        xmlns:xsi="http://www.w3.org/2001/XMLSchema-instance"
        xsi:type="xs:string">test
    </saml:AttributeValue>
  </saml:Attribute>
</saml:AttributeStatement>
IdP adapter
Use the IdP adapter to alter the processing of the authentication request at a particular point in the SAML journey, such as to redirect the user before single sign-on takes place, or before a failure response is sent.
This task assumes your environment is already correctly configured for single sign-on using SAML v2.0, where AM is the hosted IdP.
The IdP adapter provides hooks at the following points in assertion processing:
| Extension point | Description |
|---|---|
preSingleSignOn |
Invoked when the authentication request is first received. Only applicable to SP-initiated flows. |
preAuthentication |
Invoked before the request is redirected for authentication. Only applicable to SP-initiated flows. |
preSendResponse |
Invoked after the user has successfully authenticated or for an existing valid session, before the response is sent. |
preSignResponse |
Invoked after the response has been constructed, but before the response is signed, to let you customize the content of the SAML response. |
preSendFailureResponse |
Invoked before a SAML error response is returned. Only applicable to SP-initiated flows. |
Java implementation
To create a custom IdP adapter in Java, follow these high-level steps:
-
Include the
openam-federation-libraryas a dependency in your Maven project. -
Write a Java class that implements the org.forgerock.openam.saml2.plugins.IDPAdapter interface, or extends the
com.sun.identity.saml2.plugins.DefaultIDPAdapterclass. -
Override one of the methods described in the extension points table to customize the authentication journey.
-
Package your custom class in a JAR file and copy to the
/WEB-INF/libfolder where you deployed AM. -
Configure AM to use the new Java plugin.
-
In the AM admin UI, go to Realms > Realm Name > Applications > Federation > Entity Providers > Hosted IDP Name > Advanced.
-
In the IDP Adapter Class field, type the fully qualified name of your custom class.
-
Save your changes.
-
-
Restart AM or the container in which it runs.
-
Test your changes using an appropriate mode of single-sign on.
For example, note that some extension points are only invoked during SP-initiated flows.
Scripted implementation
Complete the following steps to implement an example IdP adapter script that determines whether the authentication journey should be redirected based on the evaluation of a policy.
|
Learn about IdP adapter scripts from the following resources:
|
-
For this example, configure a policy that belongs to a policy set named
saml:-
In the AM admin UI, go to Realms > Realm Name > Authorization > Resource Types to create a new resource type with the following values:
-
Name:
SAML SP Access -
Pattern:
* -
Action: Assert (Default State: Deny)
-
-
Go to Policy Sets to create a new policy set:
-
Id:
saml -
Name:
saml -
Resource Types:
SAML SP Access
-
-
Add a new policy:
-
Name:
SAML Access Policy -
Resource Types:
SAML SP Access -
Resources:
* -
Actions:
ASSERT:Denied -
Response Attributes:
redirect_uri: https://example.com -
Subjects:
"type": "AuthenticatedUsers"
-
-
-
To modify the default script, go to Scripts, and click SAML2 IDP Adapter Script. Alternatively, create a new script of type
Saml2 IDP Adapter.-
In the Script field, add code to the
preSendResponsefunction to redirect or send an error response if the policy for the SP evaluates to false. For example:function preSendResponse () { var frJava = JavaImporter( com.sun.identity.saml2.common.SAML2Exception); try { var ents = idpAdapterScriptHelper.getEntitlements( "saml", realm, session, authnRequest).iterator(); while(ents.hasNext()){ var entitlement = ents.next(); var isAllowed = entitlement.getActionValue("Assert"); if(isAllowed != null && isAllowed == true){ return false; } else{ var redirectUris = entitlement.getAttributes().get("redirect_uri"); if (redirectUris == null || redirectUris.isEmpty()){ logger.error("No redirect_uri"); response.sendError(403); } else{ var redirectUri = redirectUris.iterator().next(); response.sendRedirect(redirectUri); } return true; } } } catch(error) { logger.error("Error in preSend reponse. " + error); throw new frJava.SAML2Exception(error); } } -
Validate and save your changes.
-
-
Configure AM to use the updated IdP adapter script.
-
Still in the AM admin UI, go to Applications > Federation > Entity Providers > Hosted IDP Name > Advanced.
-
Under IDP Adapter, select your customized script from the IDP Adapter Script drop-down list.
-
Save your changes.
-
-
Test your changes using an SP-initiated flow and verify that the user is redirected to the
redirect_uri(in this example,https://example.com).
SP adapter
Use the SP adapter to make changes during the processing of the
authentication request, such as updating the SPNameQualifier attribute,
or during assertion processing after a response has been received.
These steps assume your environment is already correctly configured for single sign-on using SAML v2.0, where AM is the hosted SP.
The SP adapter provides hooks at the following points:
| Extension point | Description |
|---|---|
preSingleSignOnRequest |
Invoked before AM sends the single sign-on request to the IdP. |
preSingleSignOnProcess |
Invoked before single sign-on processing begins on the SP side, when AM receives the response from the IdP. |
postSingleSignOnSuccess |
Invoked when single sign-on processing succeeds. |
postSingleSignOnFailure |
Invoked when single sign-on processing fails. |
postNewNameIDSuccess |
Invoked when the processing of a new name identifier succeeds. |
postTerminateNameIDSuccess |
Invoked when the association of a name identifier between an SP and IdP is successfully terminated. |
preSingleLogoutProcess |
Invoked before the single logout process starts on the SP side, while the authenticated session is still valid. |
postSingleLogoutProcess |
Invoked after the single logout process succeeds when the authenticated session has been invalidated. |
Java implementation
To create a custom SP adapter in Java, follow these high-level steps:
-
Include the
openam-federation-libraryas a dependency in your Maven project. -
Write a Java class that implements the org.forgerock.openam.saml2.plugins.SPAdapter interface.
-
Add code to one or more of the methods described in the extension points table to customize the authentication journey.
-
Package your custom class in a JAR file and copy to the
/WEB-INF/libfolder where you deployed AM. -
Configure AM to use the new Java plugin.
-
In the AM admin UI, go to Realms > Realm Name > Applications > Federation > Entity Providers > Hosted SP > Assertion Processing.
-
In the Adapter field, type the fully qualified name of your custom class.
-
Save your changes.
-
-
Restart AM or the container in which it runs.
-
Test your changes.
Scripted implementation
Complete the following steps to implement an example SP adapter script that
updates the SPNameQualifier attribute in the authentication request.
|
Learn about SP adapter scripts from the following resources:
|
-
In the AM admin UI, go to Realms > Realm Name > Scripts, and click SAML2 SP Adapter Script. Alternatively, create a new script of type
Saml2 SP Adapter. -
In the Script field, add code to the
preSingleSignOnRequestfunction to change the value ofSPNameQualifierin the authentication request. Optionally, add code to redirect a successful login in thepostSingleSignOnSuccessfunction.For example:
function preSingleSignOnRequest() { logger.error("In preSingleSignOnRequest"); authnRequest.getNameIDPolicy().setSPNameQualifier("mySP-Updated"); } function postSingleSignOnSuccess() { logger.error("In postSingleSignOnSuccess"); response.sendRedirect("https://example.com"); return true; } -
Validate and save your changes.
-
Configure AM to use the updated SP adapter script.
-
In the AM admin UI, go to Realms > Realm Name > Applications > Federation > Entity Providers > Hosted SP Name > Assertion Processing.
-
Under Adapter, select your customized script from the Adapter Script drop-down list.
-
Save your changes.
-
-
Test your changes using an SP-initiated flow.
Verify that the SAML2.0 request contains the updated value (
SPNameQualifier="mySP-Updated") and that the user is redirected tohttps://example.comon successful login.
NameID mapper
Use this extension point to customize the value of the NameID attribute returned in the SAML assertion.
These steps assume your environment is already correctly configured for single sign-on using SAML v2.0, where AM is the hosted IdP.
Java implementation
To create a custom NameID mapper in Java, follow these high-level steps:
-
Clone the am-external Git repository. For example:
$ git clone https://github.com/ForgeRock/am-external.gitLearn about using AM source code in How do I access the proprietary Maven repositories?.
-
Check out the branch for your release version, for example:
$ cd am-external $ git checkout releases/[.replaceable]##version## $ cd openam-federation -
Create a new Java project and add the
openam-federation-libraryas a Maven dependency, for example:<dependency> <groupId>org.forgerock.am</groupId> <artifactId>openam-federation-library</artifactId> </dependency> -
Write a Java class that extends the
com.sun.identity.saml2.plugins.DefaultIDPAccountMapperclass.Refer to the com.sun.identity.saml2.plugins.IDPAccountMapper interface for implementation details.
-
Override the
getNameID()method to return a customized NameID value. For example:public class CustomIDPAccountMapper extends DefaultIDPAccountMapper{ @Override public NameID getNameID(Object session, String hostEntityID, String remoteEntityID, String realm, String nameIDFormat) throws SAML2Exception { NameID myNameID = super.getNameID(session, hostEntityID, remoteEntityID, realm, nameIDFormat); if (remoteEntityID.equals("https://sp.example.com:8443/am") { myNameID.setValue(myNameID.getValue() + "@sp.example.com"); } return myNameID; } } -
Package your custom class in a JAR file and copy to the
/WEB-INF/libfolder where you deployed AM. -
Configure AM to use the new Java plugin.
-
In the AM admin UI, go to Realms > Realm Name > Applications > Federation > Entity Providers > Hosted IDP > Assertion Processing.
-
In the Account Mapper field, type the fully qualified name of your custom class.
-
Save your changes.
-
-
Restart AM or the container in which it runs.
-
Test your changes.
Scripted implementation
Follow these steps to use a script to customize the NameID value.
|
Learn about NameID mapper scripts from the following resources:
|
-
In the AM admin UI, go to Realms > Realm Name > Scripts, and create a new script of type
Saml2 NameID Mapper.The NameID mapper script type is a next-generation script only and must be written in JavaScript. -
In the Script field, set a custom value for NameID. For example:
/* * Retrieve nameID value from Java plugin and modify */ function getModifiedNameID() { var nameIDValue = nameIDScriptHelper.getNameIDValue(); if (nameIDValue.includes(".com")) { return nameIDValue.replace(".com", ".org"); } return nameIDValue; } /* * Use identity binding to gather attributes */ function getIdentityNameID() { var givenName = identity.getAttributeValues("givenName")[0]; var lastName = identity.getAttributeValues("sn")[0]; return givenName + "_" + lastName; } getModifiedNameID(); //getIdentityNameID(); -
Validate and save your changes.
-
Configure AM to use the updated NameID mapper script.
-
In the AM admin UI, go to Realms > Realm Name > Applications > Federation > Entity Providers > Remote SP Name > Assertion Processing.
-
Under Account Mapper, select your script from the SAML2 Name ID Mapper Script drop-down list.
-
Save your changes.
-
-
Test your changes using an SP-initiated flow.
Verify that the SAML 2.0 assertion shows an updated value, for example:
<saml:NameID Format="urn:oasis:names:tc:SAML:1.1:nameid-format:emailAddress"
             NameQualifier="idp"
             SPNameQualifier="sp">bjensen@example.org</saml:NameID>
Reference
This reference section covers service provider (SP), identity provider (IdP), and circle of trust (CoT) configuration properties. For the global services reference, see Reference.
Hosted IdP configuration
After you’ve set up a hosted IdP, you can configure it through the AM admin UI under Realms > Realm Name > Applications > Federation > Entity Providers > Provider Name.
Assertion content
The following groups appear on the Assertion Content tab:
Signing and Encryption
- Request/Response Signing
-
Specifies which parts of messages the IdP requires the SP to sign digitally.
- Encryption
-
When selected, the SP must encrypt NameID elements.
- Secret Label and Algorithms
-
- Secret Label Identifier
-
An identifier for the secret label AM uses for this entity provider when resolving secrets.
For example, if you set this value to
demo, the entity provider uses the following secret labels:-
am.applications.federation.entity.providers.saml2.demo.signing -
am.applications.federation.entity.providers.saml2.demo.encryption
-
If not specified, AM uses the entity provider role-specific, default global secret labels. Learn more in Secret label mappings for SAML v2.0 signing and encryption.
- Signing Algorithm
-
The algorithms the provider can use to sign the request/response attributes selected in the Request/Response Signing group.
These algorithms are exposed in the provider’s metadata extension.
This property has no default.
- Digest Algorithm
-
The digest algorithms the provider can use when signing the requests and responses selected in the Request/Response Signing group.
These algorithms are exposed in the provider’s metadata extension.
This property has no default.
- Encryption Algorithm
-
This field specifies two types of encryption algorithms for the provider:
-
Symmetric algorithms, which the provider can use to encrypt the objects selected in the Encryption group. Select one or more AES algorithms from the drop-down list.
Default:
http://www.w3.org/2001/04/xmlenc#aes128-cbc -
Asymmetric algorithms, advertised as the provider’s transport key algorithm. When SAML 2.0 token encryption is enabled, hosted providers should use the algorithm the remote provider is advertising when encrypting symmetric encryption keys.
Select one or more algorithms from the list:
Key transport algorithms
-
http://www.w3.org/2009/xmlenc11#rsa-oaep.
When this algorithm is configured, AM will use the Mask Generation Function Algorithm property (Configure > Global Services > Common Federation Configuration) to create the transport key.
You can find a list of supported mask generation function algorithms in Algorithms.
-
http://www.w3.org/2001/04/xmlenc#rsa-1_5.
For security reasons, you should not use this option.
-
NameID Format
- NameID Format List
-
Specifies the supported name identifiers for users that are shared between providers for single sign-on (SSO).
The following diagram shows how the hosted IdP decides which of the supported NameID formats is used:

- NameID Value Map
-
Maps name identifier formats to user profile attributes. The
persistentandtransientname identifiers don’t need to be mapped.NameID mapping supports Base64-encoded binary values. With this flag set, AM Base64-encodes the profile attribute when adding it to the assertion.
Authentication Context
- Mapper
-
A class that implements the
IDPAuthnContextMapperinterface and sets up the authentication context.Default value:
com.sun.identity.saml2.plugins.DefaultIDPAuthnContextMapper - Authentication Context
-
Maps the authentication context classes supported by the IdP and the authentication mechanisms used by AM when an SP specifies an authentication context class in a SAML 2.0 request.
- Context Reference
-
Select from the following options to define a context reference:
-
Predefined Reference to choose from a list of supported context references.
-
Custom Reference to type your own reference to an authentication context.
-
- Key
-
Select an authentication mechanism from the list for AM to use when the SP specifies an authentication context class in a SAML 2.0 request.
Authentication mechanisms
- Service
-
Specify an authentication tree for AM to use to authenticate the end user.
For example, in the Value field, enter
HmacOneTimePasswordto use the built-in one-time passcode (OTP) example authentication tree. - Module
-
This property was used only for authentication with modules and chains and is no longer documented.
- Authentication Level
-
AM authenticates the user with a method that has an associated authentication level equal to or higher than the specified value.
If there is more than one suitable method, AM presents the available options by using a
ChoiceCallback.Learn more about using and returning callbacks during authentication in Authenticate over REST.
The RoleandUseroptions are deprecated. Don’t use these options. - Value
-
The name of the authentication mechanism you selected from the Key list. For example, if you chose
Serviceas the authentication mechanism, enter the name of an authentication tree. - Level
-
The order of precedence of the supported context reference classes as a numeric value.
Classes with higher numbers are considered stronger than lower numbered classes.
The values determine which authentication classes can be used
when the SP makes an authentication request that uses a comparison attribute;
for example, minimum or better.
The value of this field should match the auth level of the service. For example, if you configured an authentication mechanism as a tree that sets an auth level of 10, set the same value as you specified in the Level field. Because AM compares the current auth level against the level specified in Authentication Context table, if the two values don’t match, AM could require a logged-in user to re-authenticate.
Example
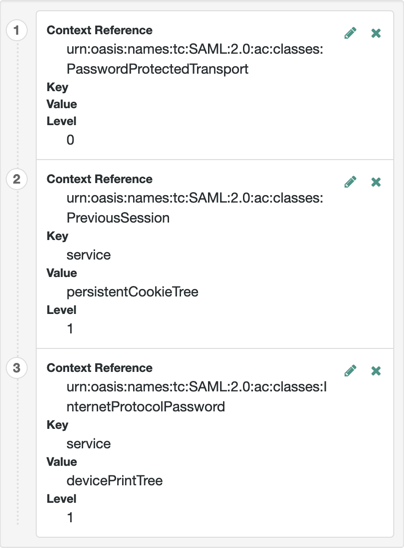
+ Learn more about authentication context classes in Authentication Context for the OASIS Security Assertion Markup Language (SAML) V2.0 in the SAML V2.0 Standard.
+
Default value: urn:oasis:names:tc:SAML:2.0:ac:classes:PasswordProtectedTransport
Assertion processing
The following properties appear on the Assertion Processing tab:
Attribute Mapper
- Attribute Mapper Plugin
-
This extension point is used to map the IdP attributes that are inserted into the SAML assertion.
The plugin can be implemented either in JavaScript or as a Java class. If defined, the scripted implementation takes precedence, otherwise AM invokes the
Attribute Mapperclass.Learn more in IdP attribute mapper.
The following plugin properties determine which implementation is used:
- Attribute Mapper
-
Specifies the Java class for the Attribute Mapper plugin. This class is not invoked if a script is selected for
Attribute Mapper Script.Default:
com.sun.identity.saml2.plugins.DefaultIDPAttributeMapper - Attribute Mapper Script
-
Specifies the scripted implementation of the Attribute Mapper plugin.
Select from a list of all the
Saml2 IDP Attribute Mappertype scripts saved to this realm, including the default template script,SAML2 IDP Attribute Mapper Script.You can find details in saml2-idp-attribute-mapper.js.
- Attribute Map
-
Maps SAML attributes to user profile attributes.
The user profile attributes used here must both be allowed in user profiles, and also be specified for the identity repository.
See Adding User Profile Attributes, for instructions on allowing additional attributes in user profiles.
To see the profile attributes available for an LDAP identity repository, log in to the AM admin UI, and go to Realms > Realm Name > Identity Stores > User Configuration. Check the LDAP User Attributes list.
The default IdP mapping implementation allows you to add static values in addition to values taken from the user profile. You add a static value by enclosing the profile attribute name in double quotes ("), as in the following example:
Account Mapper
- Account Mapper
-
Specifies a class that implements
AccountMapperto map remote users to local user profiles. - Disable NameID Persistence
-
Disables the storage of the NameID values in the identity repository for all NameIDs issued by the IdP instance as long as the NameID format is anything but the persistent NameID format:
urn:oasis:names:tc:SAML:2.0:nameid-format:persistent. That is, you can disable the storage of NameID values with persistent NameID-Format if and only if there is a NameID value mapping set up for the NameID-Format.By preventing the storage of the NameID values, the
ManageNameIDand theNameIDMappingSAML profiles will no longer work when using any persistent NameID formats. Existing account links that have been established and stored are not removed when disabling NameID persistence.Default value:
false
Local Configuration
- Auth URL
-
If present, overrides the default UI login URL used to authenticate users during federation.
Use this property to specify an alternative URL for authenticating users, for example, if you have created a custom user interface other than the UI.
The specified authentication URL is responsible for authenticating the federated user and must establish a session in AM, and return the SSO token value in the configured cookie name, usually
iPlanetDirectoryPro.The domain of the authentication URL must be configured in AM so that the cookie is accepted, and if host cookies are configured in AM, then the fully qualified domain name of the authentication URL must be identical to that of the AM instance.
Learn more about configuring the domains AM accepts in the SSO cookies in Change the cookie domain.
AM redirects users to the URL specified and appends a
gotoparameter. The parameter contains the URL the user must be redirected to after authentication. The specified authentication URL must not override thegotoparameter, as that would redirect the user elsewhere and federation will fail.Learn more in Success and failure redirection URLs.
- Reverse Proxy URL
-
When a reverse proxy is used for SAML endpoints, it is specified here.
- External Application Logout URL
-
URL to which to send an HTTP POST including all cookies when receiving a logout request. To add a user session property as a POST parameter, include it in the URL query string as a
appsessionpropertyparameter.
Services
The following properties appear on the Services tab:
- MetaAlias
-
Used to locate the provider’s entity identifier, specified as
[/realm-name]*/provider-name, where provider-name cannot contain slash characters (/). For example:/myRealm/mySubrealm/idp.Ensure the MetaAlias is unique for each provider configured in a CoT and in the realm.
IDP Service Attributes
- Artifact Resolution Service
-
Specifies the endpoint to manage artifact resolution. The Index is a unique number identifier for the endpoint.
- Single Logout Service
-
Specifies the endpoints to manage single logout (SLO), depending on the SAML binding selected.
- Manage NameID Service
-
Specifies the endpoints to manage name identifiers, depending on the SAML binding selected.
- Single SignOn Service
-
The endpoints to manage SSO.
These endpoints are used only for SP-initiated flows but are included as a requirement of the SAML V 2.0 Metadata specification.
- Assertion ID Request Service
-
Specifies the endpoints to request for an specific assertion by referring to its assertion ID.
Advanced settings
The following properties appear on the Advanced tab:
SAE Configuration
- IDP URL
-
Specifies the endpoint to manage Secure Attribute Exchange requests.
- Application Security Configuration
-
Specifies how to handle encryption for Secure Attribute Exchange operations.
ECP Configuration
- IDP Session Mapper
-
Specifies the class that finds a valid session from an HTTP servlet request to an IdP with a SAML Enhanced Client or Proxy profile.
Session Synchronization
- Enabled
-
When enabled, the IdP sends a SOAP logout request over the back channel to all SPs when an authenticated session times out. An authenticated session can time out when the maximum idle time or maximum session time is reached, for example.
IDP Finder Implementation
- IDP Finder Implementation Class
-
Specifies a class that finds the preferred IdP to handle a proxied authentication request.
- IDP Finder JSP
-
Specifies a JSP that presents the list of IdPs to the user.
- Enable Proxy IDP Finder For All SPs
-
When enabled, apply the finder for all remote SPs.
Relay State URL List
- Relay State URL List
-
List of URLs permitted for the
RelayStateparameter. For SLO operations, AM validates the redirection URL in theRelayStateparameter against this list. If theRelayStateparameter’s value is in the list, AM allows redirection to theRelayStateURL. If it is not in the list, a browser error occurs.Use the pattern matching rules described in Success and failure redirection URLs to specify URLs in the list.
If you do not specify any URLs in this property, AM only allows redirection to
RelayStateURLs that match the domain of the instance. Any other URL will cause a browser error.This property doesn’t apply to IdP-initiated SSO, where the validation of the
RelayStateparameter should be performed on the SP.
IDP Adapter
- IDP Adapter Plugin
-
This plugin is invoked immediately before sending a SAML 2.0 response.
The plugin can be implemented either in JavaScript or as a Java class. If defined, the scripted implementation takes precedence, otherwise AM invokes the
IDP AdapterJava class.Learn more in IdP adapter.
- IDP Adapter Class
-
Specifies the Java class for the IdP Adapter plugin.
This class is not invoked if a script is selected for
IDP Adapter Script. - IDP Adapter Script
-
Specifies the script for the IdP Adapter plugin.
Select from a list of all the
Saml2 IDP Adaptertype scripts saved to this realm, including the default template script,SAML2 IDP Adapter Script.Learn more in saml2-idp-adapter.js.
Remote IdP configuration
After you’ve set up a remote IdP, configure it through the AM admin UI under Realms > Realm Name > Applications > Federation > Entity Providers > Provider Name.
Assertion content
The following properties appear under the Assertion Content tab:
Signing and Encryption
- Request/Response Signing
-
The requests and responses that the IdP requires the SP to sign digitally.
- Encryption
-
-
NameID Encryption – When selected, the SP must encrypt NameID elements.
-
- Algorithms
-
Select the signing, encryption and digest algorithms that the SP will use.
NameID Format
-
NameID Format List – The supported name identifiers for users who are shared between providers for single sign-on.
Secrets
-
Secret Label Identifier – Identifier used to create a secret label for mapping to a secret in the secret store. AM uses this label to create a specific secret label for this entity provider. The secret label takes the form
am.applications.federation.entity.providers.saml2.identifier.basicauthwhere identifier is the value of Secret Label Identifier. The label can only contain charactersa-z,A-Z,0-9, and periods (.). It can’t start or end with a period.If you change the Secret Label Identifier for a specific entity provider, any corresponding mappings are deleted, unless they’re referenced by other entity providers.
Basic Authentication
-
Enabled – Authenticate with the specified username and password when making requests to this entity provider’s SOAP endpoints.
-
User Name – The username with which to authenticate at SOAP endpoints.
-
Password – The password with which to authenticate at SOAP endpoints.
If you set a value for Secret Label Identifier, and AM finds a mapping to this secret label in the secret store, the value of this Password field is ignored. For example, if you set the Secret Label Identifier to demo and AM finds a secret mapping to am.applications.federation.entity.providers.saml2.demo.basicauth, AM uses this secret and ignores the value of the Password field. For basic authentication, there is no default secret label for the realm, or globally.
Client Authentication
These settings let an SP authenticate to the IdP using mutual TLS (mTLS).
When you enable client authentication for any request type in this section, you must configure a secret mapping from one of the following secret labels to a valid certificate in the secret store:
-
am.default.applications.federation.entity.providers.saml2.sp.mtls– the global or realm-specific mapping for hosted SPs -
am.applications.federation.entity.providers.saml2.identifier.mtls– a mapping for a specific SP, where identifier is the value of the Secret Label Identifier you set in the Secrets panel in the SP configuration.
If you configure a global mapping, a realm-specific mapping, and a mapping for a specific SP, the order of precedence is as follows:
-
Hosted SP-specific mapping
-
Realm-level default
-
Global default
The certificates mapped to these labels are included in the SP metadata export with <KeyDescriptor use="signing">.
Currently, you can enable mTLS for the following request:
-
Artifact Resolve – For artifact resolution requests, the IdP instructs the SP to send a client certificate along with the request.
Services
The following properties appear under the Services tab:
IDP Service Attributes
- Artifact Resolution Service
-
The endpoint to manage artifact resolution. The Index is a unique identifier for the endpoint.
- Single Logout Service
-
The endpoints to manage single logout, depending on the selected SAML binding.
- Manage NameID Service
-
The endpoints to manage name identifiers, depending on the selected SAML binding.
- Single SignOn Service
-
The endpoints to manage single sign-on.
These endpoints are used only for SP-initiated flows but are included as a requirement of the SAML V 2.0 Metadata specification.
Hosted SP configuration
After you’ve set up a hosted SP, you can configure it through the AM admin UI under Realms > Realm Name > Applications > Federation > Entity Providers > Provider Name.
Assertion content
The following properties appear under the Assertion Content tab:
Signing and Encryption
- Request/Response Signing
-
The parts of messages the SP requires the IdP to sign digitally.
- Encryption
-
The IdP must encrypt selected elements.
- Secret Label and Algorithms
-
- Secret Label Identifier
-
An identifier for the secret label AM uses for this entity provider, when resolving secrets.
For example, if you set this value to
demo, the entity provider uses the following secret labels:-
am.applications.federation.entity.providers.saml2.demo.signing -
am.applications.federation.entity.providers.saml2.demo.encryption
If not specified, AM uses the entity provider role-specific, default global secret labels. Learn more in Secret label mappings for SAML v2.0 signing and encryption.
-
- Signing Algorithm
-
The algorithms the provider can use to sign the request/response attributes selected in the Request/Response Signing group.
These algorithms are exposed in the provider’s metadata extension.
This property has no default.
- Digest Algorithm
-
The digest algorithms the provider can use when signing the requests and responses selected in the Request/Response Signing group.
These algorithms are exposed in the provider’s metadata extension.
This property has no default.
- Encryption Algorithm
-
The two types of encryption algorithms for the provider:
-
Symmetric algorithms, which the provider can use to encrypt the objects selected in the Encryption group. Select one or more AES algorithms from the drop-down list.
Default:
http://www.w3.org/2001/04/xmlenc#aes128-cbc -
Asymmetric algorithms, advertised as the provider’s transport key algorithm. When SAML v2.0 token encryption is enabled, hosted providers should use the algorithm the remote provider is advertising when encrypting symmetric encryption keys.
Select one or more algorithms from the drop-down list:
Key transport algorithms
-
http://www.w3.org/2009/xmlenc11#rsa-oaep.
When this algorithm is configured, AM will use the Mask Generation Function Algorithm property (Configure > Global Services > Common Federation Configuration) to create the transport key.
Learn about the supported mask generation function algorithms in Algorithms.
-
http://www.w3.org/2001/04/xmlenc#rsa-1_5.
For security reasons, you should not use this option.
-
NameID Format
- NameID Format List
-
The supported name identifiers for users that are shared between providers for single sign-on.
The following diagram shows how the hosted SP decides which of the supported NameID formats is used:

- Disable NameID Persistence
-
Disables the storage of
NameID`s in the user datastore,
even if the `NameID
format isurn:oasis:names:tc:SAML:2.0:nameid-format:persistentin the received assertion, and the account mapper has identified the local user.You might want to disable storage of NameID values if you’re using a read-only datastore, or an external identity store that does not have the AM identity schemas applied.
When local authentication is utilized for account linking purposes, disabling federation persistence requires end users to authenticate locally for each SAML-based login.
Default value:
false
Authentication Context
- Mapper
-
A class that implements the
SPAuthnContextMapperinterface and maps the incoming request parameters to an authentication context.Default:
com.sun.identity.saml2.plugins.DefaultSPAuthnContextMapper - Authentication Context
-
The authentication context maps the URI references to IdP’s supported authentication context classes to authentication levels set on the SP side.
- Context Reference
-
Select from the following options to define a context reference:
-
Predefined Reference to choose from a list of supported context references.
-
Custom Reference to type your own reference to an authentication context.
-
- Level
-
The order of precedence of the supported context reference classes as a numeric value.
Classes with higher numbers are considered stronger than lower numbered classes. The values determine which authentication classes can be used when the SP makes an authentication request that uses a comparison attribute; for example,
minimumorbetter.Example
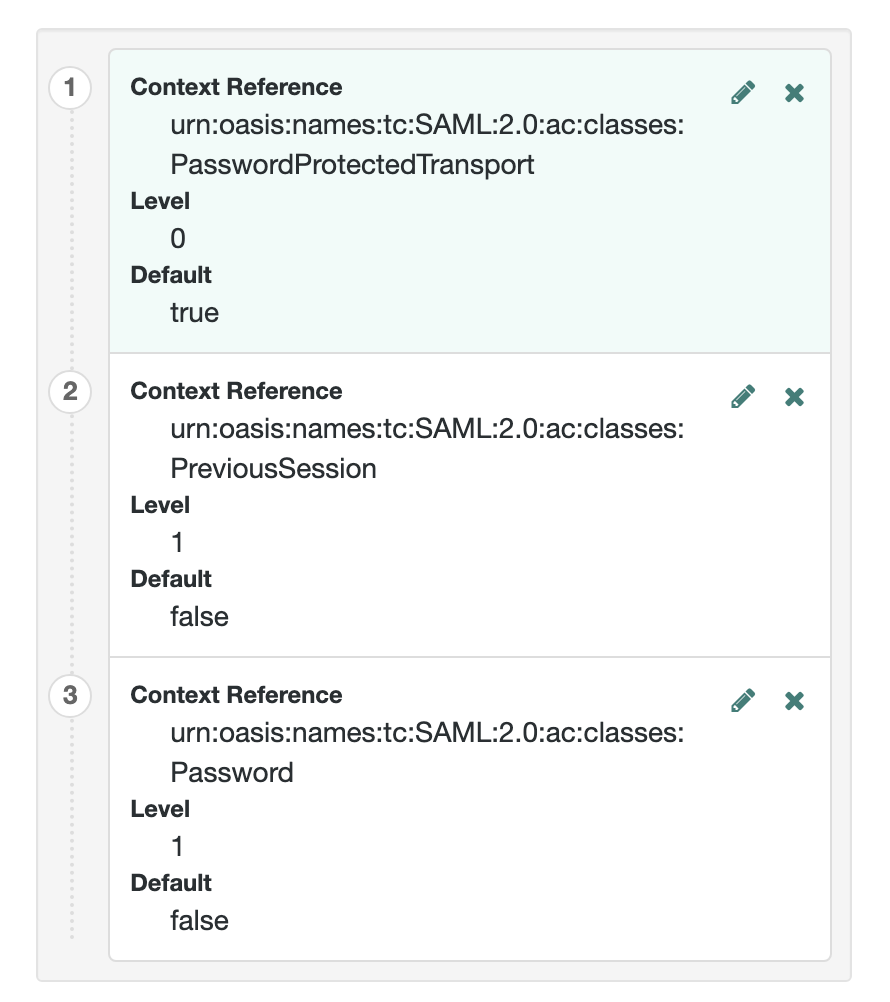
Learn about authentication context classes in Authentication Context for the OASIS Security Assertion Markup Language (SAML) V2.0 in the SAML V2.0 Standard.
Default value:
urn:oasis:names:tc:SAML:2.0:ac:classes:PasswordProtectedTransport
- Comparison Type
-
Used in conjunction with the default authentication context to specify the possible range of authentication mechanisms the IdP can choose from.
For example, if the Comparison Type field is set to
better, and thePasswordProtectedTransportauthentication context class is selected in the Default Authentication Context field, the IdP must select an authentication mechanism with a higher level assigned.Default:
exact - Include Request Authentication Context
-
Whether to include an authentication context class as the Requested Authentication Context in the SAML v2.0 Authentication Request.
Default: Enabled
- Assertion Time Skew
-
Grace period in seconds for the
NotBeforetime in assertions.
Assertion processing
The following properties appear under the Assertion Processing tab:
Attribute Mapper
- Attribute Mapper
-
A class that implements the attribute mapping.
- Attribute Map
-
Maps SAML attributes to session properties, or user profile attributes.
The value of Key is a SAML attribute sent in an assertion, and the value of Value is a property in the authenticated session, or an attribute of the user’s profile.
By default, the SP maps the SAML attributes it receives to equivalent-named session properties. However, when the SP is configured to create identities during autofederation and the identity does not exist yet, the SP maps the SAML attributes to their equivalents in the newly-created user profile.
The special mapping
Key: *, Value: *means that the SP maps each attribute it receives in the assertion to equivalent-named properties or attributes. For example, if the SP receivesmailandfirstnamein the assertion, it maps them tomailandfirstnamerespectively.Remove the special mapping and add key pairs to the map if:
-
(During autofederation) The attributes in the IdP’s and the SP’s identity stores do not match.
-
You need control over the names of the session properties.
-
You need control over which attributes the SP should map, because the IdP adds too many to the assertion.
For example, if the SAML attribute is
firstnameand you want the SP to map it to a session property/user profile attribute calledcn, create a mapping similar toKey: firstname, Value: cn. -
Auto Federation
- Enabled
-
When enabled, automatically federate user’s accounts at different providers based on the specified SAML attribute.
- Attribute
-
The SAML attribute to match accounts at different providers.
Account Mapper
- Account Mapper
-
A class that implements
AccountMapperto map remote users to local user profiles. - Use Name ID as User ID
-
When selected, fall back to using the name identifier from the assertion to find the user.
- Transient User
-
The user profile to map all IdP users when sending transient name identifiers.
URL
- Local Authentication URL
-
Use this property to specify an alternative URL to redirect the user to after validating the SAML2 assertion from the IdP. For example, if you have created a custom user interface other than the AM UI.
When in integrated mode, the query parameters are appended to the configured URL. Typically, these parameters contain all the information necessary for AM to continue the authentication journey.
When in standalone mode, AM redirects users to the specified URL, and appends a
gotoparameter. This parameter contains the URL the user must be redirected to next. - Intermediate URL
-
The URL to redirect the user to after authentication but before the original URL requested.
- External Application Logout URL
-
The URL to send an HTTP POST to including all cookies when receiving a logout request. To add a user session property as a POST parameter, include it in the URL query string as a
appsessionpropertyparameter.
Services
The following properties appear under the Services tab:
- MetaAlias
-
Used to locate the hosted provider’s entity identifier, specified as
[/realm-name]*/provider-name, where provider-name can not contain slash characters (/). For example:/myRealm/mySubrealm/sp.Ensure the MetaAlias is unique for each provider configured in a CoT and in the realm.
SP Service Attributes
- Single Logout Service
-
The endpoints to manage single logout, depending on the SAML binding selected.
- Manage NameID Service
-
The endpoints to manage name identifiers, depending on the SAML binding selected.
- Assertion Consumer Service
-
The endpoints to consume assertions, with Index corresponding to the index of the URL in the standard metadata.
The scheme, FQDN, and port configured must exactly match those of the SP as they appear in its metadata.
To determine the SP’s endpoint URL, AM uses the Base URL service, if configured.
If the URL does not match, the SAML v2.0 flow will fail and AM will log
Invalid Assertion Consumer Location specifiedin the audit log file.
Advanced settings
The following properties appear under the Advanced tab:
SAE Configuration
- SP URL
-
The endpoint to manage Secure Attribute Exchange requests.
- SP Logout URL
-
The endpoint of the SP that can handle global logout requests.
- Application Security Configuration
-
How to handle encryption for Secure Attribute Exchange operations.
ECP Configuration
- Request IDP List Finder Implementation
-
A class that returns a list of preferred IdPs trusted by the SAML Enhanced Client or Proxy profile.
- Request IDP List Get Complete
-
A URI reference used to retrieve the complete IdP list if the
IDPListelement is not complete. - Request IDP List
-
A list of IdPs for the SAML Enhanced Client or Proxy to contact, used by the default implementation of the IDP Finder.
IDP Proxy
- IDP Proxy
-
When enabled, AM includes a
Scopingelement in the authentication request to enable the request to be proxied. - Introduction
-
When enabled, use introductions to find the proxy IdP.
- Proxy Count
-
The maximum number of proxy IdPs.
- IDP Proxy List
-
A list of URIs identifying preferred proxy IdPs.
Session Synchronization
- Enabled
-
When enabled, the SP sends a SOAP logout request over the back channel to all IdPs when an authenticated session times out. An authenticated session can time out when the maximum idle time or maximum session time is reached, for example.
Relay State URL List
- Relay State URL List
-
List of URLs permitted for the
RelayStateparameter. AM validates the redirection URL in theRelayStateparameter against this list. If theRelayStateparameter’s value is in the list, AM allows redirection to theRelayStateURL. If it is not in the list, a browser error occurs.Use the pattern matching rules described in Success and failure redirection URLs to specify URLs in the list.
If you DO NOT specify any URLs in this property, AM only allows redirection to
RelayStateURLs that match the domain of the instance. Any other URL will cause a browser error.
Remote SP configuration
After you’ve set up a remote SP, configure it through the AM admin UI under Realms > Realm Name > Applications > Federation > Entity Providers > Provider Name.
Assertion content
The following properties appear under the Assertion Content tab:
Signing and Encryption
- Request/Response Signing
-
The requests and responses that the SP requires the IdP to sign digitally.
- Encryption
-
The elements that the SP requires the IDP to encrypt.
-
Attribute Encryption – When selected, the IDP must encrypt SAML attributes.
-
Assertion Encryption – When selected, the IDP must encrypt SAML assertions.
-
NameID Encryption – When selected, IDP must encrypt NameID elements.
-
- Algorithms
-
-
Signing Algorithm – The signing algorithm the SP will use.
-
Digest Algorithm – The digest algorithm the SP will use.
-
Encryption Algorithm – The encryption algorithm the SP will use.
-
NameID Format
-
NameID Format List – The supported name identifiers for users who are shared between providers for single sign-on.
-
NameID Value Map – Map the NameID format to a user profile attribute, for example:
urn:oasis:names:tc:SAML:1.1:nameid-format:emailAddress=mailorurn:oasis:names:tc:SAML:2.0:nameid-format:persistent=objectGUID;binary.-
Key– The Name ID format to map, for example:urn:oasis:names:tc:SAML:1.1:nameid-format:emailAddress -
Value– The profile attribute, for example:mail. -
Binary– Indicates that the profile attribute is binary and should be Base64-encoded when used as the NameID value.
If the specified NameID format is used in the protocol, the corresponding profile attribute value is used as the NameID in the Subject assertion element. This mapping overrides all the values defined in the NameID Value Map on the hosted IdP. For example, if a NameID Value Map is defined for the SP and a request is made with a specific NameID Format that only exists on the IdP, it will fail.
-
-
Disable NameID Persistence Disables the storage of NameID values at the IDP when generating an assertion for this remote SP.
Default value:
false
Secrets
-
Secret Label Identifier – Identifier used to create a secret label for mapping to a secret in the secret store.
AM uses this label to create a specific secret label for this entity provider. The secret label takes the form
am.applications.federation.entity.providers.saml2.identifier.basicauthwhere identifier is the value of Secret Label Identifier. The label can only contain charactersa-z,A-Z,0-9, and periods (.). It can’t start or end with a period.If you change the Secret Label Identifier for a specific entity provider, any corresponding mappings are deleted, unless they’re referenced by other entity providers.
If you specify a value for Secret Label Identifier, and AM finds a mapping to this secret label in the secret store, the value of the Password field is ignored. For basic authentication, there is no default secret label for the realm, or globally.
Basic Authentication
-
Enabled – Require authentication with the specified username and password at SOAP endpoints.
-
User Name – The username used to authenticate at SOAP endpoints.
-
Password – The password used to authenticate at SOAP endpoints.
If you specify a value for Secret Label Identifier, and AM finds a mapping to this secret label in the secret store, the value of the Password field is ignored. For basic authentication, there is no default secret label for the realm, or globally.
Assertion processing
The following properties appear under the Assertion Processing tab:
Services
The following properties appear under the Services tab:
SP Service Attributes
- Single Logout Service
-
The endpoints to manage single logout, depending on the selected SAML binding.
- Manage NameID Service
-
The endpoints to manage name identifiers, depending on the selected SAML binding.
- Assertion Consumer Service
-
The endpoints to consume assertions. Index corresponds to the index of the URL in the standard metadata.
Advanced settings
The following properties appear under the Advanced tab:
- Skip Endpoint Validation For Signed Requests
-
When enabled, AM doesn’t verify Assertion Consumer Service URL values in SAML authentication requests. For example, this lets the Assertion Consumer Service URL contain dynamic query parameters.
Because assertion consumer service URL verification is part of the SAML v2.0 specification, you can only skip validation if the authentication request is digitally signed by the SP. To digitally sign authentication requests, in the remote SP configuration go to Assertion Content > Signing and Encryption > Request/Response Signing, and select Authentication Requests Signed.
You must configure the remote SP to sign the authentication request.
AM returns an error if it receives an unsigned authentication request and this option is enabled.
SAE Configuration
- SP URL
-
The endpoint to manage Secure Attribute Exchange requests.
- SP Logout URL
-
The endpoint of the SP that can handle global logout requests.
IDP Proxy
- IDP Proxy enabled
-
When enabled, the authentication requests from this SP can be proxied.
- Proxy all requests
-
When enabled, AM proxies every authentication request from the SP, whether it contains a
Scopingelement or not.IDP Proxy enabled must be set to
truefor this option to take effect. - Introduction enabled
-
When enabled, use introduction cookies to find the proxy IdP.
This property only works with a non-default SAML2IDPProxyFRImpl implementation, and will be deprecated in a future release.
- Use IDP Finder
-
When enabled, use the IDP finder service to determine the IDP to which authentication requests are proxed.
- Proxy Count
-
Specifies the maximum number of proxy IdPs. AM sets the specified value in the
Scopingelement of the authentication request it proxies for this SP.You must enable Proxy all requests for this option to take effect.
- IDP Proxy List
-
A list of URIs identifying preferred proxy IdPs.
Tree Name
- Tree Name
-
If configured, AM redirects the remote SP to the specified tree, ignoring the configured authentication contexts and existing sessions. The redirect contains a transaction condition advice to ensure the tree is run.
You can access the requested authentication context and mappings by including a Scripted Decision node in the tree that queries the samlApplication script binding.
CoT configuration
Once you have set up a CoT, you can configure it through the AM admin UI under Realms > Realm Name > Applications > Federation > Circle of Trust > Circle of Trust Name.
- Name
-
String that refers to the circle of trust.
Once you have set up a circle of trust, the name cannot be configured.
- Description
-
Short description of the circle of trust.
- Status
-
Whether this circle of trust is operational.
- Entity Providers
-
Known hosted and remote identity and service providers participating in this circle of trust.
- SAML2 Writer Service URL
-
SAML v2.0 service that writes identity provider entity identifiers to Common Domain cookies after successful authentication, used in identity provider discovery. Example:
https://discovery.example.com:8443/openam/saml2writer. - SAML2 Reader Service URL
-
SAML v2.0 service that reads identity provider entity identifiers from Common Domain cookies, used in identity provider discovery. Example:
https://discovery.example.com:8443/openam/saml2reader.
SAML v2.0 advanced properties
To configure SAML v2.0 advanced properties, in the AM admin UI, go to Configure > Server Defaults > Advanced.
openam.saml.decryption.debug.mode-
When enabled, AM decrypts SAML v2.0 messages that are sent and received, and writes the content to the debug logs.
Don’t enable this property in production environments as these messages may contain user information.
Default:
False org.forgerock.openam.saml2.authenticatorlookup.skewAllowance-
The allowable time difference, in seconds, between any existing session the user may have, and the current time when an authentication request specifies
ForceAuthn.If the authenticated user’s session was created outside of the allowable time range, AM rejects the assertion, and re-authentication is required.
Default:
60 org.forgerock.openam.saml2.tls.handler.cache.size-
The size of the cache that holds HTTP Client handlers to facilitate mTLS authentication for artifact resolution.
The default should suffice for most deployments. Increase the cache size if you have a large number of remote IDPs that each use a separate secret alias.
The entire cache is invalidated when a secret store changes in a realm.
Default:
50