Custom Java nodes
These topics provide guidance and best practices for developing and maintaining Java authentication nodes in AM.
|
To create your own custom scripted nodes, use the Node Designer. |
About authentication nodes
Learn how nodes define actions taken during authentication.
Prepare your environment
Discover the prerequisites for building and customizing Java authentication nodes.
Secure nodes
Learn about security best practices when developing authentication nodes.
Develop nodes
Learn how to develop and maintain authentication nodes.
Translate nodes
Internationalize the text in your nodes.
Build and install nodes
Find out how to build and install authentication nodes for use in authentication trees.
You can find information on configuring and using authentication trees in Configure trees.
Name changes for ForgeRock products
Product names changed when ForgeRock became part of Ping Identity.
The following name changes have been in effect since early 2024:
| Old name | New name |
|---|---|
ForgeRock Identity Cloud |
PingOne Advanced Identity Cloud |
ForgeRock Access Management |
PingAM |
ForgeRock Directory Services |
PingDS |
ForgeRock Identity Management |
PingIDM |
ForgeRock Identity Gateway |
PingGateway |
Learn more about the name changes in New names for ForgeRock products in the Knowledge Base.
Authentication nodes
Authentication trees provide fine-grained authentication by allowing multiple paths and decision points throughout the authentication flow.
Authentication trees are made up of authentication nodes that define actions taken during authentication. Each node performs a single task during authentication, such as collecting a username or making a simple decision. Nodes can have multiple outcomes rather than just success or failure.
You can create complex yet customer-friendly authentication experiences by linking nodes together, creating loops, and nesting nodes within a tree, as follows:
Node types
Nodes are designed to have a single responsibility. Where appropriate, they should be loosely coupled with other nodes, enabling reuse in multiple situations.
For example, if a newly written node requires a username value, it should not collect it itself, but rely on another node, namely the Username Collector node.
There are two broad node types: collector nodes and decision nodes.
Collector nodes
Collector nodes capture data from a user during the authentication process. This data is often captured by a callback that is rendered in the UI as a text field, drop-down list, or other form component.
Examples of collector nodes include the Username Collector node and Password Collector node.

Collector nodes can perform basic processing of the collected data, before making it available to subsequent nodes in the authentication tree.
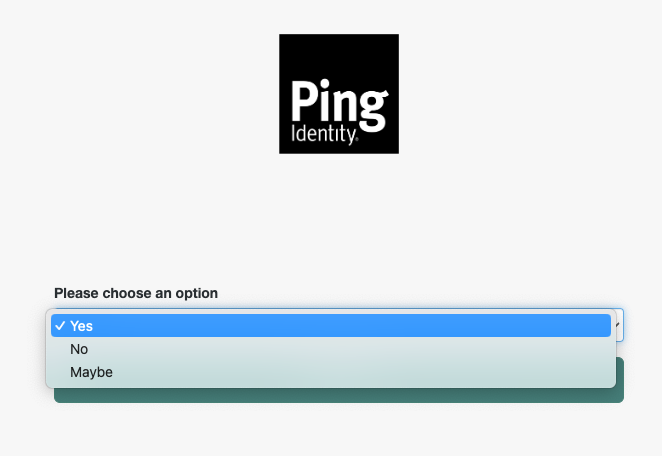
The Choice Collector node provides a drop-down list, populated with options defined when the tree is created, or edited.
Not all collector nodes use callbacks. For example, the Zero Page Login Collector node retrieves a username and password value from the request headers, if present.
Decision nodes
Decision nodes do the following:
-
Retrieve the state produced by one or more nodes.
-
Perform some processing on that state.
-
Optionally, store some derived information in the shared state.
-
Provide one or more outcomes, depending on the result.
The simplest decision node returns a boolean outcome - true, or false.
Complex nodes may have additional outcomes. For example, the LDAP Decision node provides the additional outcomes
Locked, Expired, and Cancelled. The tree administrator decides what to do with each outcome;
for example, the True outcome is often routed to a Success node, or to additional nodes for further authentication.
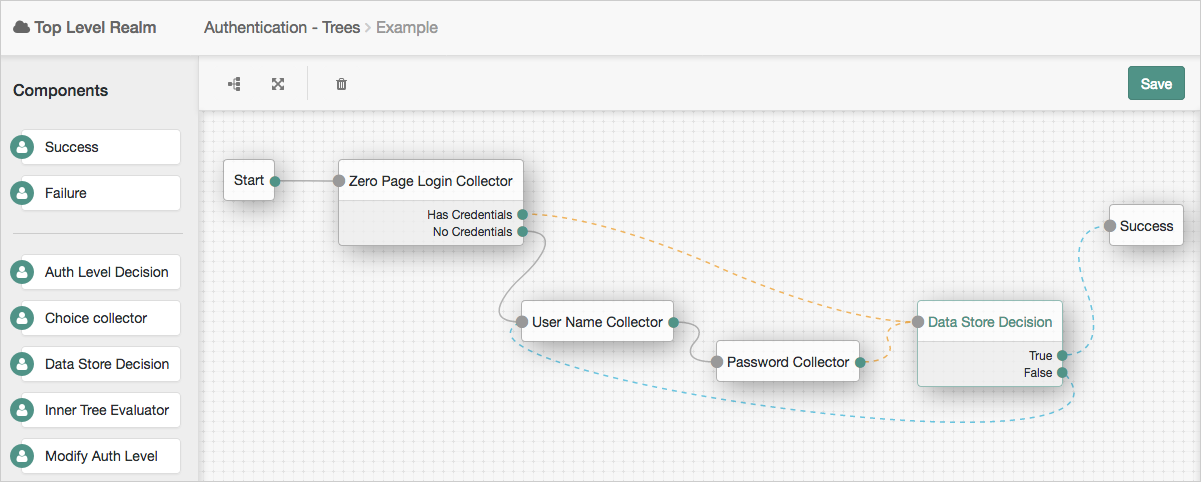
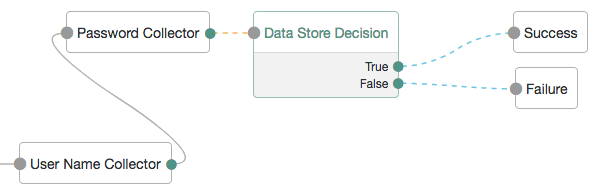
In the following example tree, two collector nodes are connected before a Data Store Decision node. The node then uses the credentials to authenticate the user against the identity stores configured for the realm. In this instance, an unsuccessful login attempt leads directly to failure; the user must restart the process from scratch.
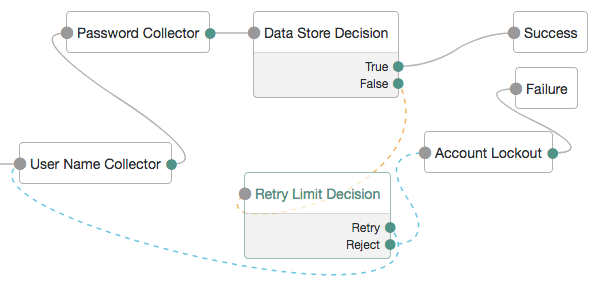
A more user-friendly approach might route unsuccessful attempts to a Retry Limit Decision node. In the following example, unsuccessful authentication attempts at the Data Store Decision node stage are routed into a Retry Limit Decision node. Depending on how many retries have been configured, the node either retries or rejects the new login attempt. Rejected attempts lead to a locked account.
|
Nodes can have prerequisite stages
Some Decision nodes are only applicable when used in conjunction with other nodes. For example, the Persistent Cookie Decision node looks for a persistent cookie that has been set in the request, typically by the Set Persistent Cookie node. The OTP Collector Decision node, which is both a collector and a decision node, only works when used in conjunction with a one-time password generated by a HOTP Generator node. |
Restrict a node’s functionality
To determine the functionality of a node, reduce the node’s responsibility to its core purpose. For example, the Password Collector node just captures the user’s password.
Before you create a set of nodes, assess the level of granularity the nodes should produce. For example, a customer’s environment may require a series of utility nodes that, on their own, don’t perform authentication actions, but have multiple use cases in many authentication journeys. In this case, you can create nodes that take values from the shared state and save it to the user’s profile.
Individual nodes can respond to a variety of inputs and outputs, and return different sets of callbacks to the user without leaving the node.
The following guidelines help a node developer determine the best point at which to split a node into multiple instances:
-
If a node’s process method takes input from the user, and immediately processes it:
Consider splitting the functionality over two nodes:
-
A collector node returns callbacks to the user and stores the response in the shared state.
-
A decision node uses the inputs collected so far in the tree to determine the next course of action.
A node that takes input from the user and makes a decision should only be designed as a single node if there is no possible additional use for the data gathered, other than making that specific decision.
-
-
If a processing stage in a node is duplicated in other nodes:
In this case, take the repeating stage out and place it in its own node. Connect this node appropriately to each of the other nodes.
If multiple nodes contain the same step in processing, such as returning a set of callbacks to ask the user for a set of data before processing it in different ways, the common functionality should be pulled out into its own node.
-
If a single function within the node has obvious use cases in other authentication journeys:
In this case, the functionality should be written into a single, reusable node. For example, in multi-factor authentication, a mechanism for reporting a lost device is applicable to many node types, such as mobile push, OATH, and others.
Prepare for development
This page explains the prerequisites for building custom authentication nodes, and shows how to use either a Maven archetype, or the samples provided with AM, to set up a project for building nodes.
|
You can find information about customizing post-authentication hooks for a tree in Create tree hooks. |
Prepare an environment for building custom authentication nodes
-
Make sure your Backstage account is part of a subscription:
-
In a browser, go to the Backstage website and sign on or register for an account.
-
Confirm or request your account is added to a subscription. Learn more in Getting access to product support in the Knowledge Base.
-
-
Install Apache Maven 3.6.3 or later, and Oracle JDK or OpenJDK version 17 or later.
To verify the installed versions, run the
mvn --versioncommand:$ mvn --version Apache Maven 3.9.6 (bc0240f3c744dd6b6ec2920b3cd08dcc295161ae) Maven home: /opt/homebrew/Cellar/maven/3.9.6/libexec Java version: 17.0.12, vendor: Homebrew, runtime: /opt/homebrew/Cellar/openjdk/17.0.12/libexec/openjdk.jdk/Contents/Home Default locale: en_GB, platform encoding: UTF-8 OS name: "mac os x", version: "14.7", arch: "aarch64", family: "mac" -
Configure Maven to be able to access the proprietary repositories by adding your Backstage credentials to the Maven
settings.xmlfile. Learn more in How do I access the proprietary protected Maven repositories?.If you want to use the archetype to create a project for custom authentication nodes, you also need access to the
forgerock-private-releasesrepository. Ensure yoursettings.xmlfile contains a profile similar to the following:<profiles> <profile> <id>forgerock</id> <repositories> <repository> <id>forgerock-private-releases</id> <url>https://maven.forgerock.org/artifactory/private-releases</url> <releases> <enabled>true</enabled> <checksumPolicy>fail</checksumPolicy> </releases> <snapshots> <enabled>false</enabled> <checksumPolicy>warn</checksumPolicy> </snapshots> </repository> </repositories> </profile> </profiles> <activeProfiles> <activeProfile>forgerock</activeProfile> </activeProfiles>
Set up a Maven project to build custom authentication nodes
Ping Identity provides a Maven archetype that creates a starter project, suitable for building an authentication node. You can also download the projects used to build the authentication nodes included with AM and modify those to match your requirements.
|
Complete the steps in Prepare an environment for building custom authentication nodes before proceeding. |
Complete either of the following steps to set up or download a Maven project to build custom authentication nodes:
-
To use the
auth-tree-node-archetypearchetype to generate a starter Maven project:-
In a terminal window, go to a folder where you’ll create the new Maven project. For example:
$ cd ~/Repositories -
Run the
mvn archetype:generatecommand, providing the following information:groupId-
A domain name you control, used for identifying the project.
artifactId-
The name of the JAR created by the project, without version information. Also the name of the folder created to store the project.
version-
The version assigned to the project.
package-
The package name in which your custom authentication node classes are generated.
authNodeName-
The name of the custom authentication node, also used in the generated
README.mdfile and for class file names.AM stores installed nodes with a reference generated from the node’s class name. An installed node registered through a plugin is stored with the name returned as a result of calling
Class.getSimpleName().AM doesn’t protect installed node names. The most recently installed node with a specific name will overwrite any previous installation of that node (including the nodes that are provided with AM by default). You must therefore choose a unique name for your custom node, and make sure the name isn’t already used for an existing node.
For example:
$ mvn archetype:generate \
  -DgroupId=com.example \
  -DartifactId=custom-auth-node \
  -Dversion=1.0.0-SNAPSHOT \
  -Dpackage=com.example.custom \
  -DauthNodeName=MyCustomAuthNode \
  -DarchetypeGroupId=org.forgerock.am \
  -DarchetypeArtifactId=auth-tree-node-archetype \
  -DarchetypeVersion=8.0.0 \
  -DinteractiveMode=false
[INFO] Project created from Archetype in dir: /Users/Ping/Repositories/custom-auth-node
[INFO] ------------------------------------------------------------------------
[INFO] BUILD SUCCESS
[INFO] ------------------------------------------------------------------------
[INFO] Total time: 11.397 s
[INFO] Finished at: 2024-09-25T15:45:06+00:00
[INFO] ------------------------------------------------------------------------
A new custom authentication node project is created; for example, in the
/Users/Ping/Repositories/custom-auth-nodefolder.Example
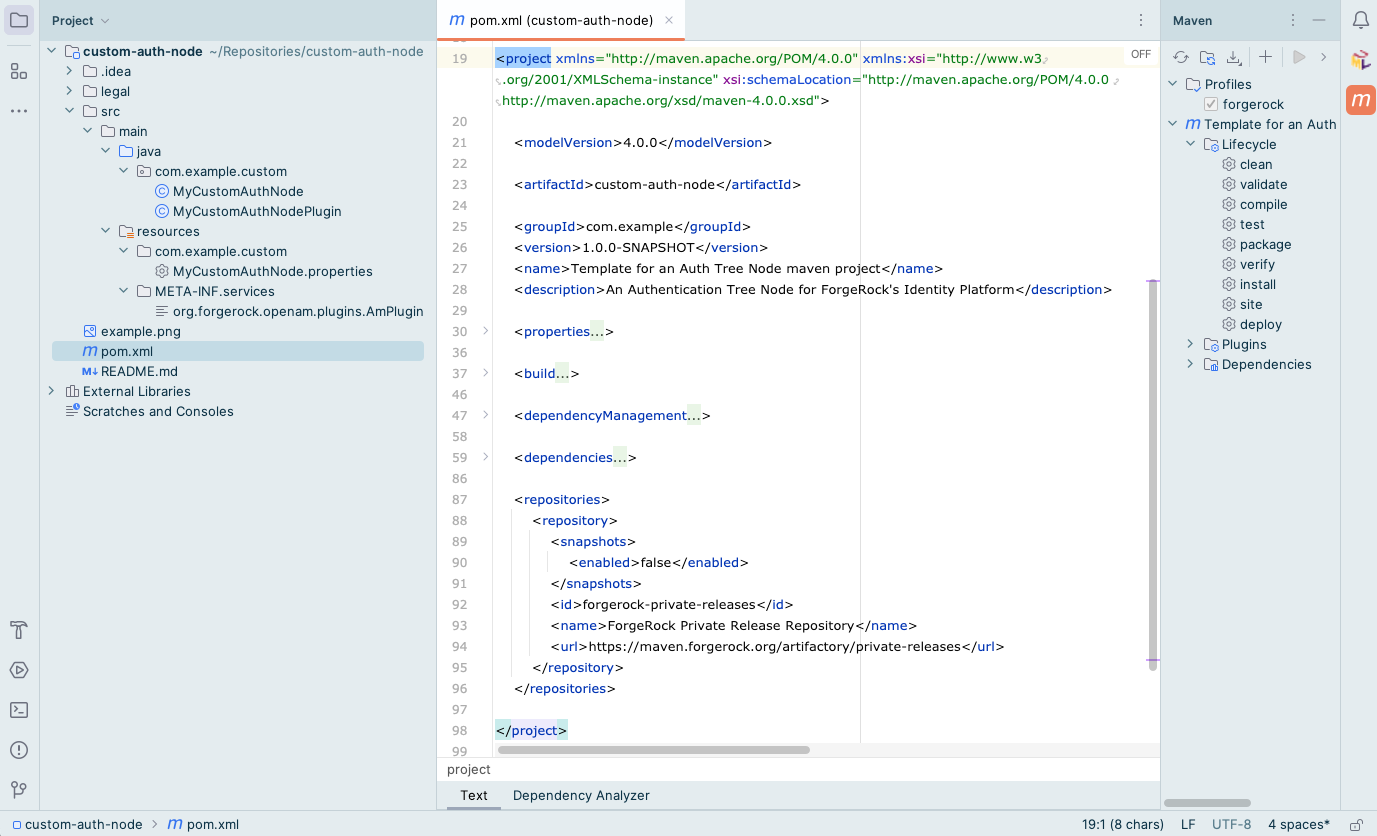 Figure 2. Node project created by using the archetype
-
-
To download the project containing the default AM authentication nodes from the
am-externalrepository:-
Clone the
am-externalrepository:$ git clone https://github.com/ForgeRock/am-external.git -
Check out the
release/8.0.0branch:$ cd am-external $ git checkout releases/8.0.0The AM authentication nodes project is located in the
am-external/openam-auth-trees/auth-nodes/folder.Example
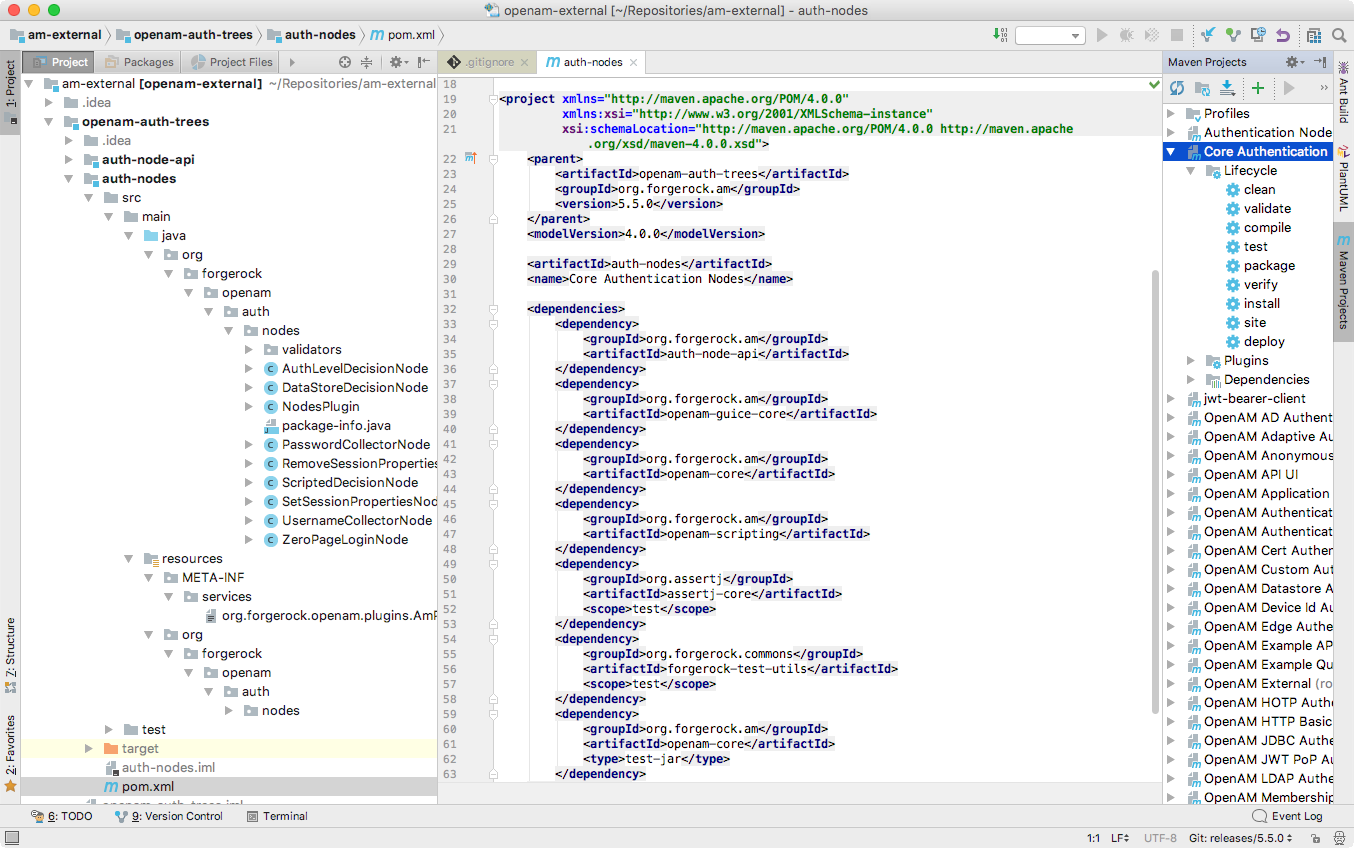 Figure 3. Node Project Cloned from the
am-externalrepository
-
Files contained in the Maven project
pom.xml-
Apache Maven project file for the custom authentication node.
This file specifies how to build the custom authentication node, and also specifies its dependencies on AM components.
Example
The following is an example
pom.xmlfile from a node project:<project> <modelVersion>4.0.0</modelVersion> <groupId>com.example</groupId> <artifactId>example-node-plugin</artifactId> <version>1.0.0</version> <dependencyManagement> <dependencies> <dependency> <groupId>org.forgerock.am</groupId> <artifactId>openam-bom</artifactId> <version>7.2.0-SNAPSHOT</version> <scope>import</scope> </dependency> </dependencies> </dependencyManagement> <dependencies> <dependency> <groupId>org.forgerock.am</groupId> <artifactId>auth-node-api</artifactId> <scope>provided</scope> </dependency> <dependency> <groupId>org.forgerock.am</groupId> <artifactId>openam-annotations</artifactId> <scope>provided</scope> </dependency> <dependency> <groupId>com.google.guava</groupId> <artifactId>guava</artifactId> <version>26.0-jre</version> </dependency> </dependencies> <build> <plugins> <plugin> <groupId>org.apache.maven.plugins</groupId> <artifactId>maven-shade-plugin</artifactId> <configuration> <shadedArtifactAttached>false</shadedArtifactAttached> <createDependencyReducedPom>true</createDependencyReducedPom> <relocations> <relocation> <pattern>com.google</pattern> <shadedPattern>com.example.node.guava</shadedPattern> </relocation> </relocations> <filters> <filter> <artifact>com.google.guava:guava</artifact> <excludes> <exclude>META-INF/**</exclude> </excludes> </filter> </filters> <transformers> <transformer implementation="org.apache.maven.plugins.shade.resource.ManifestResourceTransformer"> <manifestEntries> <Import-Package>javax.annotation;resolution:=optional,sun.misc;resolution:=optional</Import-Package> </manifestEntries> </transformer> </transformers> </configuration> </plugin> </plugins> </build> </project> authNodeName.java-
Core class for the custom authentication node. Learn more in Node class.
authNodeNamePlugin.java-
Plugin class for the custom authentication node. Learn more in Plugin class.
authNodeName.properties-
Properties file containing the localized strings displayed by the custom authentication node. Learn more in Internationalize nodes.
You must include a
nodeDescriptionproperty in your node to ensure it appears in the authentication tree designer. AM uses thenodeDescriptionproperty value as the name of your node.
The authNodeName reflects the name of your authentication node.
For example, the auth-tree-node-archetype for Maven uses MyCustomAuthNode as the authNodeName.
Tips for custom authentication node projects
When you configure a project for creating custom nodes, consider the following points:
-
Your node may be deployed into a different AM version to the one you compiled against.
Nodes from previous product versions should be compatible with subsequent product versions if you have only used
@SupportedAPIs. Learn more in the PingAM Java API Specification.For example, a node built against AM 7.5 APIs can be deployed in an AM 8.0.0 instance.
-
Other custom nodes may depend on your node, which may be being built against a different version of the AM APIs.
-
Other custom nodes, or AM itself, may be using the same libraries as your node; for example, Guava or Apache Commons, and so on. This may cause version conflicts.
To help protect against some of these issues, consider the following recommendations:
-
Mark all product dependencies as
providedin your build system configuration. -
Repackage all external, non-proprietary dependencies inside your own
.jarfile. Repackaged dependencies will not clash with a different version of the same library from another source.If you are using Maven, use the maven-shade-plugin to repackage dependencies.
Security considerations
This section describes the security best practices you should implement when developing authentication nodes in AM.
Store sensitive data in secrets
When developing nodes that include sensitive data such as passwords and encryption keys, make sure the data is secured:
-
Use secret stores for sensitive data, such as passwords and encryption keys. Never store them directly in configuration or expose them in scripts.
Learn more in Secret stores.
-
Store secrets using secure state. You can find information about secure state in Store values in shared tree state.
Update cryptography
Make sure you use well-known and trusted cryptographic libraries where appropriate.
Different algorithms and methods are discovered and tested over time, and communities of experts decide which are the most secure for different uses. Use up-to-date cryptographic methods and algorithms to generate keys.
Sanitize user input data
When developing nodes that accept user input data, sanitize the input data and remove any sensitive information, such as passwords, before using and storing the data. Don’t use unsanitized user input data for any purpose.
Where a node reads data from the shared state, always treat that data as user input data and sanitize accordingly.
Other considerations
-
If a node identifies a user before they sign in, make sure the node sets the identified identity on the node action using the
withIdentifiedIdentitymethod.Learn more in Action fields and methods and Access an identity’s profile.
-
Consider what data is being set in shared state and how subsequent nodes will use it. Make sure the data can’t be used in unintended ways. For example, consider data such as usernames and authentication levels that could result in information disclosure or elevation of privilege.
Where a node reads data from the shared state, always treat that data as user input data and sanitize accordingly.
-
Make sure you don’t expose any sensitive information in your logs. For example, don’t log any plaintext secrets or personally identifiable information (PII).
Develop and maintain nodes
The following table describes the tasks involved in developing and maintaining custom nodes:
| Task | Resources |
|---|---|
Create a class to implement the This class is your custom authentication node. It should define all aspects of your node, such as configuration data, outcomes, and business logic. |
|
Store values in shared tree state Use the tree state to store values for use by downstream nodes. |
|
Access an identity’s profile Read or write data to and from an identity’s profile. The identity must be verified before it can be accessed. |
|
Include callbacks Use existing callbacks to interact with the authenticating user. |
|
Handle multiple visits to a node Allow the authentication flow to return to the same node if needed. |
|
Create a plugin class The plugin class provides details about your node to AM. |
Node class
The Node class can access and modify the persisted state shared between the nodes within a tree,
and can request input by using callbacks. The class also defines the possible exit paths from the node.
In Java terms, an authentication node is a class that implements the Node interface,
org.forgerock.openam.auth.node.api.Node.
The SetSessionPropertiesNode class shows the steps to implement the Node interface:
package org.forgerock.openam.auth.nodes;

import java.util.Map;

import javax.inject.Inject;

import org.forgerock.openam.annotations.sm.Attribute;
import org.forgerock.openam.auth.node.api.Action;
import org.forgerock.openam.auth.node.api.Node;
import org.forgerock.openam.auth.node.api.SingleOutcomeNode;
import org.forgerock.openam.auth.node.api.TreeContext;
import org.forgerock.openam.auth.nodes.validators.SessionPropertyValidator;
import org.slf4j.Logger;
import org.slf4j.LoggerFactory;

import com.google.inject.assistedinject.Assisted;

/*
 * A node that defines a configurable set of properties to add to
 * the authenticated session if/when it is created.
 */
@Node.Metadata(outcomeProvider = SingleOutcomeNode.OutcomeProvider.class,
        configClass = SetSessionPropertiesNode.Config.class,
        tags = {"utilities"})                                           1
public class SetSessionPropertiesNode extends SingleOutcomeNode {       2

  /
   * Configuration for the node.
   /
  public interface Config {                                             3
    /
     * A map of property name to value.
     * @return a map of properties.
     /
    @Attribute(order = 100, validators = SessionPropertyValidator.class)
    Map<String, String> properties();
  }

  private final Config config;                                          4
  private final Logger logger = LoggerFactory.getLogger(SetSessionPropertiesNode.class);

  /
   * Constructs a new SetSessionPropertiesNode instance.
   * @param config Node configuration.
   */
  @Inject                                                               5
  public SetSessionPropertiesNode(@Assisted Config config) {
    this.config = config;
  }

  @Override
  public Action process(TreeContext context) {                          6
    logger.debug("SetSessionPropertiesNode started");
    Action.ActionBuilder actionBuilder = goToNext();
    config.properties().entrySet().forEach(property → {
      actionBuilder.putSessionProperty(property.getKey(), property.getValue());
      logger.debug("set session property {}", property);
    });
    return actionBuilder.build();
  }
}| Step | Description | Further information |
|---|---|---|
1 Apply the |
The annotation specifies the outcome provider, configuration class, and optionally, the configuration validation class and tags. Use an existing outcome provider such as |
|
2 Implement the |
Extend one of the following abstract classes to implement the
Alternatively, write your own implementation of the |
Javadoc:
|
3 Implement the |
The |
|
4 Define private constants and methods |
Optional |
|
5 Inject dependencies |
Inject objects using Guice as this makes it easier to unit test your node. This example specifies |
|
6 Override the |
The It takes a The method returns an The choice of outcome in a simple decision node would be |
Metadata annotation
The annotation specifies two required attributes: the outcomeProvider and the configClass.
Typically, the configClass attribute is an inner interface in the node implementation class.
You can also specify the following optional attributes: configValidator, extensions, and tags.
For example, the following is the @Node.Metadata annotation for the Data Store Decision node:
@Node.Metadata(outcomeProvider = AbstractDecisionNode.OutcomeProvider.class,
        configClass = DataStoreDecisionNode.Config.class,
        tags = {"basic authn", "basic authentication"})
Outcome provider
The outcomeProvider class defines the possible node outcomes.
The abstract implementations of the node interface,
org.forgerock.openam.auth.node.api.SingleOutcomeNode and org.forgerock.openam.auth.node.api.AbstractDecisionNode,
define outcome providers you can use for simple use cases.
Provide your own implementation for more complex use cases.
To ensure the node is available to the Configuration Provider node, your outcome provider
class must implement the StaticOutcomeProvider or the BoundedOutcomeProvider interfaces.
Learn more about these implementations and interfaces in the org.forgerock.openam.auth .node.api package.
For example, the following is the custom outcome provider from the LDAP Decision node,
which has True, False, Locked, Cancelled, and Expired exit paths:
    /**
     * Defines the possible outcomes from this Ldap node.
     */
    public static class LdapOutcomeProvider implements StaticOutcomeProvider {
        @Override
        public List<Outcome> getOutcomes(PreferredLocales locales) {
            ResourceBundle bundle = locales.getBundleInPreferredLocale(LdapDecisionNode.BUNDLE,
                    LdapOutcomeProvider.class.getClassLoader());
            return ImmutableList.of(
                    new Outcome(LdapOutcome.TRUE.name(), bundle.getString("trueOutcome")),
                    new Outcome(LdapOutcome.FALSE.name(), bundle.getString("falseOutcome")),
                    new Outcome(LdapOutcome.LOCKED.name(), bundle.getString("lockedOutcome")),
                    new Outcome(LdapOutcome.CANCELLED.name(), bundle.getString("cancelledOutcome")),
                    new Outcome(LdapOutcome.EXPIRED.name(), bundle.getString("expiredOutcome")));
        }
    }
Configuration class
The configClass contains the configuration of any attributes requested by the node when using it as part of a tree.
Learn more in the Config interface.
Configuration validator
The optional configValidator class validates the provided configuration at the class level.
This can be useful when you have two attributes that depend on each other for validation.
For example, an attribute is only required if another attribute is set to true.
The configValidator class must implement the ServiceConfigValidator interface.
For example, the following is the @Node.Metadata annotation for the Message node:
@Node.Metadata(outcomeProvider = AbstractDecisionNode.OutcomeProvider.class,
        configClass = MessageNode.Config.class,
        configValidator = MessageNode.MessageNodeValidator.class,
        tags = {"utilities"})
Where the MessageNode.MessageNodeValidator.class validates the locales entered:
    /**
     * Validates the message node, ensuring all provided Locales are valid.
     */
    public static class MessageNodeValidator implements ServiceConfigValidator {

        private final Logger logger = LoggerFactory.getLogger(MessageNodeValidator.class);

        private static String getLocaleStringFromMessage(String message) {
            return StringUtils.substringBetween(message, "[", "]");
        }

        @Override
        public void validate(Realm realm, List<String> configPath, Map<String, Set<String>> attributes)
                throws ServiceConfigException, ServiceErrorException {
            for (String messageAttribute : MESSAGE_ATTRIBUTES) {
                validateMessageAttribute(attributes, messageAttribute);
            }
        }

        private void validateMessageAttribute(Map<String, Set<String>> attributes, String messageAttribute)
                throws ServiceConfigException {
            Set<String> attributesSet = attributes.get(messageAttribute);
            Set<Locale> messageLocales = attributesSet.stream()
                    .map(MessageNodeValidator::getLocaleStringFromMessage)
                    .map(com.sun.identity.shared.locale.Locale::getLocale)
                    .collect(Collectors.toSet());
            for (Locale messageLocale : messageLocales) {
                if (!LocaleUtils.isAvailableLocale(messageLocale)) {
                    logger.debug("Invalid messageLocale {} for {} attribute", messageLocale.toString(),
                            messageAttribute);
                    throw new ServiceConfigException("Invalid locale provided");
                }
            }
        }
    }
Extensions
The optional extensions class provides additional metadata information about the node. The Java class is serialized
into JSON.
For example, the following is the @Node.Metadata annotation for the Username Collector node with an extensions
class added:
@Node.Metadata(outcomeProvider = SingleOutcomeNode.OutcomeProvider.class,
        configClass = UsernameCollectorNode.Config.class,
        extensions = UsernameCollectorNode.ExtraMetadata.class,
        tags = {"basic authn", "basic authentication"})
Where the UsernameCollectorNode.ExtraMetadata.class adds extra metadata:
/**
     * Extra Metadata for the username collector node.
     */
    public static class ExtraMetadata {

        /**
         * The owner of the node.
         */
        public String owner = "Ping Identity";

    }
The getType() response for this node includes this metadata:
"metadata": {
    "owner": "Ping Identity",
Tags
The optional tags attribute contains a list of tags to categorize the node within the tree designer view.
Tags are made up of one or more text strings that let users find the node more easily when designing trees.
For example, you could include common pseudonyms for the functionality the node provides,
such as mfa for a node that provides multi-factor authentication functionality.
The tree designer view organizes nodes into a number of categories, based on the presence of certain tag values, as described in the table below:
| Category | Tag | Example nodes |
|---|---|---|
Basic Authentication |
|
|
MFA |
|
|
Risk |
|
|
Behavioral |
|
|
Contextual |
|
|
Federation |
|
|
Identity Management |
|
Anonymous User Mapping node |
Utilities |
|
|
Nodes that aren’t tagged with one of these tags appear in an Uncategorized section. |
For example, the @Node.Metadata annotation for Timer Start node places it in the Utilities section:
@Node.Metadata(outcomeProvider = SingleOutcomeNode.OutcomeProvider.class,
        configClass = TimerStartNode.Config.class,
        tags = {"metrics", "utilities"})
Learn more in the Annotation Interface Node.Metadata.
Config interface
The Config interface defines the configuration data for a node.
A node can’t have state, but it can have configuration data. Configuration is per node.
Different nodes of the same type in the same tree have their own configuration.
You don’t need to write a class that implements the interface you define. AM automatically creates this as required.
Define node properties
Configure the node properties using methods. To provide a default value to the tree administrator, mark the method as default and define both a method and a value.
To omit a default value, define the method’s signature but not the implementation.
For example:
public interface Config {

  //This will have no default value for the UI
  @Attribute(order = 10)
  String noDefaultAttribute();

  //This will default to the value LOCK.
  @Attribute(order = 20)
  default LockStatus lockAction() {
    return LockStatus.LOCK;
  }
}
For this Config example, a custom enum named LockStatus is returned.
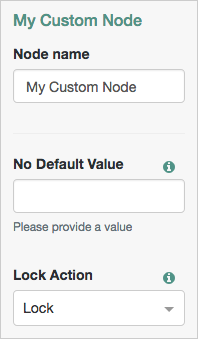
The defined properties appear as configurable options in the tree designer view when adding a node of the relevant type. The options display to the user automatically.
Attribute names are used when localizing the node’s text. Learn more in Internationalize nodes.
You can find more information in the Config annotation type in the AM Public API Javadoc.
The @Attribute annotation
The @Attribute annotation is required.
It defines the properties that appear as configurable options when you add or update a node.
Consider the following when using the @Attribute annotation:
-
You must specify an integer value for
orderto determine the position of the attribute in the UI. -
Only use compatible Java types as attributes.
Compatible Java types
Java type Additional information java.lang.Stringjava.lang.Integerjava.lang.Longjava.lang.Booleanjava.lang.EnumUse any enum type.
org.forgerock.json.JsonValuejava.util.Localejava.net.URLchar[](char array)Use for passwords, but consider using
org.forgerock.secrets.Purposeinstead.java.util.Listjava.util.Setjava.util.MapUse with the following elements:
-
Boolean
-
Duration
-
Integer
-
Locale
-
Long
-
String
-
URL
-
JsonValue
-
char[]
Keys must be strings for
java.util.Map.java.util.OptionalUse with any of these compatible Java types.
org.forgerock.secrets.PurposeUse for secret values such as passwords.
You must annotate this type with
@SecretPurposeto define the secret label. -
-
Include
requiredValue = trueif the attribute is a required value.Any attributes that aren’t required should be an Optional attribute unless they’re already part of a collection through
List,Map, orSet.Attributes aren’t required by default when either
requiredValueis omitted or set tofalse. -
Specify one or more
validatorsif you need to validate the attribute values provided.Include a validator as follows:
-
Use an existing validator class from the
org.forgerock.openam.auth.nodes.validatorspackage, such asDecimalValidatororHMACKeyLengthValidator. -
Create your own validator by implementing the ServiceAttributeValidator interface.
Example
The following example creates a validator called
GreaterThanZeroValidator:public class GreaterThanZeroValidator implements ServiceAttributeValidator { @Override public boolean validate(Set<String> values) { boolean isValid = true; for (String value : values) { if (Integer.parseInt(value) <= 0) { isValid = false; break; } } return isValid; } }
-
For example:
public interface Config {
  @Attribute(order = 1)
  String domain();                                                    1

  @Attribute(order = 2, validators = {DecimalValidator.class,         2
                                      HMACKeyLengthValidator.class})
  int exampleNumber();

  @Attribute(order = 3, requiredValue = true)
  boolean isVerificationRequired();                                   3

  @Attribute(order = 4)
  @TextArea                                                           4
  String textBox();

  @Attribute(order = 5)
  @Password                                                           5
  char[] clientSecret();

  @Attribute(order = 6)
  default YourCustomEnum action() {
    return YourCustomEnum.LockScreen;                                 6

  @Attribute(order = 7, requiredValue = true, resourceName = "secretLabelIdentifier")
  @SecretPurpose("am.authentication.nodes.customauth.%s.secret")
  Purpose<GenericSecret> secretValuePurpose();                        7
  };
}
1 The domain attribute defines a String-type node property for display in the UI.
Access the attribute in the process method by using a reference to the config interface;
for example, config.domain().
2 Specify one or more validator classes as the validators parameter.
3 The boolean attribute is defined as a required value.
4 Use the TextArea annotation to indicate a String-type node property that needs a larger text input than a single line.
5 Use the Password annotation to mask the input characters and encrypt the value of the attribute.
6 A custom enum attribute. This provides type safety and negates the misuse of Strings as generic type-unsafe value holders. The UI will correctly handle the enum and only let the tree administrator choose from the defined enum values.
Learn more in the Attribute annotation type in the AM Public API Javadoc.
7 An identifier used to create a secret label for the node that maps to a secret in a secret store.
The default custom authentication node secret label is am.authentication.nodes.customauth.%s.secret
where %s is the value of the identifier. The identifier can only contain alphanumeric characters a-z, A-Z, 0-9,
and periods (.). It can’t start or end with a period.
|
To retrieve the secret using the identifier from your custom node, use the Secrets class, for example: Learn more in:
|
Inject objects into a node instance
A node instance is constructed every time the node is reached in a tree and is discarded as soon as it’s been used to process the state once.
State stored in a node is lost when the node’s process method completes. To make state available for other nodes in the tree, nodes must return the state to the user or store it in the shared state.
AM uses Google’s Guice dependency injection framework for authentication nodes and uses Guice to manage most of its object lifecycles. Use just-in-time bindings from the constructor to inject an object from Guice.
The following node-specific instances are available from Guice:
- @Assisted Realm
-
The realm that the node is in.
- @Assisted UUID
-
The unique ID of the node instance.
- @Assisted TreeMetadata
-
The metadata for the tree that the node belongs to.
- <T> @Assisted T
-
The configuration object that is an instance of the interface specified in the
configClassmetadata parameter.
|
Any other objects in AM that are managed by Guice can also be obtained from within the constructor. |
The following example is the configuration injection used by the Debug node:
@Inject
public DebugNode(@Assisted DebugNode.Config config) {
  this.config = config;
  ...
}Use a cache
You can use Guice injection to cache information in a node by annotating the object
that contains the cache with the @Singleton annotation.
The Guice injected singleton will be used by multiple threads, so it must be thread safe. The following example uses
the Google LoadingCache, which is thread safe.
Alternatively, use java.util.concurrent.ConcurrentMap if you prefer to use a built-in Java class.
|
For example:
@Node.Metadata(
  outcomeProvider = SingleOutcomeNode.OutcomeProvider.class,
  configClass = MyCustomNode.Config.class)
  public class MyCustomNode extends SingleOutcomeNode {

    public interface Config {
      String url();
    }

    private final Config config;
    private final MyCustomNodeCache cache;

    @Inject
    public MyCustomNode(@Assisted Config config, MyCustomNodeCache cache) {
      this.config = config;
      this.cache = cache;
    }

    @Override
    public Action process(TreeContext context) {
      CachedThing thing = cache.getThing(config.url());
      // implement node logic here
    }
}

@Singleton
class MyCustomNodeCache {
   private final LoadingCache<String, CachedThing> cache =
      CacheBuilder.newBuilder()
         .build(CacheLoader.from(url -> read(url)));

   public CachedThing get(String url) {
      return cache.get(url);
   }

   private CachedThing read(String url) {
      // Access resource and construct
   }
}
Send an HTTP request
You can use Guice injection to send an HTTP request by injecting the CloseableHttpClientHandler into the
node instance. This means the node uses the standard AM HTTP client handler, and all the httpClient
settings and tuning apply.
The following example demonstrates sending an HTTP POST request to the https://www.example.com/api endpoint:
@Inject
public MyCustomNode(@Named("CloseableHttpClientHandler") Handler httpClientHandler) {
  this.httpClientHandler = httpClientHandler;
}

@Override
public Action process(TreeContext context) {
   URI uri = URI.create("https://www.example.com/api");

   Request request = new Request()
           .setUri(uri)
           .setMethod(HttpConstants.Methods.POST);

   JsonValue body = json(object(field("sampleKey", "sampleValue")));
   request.getEntity().setJson(body);

   Response response = httpClientHandler.handle(new RootContext(), request).getOrThrow();
}
Custom Guice bindings
If just-in-time bindings aren’t sufficient for your use case,
you can add your own Guice module into the injector configuration
by implementing your own com.google.inject.Module and registering it using the service loader mechanism.
For example:
// com/example/MyCustomModule.java
public class MyCustomModule extends AbstractModule {
   @Override
   protected void configure() {
      bind(Thing.class).to(MyThing.class);
      // and so on
   }
}
// META-INF/services/com.google.inject.Module
// Learn more in https://docs.oracle.com/javase/tutorial/ext/basics/spi.html
com.example.MyCustomModuleThe MyCustomModule object will then be automatically configured as part of the injector creation.
Action class
The Node class returns an Action instance from its process() method.
The Action class encapsulates changes to authentication tree state and flow control.
For example, the following implementation demonstrates an authentication level decision:
@Override
public Action process(TreeContext context) throws NodeProcessException {
  NodeState state = context.getStateFor(this);
  if (!state.isDefined(AUTH_LEVEL)) {
    throw new NodeProcessException("Auth level is required");
  }
  JsonValue authLevel = state.get(AUTH_LEVEL);
  boolean authLevelSufficient =
    !authLevel.isNull()
    && authLevel.asInteger() >= config.authLevelRequirement();
  return goTo(authLevelSufficient).build();
}
Learn more in the Action class.
Action fields and methods
The Action class uses the following fields:
| Fields | Description |
|---|---|
|
A list of the callbacks requested by the node.
This list may be |
|
A custom error message string included in the response JSON if the authentication tree reaches the Failure node authentication node. Each node in a tree can replace or update the error message string as the user traverses through the authentication tree. If required, your custom node or custom UI must localize the error string. |
|
A custom lockout message string included in the response JSON when the user is locked out. If required, your custom node or custom UI must localize the error string. |
|
The result of the node. |
|
A map of properties returned to the client. Use the |
|
The list of classes implementing the TreeHook interface that run after a successful login. |
|
A map of properties added to the final session if the authentication tree completes successfully. Use |
|
Deprecated. Use the |
|
The list of webhooks that run after logout. Use the |
The Action class provides the following static methods to create an ActionBuilder:
| Methods | Description |
|---|---|
|
Specify the exit path to take, and move on to the next node in the tree. For example: |
|
Send the specified callbacks to the user for them to interact with. For example, the Username Collector node uses the following code
to send the |
|
Returns true if the action is a request for input from the user. |
|
Suspends the authentication tree and lets the user resume it from the point it was suspended. You can also control how long it is suspended for. For example, the following call is taken from the Email Suspend node: Use the SuspensionHandler interface for handling the suspension request. |
The inner class ActionBuilder provides the following methods for constructing
the Action object and setting action-related properties:
| Methods | Description | ||
|---|---|---|---|
|
Add a node type to the session properties and shared state. Replace any existing shared state with the specified TreeContext’s shared state. |
||
|
Add one or more session hook classes for AM to run after a successful login. |
||
|
Add one or more webhook names to the list of webhooks. |
||
|
Creates and returns an Action instance providing the mandatory fields are set. |
||
|
Add a new session property. |
||
|
Remove the specified session property. |
||
|
Deprecated. Use the |
||
|
Set a description for this action. |
||
|
Set a custom message for when the authentication tree reaches the failure node. |
||
|
Set a header for this action. |
||
|
Add an identity, authenticated or not, that is confirmed to exist in an identity store.
Specify the username and identity type or an Use this method to record the type of identified user. If the advanced server property,
This lets the authentication tree engine correctly resolve identities that have the same username. Learn more in advanced server properties. |
||
|
Set a custom message for when the user is locked out. |
||
|
Set the maximum idle time for the authenticated session in minutes. This overrides the maximum idle time set in the journey or the Session service.
|
||
|
Set the maximum authenticated session time in minutes. This overrides the maximum authenticated session time set in the journey or the Session service.
|
||
|
Set a stage name to return to the client to aid the rendering of the UI. The property is only sent if the node also sends callbacks. |
||
|
Deprecated. Use |
Handle errors
This page covers error handling in authentication nodes, including how to report errors to end users and tree administrators, as well as handling unrecoverable errors.
Authentication trees provide a number of ways to output error messages to the user.
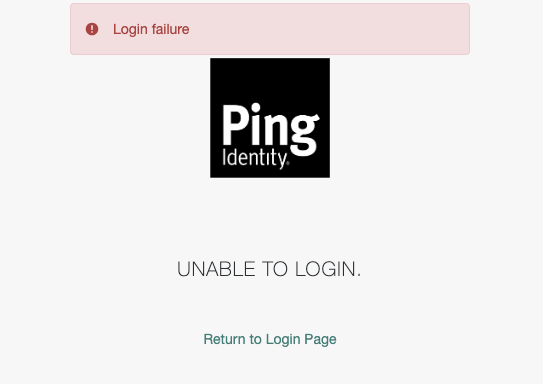
Authentication errors
The most common error to display is a message in the event of an unsuccessful authentication. In an authentication tree, this occurs when the authentication process terminates at the failure node:
Unrecoverable errors
By default, when a catastrophic error occurs during node processing,
a NodeProcessException exception should be thrown,
which halts the authentication journey immediately, and displays a generic error message.
This may not be desirable, as it could create a negative user experience.
Instead, errors that occur during node processing should be caught within the processing block of the node’s code, and the user should be routed to an erroneous state outcome. It may be appropriate to have a single error outcome, multiple error outcomes, or no error outcome at all, depending on the node.
It is valuable to store information about the cause of the error in the shared state, in case a node further along the tree processes it. This information should include error text to display to the user. If the shared state is used for this purpose, it is important to document not only the meaning of the various outcomes, but also the keys used to store information in the shared state.
Configuration errors
You can display error messages to the tree administrator; for example, when a configuration property of a node is required, but not provided.
To automatically display an appropriate error message when required values are missing,
add requiredValue=true to your config property, as follows:
@Attribute(order = 300, requiredValue = true)
Set<String> accountSearchBaseDn();
To control the messages displayed on error, ensure there is a .properties file
under src/main/resources/org.forgerock.openam.auth.nodes with the same name as your node class.
Learn more in Internationalize nodes.
Store values in shared tree state
Tree state exists for the lifetime of the journey session. When the tree has completed, the journey session is terminated and an authenticated session is created. The purpose of tree state is to hold state between the nodes.
A good example is the Username Collector node, which gets the username from the user and stores it in the shared tree state. Later, the Data Store Decision node can pull this value from the shared tree state and use it to authenticate the user.
Authentication trees can be stateful or stateless. When they are stateful, the AM server that starts the authentication flow mustn’t change. A load balancer cookie is set on the responses to the user to ensure the same AM server is used. When they are stateless, any AM instance in a deployment can proceed with the journey session.
You can find more information on configuring sessions in Sessions.
Store values in a tree’s node states
Always store the authentication state in the NodeState object
that AM lets you access from the TreeContext object passed to the node’s process() method.
AM ensures the node state is made available to downstream nodes:
-
Store non-sensitive information with the
NodeState.putShared()method. -
Store sensitive information, such as passwords, with the
NodeState.putTransient()method.AM encrypts the transient state with the key that has the
am.authn.trees.transientstate.encryptionsecret label. Downstream nodes must have the same key to decrypt and read it.Limit what you store with the
putShared()andputTransient()methods to make sure the authentication flow isn’t bloated with calls to encrypt or decrypt data, and the journey session size stays small. This is especially true when the realm is configured for client-side journey sessions.
Get and set values stored in tree state
Internally, AM distinguishes the following node state data:
-
Shared state, where nodes store non-sensitive information that needs to be available during the authentication flow.
You store this with the
NodeState.putShared()method. -
Transient state, where nodes store sensitive information that AM encrypts on round trips to the client.
You store this with the
NodeState.putTransient()method. -
Secure state, where nodes store decrypted transient state.
Learn more in NodeState.
Set values in the tree state
To set node state values, get the NodeState using the TreeContext.getStateFor(Node node) method.
Then, use the NodeState.putShared() and NodeState.putTransient() methods as described above.
For example:
// Setting values in NodeState
public Action process(TreeContext context) {
  String username;
  String password;
  // ...
  NodeState state = context.getStateFor(this);
  state.putShared(USERNAME, username);      // Non-sensitive information
  state.putTransient(PASSWORD, password);   // Sensitive information
  if (!state.isDefined(OPTIONAL_NUMERIC)) { // Check before updating
    state.putShared(OPTIONAL_NUMERIC, 42);
  }
  goToNext().build();
}
Get values in the tree state
To read node state values, use the NodeState.isDefined(String key) and NodeState.get(String key) methods.
For example:
// Getting values from NodeState
public Action process(TreeContext context) {
  NodeState state = context.getStateFor(this);
  String username;
  if (state.isDefined(USERNAME)) {
      username = state.get(USERNAME);
  } else {
    throw new NodeProcessException("Username is required");
  }
  // ...
  goToNext().build();
}
The get(String key) method retrieves the state for the key from NodeState states in the following order:
-
transient
-
secure
-
shared
For example, if the same property is stored in the transient and shared states, the method returns the value of the property in the transient state first.
Combine objects
To combine objects from shared, transient and secure state, use the getObject method.
For example, if the following objectAttributes value exists in shared state:
"objectAttributes": { "sharedKey": "value" }and the following objectAttributes value exists in transient state:
"objectAttributes": { "transientKey": "value" }when you call nodeState.getObject("objectAttributes");, the combined result is as follows:
{
   "sharedKey": "value",
   "transientKey": "value"
}
This object is read-only.
Merge keys
To merge keys in an object, use the mergeShared and mergeTransient methods.
Learn more in Access shared state data.
Access an identity’s profile
AM allows a node to read and write data to and from an identity’s profile.
This is useful if a node needs to store information more permanently
than when using either the authentication trees' NodeState or the identity’s session.
|
Any node that reads or writes to an identity’s profile must only occur in a tree after the identity has been verified. For example, as the final step in a tree or directly after a Data Store Decision node. To store a verified identity in the journey session, call |
Read an identity’s profile
Use the IdUtils static class:
AMIdentity id = IdUtils.getIdentity(username, realm);|
Use the IdUtilsWrapper class to assist with testing. |
If AM is configured to search for the identity’s profile using a different search attribute than the default, provide the attributes as a third argument to the method.
To obtain the attributes, you could request them in the configuration of the node or obtain them from the realm’s authentication service configuration.
The following example demonstrates how to obtain the user alias:
public AMIdentity getIdentityFromSearchAlias(String username, String realm) {
    ServiceConfigManager mgr = new ServiceConfigManager(
            ISAuthConstants.AUTH_SERVICE_NAME,
            AccessController.doPrivileged(AdminTokenAction.getInstance());

    ServiceConfig serviceConfig = mgr.getOrganizationConfig(realm, null);

    Set<String> realmAliasAttrs = serviceConfig.getAttributes()
        .get("iplanet-am-auth-alias-attr-name");

   return IdUtils.getIdentity(username, realm, realmAliasAttrs);
}
By combining these approaches, you can search for an identity by using the ID and whichever configured attribute field(s) as necessary.
Include callbacks
Nodes use callbacks to enable interaction with the authenticating user.
You can’t create your own callbacks, but there are many existing implementations available to you. Learn more in Supported callbacks.
Calling the getCallbacks(Class<t> callbackType) method on a TreeContext, the sole argument to the process()
method of a node, returns all callbacks of a particular type for the most recent request from the current node. For
example, calling context.getCallbacks(PasswordCallback.class) returns a list of the PasswordCallback callbacks displayed in the UI most recently.
The following is an example of multiple callbacks created by a node and passed to the UI:

To process the responses to callbacks, you must know the order of the callbacks in the list. You can find the position of the callbacks created by the current node by using the constant properties for each callback position in the processing node.
If the callbacks were created in previous nodes, their positions must be stored in the shared state before subsequent nodes can use them.
The following is the code that created the UI displayed in the previous image:
ImmutableList.of(
  new TextOutputCallback(messageType, message.toUpperCase()),
  new PasswordCallback(bundle.getString("oldPasswordCallback"), false),
  new PasswordCallback(bundle.getString("newPasswordCallback"), false),
  new PasswordCallback(bundle.getString("confirmPasswordCallback"), false),
  confirmationCallback
);
The order of callbacks defined in the code is preserved in the UI.
Send and execute JavaScript in a callback
A node can provide JavaScript for execution on the client-side browser.
For example, the following is a simple JavaScript script named hello-world.js:
alert("Hello, World!");Execute the script on the client by using the following code:
String helloScript = getScriptAsString("hello-world.js");
ScriptTextOutputCallback scriptCallback = new ScriptTextOutputCallback(helloScript);
ImmutableList<Callback> callbacks = ImmutableList.of(scriptCallback);
return send(callbacks).build();
Variables can be injected using your favorite Java String utilities, such as String.format(script, myValue).
To retrieve the data back from the script, add HiddenValueCallback to the list of callbacks sent to the user,
as follows:
HiddenValueCallback hiddenValueCallback = new HiddenValueCallback("myHiddenOutcome", "false");The JavaScript needs to add the required data to the HiddenValueCallback and submit the form, for example:
document.getElementById('myHiddenOutcome').value = "client side data";
document.getElementById("loginButton_0").click();
In the process method of the node, retrieve the hidden callback as follows:
Optional<String> result = context.getCallback(HiddenValueCallback.class)
  .map(HiddenValueCallback::getValue)
  .filter(scriptOutput -> !Strings.isNullOrEmpty(scriptOutput));

if (result.isPresent()) {
  String myClientSideData = result.get();
}
Handle multiple visits to the same node
An authentication flow can return to a decision node in the following ways:
-
Route the failure outcome through a Retry Limit Decision node.
This node can limit how many times a user can enter incorrect authentication details when the user is directed to an earlier node in the tree to re-enter their information. For example, to an earlier Username Collector node.
-
Re-route directly to the current processing node.
To achieve this, use the
Action.send()method rather thanAction.goTo(). TheAction.goTomethod passes control to the next node in the tree. TheAction.send()method takes a list of callbacks that you can construct in the current node. The return value is anActionBuilderthat can be used to create anActionas follows:ActionBuilder action = Action.send(ImmutableList.of(new ChoiceCallback(), new ConfirmationCallback()));
A typical example of returning to the same node is a password change screen where the user must enter their current password, new password, and new password confirmation. The node that processes these callbacks needs to remain on the screen and display an error message if any of the data entered by the user is incorrect. For example, if the new password and password confirmation don’t match.
When a ConfirmationCallback is invoked on a screen that was produced by Action.send(),
it always routes back to the node that created it.
After the details are valid, return an Action created using Action.goTo() and tree processing can continue as
normal.
Plugin class
The plugin class is responsible for informing AM about the details of the customized authentication node. There is little variation between the plugin class for each authentication node, other than the version number and class names within.
Authentication nodes are installed into the product using the AM plugin framework.
All AM plugins are created by implementing org.forgerock.openam.plugins.AmPlugin interface
and registering it using the Java service architecture - placing a file in META-INF/services.
For plugins that provide authentication nodes there is an abstract implementation of the AmPlugin interface named
org.forgerock.openam.auth.node.api.AbstractNodeAmPlugin.
The following is an example of the plugin class for an authentication node:
public class MyCustomNodePlugin extends AbstractNodeAmPlugin {                                 1

  private static final String CURRENT_VERSION = "1.0.0";                                       2

  @Override
  protected Map<String, Iterable<? extends Class<? extends Node>>>
  getNodesByVersion() {
    return Collections.singletonMap("1.0.0", Collections.singletonList(MyCustomNode.class));   3
  }

  @Override
  public String getPluginVersion() {
    return MyCustomNodePlugin.currentVersion;
  }
}
1 Name the plugin class after the core class, and append Plugin.
For example, MyCustomNodePlugin.
2 Provide a version number for the authentication node.
3 Ensure a call to the getNodesByVersion() function
returns the core classes of the authentication nodes to register.
In this example the version is 1.0.0, and there is just one node being registered as that version.
AM plugins are notified of the following events:
onInstall-
The plugin has been found during AM startup, and is being installed for the first time. It should create all the services and objects it needs.
onStartup(StartupType startupType)-
The plugin is installed and is being started. Any dependency plugins can be relied on as having been started.
The type of startup is provided:
-
FIRST_TIME_INSTALL. The AM instance has been installed for the first time. -
NORMAL_STARTUP. The AM instance is starting from a previously installed state, or is joining an already installed cluster.
-
onShutdown-
The AM instance is in the process of shutting down cleanly. Any resources the plugin is using should be released and cleaned up.
upgrade(String fromVersion)-
An existing version of the plugin is installed, and a new version has been found during startup. The plugin should make any changes it needs to the services and objects used in the previous version, and create all the services and objects required by the new version.
The version of the plugin being upgraded is provided.
onAmUpgrade(String fromVersion, String toVersion)-
An AM system upgrade is in progress. Any updates needed to accommodate the AM upgrade should be made.
Plugin-specific upgrade should not be made here, as
upgradewill be called subsequently if the plugin version has also changed.The AM version being upgraded from, and to, are provided.
The plugin is responsible for maintaining a version number for its content, which is used for triggering appropriate events for installation and upgrade.
Learn more in amPlugin in the AM Public API Javadoc.
Upgrade nodes and change node configuration
Over time, it may become necessary to change the schema of the configuration for your node.
When this happens, the changes must be propagated to the AM configuration system. To ensure an update of the AM configuration, use either of the following methods, depending on the stage of development:
-
In the development stage, give your nodes the special version number
0.0.0. Any AM configuration created by nodes that have this special version number is wiped on each restart of AM.If you are using custom nodes with version 0.0.0in trees, you must remove them from the trees before restarting AM and reinsert them after the restart. If you do not do this, the entire tree cannot be viewed in the UI after the restart. -
After moving to production and switching to semantic versioning, you must write upgrade functions into the node to locate existing configuration and convert it to the new schema.
For information on upgrading schema in production mode, refer to Upgrade simple node configuration schema changes and Upgrade complex node configuration schema changes.
Upgrade simple node configuration schema changes
This section explains how to upgrade nodes with simple schema changes. For example, changing an attribute to a compatible type.
When configuration schema changes are simple,
call the PluginTools#upgradeAuthNode(Class) method in the upgrade method of your plugin, as follows:
@Override
public void upgrade(String fromVersion) throws PluginException {
  pluginTools.upgradeAuthNode(MyCustomNode.class);
}
Examples of simple schema changes include:
-
Changing an attribute type to one that is backwards-compatible with any existing values.
For example changing an integer to a string type, or
TtoSet<T>. -
Adding a new attribute that has a default value defined.
For example:
public class MyCustomNode implements Node {
  public interface Config {
    @Attribute(order = 1)
    String existingAttribute();
    @Attribute(order = 2)
    default Integer newAttribute() {
      return 5;
    }
  }
  // ...
}
Upgrade complex node configuration schema changes
This section explains how to upgrade nodes that are changing the configuration schema such that existing values would clash with the new schema. For example, changing an attribute to an incompatible type.
When configuration schema changes are complex, use the API provided in the com.sun.identity.sm package.
In this example, version 1.0.0 of a node has the following configuration schema:
public interface Config {
    @Attribute(order = 1)
    String name();
}
Version 2.0.0 of the node requires the user’s given name and family name separately,
rather than simply a name string.
The config for version 2.0.0 is as follows:
public interface Config {
  @Attribute(order = 1)
  String givenName();

  @Attribute(order = 2)
  String familyName();
}
To upgrade this example node configuration,
find all existing instances of configuration created by the version 1.0.0 node,
find the current values for the name attribute,
and split it on the first space character to use in the two new attributes.
The following code shows how to upgrade the schema of this example node:
@Override
public void upgrade(String fromVersion) throws PluginException {
  try {
    SSOToken token = AccessController.doPrivileged(AdminTokenAction.getInstance());
    String serviceName = MyCustomNode.class.getSimpleName();
    ServiceConfigManager configManager = new ServiceConfigManager(serviceName, token);

    // Read all the values from all node in all the realms that will need replacing
    OrganizationConfigManager realmManager = new OrganizationConfigManager(token, "/");
    Set<String> realms = ImmutableSet.<String>builder()
      .add("/")
      .addAll(realmManager.getSubOrganizationNames("*", true))
      .build();
    Map<Pair<Realm, String>, String> oldValues = new HashMap<>();
    for (String realm : realms) {
      ServiceConfig container = configManager.getOrganizationConfig(realm, null);
      for (String nodeId : container.getSubConfigNames()) {
        ServiceConfig nodeConfig = container.getSubConfig(nodeId);
        String name = nodeConfig.getAttributes().get("name").iterator().next();
        oldValues.put(Pair.of(Realms.of(realm), nodeId), name);
      }
    }

    // Do the upgrade of the schema
    pluginTools.upgradeAuthNode(MyCustomNode.class);

    // Remove the old value and set the new values
    for (Map.Entry<Pair<Realm, String>, String> nameForUpdate : oldValues.entrySet()) {
      String realm = nameForUpdate.getKey().getFirst().asPath();
      String nodeId = nameForUpdate.getKey().getSecond();
      String name = nameForUpdate.getValue();
      int spaceIndex = name.indexOf(" ");

      ServiceConfig container = configManager.getOrganizationConfig(realm, null);
      ServiceConfig nodeConfig = container.getSubConfig(nodeId);
      nodeConfig.removeAttribute("name");
      nodeConfig.setAttributes(ImmutableMap.of(
        "givenName", singleton(name.substring(0, spaceIndex)),
        "familyName", singleton(name.substring(spaceIndex + 1))));
    }
  } catch (SSOException | SMSException | RealmLookupException e) {
      throw new PluginException("Could not upgrade", e);
  }
  super.upgrade(fromVersion);
}
Internationalize nodes
Internationalization (i18n) of content targets both the end user and the node administrator. Messages sent to users and other UIs can be internationalized.
You can also internationalize error messages and administrator-facing UI using the same mechanism for better user and admin experience.
Internationalized nodes use the locale of the request to find the correct resource bundle, with a default fallback if none is found.
Localize node UI text
-
Create a Java resource bundle under the
resourcesfolder in the Maven project for your node.The path and filename must match that of the core class that will use the translated text.
For example, the resource bundle for the Username Collector node is located in the following path:
src/main/resources/org/forgerock/openam/auth/nodes/UsernameCollectorNode.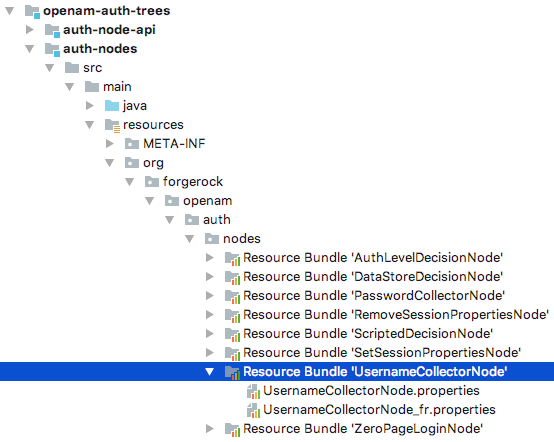 Figure 4. Example resource bundle
 -
Add the properties and strings that the node will display to the user.
For example:
callback.username=User Name -
Create a
.propertiesfile in the resource bundle for each language your node will display.The filename must include the language identifier, as per rfc5646 - Tags for Identifying Languages.
For example, for French translations your
.propertiesfile could be calledUsernameCollectorNode_fr.properties. -
Replicate the properties and translate the values in each
.propertiesfiles.For example:
callback.username=Nom d'utilisateur -
In the core class for your node, specify the path to the resource bundle from which the node will retrieve the translated strings:
private static final String BUNDLE = "org/forgerock/openam/auth/nodes/UsernameCollectorNode"; -
Define a reference to the bundle using the
getBundleInPreferredLocalefunction to enable retrieval of translated strings:ResourceBundle bundle = context.request.locales.getBundleInPreferredLocale( BUNDLE, getClass().getClassLoader()); -
Use the
getStringfunction whenever you need to retrieve a translation from the resource bundle:return send(new NameCallback(bundle.getString("callback.username"))).build();
Build and install Java nodes
This section explains how to build and install Java nodes for use in authentication trees.
Build and install a custom Java node
-
Change to the root directory of the Maven project of the custom nodes.
For example:
$ cd /Users/Ping/Repositories/am-external/openam-auth-trees/auth-nodes -
Run the
mvn clean packagecommand.The project will generate a
.jarfile containing your custom nodes. For example,auth-nodes-version.jar. -
Include the custom
.jarfile in the AM.warfile, as described in Customize the AM.warfile.Delete or overwrite older versions of the nodes
.jarfile from theWEB-INF/lib/folder, to avoid clashes.If you are using custom nodes with version 0.0.0in trees, you must remove them from the trees before restarting AM and reinsert them after the restart. If you do not do this, the entire tree cannot be viewed in the UI after the restart. -
Restart AM for the new nodes to become available.
The custom authentication node is now available in the tree designer to add to authentication trees:
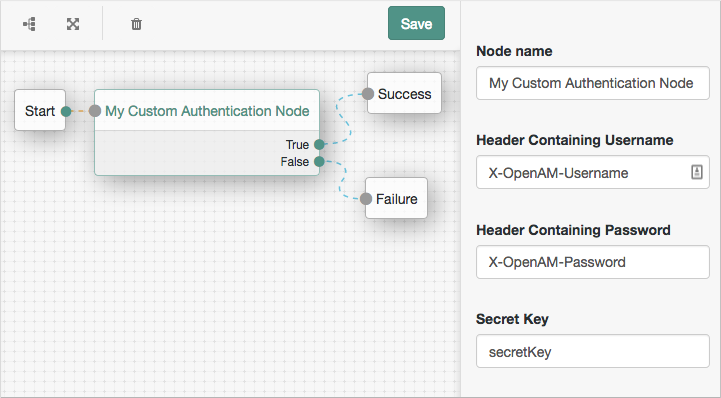 Figure 5. Custom node in a tree
Learn more about using the tree designer to manage authentication trees in Configure authentication trees.
For information on upgrading custom nodes, refer to Upgrade nodes and change node configuration.
Post-installation tasks
This page covers post-installation tasks relating to authentication nodes, such as testing, debugging, auditing, and performance monitoring.
Test nodes
You can test authentication nodes in multiple ways, including unit tests, functional tests, and performing exploratory or manual testing.
Authentication nodes are well suited to tests that have a high percentage of code coverage. The low number of static dependencies lets you unit test the node class as well as the business logic classes.
Unit tests
Your unit tests should aim to cover a high percentage of the code. Most of the business logic is defined by the tree layout instead of within the nodes themselves, which simplifies unit testing.
At a minimum, the process(TreeContext context) method must be tested to make sure all appropriate code paths are
triggered, based on whether appropriate values in the shared state and callbacks exist.
The TreeContext class and contents have been designed to simplify unit tests without needing to mock.
Functional tests
Functional tests involve creating an authentication tree in an AM instance and testing it using the REST API. You should write them to cover all the possible authentication flows, including successful and unsuccessful outcomes.
Consider the following when writing functional tests:
-
All relevant code paths discovered through unit testing should be functionally tested to ensure helper, utility, and related mechanisms function as expected.
-
Functional tests must make sure the business logic is called correctly and processed as expected.
-
Mocking expected services can be useful when functionally testing nodes that make calls to third-party services.
To perform functional testing, write a series of REST requests to create the authentication tree and test all the identified flows through the authentication tree. The REST API returns a JSON payload, which lets you programmatically step through each node and collect responses at every stage.
You can find details about creating a tree using the REST API in Create an authentication tree over REST.
|
Test your tree in the UI first and use the Developer Tools in your browser to copy relevant web requests as a curl command. The resulting curl command includes all the headers, options, and data sent for the selected web request. You can use this information and the REST syntax as the basis of your REST calls. |
You can use a third-party tool such as Postman for REST-based testing.
Manual testing
Manual testing should occur both during and after node development.
During development, it is expected a node developer will frequently load and reload nodes to ensure they operate as expected, including configuration and execution, as well as any expected error conditions.
After development, manual testing should continue in an exploratory fashion. Using a node multiple times can often highlight areas left unpolished, or particular usability issues that can be missed by automated testing.
Debug nodes
You might need to debug your nodes during development as well as prepare your nodes to allow debug logging after they are deployed.
Use the Debug node
During development, it can be useful to include one or more Debug nodes in your authentication tree to inspect the tree state.
-
Insert the Debug node in the tree between the node you want to inspect and the next node in the flow. For example, if you wanted to inspect the Custom Node, where the next node was a Scripted Decision node, you would insert the Debug node as follows:

-
Save your changes.
-
Test your tree in a new incognito browser window (or a separate browser).
When the Debug node is reached, a pop-up window displays details about the tree state.
If the browser blocks the pop-up window, unblock it:
-
For Chrome, follow the instructions under the "Allow pop-ups and redirects from a site" section in this support article: https://support.google.com/chrome/answer/95472.
-
For other supported browsers, consult the browser documentation.
Refresh the browser window. The pop-up window should now appear.
-
-
Remove the Debug node once you finish debugging.
Attach a debugger to Apache Tomcat
During development, you may want to attach a remote debugger to Tomcat to let you debug the node development with an IDE (for example, to set breakpoints).
-
Set a
CATALINA_OPTSenvironment variable to enable the debugger on Tomcat. For example, add the following in yoursetenvfile:-
Linux
-
Windows
In
$CATALINA_BASE/bin/setenv.sh:export CATALINA_OPTS="$CATALINA_OPTS -Xdebug -Xrunjdwp:transport=dt_socket, address=*:8000,server=y,suspend=n"In
$CATALINA_BASE/bin/setenv.bat:set "CATALINA_OPTS=%CATALINA_OPTS% -Xdebug -Xrunjdwp:transport=dt_socket, address=*:8000,server=y,suspend=n"The
*:in theaddressoption lets you debug remote servers as well as developments running onlocalhost. -
-
Start the web container as normal.
-
Connect your IDE to Tomcat as a remote JVM debug instance. The way you do this depends on your IDE, but make sure the following settings are correct:
-
Port: the port in the IDE debug configuration must match the port set in thesetenvfile (8000in this example). -
Address: the address should either be the IP address of the Tomcat instance if it’s running on a different machine orlocalhost.
-
-
Remove the debugger options from your
setenvfile once you finish debugging.
Add debug logging
Add debug logging to your custom node to help administrators and support staff investigate any issues that arise in production.
To add debug logging to a node, include a reference to the amAuth SLF4J Logger instance.
For example, you can assign the logger to a private field as follows:
import org.slf4j.Logger;
import org.slf4j.LoggerFactory;

// ...

private final Logger logger = LoggerFactory.getLogger("amAuth");|
Consider the logging level you use. Excessive use of the |
You can also use the SLF4J varargs methods to defer string concatenation to SLF4J.
This means you can skip string concatenation
if the configured logging level means your message won’t be written.
The following example uses the debug level:
logger.debug("authLevelSufficient {}", authLevelSufficient);Audit logging
Audit logging helps administrators to investigate user and system behavior.
AM records all incoming calls as access events. Additionally, to capture further details about the authentication flows, AM records an authentication audit event for each node, and the tree outcome.
A node can provide extra data to be included in the standard audit event which is logged when an authentication node completes.
AM logs an AM-NODE-LOGIN-COMPLETED audit event each time an authentication node completes.
To add extra information to this audit event, override the node interface method getAuditEntryDetail.
For example, the Retry Limit Decision node overrides this method to record how many retries remain:
@Override
public JsonValue getAuditEntryDetail() {
  return json(object(field("remainingRetries", String.valueOf(retryLimitCount))));
}
When this node is processed, it results in an audit event similar to the following:
{
  "realm": "/",
  "transactionId": "45453155-cf94-4e23-8ee9-ecdfc9f97e12-1785617",
  "component": "Authentication",
  "eventName": "AM-NODE-LOGIN-COMPLETED",
  "entries": [
    {
      "info": {
        "nodeOutcome": "Retry",
        "treeName": "Example",
        "displayName": "Retry Limit Decision",
        "nodeType": "RetryLimitDecisionNode",
        "nodeId": "bf010b6b-61f8-457e-80f3-c3678e5606d2",
        "authLevel": "0",
        "nodeExtraLogging": {
          "remainingRetries": "2"
        }
      }
    }
  ],
  "timestamp": "2018-08-24T09:43:55.959Z",
  "trackingIds": [
    "45453155-cf94-4e23-8ee9-ecdfc9f97e12-1785618"
  ],
  "_id": "45453155-cf94-4e23-8ee9-ecdfc9f97e12-1785622"
}
The result of the getAuditEntryDetail method is stored in the nodeExtraLogging field.
Monitor nodes
You can track authentication flows that complete with success, failure, or timeout as an outcome by using the metrics functionality built-in to AM.
Learn more in Monitor AM instances.
You can also use the following nodes in a tree to create custom metrics:
Troubleshoot node development
This page offers solutions to issues that may occur when developing authentication nodes.
- I installed my node in AM. Why doesn’t it appear in the authentication tree designer?
-
The
authNodeName.propertiesfile for your node must include anodeDescriptionproperty for your node to appear in the authentication tree designer.AM uses the
nodeDescriptionproperty value as the name of your node. - How do I get new attributes to appear in the node after the service has been loaded once?
-
Learn more in Upgrade nodes and change node configuration.
- What type of exception should I throw so that the framework handles it gracefully?
-
To display a custom message to the user, exceptions must be handled inside the node and an appropriate information callback returned.
Learn more in Handle errors.
- Do I need multiple projects/jars for multiple nodes?
-
No — you can bundle multiple nodes into one plugin and deploy that plugin in a single
.jarfile.Learn more in Build and install Java nodes.
- What utilities exist for me to use to assist in the node building experience?
-
A number of utilities are available for use in your integrations and custom nodes.
Learn more in the AM Public API Javadoc.
- Transient state vs shared state — when should I use one or the other?
-
Use transient state for secret values that shouldn’t persist.
Learn more in Store values in shared tree state.
- If my service collects a username in a different way from the Username Collector node, where do I put the username from the framework to get the principal?
-
Learn more in Access an identity’s profile.
- Where do I go for examples of authentication nodes?
-
There are many public examples of community nodes at https://github.com/ForgeRock.
Find sample community nodes written by third parties on the Marketplace website.
For source access to the authentication nodes included with AM, read How do I access and build the sample code provided for PingAM?.