Setting up your environment in PingOne
This topic guides administrators through setting up a new environment for PingOne Privilege, which is the first step to enabling secure, centralized privileged access management (PAM) for your organization.
|
PingOne Privilege is currently part of a controlled release. The application and required roles are feature-flagged for new tenants. If you don’t see the PingOne Privilege application or the required roles in your tenant, contact Ping Identity support to have them enabled. |
Before you begin
-
You must have access to the PingOne admin console.
-
Your account must have the following administrator roles assigned for the initial setup: Identity Data Admin, PingOne Privilege Administrator, and Application Owner.
-
You need a PingOne environment and a solution built with PingOne SSO and PingID. Learn more in Building solutions in the PingOne documentation.
Step 1: Add the PingOne Privilege service
First, add the PingOne Privilege service to your PingOne environment. Learn more in Adding a service to an environment in the PingOne documentation.
-
In the PingOne admin console, go to Overview.
-
In the Services section, click the icon.
-
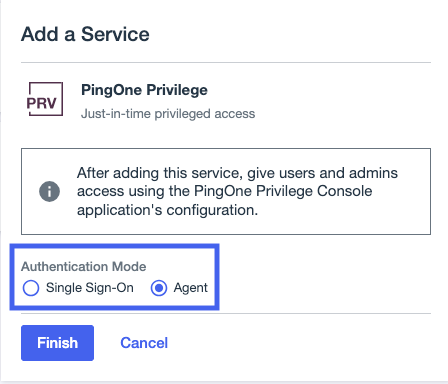
In the Add a Service list, select PingOne Privilege.
-
Select the Authentication Mode.
The authentication mode determines how you deploy PingOne Privilege and how users authenticate.
-
For agentless deployments, users authenticate via PingOne SSO.
-
For agent-based deployments, users authenticate via the PingOne Privilege agent.
Learn more in Choosing a deployment model.
-
-
Click Finish.
Step 2: Create and configure an administrator group
Next, create a group for your PingOne Privilege administrators and grant it access to the application. Learn more in Managing groups in the PingOne documentation.
-
In the PingOne admin console, go to Directory > Groups.
-
Click the icon and create a new group for PingOne Privilege administrators, for example,
Privilege Admins. -
Go to Applications > Applications and click the PingOne Privilege application.
-
In the Access tab, click the Pencil icon.
-
In the Edit Access window, add the administrator group you just created. Click Save.
Step 3: Assign roles and add users to the administrator group
Finally, add users to the administrator group and assign them the necessary roles. Learn more in Managing administrator roles in the PingOne documentation.
-
In the PingOne admin console, go to Directory > Users.
-
Select a user to be a PingOne Privilege administrator.
-
In the user’s profile, go to the Groups tab and add the user to the PingOne Privilege administrator group you created.
-
Go to the Roles tab and assign the following roles to the user:
The following roles are required for the initial setup of PingOne Privilege:
-
PingOne Privilege Administrator: Required to create onboarding links and manage PingOne Privilege resources.
-
Identity Data Administrator: Required to manage users and groups in the directory.
-
Application Owner: Required to grant application access to groups.
-
-
Click Save.
-
Repeat these steps for each user who will be a PingOne Privilege administrator.