Admin user tasks
The Admin user functionality is similar to that of a system administration superuser. Admin users have the access rights to company-wide entitlement data on the PingOne Autonomous Identity console. Admin users can approve or revoke a user’s entitlement.
Investigate Most Critical Entitlements
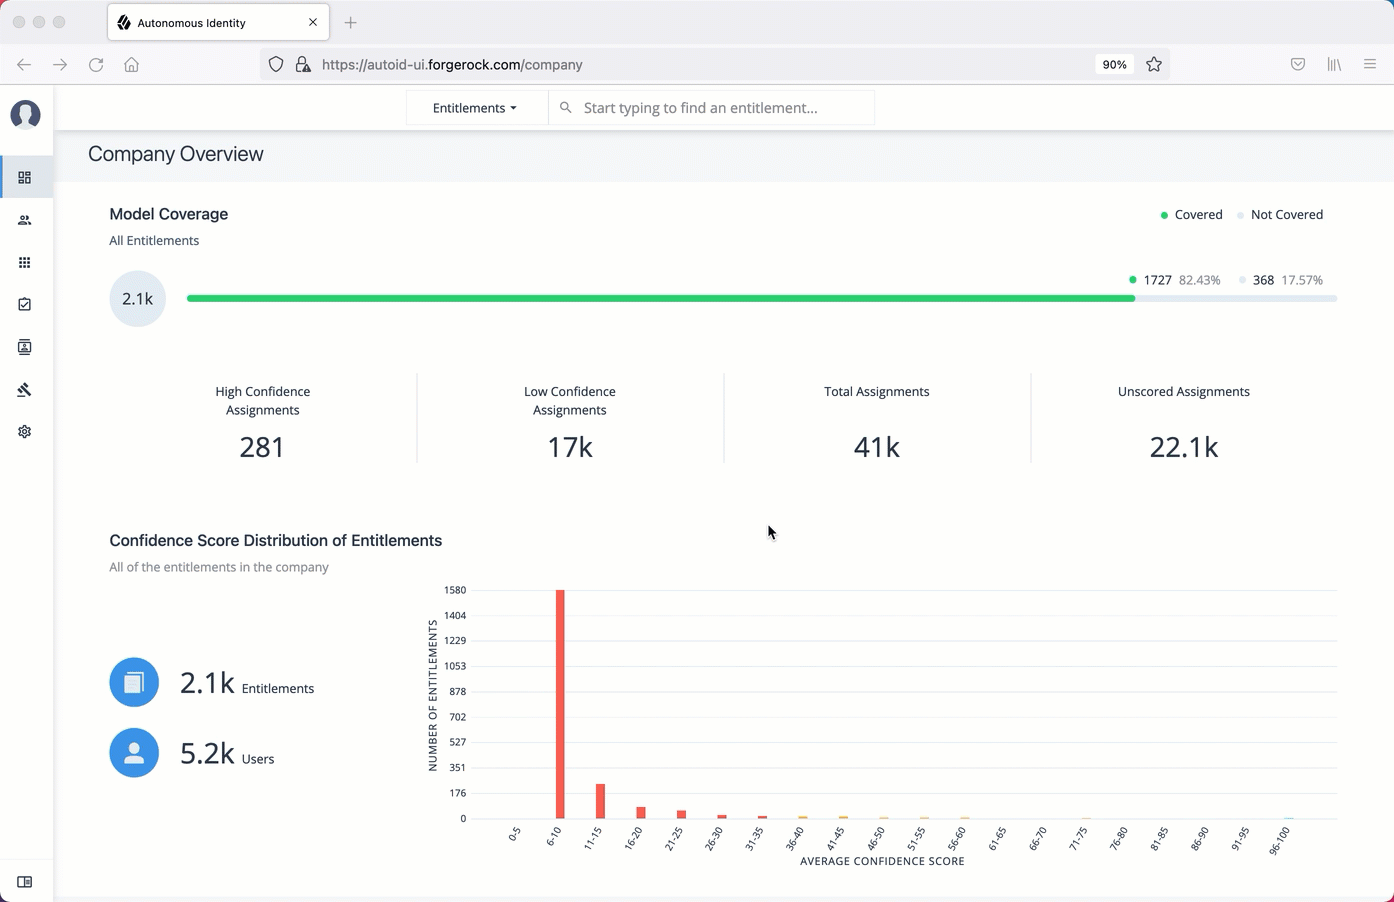
One important task that an administrator must perform is to examine all critical entitlements. Critical entitlements are assigned entitlements that have are highly-assigned but have a low confidence score associated with it. The PingOne Autonomous Identity console provides a means to examine these entitlements.
Follow these steps to evaluate the most critical entitlements list:
-
On the Dashboard, scroll down to the Most Critical Entitlements section. This section displays the entitlements that have low confidence scores and a high number of employees who have this entitlement.
-
Click an entitlement to view its details.
-
On the Entitlements detail page, review the key metrics.
-
Click the right arrow in one of the category ranges to view the users, and then click one of the users in the list.
-
On the User’s Entitlements page, scroll down to review the Confidence Score Comparison table to display the differences between the user’s attribute and the driving factor attributes.
-
Click Employees associated with this entitlement to review other uses who have this entitlement.
-
Click Actions, and then click Approve or Revoke for this entitlement. You can also bulk approve more than one entitlement. You can only revoke one entitlement at a time.
Click an example
Approve or revoke access an entitlement for a user
Follow these steps to investigate a confidence score and approve or revoke access an entitlement assigned to a specific user:
-
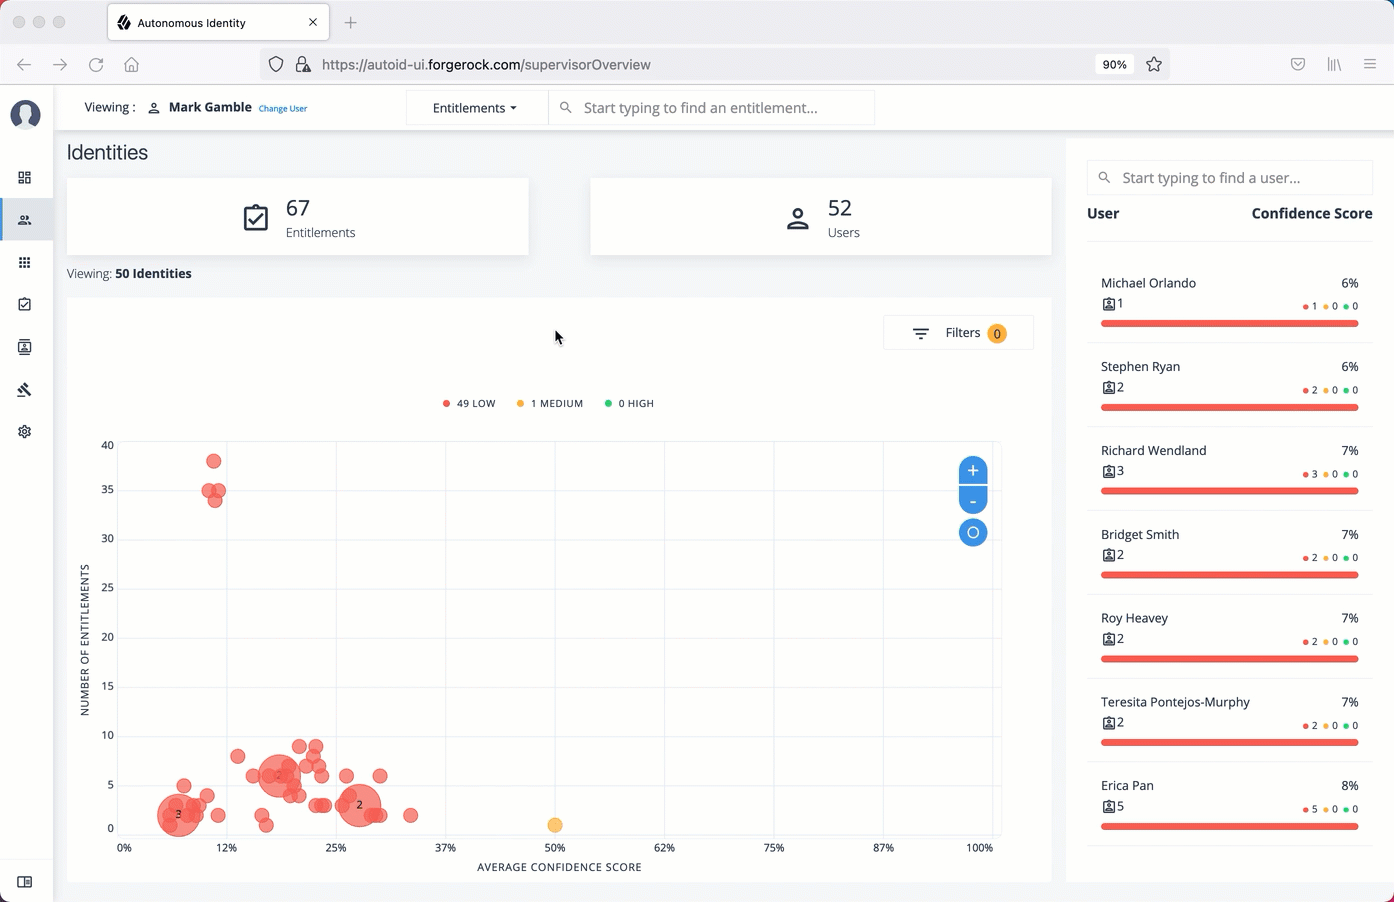
On PingOne Autonomous Identity console, click Identities, and enter a name of a supervisor. The only way to access a user’s entitlements is through the Most Critical Entitlements section or the Identities page.
-
On the Identities page, click a circle, and then click the user in the list on the right.
-
On the User Entitlement page, click a confidence circle on the graph to highlight the entitlement below.
-
For the selected entitlement, click the down arrow on the right to view the Driving Factor Comparison.
-
Click Employees associated with this entitlement to view the justifications for those users with high confidence scores with this entitlement.
-
Click Actions, and then click Approve Access or Revoke access. If you have more than one entitlement that you want to approve, select them all and do a bulk Approval. You can only do one Revoke Access at a time.
Click an example
Check not-scored users
Follow these steps to check Not Scored entitlements. Not-scored indicates that it does not have a justification associated with the entitlement:
-
On PingOne Autonomous Identity console, click Identities, and enter a name of a supervisor. The only way to access a user’s entitlements is through the Most Critical Entitlements section or the Identities page.
-
On the Identities page, click a circle, and then click the user in the list on the right.
-
On the User Entitlement page, click Not Scored.
-
On the Not Scored Entitlements page, click the down arrow to view the driving factors comparison.
-
Click Employees associated with this entitlement to view the justifications for those users with high confidence scores with this entitlement.
-
Click Actions, and then click Approve Access or Revoke access. At a later date, you can re-click the Approve or Revoke button to cancel the operation.
Click an example
Apply filters
Follow these steps to apply filters to your confidence score graphs on the Identities and Entitlements pages:
| The Filters for the Identities and Entitlements are similar. The filters for the Applications and Rules pages offer different options to filter your searches. |
-
On the Identities or Entitlements page, view the average confidence score graph.
-
On the right, click Filters.
-
Under filters, do one or all of the following:
-
Click Remove High Scores from Average or enable any filter in the Application Filters section.
-
Under Applications, click one or more applications to display the identities or entitlements asssociated with the selected application.
-
Click Add Filters to further display only those identities or entitlements based on a user attribute, such as
city. When ready, click Apply Filters.
-
-
Click Clear Filters to remove your filters.
Click an example
Changing the API’s elasticsearch client request timeout
The following steps outline how to change the PingOne Autonomous Identity API’s Elasticsearch client timeout to override the default of 30 seconds.
-
Open the
/opt/autoid/res/api/docker-compose.ymlfile, and edit theELASTICSEARCH_CLIENT_TIMEOUTvariable as necessary (time in milliseconds):environment: … - ELASTICSEARCH_CLIENT_TIMEOUT=30000
For example:
environment: … - ELASTICSEARCH_CLIENT_TIMEOUT=60000
-
Remove the currently running
zoran-apicontainer, and redeploy thezoran-apiDocker image:docker stack rm api docker stack deploy --with-registry-auth --compose-file /opt/autoid/res/api/docker-compose.yml api
-
Restart the
zoran-apiand nginx containers:docker service update --force ui_zoran-ui && docker service update --force nginx_nginx
-
Verity that PingOne Autonomous Identity is running by opening the UI in a web browser.