Secure connections
Secure communication between the agent and AM
| Be aware of security breaches and vulnerabilities. Make sure your environment isn’t using outdated, insecure protocols, such as SSL 3.0, TLS 1.0, and others. |
To secure communications, configure the agent to validate server certificates installed in the server where AM runs and to present a client certificate to AM. Learn more in AM’s Secure HTTP and LDAP connections.
To facilitate integration and test, Web Agents is configured by default to trust any server certificate. Test client certificates aren’t provided or configured.
To send cookies only when the communication channel is secure, set
Enable Cookie Security to
true.
Secure communication with OpenSSL
Unix-based agents support OpenSSL libraries. Windows-based agents can use OpenSSL or the Windows Secure Channel API (Schannel).
|
If you want to use OpenSSL for the IIS or Windows Apache agent, configure the agent to use OpenSSL before continuing:
|
Configure server certificate validation using OpenSSL
Perform the following steps to configure the agent to validate AM’s or PingOne Advanced Identity Cloud’s server certificate:
-
Set the Server Certificate Trust property to
false.The Server Certificate Trust property should always be falsein production. -
Set the CA Certificate File Name property to the filename of the CA bundle for your system. The exact location and name of the CRT file varies by operating system. For example, for Ubuntu, it’s
/etc/ssl/certs/ca-certificates.crt. -
Set the OpenSSL Certificate Verification Depth property to the level of certificate validation required in your environment.
-
Restart the agent.
Configure client certificate authentication using OpenSSL
When AM or PingOne Advanced Identity Cloud are configured to perform client authentication, you must configure the agent to present its client certificates as follows:
-
Create a PEM file that contains the certificate chain for the agent. For example,
client-cert.pem. -
Create a PEM file that contains the private key corresponding to the certificate. For example,
client-private-key.pem. -
Set the Public Client Certificate File Name property to the file containing the certificate chain. For example:
-
Unix
-
Windows
com.forgerock.agents.config.cert.file = /opt/certificates/client-cert.pem
com.forgerock.agents.config.cert.file = C:\Certificates\client-cert.pem
-
-
Set the Private Client Certificate File Name property to the file containing the client certificate private key. For example:
-
Unix
-
Windows
com.forgerock.agents.config.cert.key = /opt/certificates/client-private-key.pem
com.forgerock.agents.config.cert.key = C:\Certificates\client-private-key.pem
-
-
If the private key is password-protected:
-
Obfuscate the password using the
agentadmin --pcommand. For example:-
Unix
-
Windows
$ /path/to/web_agents/agent_type/bin/> agentadmin --p encryption-Key “cat certificate_password.file”
Encrypted password value: zck+6RKqjtc=
C:\path\to\web_agents\agent_type\bin> agentadmin.exe --p encryption-Key "Certificate_File_Password" Encrypted password value: zck+6RKqjtc=Where encryption-Key is the value of the Agent Profile Password Encryption Key property.
-
-
Set the Private Key Password property to the encrypted password value. For example:
com.forgerock.agents.config.cert.key.password = zck+6RKqjtc=
-
-
Restart the agent.
Use the agentadmin --Vi command to validate the TLS connection settings between the agent and AM
or PingOne Advanced Identity Cloud.
|
Secure communication with Schannel
By default, the IIS and Apache for Windows agents use the Windows built-in Secure Channel API (Schannel). Alternatively, you can use OpenSSL as described in Secure internal communication with OpenSSL.
|
Before continuing, make sure the agent is configured to use Schannel:
|
Configure server certificate validation using Schannel
Perform the following steps to configure the agent to validate AM’s or PingOne Advanced Identity Cloud’s server certificate:
-
Set the Server Certificate Trust property to
false.The Server Certificate Trust property should always be falsein production. -
If you’re using self-signed certificates or the server certificate is issued from a new CA, add the certificates required to validate AM’s or PingOne Advanced Identity Cloud’s server certificate to the Windows certificate store. For example, to use PowerShell, add certificates to the following locations:
-
Root CA certificates: add them to the
Cert:\LocalMachine\Rootlocation. -
Intermediate CA certificates: add them to the
Cert:\LocalMachine\Calocation.
-
-
Restart the agent.
Configure client certificate authentication using Schannel
When AM or PingOne Advanced Identity Cloud are configured to perform client authentication, you must configure the agent to present its client certificates using one of the following methods.
The method you use depends on whether you are loading the client certificate through the Windows certificate store or through a PFX certificate:
- Agent authenticates using a client certificate stored in the Windows Certificate store
-
Configure the agent to present its client certificate as follows:
-
Import the client certificate chain and private key into the Windows certificate store. For example, for PowerShell, import them to
Cert:\LocalMachine\My. -
Set the Public Client Certificate File Name property to the friendly name of the client certificate chain. For example:
com.forgerock.agents.config.cert.file = agent.example.com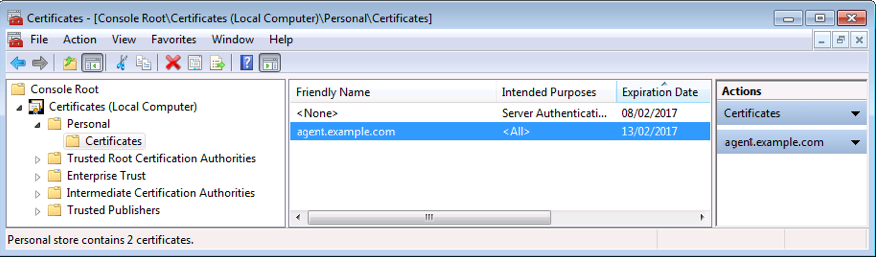
-
Restart the agent.
-
- Agent authenticates using a PFX file that contains the certificate chain
-
Configure the agent to present its client certificate as follows:
-
Create a Personal Information Exchange (PFX) file that contains the certificate chain for the agent and its private key. For example,
client.pfx. -
Set the Public Client Certificate File Name property to the PFX file you just created. For example:
com.forgerock.agents.config.cert.file = C:\Certificates\client.pfx -
Obfuscate the certificate password using the
agentadmin --pcommand. For example:C:\path\to\web_agents\agent_type\bin> agentadmin.exe --p encryption-Key "Certificate_File_Password" Encrypted password value: zck+6RKqjtc=Where encryption-Key is the value of the Agent Profile Password Encryption Key property.
-
Set the Private Key Password property to the encrypted password value. For example:
com.forgerock.agents.config.cert.key.password = zck+6RKqjtc= -
Restart the agent.
-
Use the agentadmin --Vi command to validate the TLS connection settings between the agent and AM
or PingOne Advanced Identity Cloud.
|